Use the Content Library to author, organize, and manage reusable learning objects and modules outside a course. With synchronization, you can push updates from the library to all course offerings where your content is deployed, helping maintain consistency across your organization.
Content Library requirements
To access the Content Library in Createspace, configure the following tools and permissions:
- Turn on Createspace in Organization Tools.
- Turn on Content Service in Organization Tools.
- In Roles & Permissions, enable Createspace > Can Sync and Deploy.
- In Roles & Permissions, enable Content Service > Can access Media Library Management tool.
- In Roles & Permissions, enable either Content Service > Can manage objects or Content Service > Can manage all objects.
Access Content Library
Do one of the following:
- From the navbar, select Libraries, and then select Content.
- From the Dashboard, in the Libraries widget, select Content.
- From the Dashboard, in the Recent Content widget, select a recently edited item to open it directly.
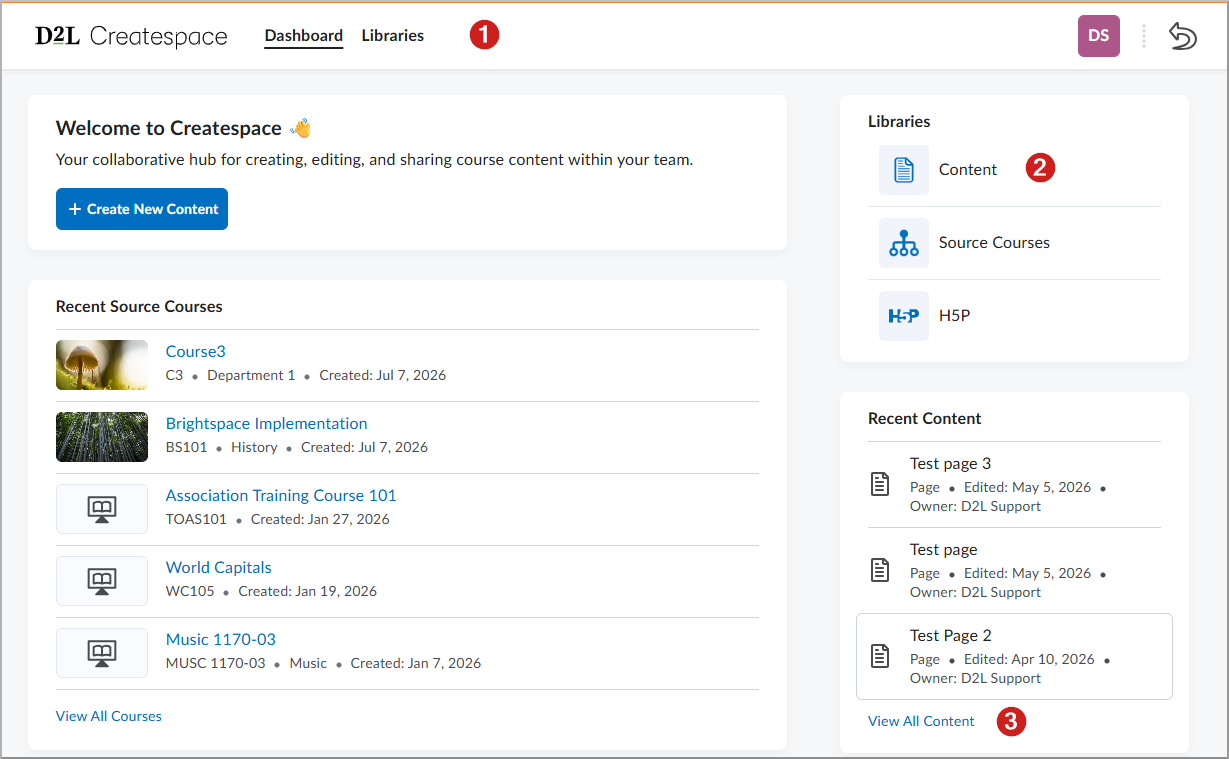
Use the Recent Content widget
The Recent Content widget on the Createspace Dashboard provides quick access to the five most recently created or edited items. The widget displays the item title, content type, last edited date, and owner.
- Selecting a Page opens a preview dialog.
- Selecting a Module opens the module editing experience.
- Selecting any other item type, such as an Assignment, Discussion Topic, or Quiz, opens the item's details page.
- Select View All Content at the bottom of the widget to navigate to the full Content Library.
Create and organize content
Create a folder and collaborate
- From the Content Library, select New Folder.
- Enter a Folder Name, and then select Create.
- To share the folder, select the Actions menu for the folder and select Manage Collaborators.
- Search for users or roles, and then add them as collaborators. Collaborators can view, edit, and add content to the shared folder.
Create a module
Modules organize course content into logical sections. Use modules to group related Pages, Assignments, Discussion Topics, and Quizzes.

|
Note: The terminology used for course structure depends on the d2l.Languages.Terminology.ModuleHierarchy configuration variable. By default, Brightspace uses the terms Unit and Lesson. If this configuration variable is changed, Brightspace uses Module and Submodule. In some areas of Createspace, you may still see the term Module regardless of your configured terminology. |
- From the Content tab, select Add Content.
- Select Module.
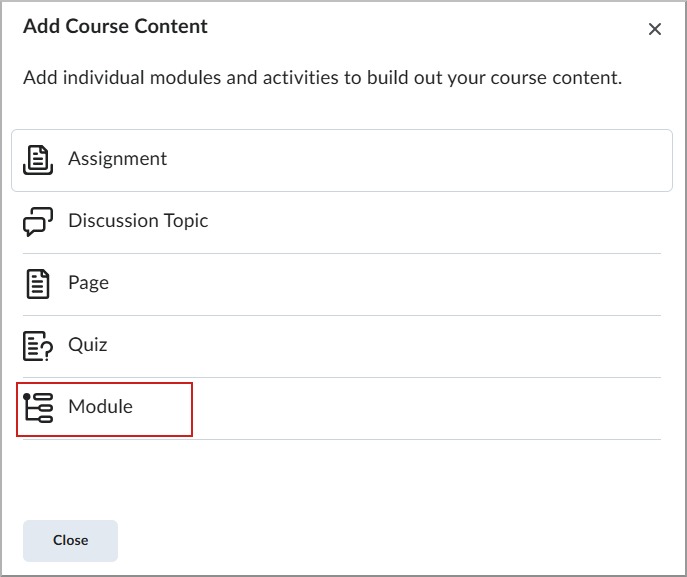
- Create the module container:
- Enter a Title for your module.
- Optionally, add a Description using the Brightspace Editor.
- Select Save and Close.
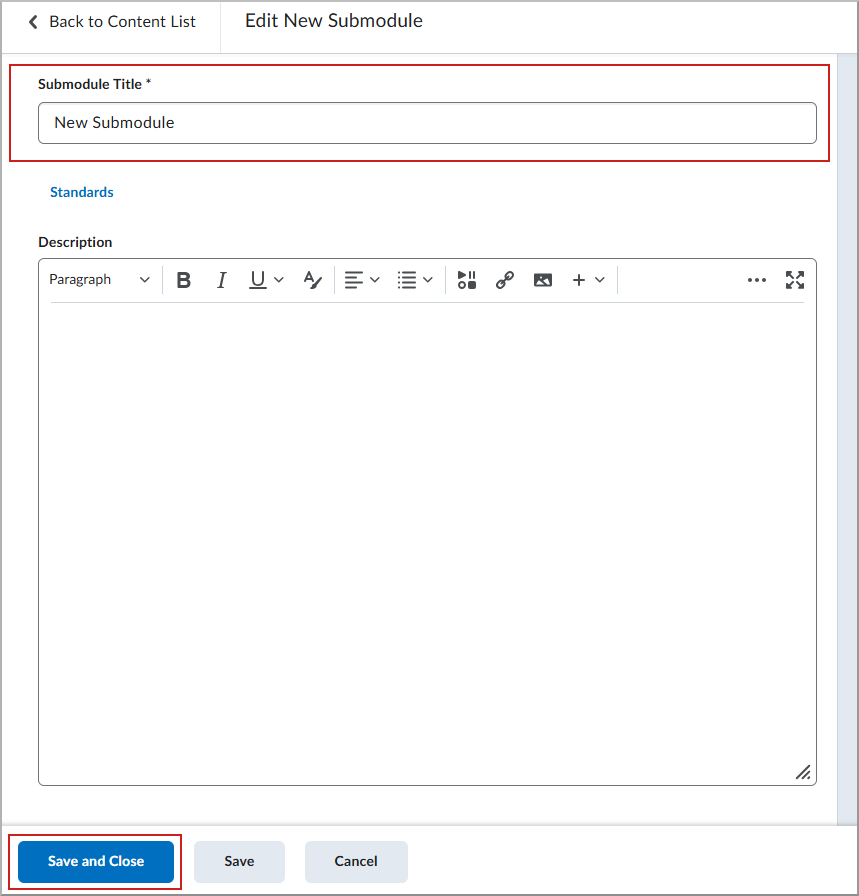
- Add submodules, if needed:
- Inside your new unit, select Create New.
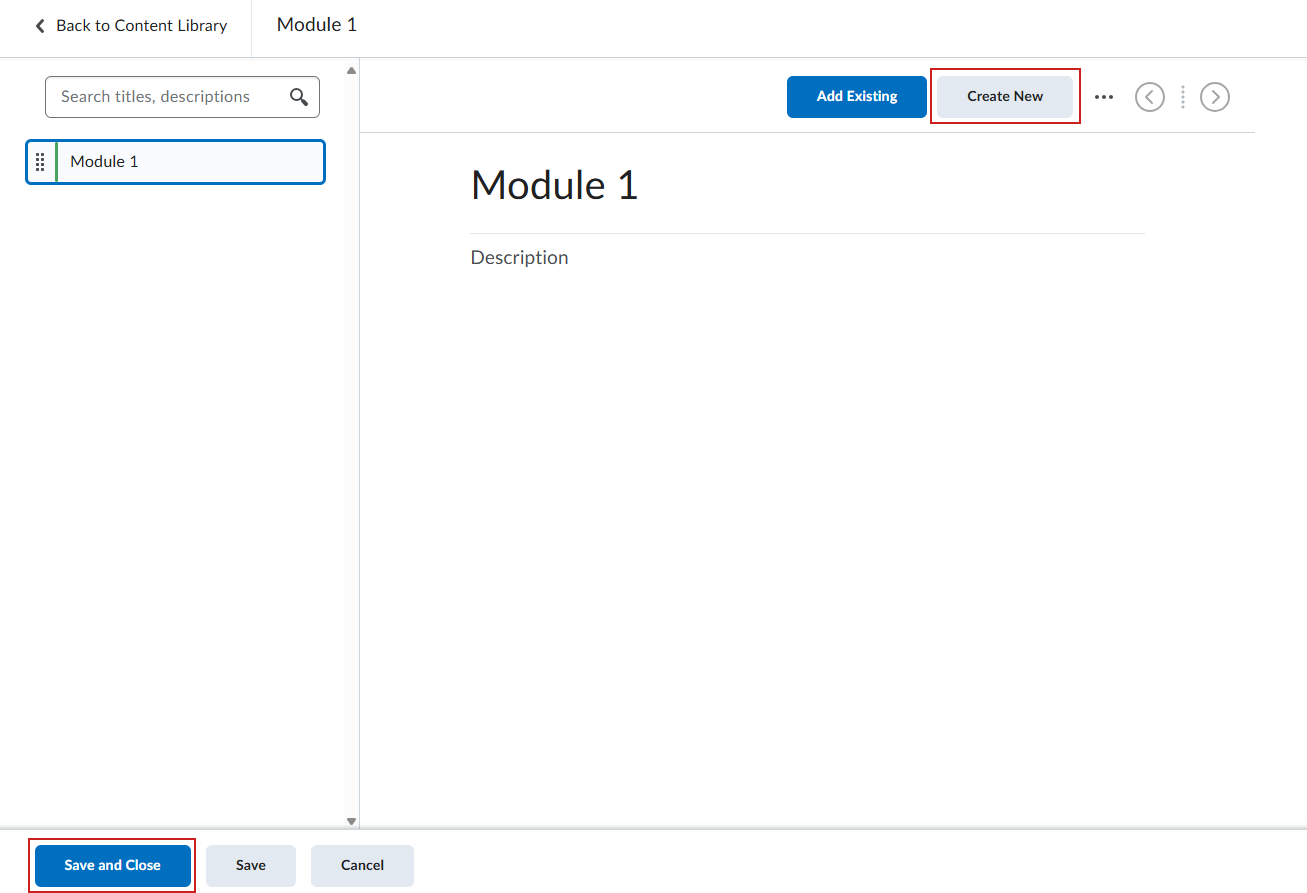
- Select New Submodule.
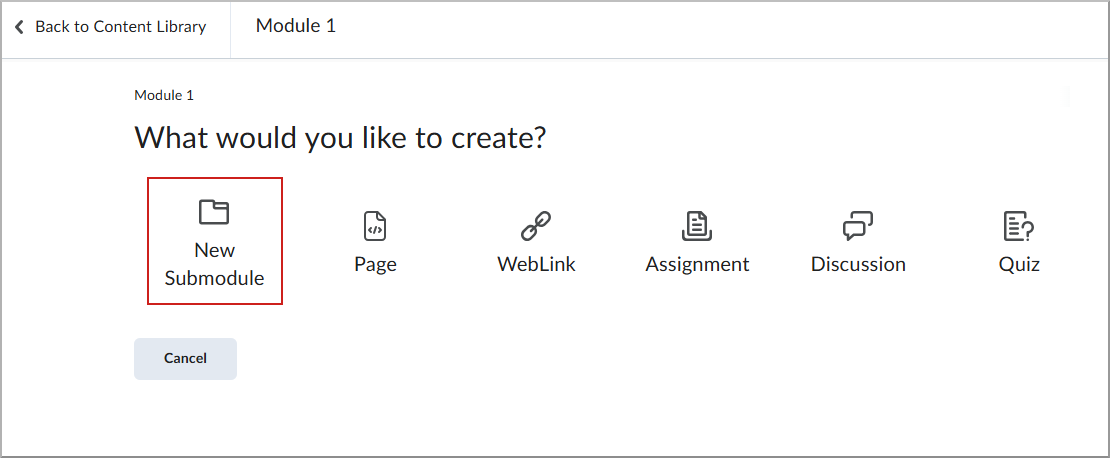
- Enter a Title and select Save and Close.
- Add content to the module:
- Inside your module or lesson, select Create New.
- Do one of the following:
- Select New Submodule to create a nested folder structure within the module.
- Select Page to create a new Hypertext Markup Language (HTML) content page where you can use Creator+ elements.
- Select Web Link to add an external uniform resource locator (URL) or resource link.
- Select Assignment to create a new assessment activity for learner submissions.
- Select Discussion to create a new collaborative topic for learner interaction.
- Select Quiz to create a new assessment with questions and automated grading.
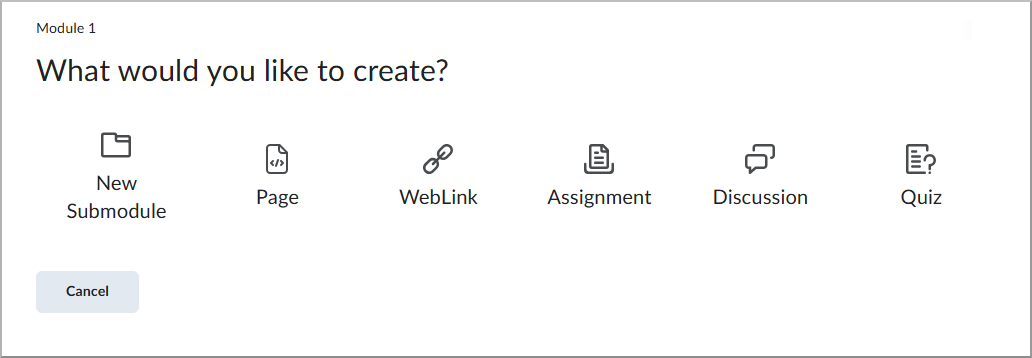
| Note: Selecting any of these options opens the authoring screen for that content type. Complete the required fields and select Save and Close to return to the module page. |
- After you add all content to the module, select Save and Close.
Create a Page
Pages provide learners with instructional content, such as text, images, videos, and interactive Creator+ elements. Create a Page to present course materials, instructions, or other learning resources within a module.
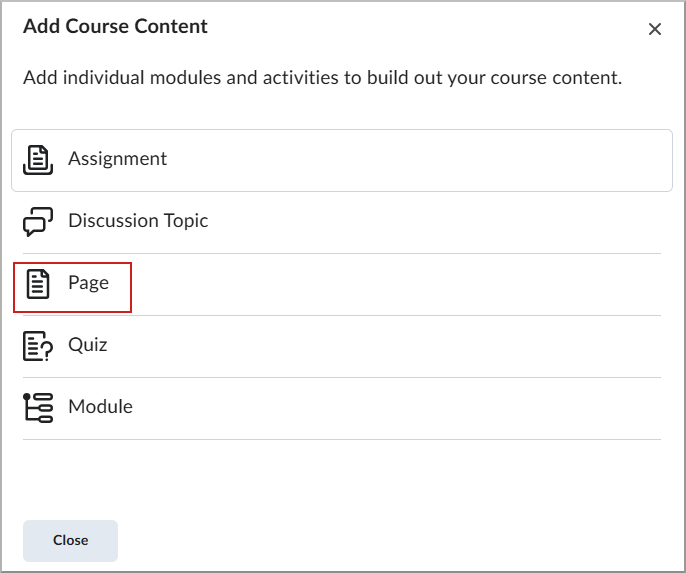
- From the Content tab, select Add Content.
- Select Page.
- Enter a Topic Title and Description.
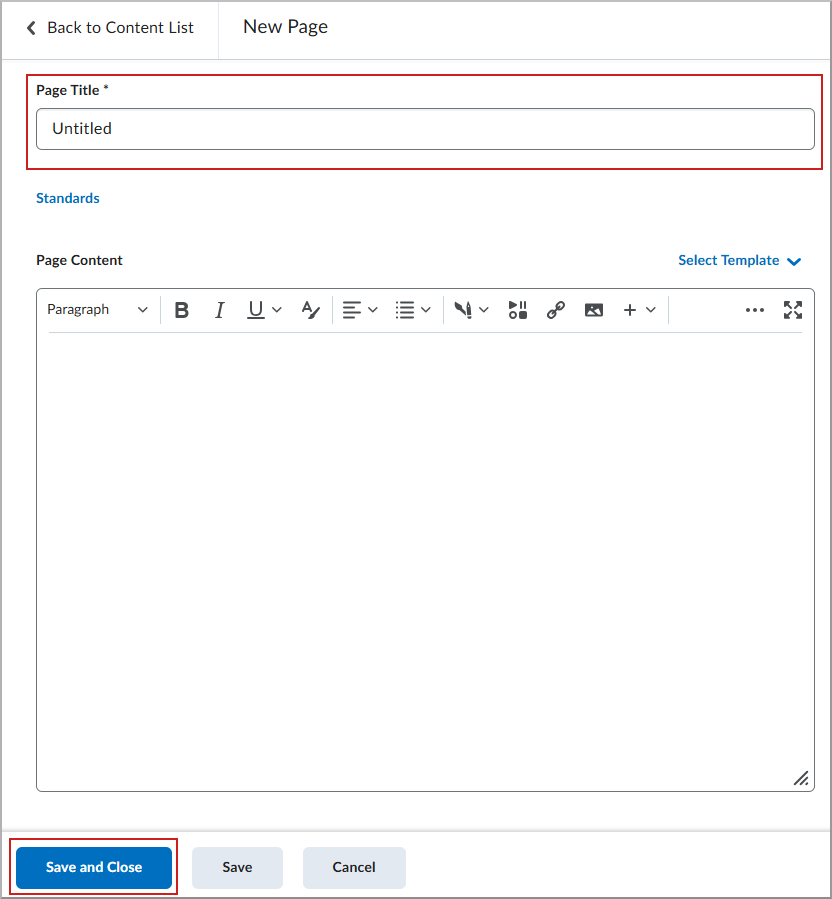
- Select Save and Close.
Create an Assignment
Assignments allow learners to submit files or complete work for evaluation. Create an Assignment to collect learner submissions, set due dates and availability, and provide feedback and grades.
- From the Content tab, select Add Content.
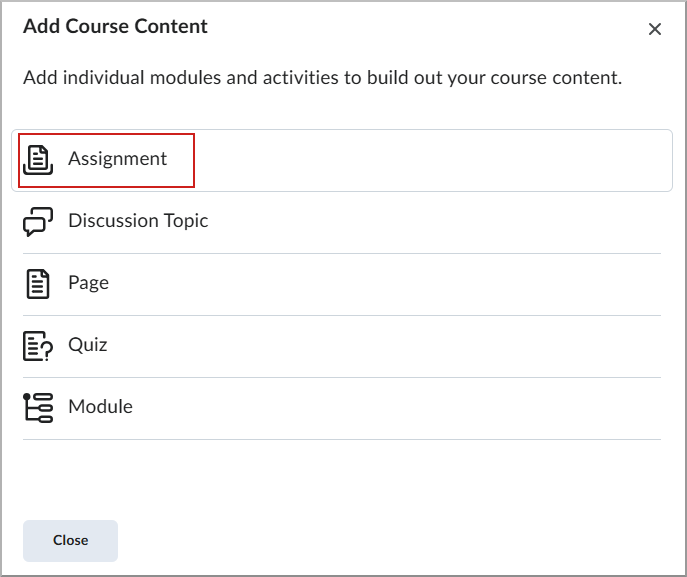
- Select Assignment.
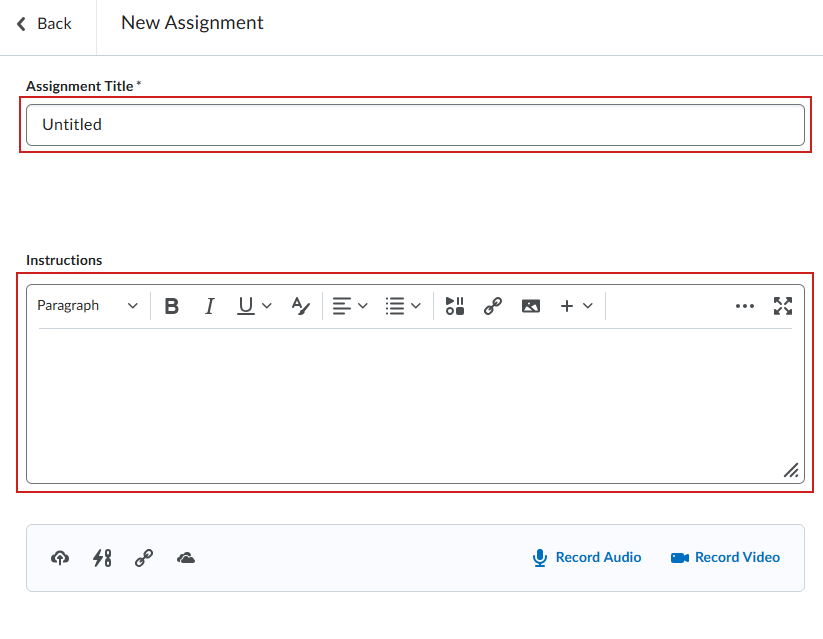
- Enter an Assignment Title and Instructions.
- Select Save and Close.
Create a Discussion Topic
Discussion Topics encourage learner collaboration by providing a space for conversations, questions, and knowledge sharing. Create a Discussion Topic to facilitate class discussions, collect responses, or support collaborative learning activities.
- From the Content tab, select Add Content.
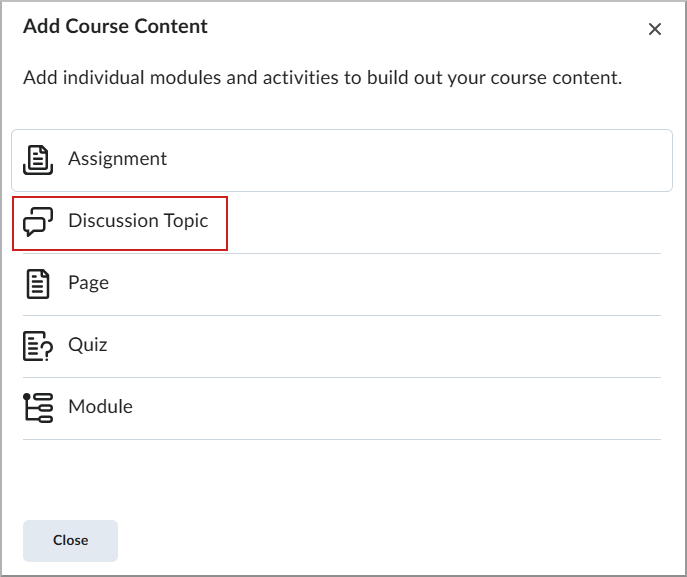
- Select Discussion Topic.
- Enter a Topic Title and Description.
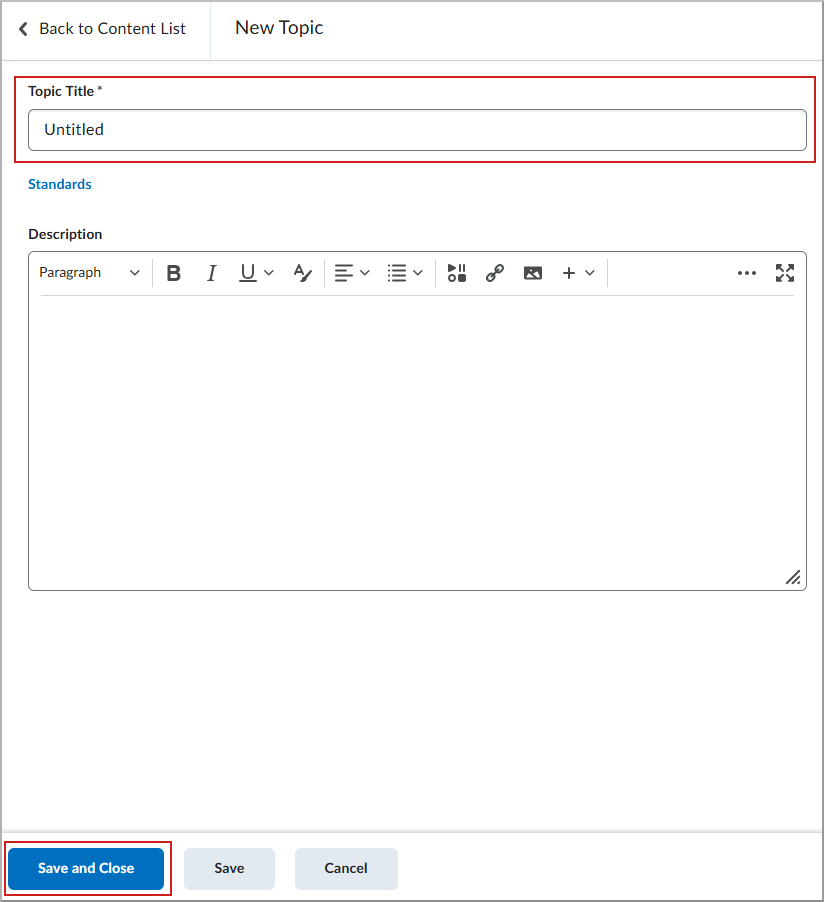
- Select Save and Close.
Create a Quiz
Quizzes assess learner knowledge using a variety of question types. Create a Quiz to evaluate learner understanding, configure availability and timing, and automatically evaluate supported question types.
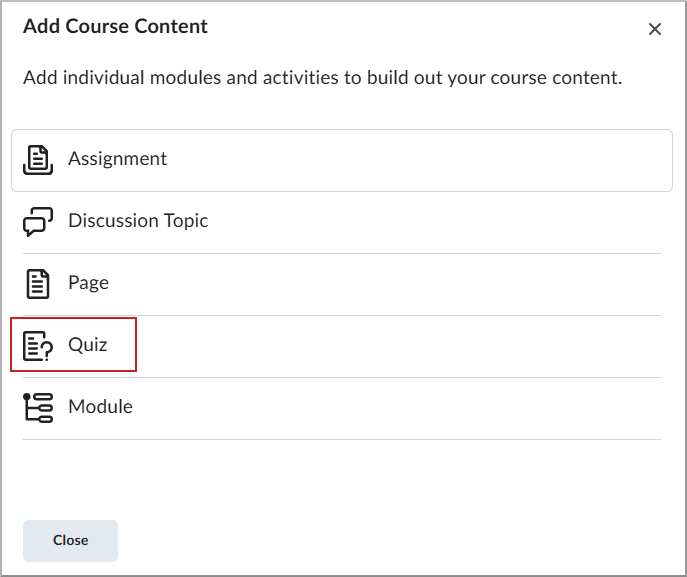
- From the Content tab, select Add Content.
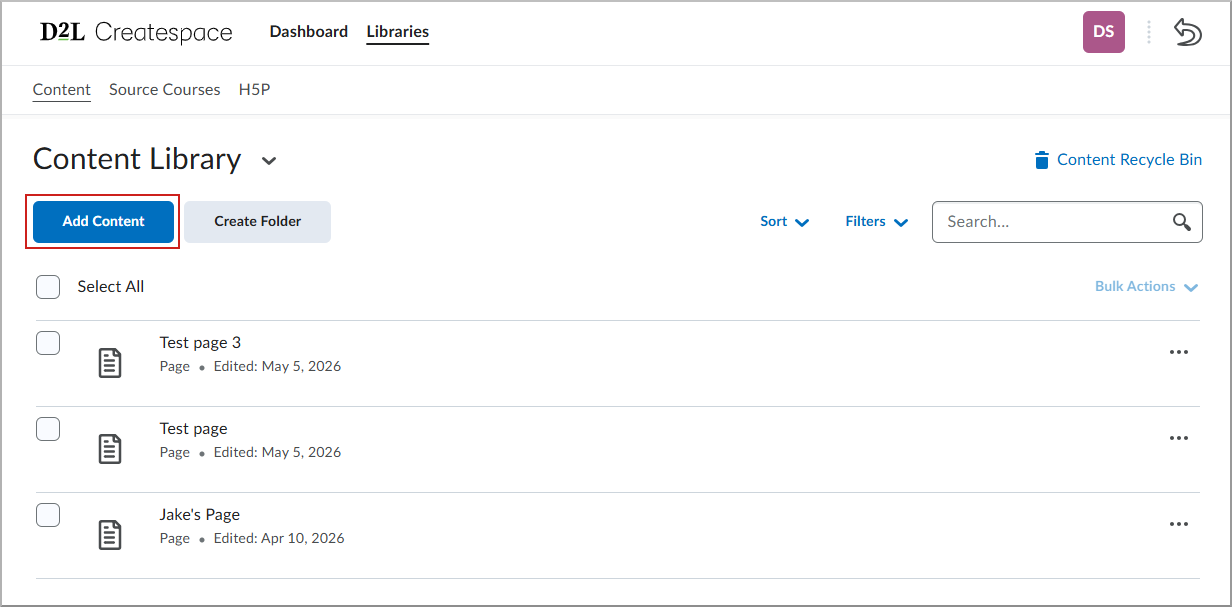
- Select Quiz.
- Enter a Quiz Title and configure your questions and settings.
- Select Save and Close.
Deploy and track content
Deploy content
Deploy reusable content from the library to a target course offering or source course.
|
Note: The Deploy action is primarily used for modules. You can also deploy supported individual content items, which are typically deployed as part of a module. |
With the appropriate administrative permissions, you can deploy content to any organizational unit, even if you are not enrolled in the course.
- In the Createspace Content Library, locate the module, Page, Assignment, Quiz, or Discussion Topic you want to deploy.
- Select the Actions menu, and then select Deploy.
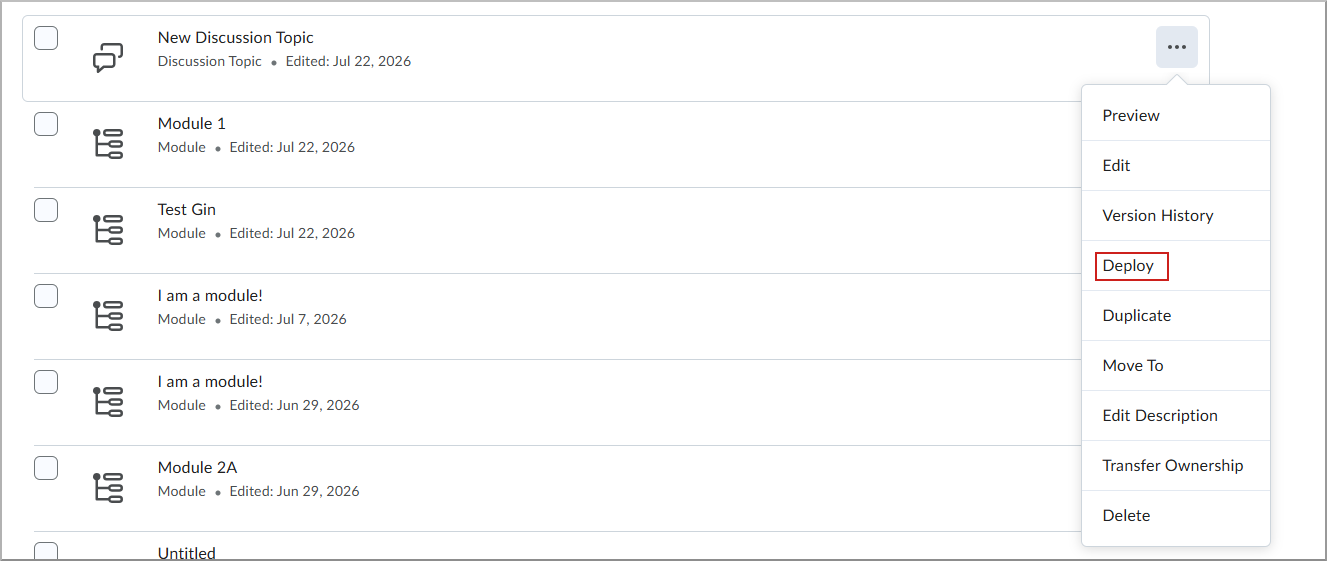
- Select the target course offerings.
- Select Deploy.
If a selected course does not contain a module, the Create Module dialog opens. Enter a Module Title, and then select Create and Deploy.
The content item is deployed to the selected courses.
How synchronization works
Synchronization updates deployed Createspace content in linked Brightspace courses while preserving learner progress and course-specific settings where possible.
When you initiate a synchronization from Createspace, the system compares the Createspace source object with the deployed object in each selected linked course and updates the Brightspace content to match the latest version.
|
Note: Quiz synchronization is not currently supported. If you synchronize a module that contains a Quiz, the synchronization completes with a partial failure because the Quiz is not synchronized. |
What synchronization updates
Synchronization overwrites fields that are managed in Createspace so that deployed content remains consistent with the source object. These fields can include:
- Titles
- Page content
- Instructions and descriptions
- Other fields that are editable in Createspace
Fields that cannot be configured in Createspace remain unchanged in the linked Brightspace course. These fields can include:
- Availability dates and due dates
- Grade items
- Linked rubrics
- Quiz restrictions and other instructor-managed settings
Learner progress
Synchronization preserves learner progress associated with the deployed content. Updating a deployed object does not reset learner completion or progress data.
Synchronization notifications
The user who initiates a synchronization receives toast messages and notifications indicating whether the synchronization succeeded or failed. The initiator receives these notifications regardless of their role permissions.
Instructors and other users in linked courses can receive notifications when synchronized content is updated if they have the Can receive notifications in courses that have content synced with Createspace role permission.
Notifications appear in the Alerts area represented by the bell icon in Brightspace. Notifications are not currently available within the Createspace interface.
Notifications indicate whether the synchronization succeeded or failed, but they do not provide details about the individual changes that were applied.
Synchronize content to multiple courses
You can synchronize content to up to 50 linked courses at a time to update the deployed Createspace object in each selected course.
What happens when content differs between Createspace and a linked course
Synchronization maintains the structure defined in Createspace while protecting content that exists only in the linked Brightspace course.
If synchronization detects material in a linked course that no longer exists in, or was never part of, the Createspace source module, the material is not deleted. Instead, the system creates a new module in the linked course and moves the unmatched material into it for instructor review.
This behavior can occur in the following scenarios:
- A child object was deleted from the Createspace module and the module was then synchronized.
- An instructor added a new child object directly to the module in the linked Brightspace course and the module was then synchronized.
In both scenarios, the unmatched material remains available in the linked course. Instructors are notified that they must review the new module and decide whether to keep, move, update, or remove the material.
Synchronization limitations
- Quiz synchronization: Quiz synchronization is not currently supported. Synchronizing a module that contains a Quiz results in a partial failure because the Quiz is not synchronized.
- Change details: Synchronization notifications do not identify the specific fields or content that changed.
- Notification location: Notifications appear in the Brightspace Alerts area and are not currently available within Createspace.
Synchronize content updates
When you edit a learning object, you can push those changes to all linked courses. Linked courses are Brightspace course offerings that contain a copy of a library object and are tracked by the system to support centralized content updates and synchronization.
- From the Content Library, locate the updated item.
- Select the Actions menu and select Sync.
- Select the specific courses from the Associated Course Offerings list and select Sync.
|
Note: Synchronization is currently available for Assignments, Pages, and Modules. The Sync option is available only for objects that have already been deployed. For objects that have not been deployed, the option is not displayed in the menu. |
Manage versions and deletions
Version history
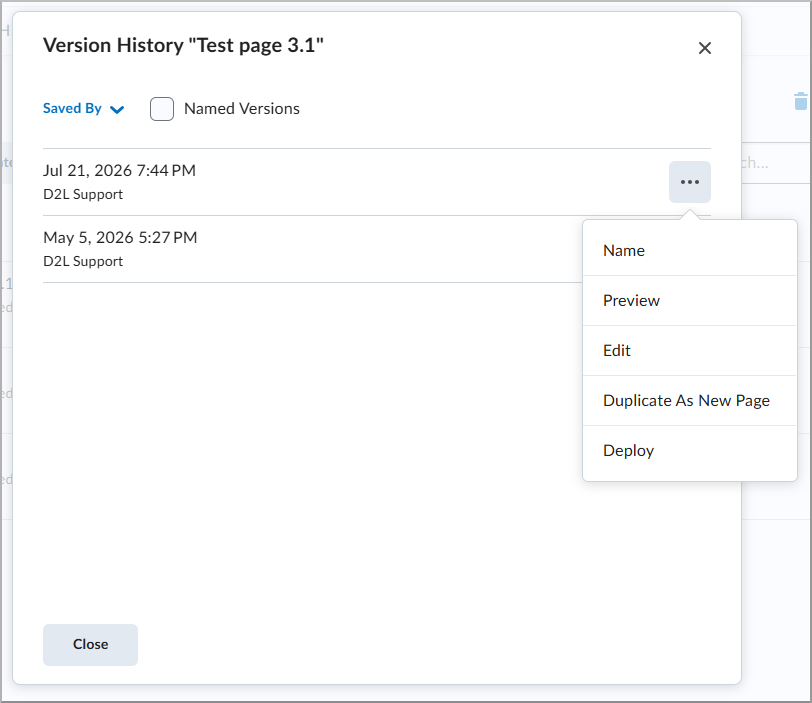
- Select the Actions menu for an item and select Version History.
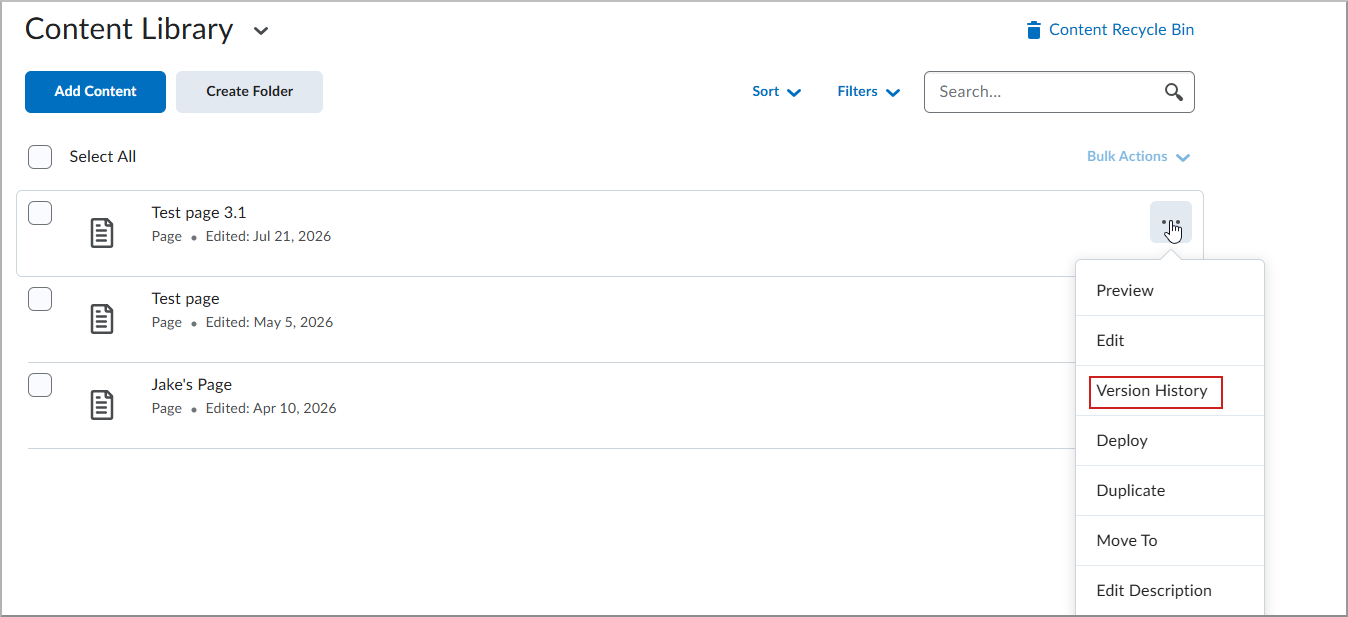
- From the Versions list, select Preview, Edit, Duplicate, or Restore for a previous version.
Restore deleted items
Deleted items are moved to the Content Recycle Bin and held for 90 days before permanent removal.
- From the Content Library, select the Recycle Bin icon.
- Locate the item you want to recover.
- Select the Actions menu and select Restore.
The item returns to its original location in the library.

|
Important: Bulk operations, such as deploying multiple objects at once or synchronizing multiple items in a single action, are not currently supported. |