You can use the Course Merchant Reporting Layer to generate PDF invoices listing what the customer has paid, and email them to your customers.
If this system is enabled, customers automatically receive a fully formatted PDF invoice once they complete the Course Merchant checkout flow. You can also download a copy of the invoice to send to them later.
If you haven't used this system before, you must contact Course Merchant Support to discuss your requirements and have the team enable the scheduled tasks to allow it to run.
Download a PDF Invoice Manually
By using information from the Course Sale record, you can manually download a PDF invoice that includes all the relevant course sale data from the Course Merchant Order (CMO).
To manually download a PDF invoice
- Open the Sales menu and select Course Sale.
- In the Course Sale table, locate the record that you want to generate an invoice for. Click the Name for that record.
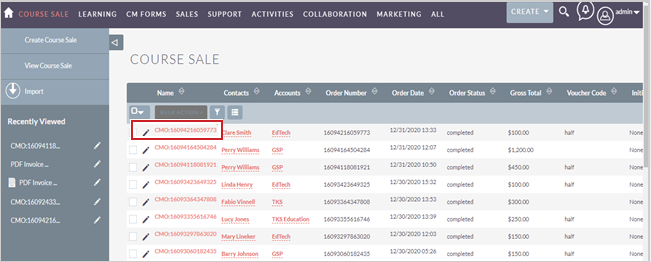
Figure: Click the Name of a record.
- In the CMO record, from the Actions drop-down menu, select Print as PDF.
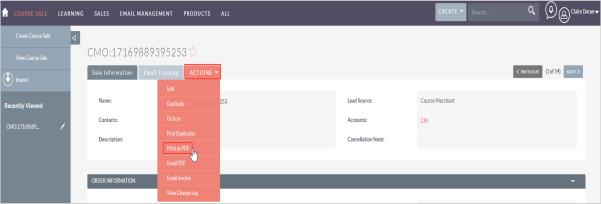
Figure: Click the Actions drop-down menu and select Print as PDF.
- A PDF invoice is generated and downloaded.
You can now manually send this PDF to your customer or file it for your records.
Re-Send a PDF Invoice
You can automatically re-send an email with a PDF invoice attached that was already sent to a customer.
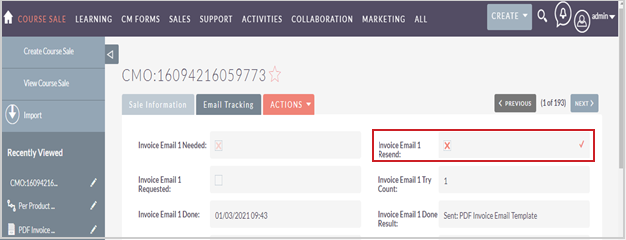
Figure: Resend and confirm an invoice was sent to a customer.
- Open the Sales menu and select Course Sale.
- In the Course Sale table, locate the record that you want to generate an invoice for. Click the Name for that record.
- In the CMO record, open the Email Tracking tab.
- In the Invoice Email 1 Resend field, double-click the pencil icon (✏) to edit the field.
- Select the checkbox. It should be marked with an X.
- Click the checkmark (✔) to save your changes.
Edit the Invoice Template
The PDF Invoice Doc Template determines the standard features of an invoice that is sent to customers as an email attachment when they make a purchase.
- Open the Email Management or All menu and select PDF - Templates.
- In the PDF - Templates table, click PDF Invoice Doc Template.
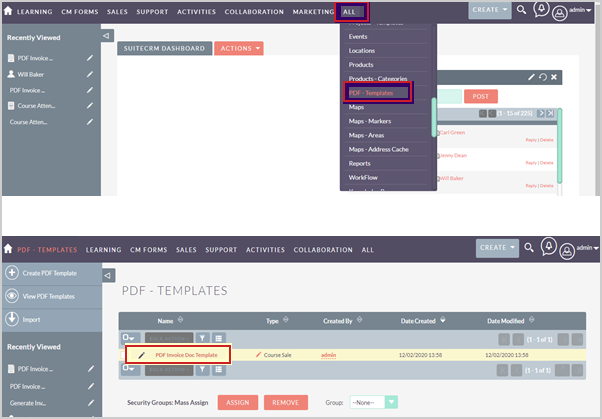
Figure: Click the All drop-down menu and select PDF - Templates. Then open the PDF Invoice Doc Template.
- To make changes to the template, open the Actions drop-down menu and select Edit.
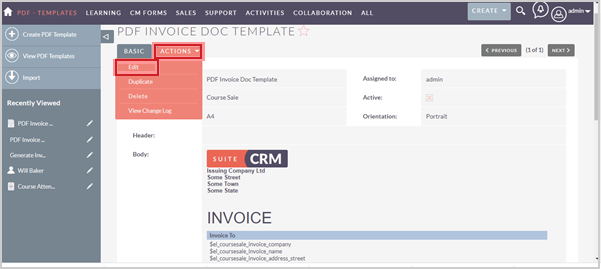
Figure: Click the Actions drop-down menu and select Edit.
- Make your desired changes to the layout and content of the invoice in the Body of the invoice template.
- If you want to add new fields to the template, use the Insert Fields option. When you have selected the field you want to add to the template, click the location in the Body where you want to place the new field.
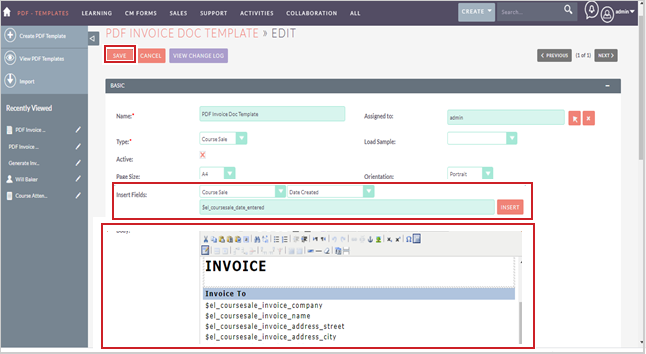
Figure: Use the Insert Fields option to add new fields to a PDF Invoice Doc Template.
- When you are done with your changes, click Save.
Edit the Invoice Email Template
The PDF Invoice Email Template determines the standard features of the email that is sent to customers when they make a purchase.
- Open the Email Management or All menu and select Email - Templates.
- In the Email - Templates table, click PDF Invoice Email Template.
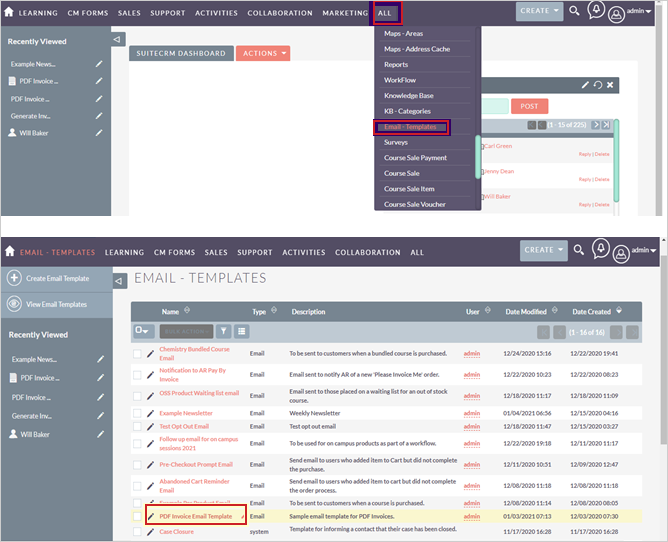
Figure: Click the All drop-down menu and select Email - Templates. Then click PDF Invoice Email Template.
- To make changes to the template, click Edit.
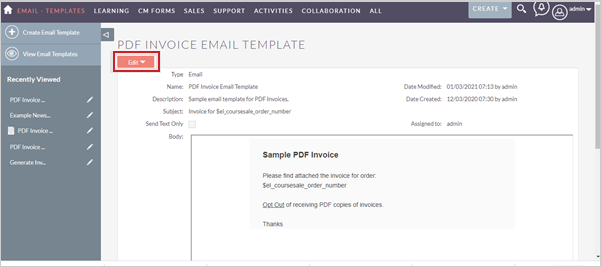
Figure: Click Edit to make changes to the PDF Invoice Email Template.
- Make your desired changes to the layout and content of the email in the Body of the email template.
- If you want to add new fields to the template, use the Insert Variable option. When you have selected the field you want to add to the template, click the location in the Body where you want to place the new field.
- You can also insert fields in the Subject line of the email. For example, you can add the Order Number after "Invoice for" in the Subject field.
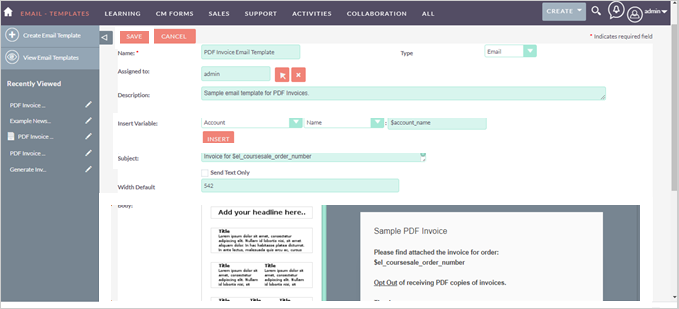
Figure: Use the Insert Variable option to add new fields to a PDF Invoice Email Template.
- When you are done with your changes, click Save.
Invoice Emails Configuration
When the PDF Invoice and Email templates are ready, you need to manage the settings for sending invoice emails via Invoice Emails Configuration.
If you are unsure of how you want to configure the invoices, contact Course Merchant Support to discuss your options.
- Open your username drop-down menu on the right side of the main navigation menu and select Admin.
- Scroll down to the bottom of the Administration page. Under Course Merchant Configuration, click Learning Invoice Emails.
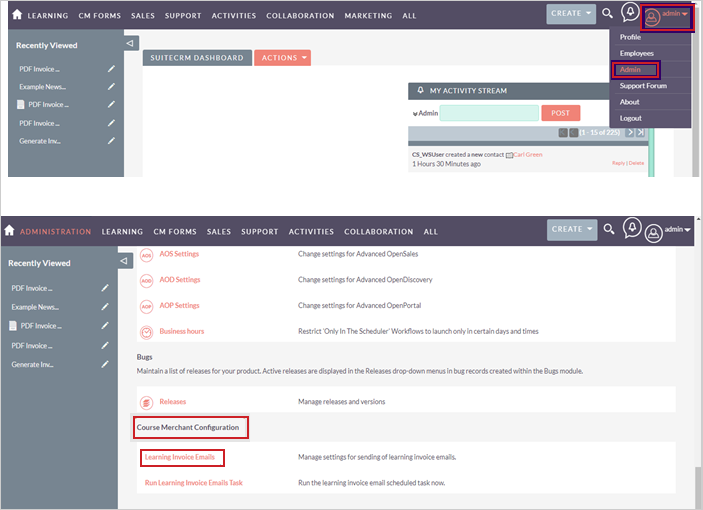
Figure: Select Admin from the main navigation menu and click Learning Invoice Emails.
- On the Invoice Emails Configuration page, there are several fields that need to be configured. The most important ones are:
- Enable Invoice Emails - This field should be selected (X) if you want an Invoice Email sent to the customer when a purchase order is completed.
- Email From Address - You should use the email address already configured in the system as the From email address.
- Send Email Copy to - You can add your own email address here to receive a copy of the email sent to customers.
- Number of email retries - This is the number of attempts that are made in sending an email to the customer.
- Friendly date/time format - This field displays date and time on the invoice like this: 04/01/2021 10:53.
- Prefix before order number in invoice filename - The invoice PDF is saved as "Invoice_16097575925068".
- Days past sale date to ignore records - An Invoice Email is not sent if the number of days entered in this field have passed since the sale order took place.
- Number of Emails - This field records the number of emails that can be sent to the customers. Additional fields need to be added if you want to send more than three emails. The state of each email is recorded under Email Tracking in the Course Sale Module.
- Email Template For Default Template -The PDF Invoice Email Template should be selected here from the list of email template options given.
- Email Template For [System Name] Staging - The PDF Invoice Email Template should be selected here from the list of email template options given if the selected staging store does not have a specific email template they want to use.
- Order Statuses which qualify for this email - Select the Order Status where a PDF Invoice Email would need to be sent. You can select more than one.
- Payment Statuses which qualify for this email - Select the Payment Status where a PDF Invoice Email would need to be sent. You can select more than one.
- Email Days After Sale to suppress - You should enter in this field the number of days after which you do not want customers to receive an Invoice Email.
- Attach PDF copy of invoice - Select this field (X) to have a PDF copy of the invoice attached to the email sent to customers.
- Invoice PDF Template For Default Template - The PDF Invoice Doc Template should be selected here from the list of template options given.
- Save copy of email against contact - Select this field if you want a copy of the PDF Invoice Email sent saved under the Contact's History.
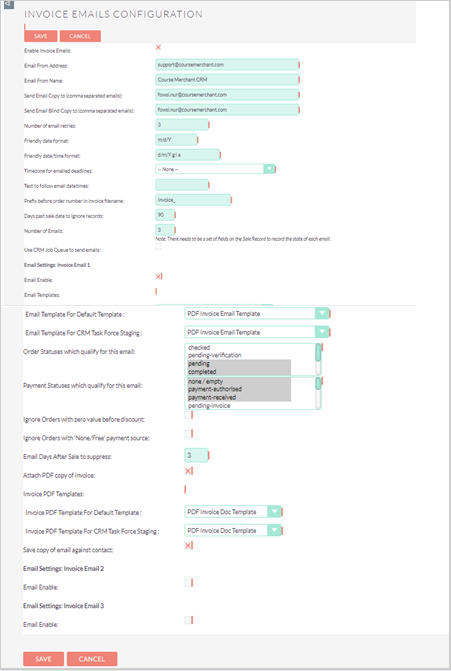
Figure: Configure fields in the Invoice Emails Configuration section.
Once you have configured the invoice emails to your liking, click Save.