Additional information to help you use the Course Merchant Reporting Layer.
Records Table Actions
Every module's records table has a default set of actions you can perform:
- Use the controls at the right end of the table to move between pages of records.
- Click a column heading to sort the table by the data in that column. Click the column heading again to change the sorting direction.
- Click the pencil icon (✏) next to the Name of a record to open that record in editing mode.

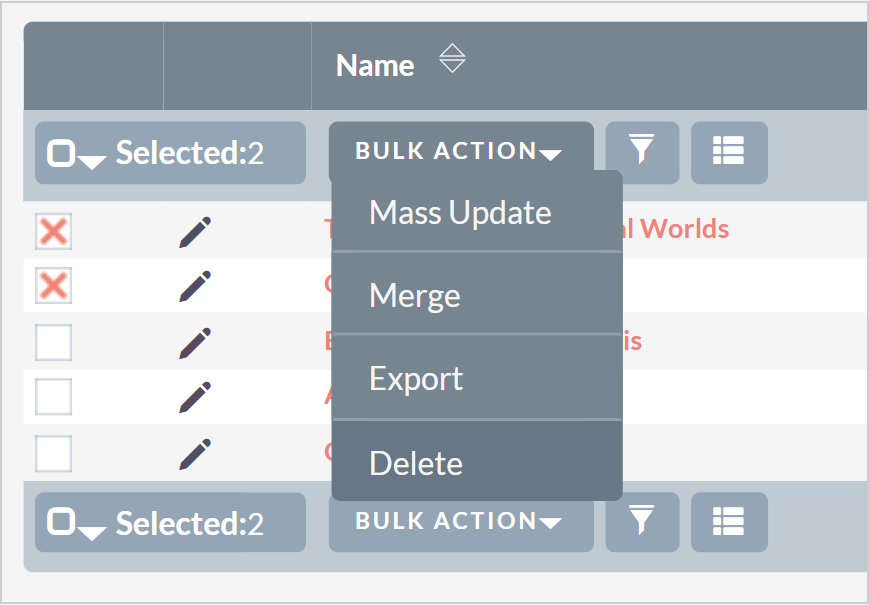
Figure: Perform actions on selected records using the Bulk Action drop-down menu.
- Select the checkbox for one or more records to perform a bulk action on them. Different modules have different bulk actions available, but most modules have the following:
- Mass Update - Selecting this opens the Mass Update box at the bottom of the page, allowing you to make bulk changes to records. D2L advises against using the mass update function on these records due to their integral connections with other records. Updating these records may result in inconsistencies and errors in data representation across various system components.

Figure: Make bulk changes in the Mass Update section and click Update.
- Merge - Allows you to merge multiple records together. This opens a new window where you must resolve any merge conflicts. D2L advises against using the merge function on these records due to their integral connections with other records. Merging these records may result in inconsistencies and errors in data representation across various system components.
- Add to Target List - Only available in the Course Attendance module. Add the selected contacts to a target list, from which you can send them targeted emails.
- Export - Exports the selected records as a CSV file.
Filter a records table
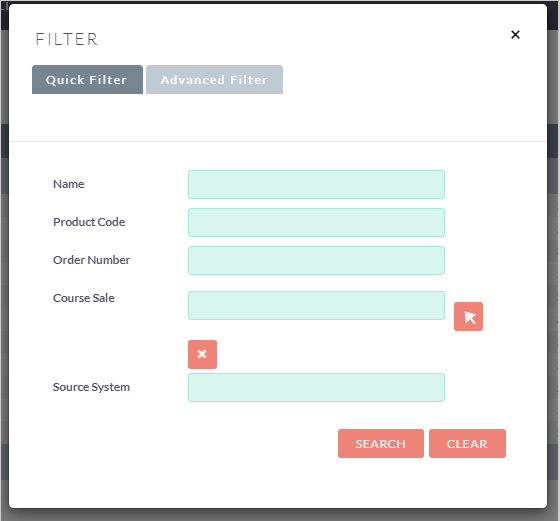
You can filter the data in any records table by clicking the Filter button (funnel icon). The Filter dialog appears, allowing you to choose between Quick Filter or Advanced Filter.

Figure: Click Filter to open the Filter dialog.

Figure: Perform a Quick Filter or Advanced Filter in the Filter dialog.
- Quick Filter gives you a selection of the most important data fields to filter by.
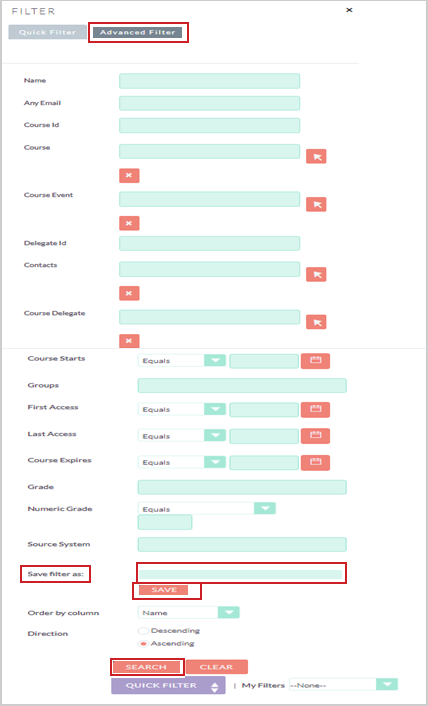
- Advanced Filter lets you filter by all available data fields. You can save an advanced filter to use again later.
You don't need to fill out all the fields to perform a search: only one is required.
Most fields require you to type in the term you wish to filter by. For these fields, you can use % as a wildcard operator to broaden your search. For instance, instead of searching exclusively for results that equal "Apples," you could change your search to "Apples%" which would match all results beginning with the word "Apples" and may include additional characters.
Some fields, such as the Course field in the example below, have a Select button (↖) to the right of the input field. Click this to open a dialog where you can select an existing record from a list. Click the Clear button (X) below the field to clear your selections.

Figure: Click Filter in a table to open the Filter dialog and perform a quick or advanced filter of records.
After filtering the data to your preference, click Search.
To remove the filter from the records table, click the orange X next to the filter button. The table will return to normal.
Save an Advanced Filter
You can save an unlimited number of advanced filters. Custom filters are saved on a per-module, per-user basis.

Figure: Click the Advanced Filter tab to fill in the fields and perform an advanced filter of records.
To save an Advanced Filter
- Click the Filter button and select Advanced Filter.
- Filter the data to your preference.
- Enter a name for your filter in Save filter as.
- Click Save.
To recall an Advanced Filter
- Click the Filter button and select Advanced Filter.
- Scroll to the bottom of the dialog and locate the My Filters drop-down menu.
- Select the saved filter name from the drop-down menu.
- The filter is automatically applied to the records table.
Configure records table columns
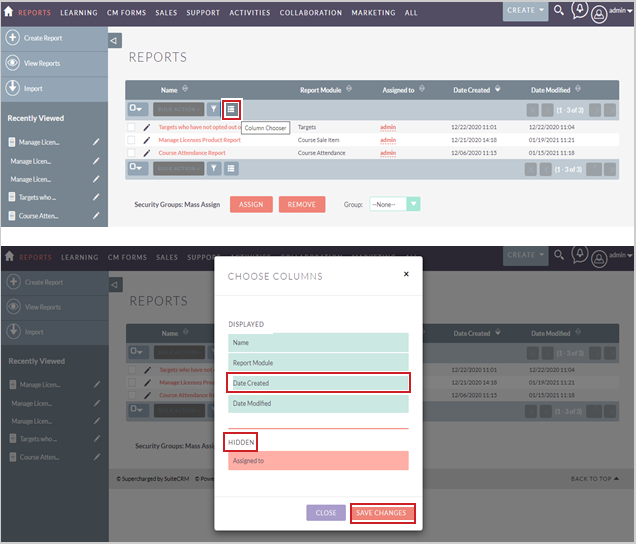
Click the Column Chooser button to configure the visibility and order of column headings in the table. Each module can be customized separately.

Figure: Click Column Chooser to select columns for the records table.
The Choose Columns dialog appears, allowing you to choose from pre-existing column headings. All the data fields in a record are available as column headings.
Columns in the Displayed section will appear in the table. The higher the column is listed, the closer to the start of the table it will appear.
Columns in the Hidden section will not appear in the table.
Use your mouse to drag and drop the columns until you have created your desired layout.
When your changes are complete, click Save Changes.