Member Discounts offer a flexible way to give customers a discount based on specific fields within their LMS profiles, such as their email address. Member discounts can be set store wide or on a per product basis. The per product setting overrides any store wide setting.
Here is an example of a product discount and a product with discounting disabled:

Figure: The membership discount is displayed next to products.
If you set a "0%" store wide member discount and then set a product override member discount, only that product has a discount applied and the discount showing within that line item.
Add a new Member Discount Level
You can set up a discount name and percentage and then set up whom you want to receive this discount. Once you have added the Member Discount Level, click Edit members to add people to the list.

Figure: Create member discounts on the Add member discount level page.
The following are input fields:
- Member Discount Level - The name of the discount list.
- Discount Percentage - The percentage discount to give to everyone in this list.

|
Note: If you want to allow certain customers to register for courses for free, you can add a member discount level where the Discount Percentage is 100. The form automatically translates 100 to 99.9999, but this only displays to you in the Store Admin. Customers will see the 100% discount in their cart; and when they check out, no financial transaction is required. |
View Discount Levels
You can review the currently set up member discount lists.

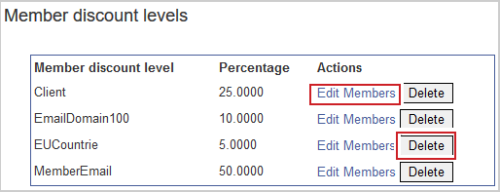
Figure: Edit Members or Delete members on the Member discount levels page.
The following actions available:
- Edit Members - Edit the list of members who receives the discount.
- Delete - Permanently remove a member discount list.
Edit Discount Levels
After you have created a new Member discount level or if you want to edit a current discount level, enter the Members page by clicking Edit Members.
You can check the Member discount level name and change the Percentage discount given to members.

Figure: Click Update to edit a Member discount level.
The current discount list is shown. You can permanently delete items from it.

Figure: Click delete to permanently remove items from the discount key.
You can set up who gets the discount.
This is where you add new items and groups of items to the discount list.

Figure: Enter a code for the Customer Member Discount Code for new items.
The following are input fields:
- Customer Member Discount Code - This is the value a customer's data needs to match for them to get the discount. For example:
- For discounts based on email domain, enter test.edu. Users with an email address that ends with test.edu receive this member discount.
- For discounts based on Brightspace org role, enter the role name.
- For discounts based on country, enter the ISO 3166 Alpha-2 code.
- For discounts based on state or region, enter a country-specific code:
- For USA states, enter the 2-character Alpha Code.
- For Canadian provinces, enter the 2-character Province Code.
- For regions in all other countries, enter free-text.
- Has Expiry Date - If you want the discount to expire, enter a date.
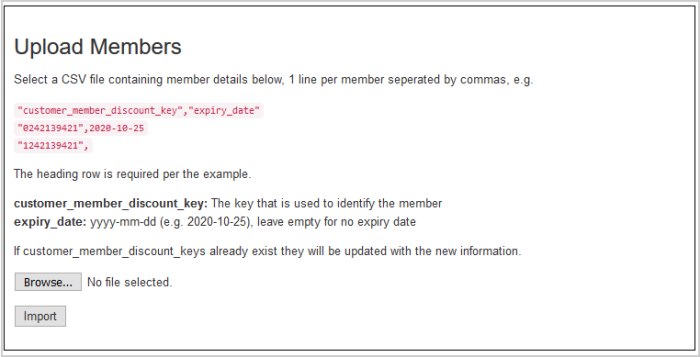
You can import a CSV file to add items to a member discount level in bulk.

Figure: Browse for or Import a member details CSV file on the Upload Members page.
Note: The customer_member_discount_key is the same as the Customer Member Discount Code from above.
The file must be a UFT-8 CSV file without BOM and in this format including the column headings.
"customer_member_discount_key","expiry_date"
"0242139421",2020-10-25
"1242139421",
You can download this example as a CSV file that you can edit here: Discount_Level_Members.csv.
Video: Membership Discounts Based on LMS Profile Fields