You can create a course and enroll users into a classlist using a text file (.txt) or comma separated values file (.csv). Before you create an import file, consider the following:
- The import file does not change names or emails that exist in the system.
- If the Org Defined ID of a user already exists in Brightspace, they are automatically enrolled in the specified course.
- If the import process finds an Org Defined ID of a user is already enrolled in the course, it rejects the row.
- If the Org Defined ID of a user does not exist in Brightspace, the users are imported as new users in the system.
- When you download and edit the sample import file, the asterisk (*) denotes a required field. Optional fields can be blank without affecting the import.
- Not all courses include sections.
- If the course includes sections, then the sample file and the import file should include the section code.
- If the course does not have sections, the section code is not in the sample file and should not be included in the import file. For example: JD4680, John, Doe, johndoe@exampleschool.com, student, false
Set required role permissions
You must ensure that you have the appropriate Classlist > Enroll via File permission. After the permission is granted, a course administrator or teacher can set up a classlist using a file.
To grant the Enroll via File permission
- In Admin Tools, under the Security heading, select Roles and Permissions.
- In the Role and Description table, select Administrator.
- From the Filter by Tool drop-down list, select Classlist.
- Ensure the Enroll Via File permission is turned on for the appropriate levels. By default, it is applied for the Administrator role to Organization, Course Template, and Course Offering.
- Repeat the process for any other roles (such as teacher) that should have this permission.
- Click Save and Close.
Download a sample .TXT or .CSV import file
After you have set the required role permissions, you can download and edit a sample file to prepare for your classlist import.
To download the sample import file
- From the course navbar where you want to import users into a classlist, click Classlist.
- Click Add Participants and select Import users from a file on your computer.
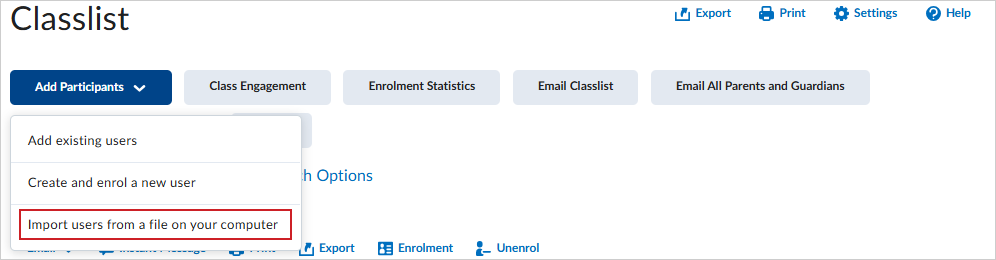
- Click Sample Text File to download the sample file.
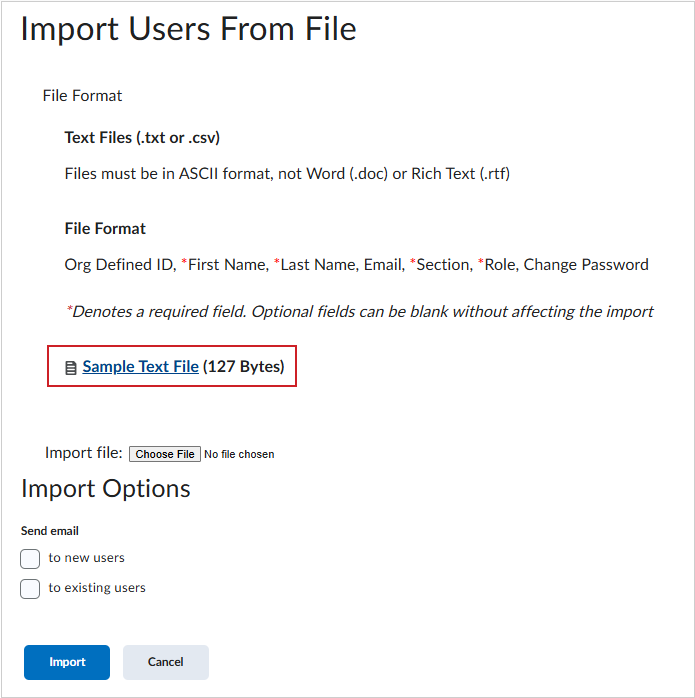
- Choose a location for your file, select a .TXT or .CSV ASCII format and click Save.
- Edit your file to add the following field information, separated by commas:
- Org Defined ID
- *First Name
- *Last Name
- Email
- *Section
- *Role
- Change Password (true/false)
- Save your file.
Your sample file is ready for import.
Import course participants using a file
Once you have downloaded and updated your sample file, you can import the file.
- From the course navbar where you want to import users into a classlist, click Classlist.
- Click Add Participants and select Import users from a file on your computer.
- Next to Import File, click Choose File and browse to the location of your file.
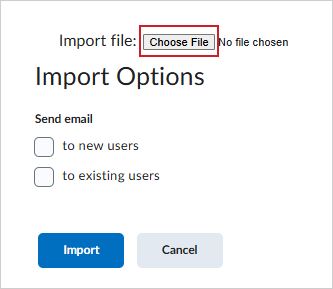
- If you want to send an email to new users or existing users, notifying them of their enrollment in the course Classlist, select the appropriate Import Options.
- Click Import.
Your Classlist is updated with the users defined in your file.