A Category is a container for related products. Categories form the basis of the storefront layout.
The Categories and their child categories are displayed in a paginated table.
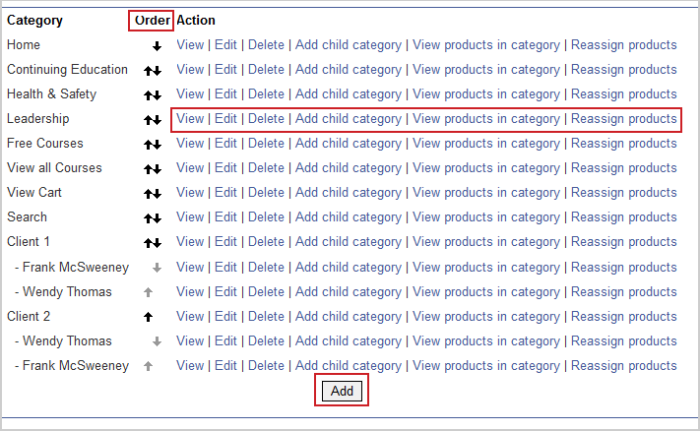
Figure: Manage categories and their child categories on the Categories page.
The following are column headings:
- Category - The name of the category and its children.
- Order - Allows you to adjust the order of categories using the up and down arrows. Top level categories have black arrows and child categories have light gray arrows.
- Action - Actions you can take:
- View - Displays the category within the storefront.
- Edit - Edits the category. The category editor is the same as the category creator.
- Delete - Deletes the category. You is asked to confirm the deletion and select if you want to delete the child categories as well on a new page. This is a permanent action.
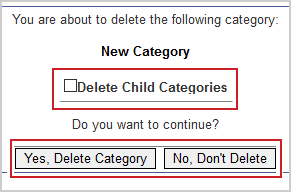
Figure: The options for deleting categories and child categories are proceeded by a confirmation message.
- Add child category - Adds a child category to the selected category.
- View products in category - Shows any products currently in this category.
- Reassign products - Allows you to move products from one category to another in bulk. A new page will open where you select the Products you want to move, select the destination category from the Move to category drop-down and then click Reassign Category
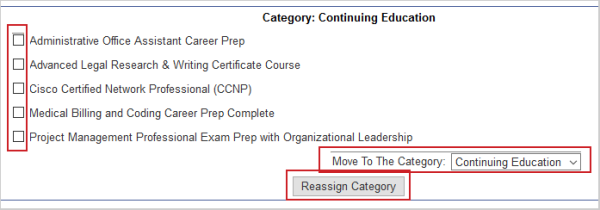
Figure: Manage and reassign categories using the Move to category drop-down and Reassign Category option.
Note: During the build phase we will add example categories to your store. The input fields of these categories are populated with whatever is in your default template.
When you click Add at the bottom of the categories page or Edit a category, you enter the categories editor.
General Settings

Figure: Create a new category using the input fields on the General Settings page.
Input Fields:
- Category Name - The name of the category.
- Category Code (Menu Code) - This forms part of the URL for the Category. You should set it to be SEO friendly. The Category Code must only contain characters A to Z, a to z, 0 to 9, - (hyphen), _ (underscore).
- Category Page Title - A template and theme specific option, only used for certain builds.
- Parent Category - If you want this category to be the child of another category, select that category here.
- Nav Image - When you click the upload link the image management window will open. You can select an image you have uploaded before in the Images menu item, or upload a new image.
Note: The Nav Image location depends on your template and how it's been customized. In some template configurations the Nav Image becomes the category button image.
- Header Image - Same as the Nav Image but for the header.
- List Image - Same as the Nav Image but for the list image.
- Optional Theme - You can select a theme template for this category. This will override the store default template for this category.
Uploading or Selecting an Image.
When you want to upload or select an image the image management window will open.
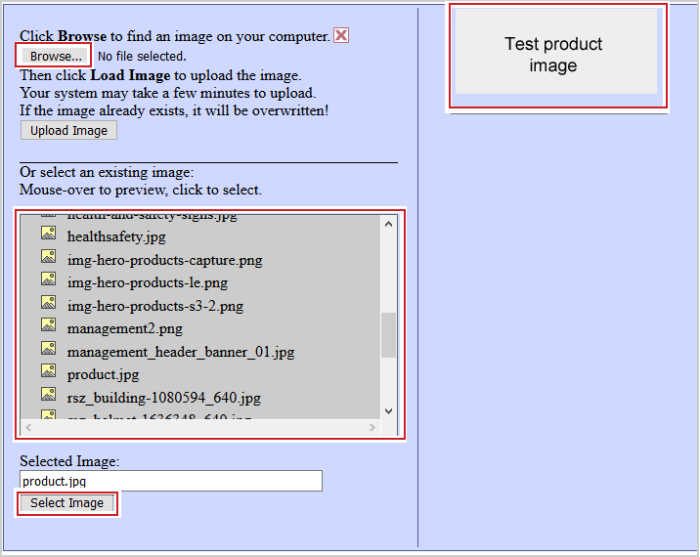
Figure: Uploading and selecting an image opens the image management window.
Reusing an Image
To use an image already uploaded to your store, select it from the list of images. A preview will appear to the right when you hover over or click the name of a file. Once you have selected one, click Select Image to confirm and return to the screen you came from.
Uploading an Image
To upload an image click Browse... to open a file picker. Once you have selected the image click Upload Image to start the upload. The upload may take a while.

Figure: Click Use Uploaded Image to add the new image.
Once the upload has finished, either click Use uploaded Image to select the image you just uploaded and return, click the red X to close the window without selecting one (This will not delete your upload image), or select a previously uploaded image from lower down the window.
Navigation

Figure: The Navigation page allows users to customize the main menu display.
Input Fields:
- Active - If set to No, the category is inactive and will not be shown in the storefront and cannot be navigated to directly with a URL.
- Show in Main Menu - Unselect to hide the category from the main menu. Note that where the main menu is displayed depends on your template and how it was been customized for you.

Figure: An example of a Main Menu.
- Link to another page - You have 4 choices; these can be used to direct people around your store using categories as menu items.
- No - Clicking this category will take you to the category itself.
- Category ID - Clicking this category will take you to the category you selected from the drop-down.
- Product ID - Clicking this category will take you directly to the selected product.
- External URL (include http://) - Clicking this category will take you to the URL entered in the box.
Metadata

Figure: Use the input fields to customize HTML elements on the Metadata page.
Input Fields:
- Meta Title - Outputted into the Title HTML element. It will show as the page title when in the category.
- Keywords - Used for category search in the store and is output in the Meta Keyword HTML element which is used for basic SEO.
- Meta Description - A summary of the pages content, used for basic SEO.
Content
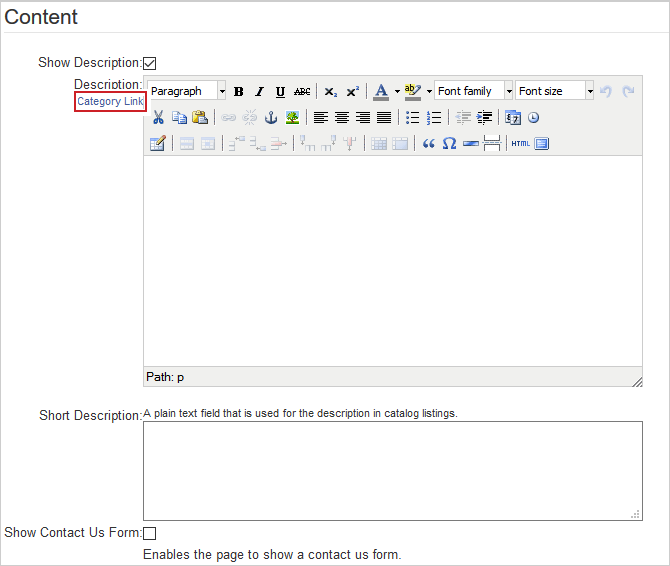
Figure: Customize which content is displayed for categories on the Content page.
Input Fields:
- Show Description - Unselect if you want the category to not show a description.
- Description - The main body of the description. You can enter and format text and images using the WYSIWYG HTML editor. (The Category link is only shown when adding a new category. It will take you to the category within your storefront).
- Short Description - A plain text field that is used for the description in categories listings. May have no effect in some templates.
- Show Contact Us Form - If selected shows a contact us form on the category page.
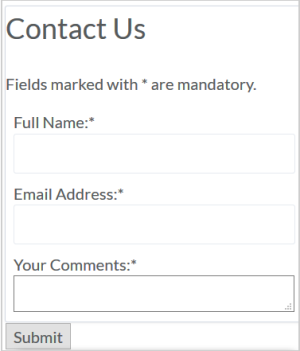
Figure: An example of a Contact Us form.
Categories Display Options

Figure: Customize how categories appear on the Categories Display page.
Input Fields:
- Show Child Categories - Unselect to hide all child categories.
- Layout - You can select from a range of layout options for any child categories and change how many Rows are shown on the page. How this looks will depend on your template and how it has been customized for you.
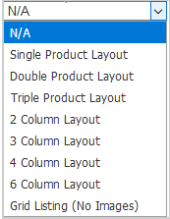
Figure: Select a product layout type from the Layout dropdown menu.
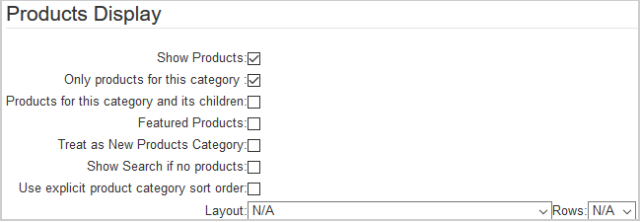
Figure: Select options for displaying products on the Products Display page.
Input Fields:
- Show Products - If unselected, this category will not display any product listings when viewed in the storefront.
- Only Products for this category - If unselected, all products in the store will show in this category, even if they aren't assigned to it.
- Products for this category and its children - Select to show products that are in this category and products in its child categories. For this to work Only products in this category must be selected.
- Featured Products - Select to show products set as Featured in this category.
- Treat as New Products Category - If selected, products in this category will be shown in a new products section. Note - This is only enabled on some templates.
- Show Search if no products - If selected, a search box will show if the category is empty.
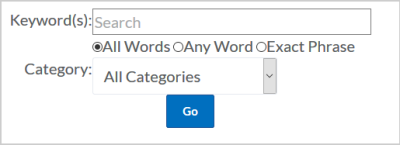
Figure: Use the Keyword(s) field and the Category dropdown menu to customize your search.
- Use explicit product category sort order - If selected, rather than following the store default product sort order you can manually sort products in this category.
Once you have selected this box, you will need to go to the list on the Categories page and click View products in category.
You will be taken to a Products List with just the Products in this Category. On the right there will be a new column called Explicit Sort Order.

Figure: The Explicit Sort Order column on the Product List page allows users to manually sort products.
You can now reorder products using the up and down arrows.
- Layout - You can select from a range of layout options for any products in this category and change how many Rows are shown on the page. How this looks will depend on your template and how it has been customized for you.
Once you have entered all the information click Save or Cancel to discard any changes.