The Multi-Profile Widget is a system widget that displays multiple roles and functions to be presented directly to learners on a course homepage. Drawing user details from Classlists and User Profiles, the Multi-Profile Widget automatically pulls in the people and details that you set up.

|
Note: The Multi-Profile widget is part of the add-on Homepage Widget Expansion Pack. Contact your D2L representative to learn more about purchase options. |
If you have not yet added the Multi-Profile widget to an organization or course homepage, the widget automatically provides you with steps for initial setup.
To deploy the widget as an administrator
- Navigate to Admin Tools > Organization Tools.
- From the Tool Availability page, toggle the Multi-Profile Widget on.
- From your homepage, click Homepage Options (...) and select Edit this homepage.
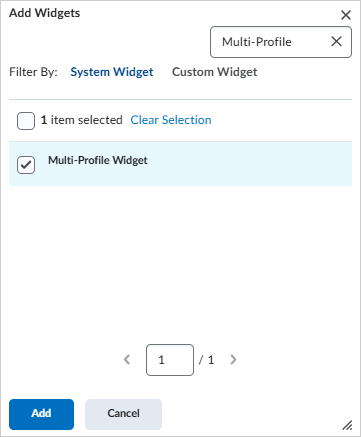
- To view all widgets available for use in the homepage you are editing, in the Widgets section, click Add Widgets.
- From the Add widgets dialog, search for the Multi-Profile widget and click Add.
- From your homepage, follow the instructions that appear on the Multi-Profile widget to set up the widget.

Configure settings for the Multi-Profile widget
Configure settings for the Multi-Profile widget to complete initial widget setup and to modify the appearance of the widget after initial set up.
To configure settings for the Multi-Profile widget:
- Navigate to a course or org level homepage with the Multi-Profile widget.
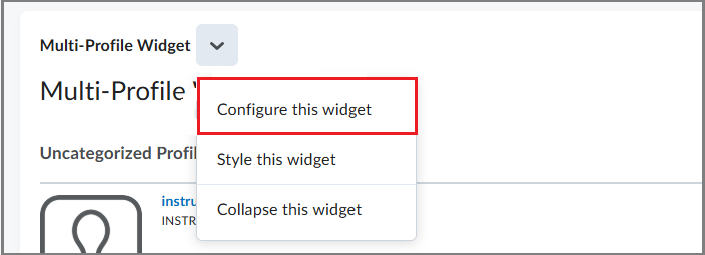
- On the Multi-Profile widget, click the Actions for Multi-Profile Widget drop-down menu. Click Configure this widget.
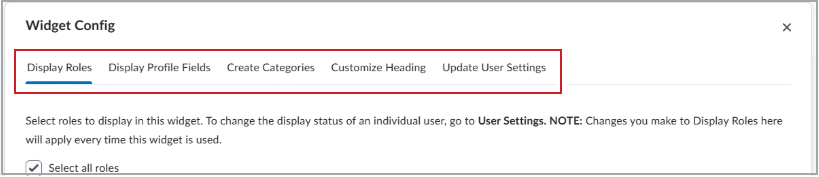
- Do any of the following in the configuration settings tabs:
- Display Roles: Select the roles to display in the widget (for example, Instructors, Facilitators, or Teaching Assistants). Click Save.
- Display Profile Fields: Select the profile fields for each user that displays in the widget (for example, Nickname, Email, Position). Click Save.
- Create Categories: Use the following tabs to create and edit categories that group similar role types based on function (for example, Facilitators and Instructors grouped within a category called Course Leaders). Categories are fully customizable.
- Set up categories: Enter a custom category in the Add a New Category field and click the Add a New Category symbol (plus sign). Then select the display order for the new categories using the number selectors in the Order column. Click Save.
- Add roles to categories: Select which roles to include in a category. Select the category from the Category drop-down list and select the associated roles for the category from the Role Types area. Click Save.
- Customize Heading: Changes the default heading from Multi-Profile Widget to a custom heading. Enter your custom heading in the Add custom heading field and click Save.
- Update User Settings: Use the following tabs to edit the visibility of individual users, change the category an individual user displays in, and reorder the appearance of users in the widget:
- User Visibility: Change the Visibility toggle for any user. Click Save.
- User Categories: Edit the category for any user. Click Save.
- User Order: Reorder the appearance of users in the widget. Select the role from the Category drop-down. Then select the display order for the users using the number selectors in the Order column. Click Save.
Click Save and Close to view your configuration settings in the widget.