Within the Course Merchant storefront, the customer account system includes some administrative options which are covered here.

Figure: Perform administrative actions from the customer account system.
Order History
The customer has access to a paginated table containing all their orders.
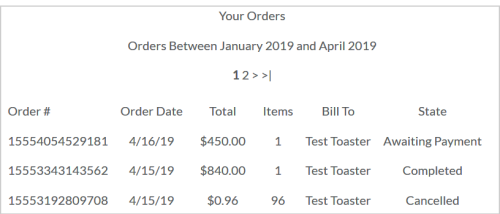
Figure: Customers can view their order history in Your Orders.
The following are column headings:
- Order # - The Course Merchant order number.
- Order Date - Date of the order.
- Total - Total cost of the order.
- Items - Quantity of product in the order.
- Bill To - Invoice name.
- State - Displays whether the order is Awaiting Payment (Invoice pending payment), Completed (Order and payment completed successfully), or Canceled (Order canceled, either at customer request or due to a payment error).
Search the Order History
The customer can search and filter the order history by Order Date, Keyword and sort by Data, A-Z, Z-A and order total.
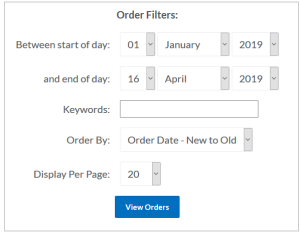
Figure: Filter an order search and click View Orders.
By default, a multiple seat purchase (anything greater than one) always creates an account in the Manage Licenses control panel.
It is possible to allow a customer to opt-in to Manage Licenses, even if they only purchase a single seat. A typical scenario for this arrangement would be a store selling products primarily to children, with payments made by a parent. An example of this is online Driving Theory lessons.
Note: This is a service that the Course Merchant team would need to configure on your behalf. If required, contact Course Merchant Support.
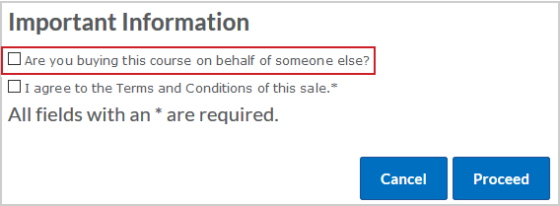
Figure: Select the appropriate checkboxes and click Proceed.
When a customer's Manage Licenses account has been created, they get an email with a link to the Manage Licenses control panel. At this point, no one has been enrolled in the LMS.

Figure: Customers receive a confirmation message when they have a new Manage Licenses account.
They can also access the Manage Licenses control panel via My Account in the storefront top menu.
Manage Licenses Home
When the customer clicks the link in the email or on the storefront, they are directed to the Manage Licenses control panel. The standard order-based Manage Licenses system displays a list of their orders. Customers can then access this list to enroll a learner in one or more of the products and their linked courses comprising the order.
At the bottom of the table, they can review each course, including the number of licenses purchased and how many are remaining. Once all the licenses from an order have been used Click Here to Add Students changes to No licenses Remain in This Order.
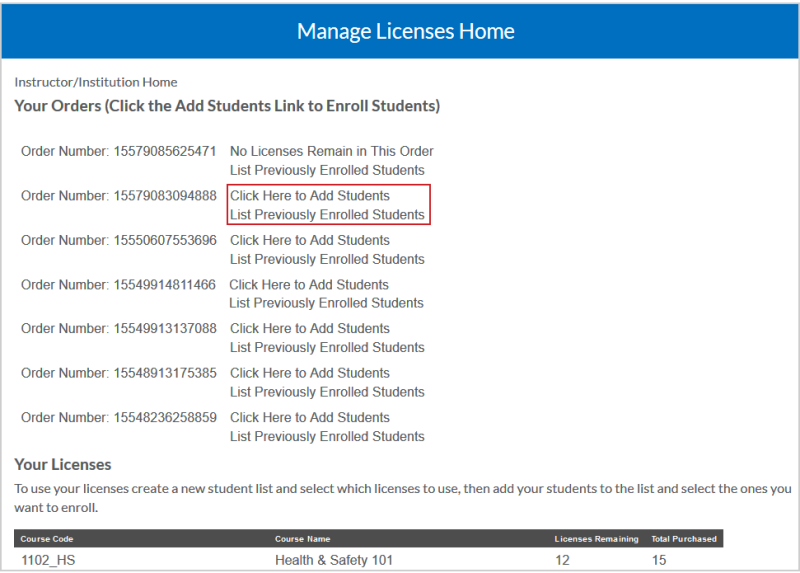
Figure: Add learners or view previously enrolled learners in the Manage Licenses Home.
The following actions are available:
- Click Here to Add Students - This directs them to the learner enrollment menu, where they can add learners.
- List Previously Enrolled Students - This takes them to the Order Details page, where they can view any previously enrolled learners.
Order Details
When a customer clicks List Previously Enrolled Students next to an order, they are taken to the Order Details page.
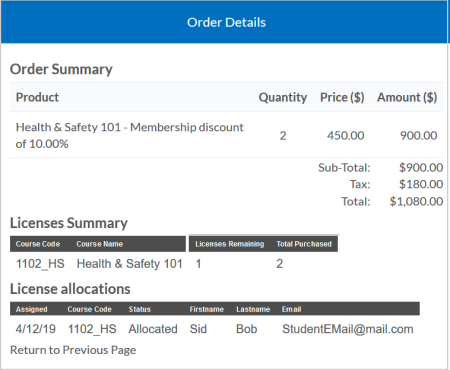
Figure: Click List Previously Enrolled Students and view Order Details.
This page shows the order summary with the total paid and the products purchased.
Under Licenses Summary they can view how many licenses they purchased for each course and how many they have left.
Under Licenses allocation they can see if they have allocated any licenses, and if so to whom and when.

Figure: View how many license allocations were made.
Enroll a Learner
When the customer clicks Click Here to Add Students, the section expands to show the learner options.
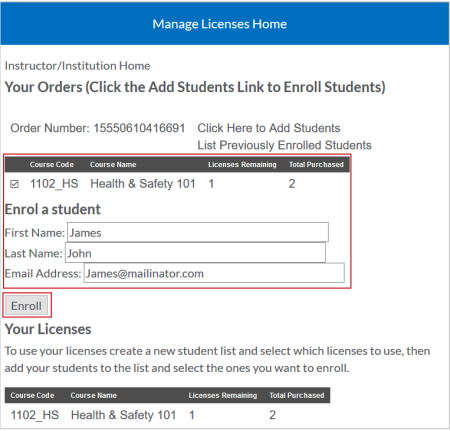
Figure: Customers must enter their information and click Enroll.
The customer needs to enter the learner's First Name, Last Name and Email Address and click Enroll.
The learner is now enrolled within the LMS.
The customer can check their newly added learner in the Order Details page. The number of Licenses Remaining is updated.
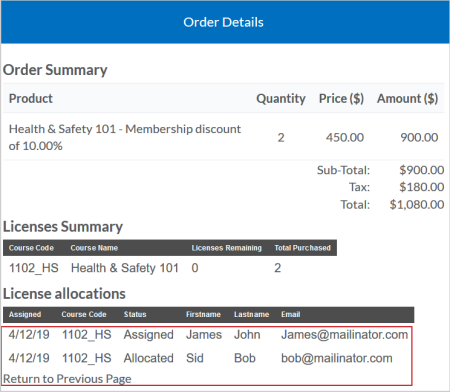
Figure: The number of License allocations updates when a customer is enrolled.
The learner receives an email containing a link to their training, along with an automatically generated username and password (Unless License Tokenization is enabled).
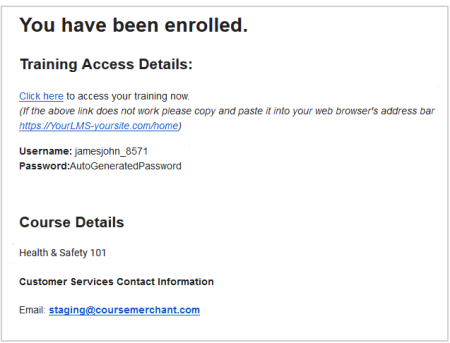
Figure: Learners receive an auto-generated name and password in a confirmation email after enrolling.
If the customer has no licenses available, the text changes to No Licenses Remain in This Order.
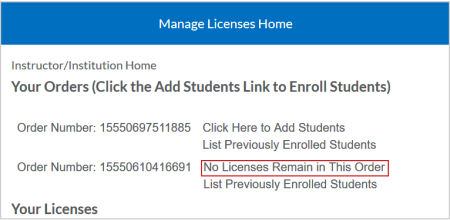
Figure: View how many licenses are left for an order on the Manage Licenses Home page.
Clicking the link displays the courses but does not permit enrollment.
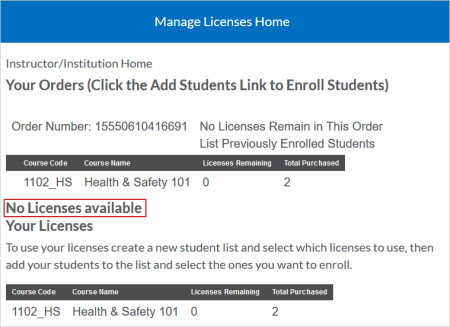
Figure: View how many licenses are available for an order on the Manage Licenses Home page.
Video: Selling Courses when the customer is not the learner
Learners List License Management
An alternative license management system is available. Due to the complexity it is only suitable for stores that have customers buying a large number of seats in a single order.
The customer receives the same email and can access the Manage Licenses control panel in the same way
Note: The list license management has two modes: Normal, allowing for individual learner entry, and Advanced, which supports bulk addition of learners via the web form or by importing from a CSV file.
Manage Licenses Control Panel
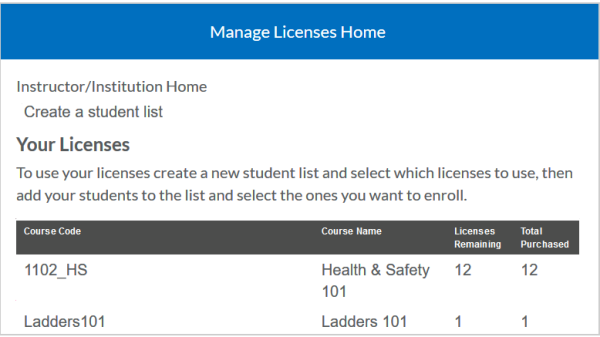
Figure: View your licenses in the Your Licenses section.
The following actions are available:
- Instructor/Institution Home - Returns the customer to the Manage Licenses control panel.
- Create a student list - Takes the customer to the Add a Student List page where they can enroll learners.
The number of licenses purchased and the number remaining are displayed.
Create a Learner List
A learner list is a set of learners who can be enrolled on one or more courses.
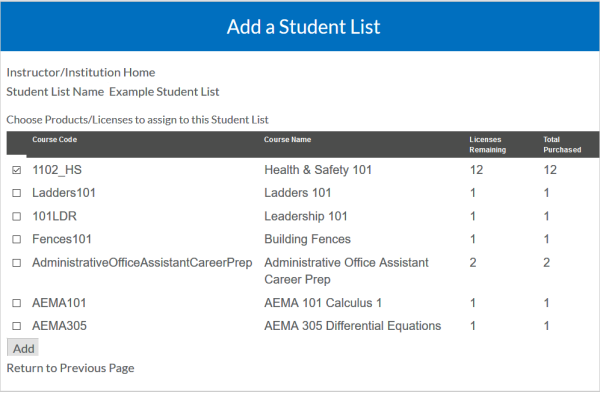
Figure: Enroll learners in courses from the Add a Student List.
The following actions are available:
- Instructor/Institution Home and Return to Previous Page - Returns the customer to the Manage Licenses control panel.
- Student List Name - The name of the learner list.
- Checkboxes - Select one or more courses that learners in this list can be enrolled in.
- Add - Creates the learner list.
Once you create a list, it appears on the Manage Licenses Home page.
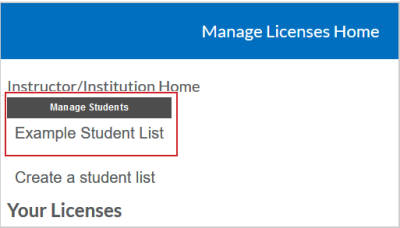
Figure:
Create a Student List to have it appear on the Manage Licenses Home page.
View the Learners List
After creating a new learner list or clicking its name on the Manage Licenses Home page, the customer enters the list editor.
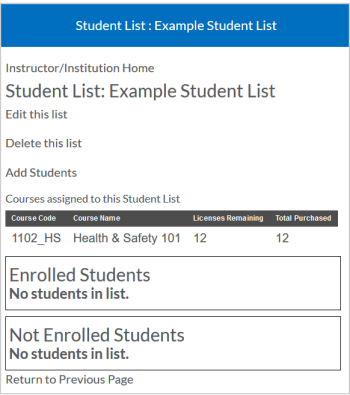
Figure: A Student List shows enrolled and not enrolled learners and can be updated using the Student List Editor.
The following actions are available:
Add Learners to a List
Learners can be added to a list either individually or in bulk. When a customer clicks on Add Students, they are taken to the Add Students page. Learners are not automatically enrolled upon being added to a list.
To add a single learner
You can add one learner at a time using the box at the top of the page.
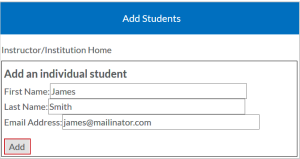
Figure: Fill out the fields for an individual learner and click Add.
- Enter the learner's First Name, Last Name, and Email Address.
- Click Add.
The learner is added to the list and shown under Not Enrolled Students.
To add in bulk via the web form
Multiple learners can be added at once using the web form.
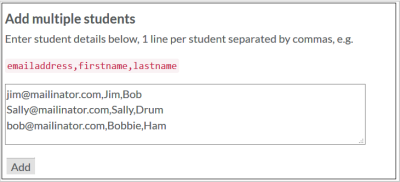
Figure: Use the web form to add multiple learners.
The learner information must be in the following format:
emailaddress,firstname,lastname
For example:
jim@mailinator.com,Jim,Bob
Sally@mailinator.com,Sally,Drum
bob@mailinator.com,Bobbie,Ham
Once you have entered the learners and clicked Add, they appear under Not Enrolled Students.
To add in bulk via CSV
Learners can also be added in bulk by uploading a CSV file.
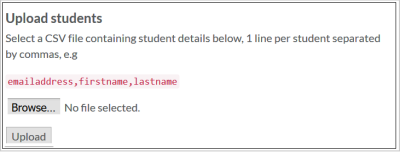
Figure: Click Browse to upload a CSV file of learners to enroll.
The CSV file needs to be in the format as used for bulk upload via web form.
You can download an example CSV file here: Student_Import.csv.
To view added learners
Once learners have been added, they appear at the bottom of the students list as Not Enrolled Students.
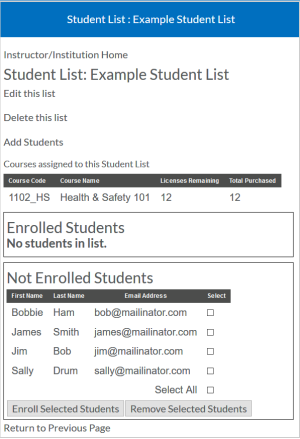
Figure: View newly-added learners in the Not Enrolled Students section.
Remove a not enrolled learner
A learner added to the list but not enrolled in a course can be removed.
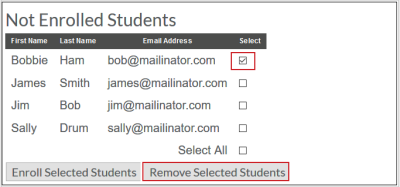
Figure: Select the check box beside a learner's name and click Remove Selected Students to remove them from the Student List.
Select the box next to their name, then click Remove Selected Students. The removal must be confirmed. This change is permanent.
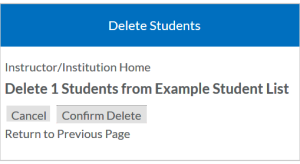
Figure: Click Confirm Delete to remove learners from the Student List.
Enroll Learners from a List
Once learners are added to a list, they must be enrolled before they can access the course.
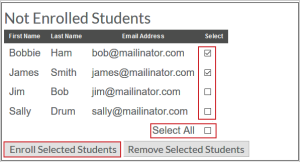
Figure: Click the Select All checkbox and then click Enroll Selected Students to enroll learners.
Learners are enrolled by selecting a single learner or multiple learners and then clicking Enroll Selected Students.
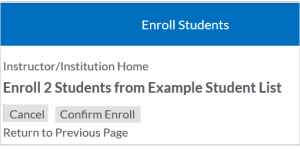
Figure: Click Confirm Enroll to enroll the selected learners.
The customer needs to confirm the enrollment.
Learners are marked as invited in the LMS and receive an email with their login credentials once they are enrolled.
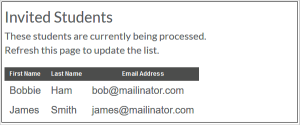
Figure: View learners who were invited to the course in the Invited Students section.
Once you refresh the page, they appear as enrolled learners.
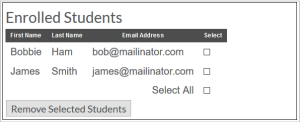
Figure: Reload the page to view learners as enrolled.
The learner receives an email containing a link to their training, along with an automatically generated username and password (Unless License Tokenization is enabled).
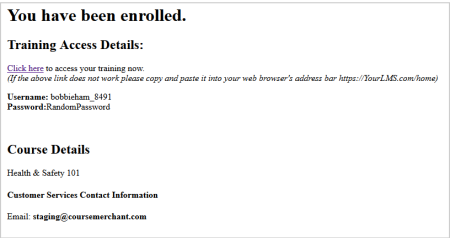
Figure: Learners receive an enrollment confirmation message with login credentials.
In this example, two learners were enrolled, so the course displays two licenses used and ten remaining.

Figure: View Licenses Remaining against the Total Purchased for licenses.
Remove Learners from a List
After a learner is enrolled, they can still be removed from the list, but this doesn't unenroll them from the course. They must by unenrolled in the LMS.
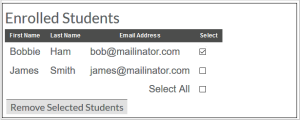
Figure: Remove an enrolled learner from your Student List.
- Click the name of the learners list on Manage Licenses Home.
- Select the learner to remove and click Remove Selected Students.
- To confirm the removal, click Confirm Delete.
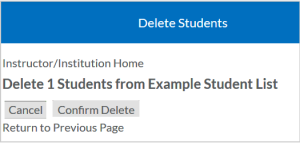
Figure: Click Confirm Delete to remove enrolled learners from the Student List.
- On the Manage Licenses Home page, the learner you removed is no longer on the learner list, but you do not get the license back.
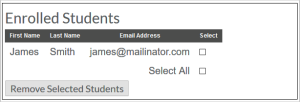
Figure: Removed learners no longer appear on the Student List.
Video: Multi-Seat License Management
Manage License Tokenization is an optional learner enrollment flow. The customer goes through either the order-based (simple) or the learner list (advanced) manage licenses process, depending on the store configuration. The differences are in the email the learner receives and how they go about accessing the course.
Instead of receiving a link to the LMS along with a username and password, a learner receives an email containing course details and a link to redeem the course license.
As the learner goes through the standard account creation flow, you can capture the full range of learner information.
Note: This is a setup that requires the Course Merchant team's assistance. If needed, contact Course Merchant Support.
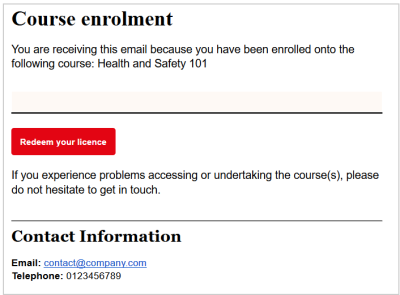
Figure: The enrollment email for a Manage License Tokenization workflow.
When the learner clicks Redeem your license, they are taken to the Course Merchant storefront.
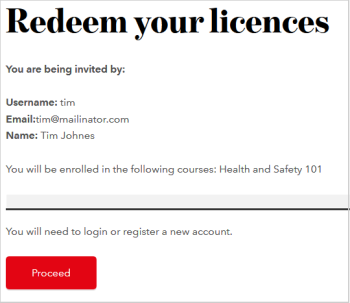
Figure: Learners are directed to the Course Merchant store after clicking Redeem your license.
Here, they can review the name of the inviting customer and the name of the course they are enrolling in.
When they click Proceed, they are taken though the standard account creation flow.
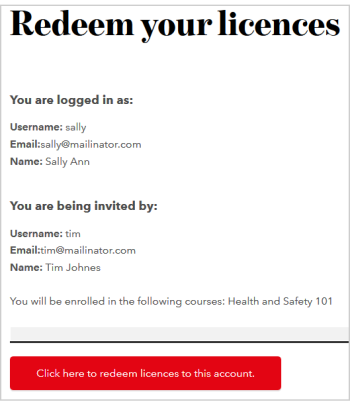
Figure: Learners must click Proceed to be directed to the account creation flow.
After creating an account, they are directed to a screen displaying their current account information and the name of the customer who invited them. Upon clicking to redeem the license, they are directed to an enrollment success page.
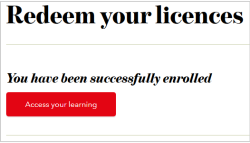
Figure: Click Access your learning to begin a course.
Clicking Access your learning takes the learner into the LMS where they can start their course.
Interstitial Page
If you need to capture more information about learners added to courses via the Manage Licenses system, an option is to implement a customizable interstitial page. Learners can enter additional account data before accessing the LMS and starting their course.
Note: This is a setup that requires the Course Merchant team's assistance. If needed, contact Course Merchant Support.
The following is the enrollment flow.
- The learner receives an enrollment email.
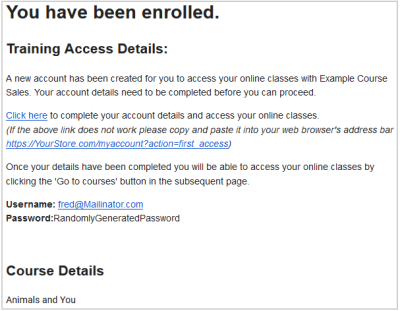
Figure: Learners receive an enrollment email for their course.
-
The learner clicks the link to be taken to the Course Merchant storefront where they are asked to sign in with the username and password they were sent. They are presented with a customizable Interstitial page which asks them to enter some information.
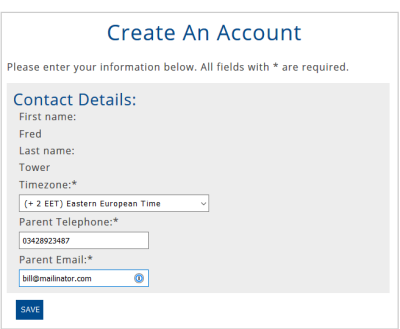
Figure: Learners must enter their Contact Details and click Save to create their account.
Once they have entered the information and clicked Save, they are taken to their Course Merchant account page where they can click Go to courses to be taken to the LMS to start their course.
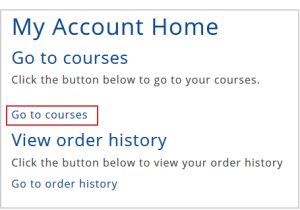
Figure: Click Go to courses to begin a course.
Manage Licenses Notes
The licenses used by customers to enroll learners in a course are Course Merchant licenses; the underlying LMS does not have a concept of licenses.
Course Merchant only consumes licenses when enrollments are performed from the Manage Licenses home page. It will not consume a license if an LMS administrator manually enrolls a learner who is part of a learner list.
If an approved order is canceled or refunded, there are two ways to remove these licenses:
- An LMS administrator can use the Log in As function (where available) to log in as the license holder. They can then navigate to YourCourseMerchantStore.com/manage?action=home, where they can assign all the refunded or canceled licenses to a dummy account.
- Contact Course Merchant Support and we will remove the licenses from the backend.
If Tokenization is enabled on your store, once a learner has been invited to make an account and enroll on the course, they become an Invited Student. A license cannot be revoked from an Invited Student. Once the learner accepts the invite and enrolls in the course, they can be unenrolled from the LMS.
If you want to return a license to a buyer who invited a learner but then changed their mind, do one of the following:
- Have an LMS administrator manually enroll a new learner of the buyer's choice.
- Give them a 100% discount single use voucher constrained to that product.