This topic provides information on mapping LTI registration information between Brightspace (host LMS) and Canvas (destination LMS).
Step 1: Create a new LTI key from the Developer Keys page in Canvas
In Canvas, open your Admin account, and navigate to Developer Keys.
- Click Add Developer Key, and then select Add LTI Key.
- From the Key Settings page, enter the following settings for the LTI key:
- Key Name: [your choice]
- Owner Email: [your email address]
- Redirect URIs: [insert Course Publisher Redirect URL found in Brightspace’s ‘recipient settings’]
- Notes: [your choice]
- To manually configure your LTI tool, click Method and select Manual Entry.
- From the Configure page, enter the following manual entry settings:
- Title: [your choice]
- Description: [your choice]
- Target Link URI: [Insert the Domain found in Brightspace’s ‘recipient settings’]
- OpenID Connect Initiation URL: [Insert Open ID Connect Login URL found in Brightspace’s ‘recipient settings’]
- JWK Method: Public JWK URL URL: [Insert Keyset URL found in Brightspace’s ‘recipient settings’]
Click LTI Advantage Services and turn on the following settings:
- Can create and view assignment data in the gradebook associated with the tool
- Can view assignment data in the gradebook associated with the tool
- Can view submission data for assignments associated with the tool
- Can create and update submission results for assignments associated with the tool
- Can retrieve user data associated with the context the tool is installed in
- Can lookup Account information
Click Additional Settings and enter the following information:
- Domain: [Insert Domain found in Brightspace’s ‘recipient settings’]
- Privacy Level: PUBLIC
- Placements: Assignment Selection, Link Selection
- Assignment/Link Selection: LtiResourceLinkRequest selected
To save your LTI key, click Save.
Step 2: Turn on the new LTI key in Canvas
In Canvas, from the Developer Keys page, set your new LTI key to ON.
Copy the client ID.
Step 3: Add the app in Canvas
In Canvas, open your Admin account, and click Settings.
Click the Apps tab.
Click Add App.
From the Add App page, enter the following information:
- Configuration Type: By Client ID
- Client ID: [paste the client ID copied from Step 2: Turn on the new LTI key]
Click Submit.
 | Note: This can also be done directly at the course-level only. |
Step 4: Create an assignment in Canvas
A Brightspace published course returns a grade value. This means that it must be added as an assignment in Canvas, not a link into a module.
In Canvas, create an assignment.
Enter the following information:
- Name: [your choice]
- Submission Type: External Tool
- Enter or find an External Tool URL: [enter the LTI link to the course you want to launch; do not click Find]
| Note: The course LTI launch link can be found next to the published course within Brightspace Course Publisher. Navigate to
Admin Tools > Course Publisher, select the Recipient's name, and click the Link icon next to course. |
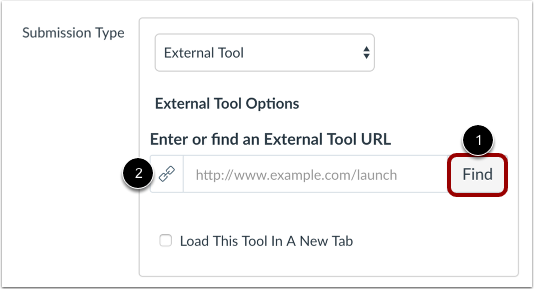
Figure: Enter the course LTI launch link into the Enter or find an External Tool URL field (2). Do not click Find (1).
Save the assignment.
Step 5: Register the Canvas LTI key information in Course Publisher
In Course Publisher, next to the recipient's name, click Recipient Settings.
Enter the following client recipient settings from the Canvas LTI key:
| Note: Ensure there are no spaces at the end of any input values.
|
Note: If your client is connecting to a Canvas Test environment, it changes multiple fields to require https://canvas.test.instructure.com. For example: https://canvas.test.instructure.com/login/oauth2/token.
Figure: Update Public Key URI, Token URI, Authenticate URI, Audience, or Issuer with https://canvas.test.instructure.com, and click Done.
Click Done.

