The purpose of this page is to guide you through the steps of setting up Distributed Administration in your organization's instance of Brightspace.
Before you begin
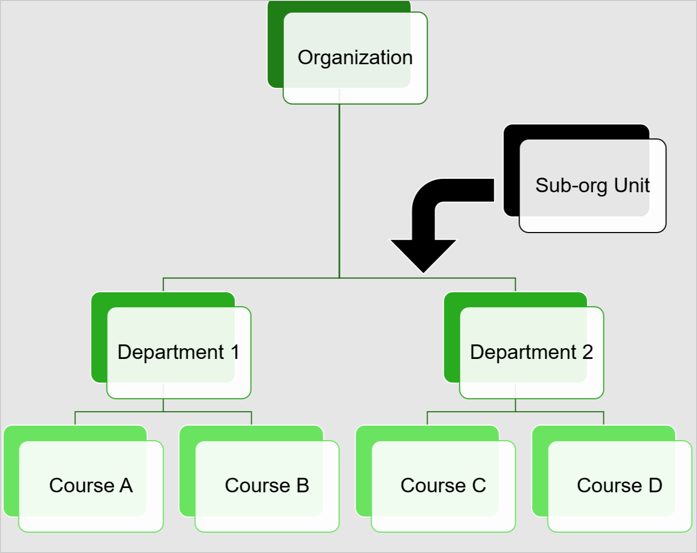
Before you begin setting up, plan the delegated administrative boundary (Sub-org unit) that you want to support, such as a campus, college, school, division, tenant, or location.
To avoid access and visibility issues later, make sure that the hierarchy under the Sub-org unit boundary supports the tasks that Sub-org administrators need to perform. For example, if Sub-org administrators need to manage courses, semesters, departments, or templates, those org units should be structured under the correct Sub-org unit.

|
Note: The Sub-org unit is the highest level a Sub-org administrator can manage. Even though a Sub-org administrator may have access to the Organization level, they can only manage tools within the Sub-org and its child org units.
As an Organization administrator, ensure all child org units you want your Sub-org administrator to manage are created below the Sub-org unit.
|
Key rules for Distributed Administration
- Use a custom org unit type for the Distributed Administration boundary.
- Do not reuse standard org unit types such as Semester or Department for your custom Sub-org unit type.
- Do not assume that visibility and access to tools at the Organization level matches visibility at the Sub-org unit level.
- Users should open tools from the correct Sub-org unit context.
- Semesters, departments, templates, and course offerings should be structured under the Sub-org unit that needs to manage them.
Plan your hierarchy carefully
Before you set up Distributed Administration, make sure your org hierarchy reflects the administrative boundary you want to delegate. For example, if a campus or college is your Sub-org unit, the semesters, departments, templates, and course offerings that administrators need to manage should be structured under that campus or college.
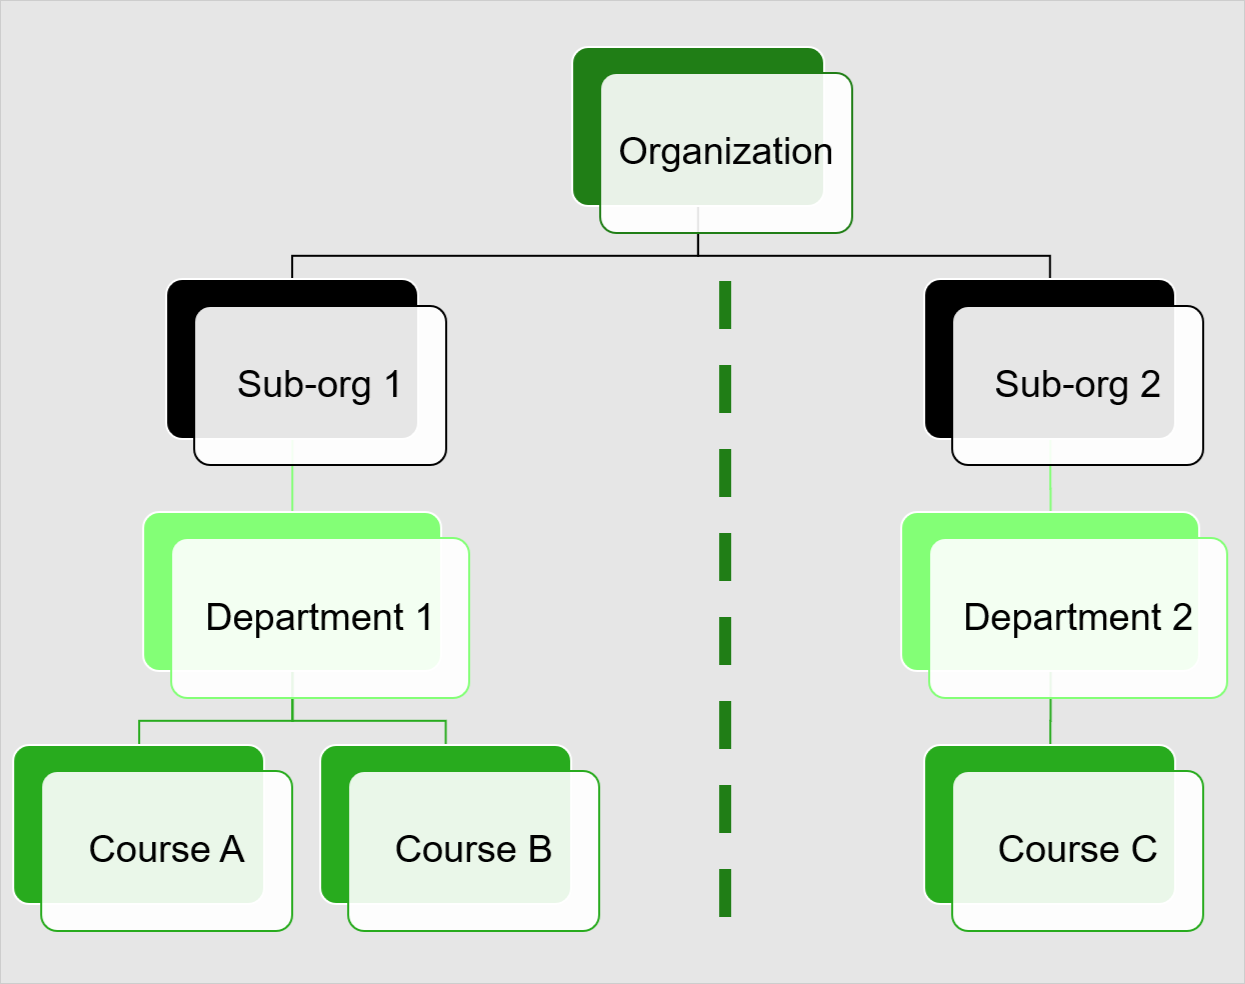
As an org-level administrator, before you set up Distributed Administration, review the permissions and administrative activities you want to delegate to Sub-org administrators. Then plan your org structure so that your Sub-org units and their hierarchy support those tasks.
For example, if Sub-org administrators at a campus or college need to manage courses, semesters, departments, or templates, make sure those org units are structured under the appropriate Sub-org unit.

|
Important: Do not use the same custom org unit type for both the Distributed Administration Sub-org unit and a standard org unit type. Do not share the same semester structure across multiple Sub-org units. Users see only content within their current Sub-org unit context.
|
What this setup includes
After you complete this page, you will have completed the following setup steps for Distributed Administration:
- Set Distributed Administrator configuration variables.
- Create a new custom Sub-org unit Type.
- Create a new Sub-org unit.
- Add your Sub-org unit Type to Roles and Permissions.
- Apply role permissions to your Sub-org administrator role.
- Create and enroll a user as a Sub-org administrator role.
- Create a custom widget to link to the Sub-org unit homepage.
Set Distributed Administrator configuration variables
The first step is to turn on Distributed Administration in your instance of Brightspace using configuration variables.
To set required configuration variables
- Navigate to Admin Tools > Config Variable Browser.
- Search for d2l.Tools.CMS.CoursePathEnforced (Org).
- Set it to ON.
- Click Save.
Distributed Administration is now available for setup in your instance of Brightspace.
Create a new custom Sub-org unit Type
The next step is to create a new custom Sub-org unit Type. This is a custom Org Unit Type that is located below the parent level Organization unit. You must create this Org Unit Type to assign a Sub-org administrator to it and allow them to complete delegated tasks.
|
Important: You must create a new custom Org Unit Type for use in Distributed Administration. Your new Org Unit Type must be named differently than the standard Org Unit Types included in Brightspace. This is to avoid confusion between your custom Org Unit Types and the standard and existing org unit types. The standard org unit types included with Brightspace are semester, department, course template, course offering, group, and section. You can rename standard org unit types. It is strongly recommended that you name your new custom Org Unit Type something distinctive so you can identify it for use by Sub-org unit Administrators. For example, Sub-org unit Type.
For more information about the differences between your top-level (parent) Organization Unit, standard Org Unit Types, and custom Org Unit Types, refer to the Org Units and Org Unit types section of About Org administration.
|
To create a Sub-org unit Type
- Navigate to Admin Tools > Org Unit Editor.
- Click Manage Types.
- Click Create Org Unit Type.
- From the Create Org Unit Type page, enter a Name, Display Name, and Description.
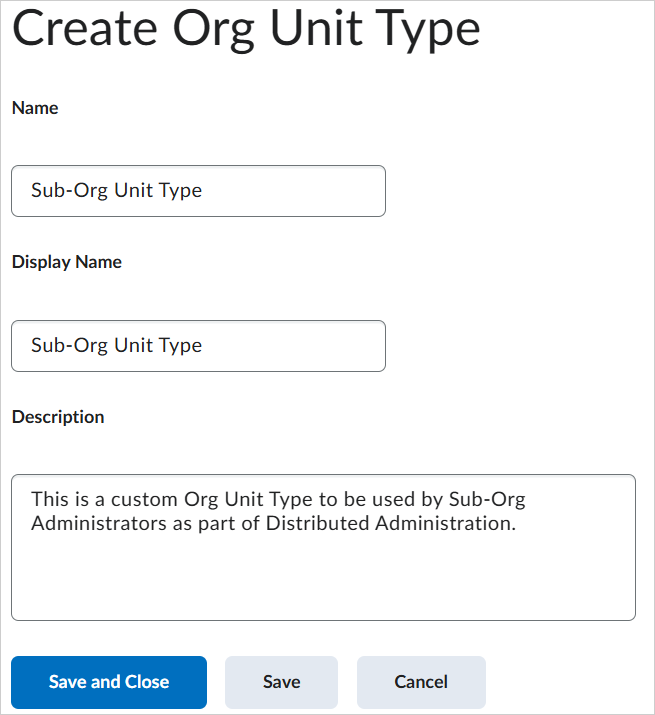
- Click Save and Close.
Your custom Sub-org unit type is created.
Create a new Sub-org unit
Now that you have created a new Sub-org unit Type, you can use that type to create a Sub-org unit with a parent Org unit.
To create a new Sub-org unit
- Navigate to Admin Tools > Org Unit Editor.
- Click Create Org Unit.
- Under Type, select the custom Sub-org unit Type that you created.
- Enter a Name and Code for your Sub-org unit.
- Next to Parent ID, click Select Org Unit.
- Select the top-level Organization unit and click Update.
- Click Create.
You have now created a Sub-org unit for use by a Sub-org administrator.
Create a new Sub-org administrator role
The next step is to create a new Sub-org administrator role to associate with your Sub-org unit type. The Sub-org administrator role is used to assign specific role permissions and enroll users as that role.
|
Important: You must choose to either copy an existing role or create a new role depending on the needs of your Organization. In both cases, set the role as a Cascading Role so that any user enrolled as a Sub-org administrator inherits all org units that fall below the org unit.
|
To create your new Sub-org administrator role
- Navigate to Admin Tools > Roles and Permissions.
- From the Role List page, click Create / Copy and do one of the following:
- Under Choose a roleselect an existing role and click Copy.
- Click Start Fresh to create a new role.
- Complete subsequent steps to create your Sub-org administrator role ensuring that you set the role as a Cascading Role.
Your Sub-org administrator role is created.
Add your Sub-org unit Type to Roles and Permissions
Now that you have your Sub-org unit Type and Sub-org administrator role created, you need to ensure that you can set permissions for the Sub-org administrator role at the Sub-org unit Type level. This means choosing this type and adding it to the available types for your role.
To add your Sub-org unit Type
- Navigate to Admin Tools > Roles and Permissions.
- Locate your new Sub-org administrator role.
- Click Actions for (Arrow icon) > Edit Permissions.
- Click Choose Org Unit Types.
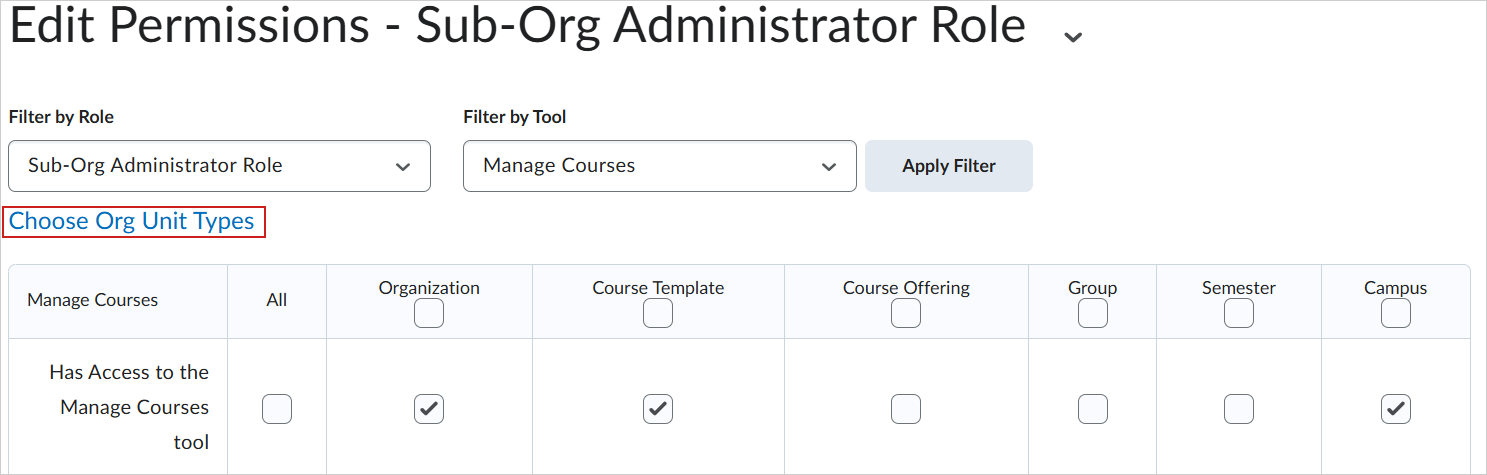
- Select your new Sub-org unit Type from the list of types and click Apply Filter. The Org Unit Types displayed in the Roles and Permission table update to include the selected type.
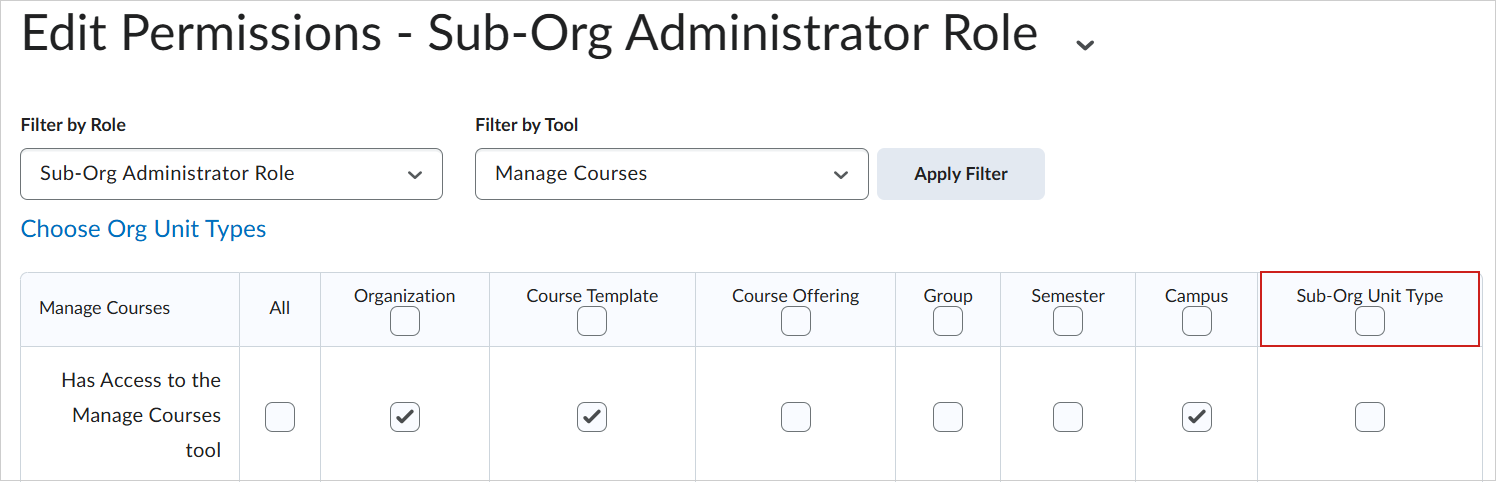
- Click Save and Close.
Now your new Sub-org unit Type is added to the table of Org Unit Types displayed in Roles and Permissions.
Apply role permissions to your Sub-org administrator role
As an Org administrator, you must assign your Sub-org administrator the required role permissions at the Sub-org unit level to ensure they can access and use the tools you want them to use within their Sub-org hierarchy. Customize the role permissions you want your Sub-org administrator role to have. These specific role permissions will vary depending on the needs of your organization.
To apply role permissions to your Sub-org administrator role
- Navigate to Admin Tools > Roles and Permissions.
- Click your new Sub-org administrator role to open the Edit Permissions page.
- From the Filter by Tool drop down menu, select the tool you want to apply permissions for.
- Set any role permissions required and click Save and Close.
Role permissions and tools available to Sub-org administrators
As an Org administrator, you can access administrative tools using the Admin Tools menu by selecting the gear icon beside your user profile. However, Sub-org administrators do not have access to the Admin Tools menu, and must access tools using the Course Admin page of their Sub-org unit homepage. Therefore, as an Org administrator, it is recommended that you add a link to the Sub-org unit homepage navbar to give Sub-org administrators access to the Course Admin page.
|
Important: The tools available to a Sub-org administrator in a Sub-org unit depend on the permissions assigned to the Sub-org administrator role. If you do not assign a required permission, the tool may not appear to Sub-org administrators, or they may receive a Not authorized message when they try to access the tool.
|
Tool
|
Required role permissions
|
What Sub-org administrators can do
|
Relevant links
|
| Announcements |
Announcements > See Announcements
Announcements > Add/Edit/Delete Announcements
|
Create announcements scoped to the Sub-org unit.
|
|
| Courses |
Manage Courses > Has Access to the Manage Courses tool
|
Create courses and course templates.
|
|
| Grades |
Grades > Manage Grades Schemes
|
Create grade schemes for the Sub-org unit.
|
|
| Homepages and Widgets |
Homepages permissions (all)
|
Manage homepage layouts and widgets.
|
|
| Import / Export / Copy Components |
Import/Export/Copy Components > View Copy Course Components Log
|
View copy history and manage course transfers.
|
|
| Navigation & Themes |
Navbars permissions (all)
|
Create and manage navigation and themes.
|
|
| Org Unit Editor |
Org Unit Editor > Can Create and Edit Org Units
Org Unit Editor > View Org Unit Editor
|
Create and manage course offerings and templates.
|
|
| Roles and Permissions (read-only) |
Security > See Roles and Permissions |
Access and view role permissions for users at the Sub-org level.
Important: Sub-org administrators can not create or edit role permissions. They can only view role permissions assigned to users. Access to Roles and Permissions is read-only.
|
|
| Rubrics |
Rubrics permissions (all) |
Create and manage rubrics at the Sub-org level.
|
|
| Source Courses |
Manage Courses permissions related to Source Courses:
|
Create and manage reusable source courses.
|
|
| Users tool and User Merge tab. |
To access Users tool, Sub-org administrators must have the following Users role permissions:
- View the Users' Email Address
-
View Users' Org Defined IDs
-
View User Enrolments
-
Create a User in the Database
-
See the User Management tool
-
Can End Active Sessions
-
Update a User
-
View Users' Contact Information
-
View User Tracking
-
Edit Users' Contact Information
-
Edit the Users' Email Address
-
Edit Users' Org Defined IDs
-
Unlock Locked User Accounts
-
Can Activate or Deactivate Users
-
Reset the Users' Passwords in the Edit Tool
-
Search for Inactive Users
-
Enrol [user]
To access the User Merge tab, Sub-org administrators must have the following role permissions:
- Users> See the User Management tool
- Users > Search for [user]
- Users > View the Users' Email Address
- Users > View Users' Org Defined IDs
- Users > Can Merge Users
- User Information Privacy > See Email Addresses
- User Information Privacy > See Org Defined IDs
- User Information Privacy > See First Names
- User Information Privacy > See Last Names
- User Information Privacy > See Usernames
- User Profile > View Other Users' Profiles
|
Access the Users tool to create users, perform searches, enroll users, or delete users at the Sub-org level.
Access the User Merge tab of the Users tool to view and merge users at the Sub-org level.
Important: Sub-org administrators can not be assigned the Users > Impersonate [role] role permission at the Sub-org unit level and therefore cannot impersonate users at the Sub-org level.
|
|
Create and enroll a user as a Sub-org administrator role
You must enroll new user as a Sub-org administrator role. However, you must ensure that you are not enrolling your new users as a Sub-org administrator role at the Organization level.
To create a user at the organization level
|
Important: From the Organization level, create a new user and assign them a limited organization role. This ensures that the user and their assigned role does not have full administrator access at the organization level. For example, when you create a new user, enroll them as a default learner role to limit their organization level access.
|
- From the Organization home page, navigate to Admin Tools > Users.
- Click New User.
- From the Create User page, fill required fields. As you complete fields to create a new users, ensure that you select an appropriate role for that user. The role selected should reflect the access that you want that user to have at the Organization level. For example, if you want your user to have limited role access at the organization level, select a Learner role.
- Click Save.
To enroll your new user as a Sub-org administrator role at the Sub-org unit level
|
Important: Use the Org Unit Editor to enroll the new user as a Sub-org administrator role at the Sub-org unit level. This gives the user enrolled as a Sub-org administrator role all applied role permissions at the Sub-org unit level.
|
- From your Organization homepage, navigate to Admin Tools > Users.
- Locate the new user you created at the Organization level.
- Click Actions for (Arrow icon) > Manage User Enrollments.
- Locate the Sub-org unit you want to enroll your user in.
- Select the Sub-org administrator role.
- Click Close.
|
Important: You must have the Users > Enroll 'Sub-org administrator' role permission at the Organization level to enroll a new user as a Sub-org administrator at the Sub-org unit level.
|
Enable access to the Sub-org unit homepage
With Distributed Administration, your Sub-org unit can now function as a new homepage for the entire Sub-org. Depending on your organizational needs, the Sub-org unit can be used by your Sub-org administrator to access tools to manage Brightspace, or it can serve as the main homepage for all your users if they only need access to Courses or Org Units under the Sub-org.
Use the Sub-org Unit as a main Landing Page with Custom Login Logic
To direct your users to your Sub-org unit as their primary homepage within Brightspace you can utilize Custom Login Logic. This sends your users right to the Sub-org unit when logging in to Brightspace rather than your Organization homepage.
My Org Units Widget
Adding the My Org Units widget to your Organization homepage will ensure users who need Sub-org unit access can easily navigate there. The widget can be customized to only show select Org Unit Types, and it is recommended to set it to show your custom Sub-org unit type. Refer to
|
Important: You and your Sub-org administrator role must have the My Org Units > See My Org Units tool role permission at the Organization level to access the My Org Units widget on the Organization homepage. Refer to Add a My Org Units widget to an organization homepage for details.
|
Custom widget
If you need something more customized for your organization, you can create a custom widget and configure it to provide a direct link to the Sub-org unit homepage, then place that custom widget on the Organization homepage. This enables Sub-org administrators to click and navigate to their Sub-org unit homepage.
To create a custom widget and add it to your Organization homepage
- Create a custom widget. Refer to Create a custom widget. Add a custom hyperlink to your widget that points directly to the Sub-org unity homepage you created.
- Add that custom widget to your Organization homepage, refer to Add widgets to your homepage.
Once you complete this setup, any assigned Sub-org administrator can access their Sub-Org Admin homepage and begin delegated tasks. For more information on the Sub-Org Admin homepage. Refer to Explore the Sub-Org Admin homepage.
Validate your setup
After you complete setup, confirm the following:
- The Sub-org administrator can access the Sub-org unit homepage.
- The correct tools appear in the Sub-org unit Course Admin page.
- The user is enrolled at the correct level with the intended role.
- The hierarchy under the Sub-org unit supports the tasks that the user needs to perform.