A Backend Product represents an individual date or time when a course takes place. A Backend Product isn't displayed within the storefront until it is linked to a Frontend Product. A Backend Product can only link to one Frontend Product, but a Frontend Product can link to multiple Backend Products.
Important: The availability of this page depends on your implementation. If you have a simplified version of Course Merchant, it will not appear in the E-Store dropdown menu. If you have a more complex implementation with backend products turned on, it will appear below Products Frontend. For more information, contact Course Merchant Support.
The Backend Product List gives you a paginated view of all the Backend Products in your store. You can edit and link them to Frontend Products for display.

Figure: Manage and view products in the Backend Product List.
Column Headings:
- Checkboxes - Allows you to select products to perform bulk actions on.
- ID - This is an internally generated unique item id assigned to each product.
- Item - The Product Name provided in the Backend Product Editor screen. This is how the item is listed in the cart and invoice.
- Sub Title - An optional secondary title that will show up at checkout and some store designs.
- Catalog No. - A unique reference number. This may be used as the product SKU.
- Price - The base price for one unit or seat.
- Status - Whether a product is currently active or inactive. An inactive product isn't shown in the storefront.
- Featured - This is always No because display options are set on Frontend Products.
- Managed - This indicates whether the product is available for purchase in your store.
- Courses - This indicates if there is an LMS course linked to the product or not.
- Qty - The number of items available in the inventory.
Available Actions:
- Edit - Opens the product editor.
- Button - Allows you to generate a buy it now button for this product.
- View - This is not applicable to your custom setup as backend products are only displayed in the store within a frontend product.
Product Actions
Under the products table is a set of buttons used to perform actions on the products.
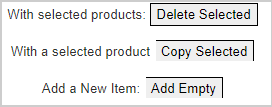
Figure: Click one of the product backend buttons to perform actions.
Available Actions:
Product Item Search
The Advanced Item Search allows you to drill down on the products in your store. Click View at the bottom of the box to execute the search or filtering.
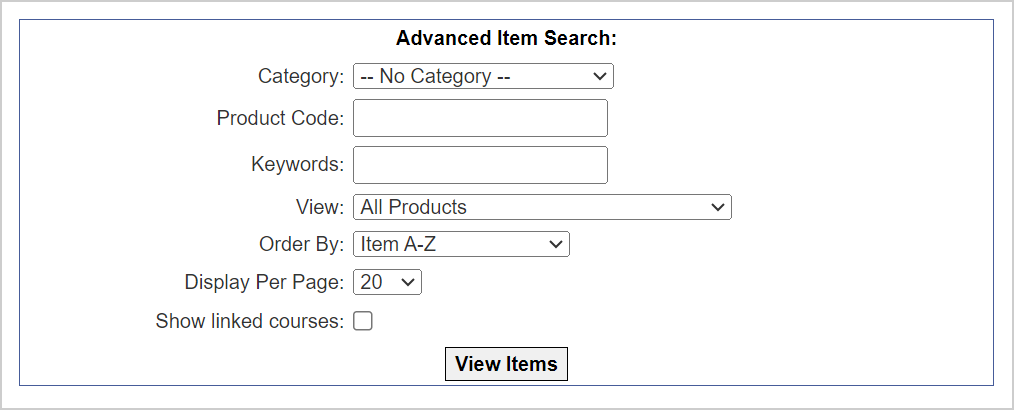
Figure: Use the Advanced Item Search to filter and search for products.
Search Fields:
- Category - Only show products within a specified category.
- Product Code - Searches by the product code, displayed as the Catalog No. in the Products List.
- Keywords - Searches the products in your store for keywords.
- View - View a subset of products:
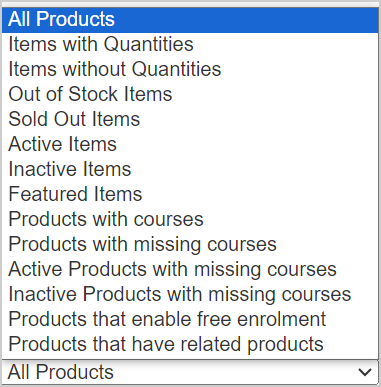
Figure: Use the All Products menu to filter products.
- All Products - Show every product in your store.
- Items with Quantities - Show products with any value in their Qty field, including 0.
- Items without Quantities - Show products that don't have a quantity set.
- Out of Stock Items - Show products with 0 Qty or the Out of stock option selected.
- Sold Out Items - Not currently used.
- Active Items - Products that have been set to active.
- Inactive Items - Products that have been set to inactive.
- Featured Items - Products that have been set to featured.
- Products with courses - Products that have a linked LMS course.
- Products with missing courses - Products that have a linked LMS course, but the link has been broken. This is normally due to the course being renamed in the LMS.
- Active Products with missing courses - Same as Products with missing courses but narrowed down by active.
- Inactive Products with missing courses - Same as Products with missing courses but narrowed down by inactive.
- Products that enable free enrollments - Products with the Is a free enrollment product option selected.
- Products that have related products - Products with related products set.
- Order By - Orders the page or search results.
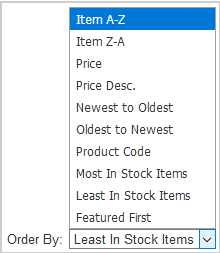
Figure: Use the Order By menu to filter product results.
- Item A-Z and Item Z-A - Sort Item name alphabetically.
- Price and Price Desc. - Sort by Price.
- Newest to Oldest and Oldest to Newest - Sort by date.
- Product Code - Sort by product code alphabetically.
- Most In Stock Items and Least In Stock Items - Sorts by amount of item stock.
- Featured First - Shows Featured items first.

Figure: Click View Items after filtering your product search.
- Display Per Page - Number of products to display per page.
- Show linked Courses - Select this then click View Items to show any LMS courses linked to the product.

Figure: View products linked to courses in the Backend Product List.
When you click Edit next to a backend product, you enter the product editor.
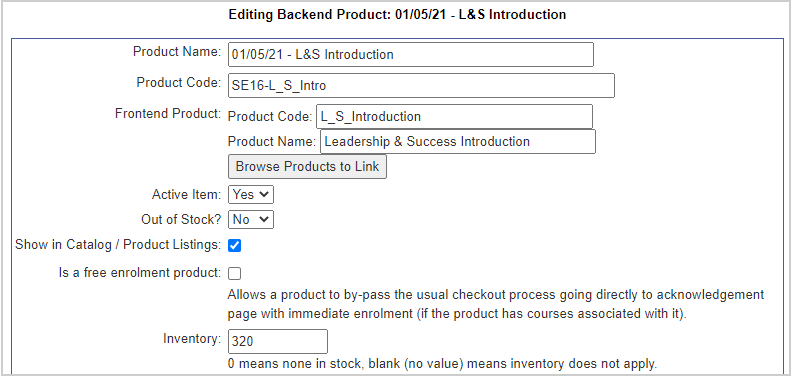
Figure: Edit a backend product using the product editor.
Input Fields:
- Product Name - The name or title of the item being sold.
- Product Code - Catalog code or SKU for the item being sold.
- Frontend Product - You can select one of the frontend products in the store from the dropdown menu. The backend product will be displayed within this product. Click Browse Products to link and select the Frontend Product you want to link to.
- Active Item - Set whether the item is currently active or inactive. If inactive it will not display in the storefront.
- Out of Stock - Whether the item has gone out-of-stock. If it is out of stock it will instead have an option to sign up for a waiting list.
- Show in Catalog / Product Listings - If unselected, the product will not show within the store, but it will be active. Useful for products you only sell via buy it now button or direct links.
- Is a free enrollment product - Allows a product to bypass the usual checkout process going directly to acknowledgment page with immediate enrollment (if the product has courses associated with it).
- Inventory - The number of seats available. When this is zero, the product can't be purchased but the customer will have the option to join a waiting list.
Product Location and Price

Figure: Edit a backend product Location and Prices.
Input Fields:
- Product Location Text Info - Can be used to list the location display in the product list table, it is a free form text field for flexibility.
- Product Type Text Info - Can be used to list the type of product display in the product list table, it is a free form text field for flexibility.
- Prices - Set the price for the product. You can create multiple price levels, the same as in Frontend Product Price and Tax, but the levels do not display on the product page.
Product Visibility

Figure: Control backend product availability by adjusting times for visibility and purchasing.
Input Fields:
- Start Date - Can be used for the display order of products but currently has no other effect.
- Visibility Start Date - The date and time at which a product will start to appear in the catalog. If left blank, the product will automatically display.
- Visibility End Date - The date a product will cease to be displayed in the catalog. The product still exists and may be findable by its direct product URL or Buy Now link even when not visible in the actual catalog.
- Purchasable Start Date - The date and time at which a product can be purchased from. It is possible for a product to be visible, but not purchasable. In this case a customer will be given the option to join a waiting list.
- Purchasable End Date - The date a product will cease to be purchasable. After this date the customer will be given the option to join a waiting list.
Related Products and Membership Discounts
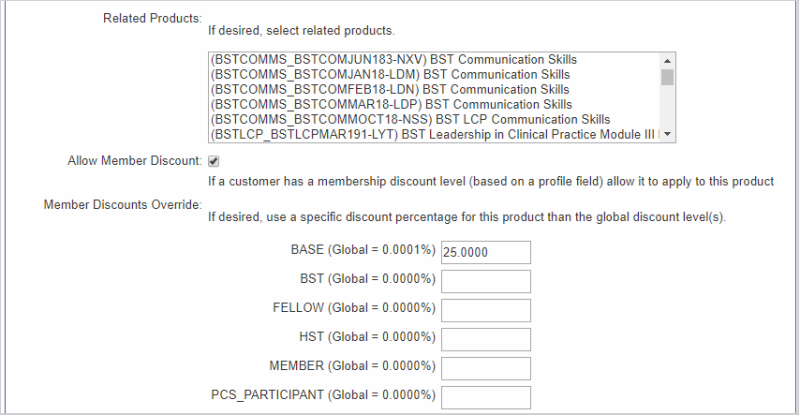
Figure: Manage member discounts for specific products.
Input Fields:
- Related Products - Related products are set against the Frontend Product.
- Allow Member Discount - If a customer has a membership discount level (based on a profile field) allow it to apply to this product.
- Member Discounts Override - If desired, use a specific discount percentage for this product than the global discount level(s).
Product Courses
Course Merchant should be set to query your LMS for your courses. This is how a product is mapped to one or more LMS courses.
There are two course linking methods:
Drop down
You can see the LMS Course Code of any courses linked with this product.
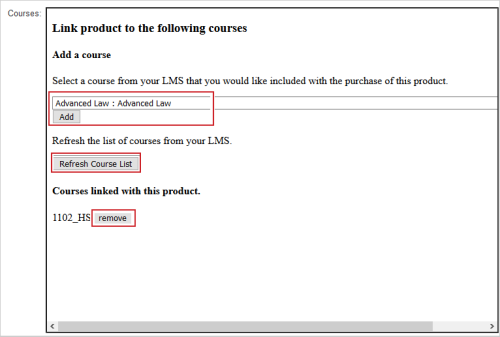
Figure: Link products to courses by clicking Add and remove products from courses by clicking remove.
- Add - Select a course from the drop down and click Add to link a course to this product. You can do this multiple times to add multiple courses. These are the LMS courses Course Merchant will enroll your users on.
- Refresh Course List - This refreshes the course list from your LMS. This is useful if a newly added LMS course isn't showing. This is a site wide refresh.
- Remove - Removes a linked course.
Course Selection Pop Up
For a store with a large number of courses there is an optional course selection pop up. You can see the Course Name and Course Code of any courses linked to this product.

Figure: Manage products linked to courses with Browse Courses to Link and Remove.
- Browse Courses to Link - Opens the pop up window where you can add or more courses to this product.
- Remove - Removes a linked course.
The pop up window shows a paginated table of every course in your LMS.
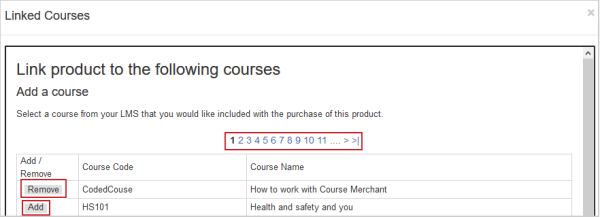
Figure: Link and remove products and courses in the Course Selection pop up window.
- Remove - Removes a linked course.
- Add - Links a course to this product. Once you have added a course to the product its button will change to Remove. Once you are done adding products click Close at the bottom of the pop up window.
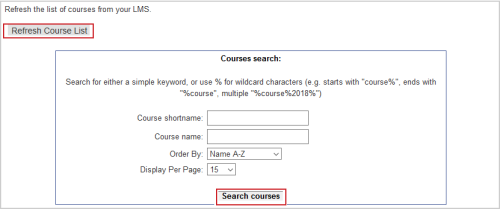
Figure: Use the Courses search section to filter course search results.
- Refresh Course List - This refreshes the course list from your LMS. This is useful if a newly added LMS course isn't showing. This is a site wide refresh.
- Course Search - Allows you to search the courses in your LMS by their Course shortname (LMS Course Code) and Course Name (LMS Course Name).
Once you have entered all the information click Save or Cancel to discard any changes.
When you click Button next to a product you are taken to the Buy It Now Button page for that product.
Every product in the store has a unique "Buy Now" code created for it. This is a link that when clicked will enable instant purchase of the item, without routing the customer via the product description pages.
"Buy Now" code is useful for pasting instant purchase links into emails, onto blogs and onto other websites. Some Course Merchant stores consist entirely of "Buy Now" links pasted into existing non-Course Merchant web pages. This is useful if you have heavily SEO optimized pages on an existing website system and don't wish to start with new web pages. Create the products and then paste the "Buy Now" code into your existing pages.
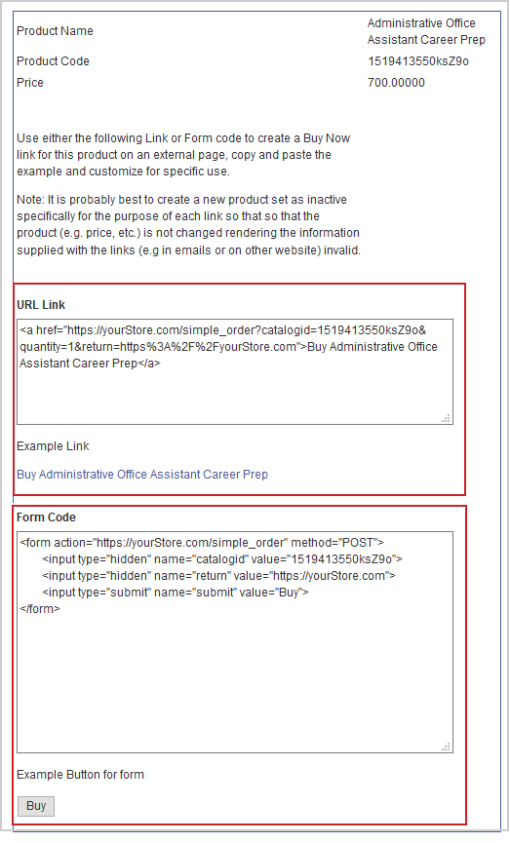
Figure: Optimize search results by editing the URL Link and Form Code.
At the top of the page you can see the Product Name, Product Code and Price of the item you are making a Buy It Now Button for.
- URL link - URL that can be included as a link on a page.
- Form code - This generates a "Buy Now" button which you can place into your page.
Note: Both button codes will do the same job. Choose the one that suits your page's design the best. Also, you can change the description and the return URL, as well as removing those items from the URL itself. You can change the text of the button, for example to "Add to Cart".
Adding a Voucher to a "Buy Now" code
A voucher code may be appended to a "Buy Now" URL. For example, if you have created a voucher code called "special123", this would be added like this:
https://store.yoursite.com/simple_order?catalogid=productcode&vouchercode=special123
Other URL Parameters
- &quantity=1 - This controls how many of the product to add to the cart via the link.
- &return=URL - If you include this parameter then the shopping cart the customer is taken to will include a Continue Shopping button. The URL supplied is where the button will direct the customer to if they click it.
Video: Buy Now Buttons and Social Media