A product is set up so that when it's out of stock, it gives customers the option to sign up for a waiting list to be notified when it comes back into stock. This is useful when you have limited spaces on a course, for example, because tutors become fully booked, or limited stock of a product. Once you add more stock to the product's inventory or have a related product they might like, you can send them an email.
When you enter the Products with waiting lists page, you can find a paginated list of products with waiting lists.

Figure: View products with a waiting list on the Products with waiting lists page.
Note: The column headings are the same as in the Frontend Products List.
To search the products waiting lists
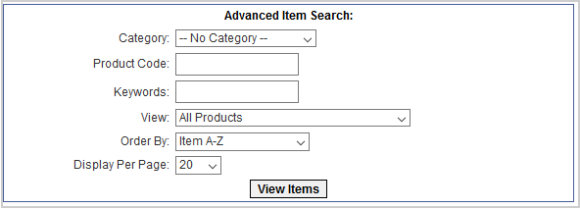
You can search and filter the products waiting lists using the Advanced Item Search.

Figure: Use the Advanced Item Search to filter products on the Products with waiting lists page.
Note: The search controls are the same as the Frontend Product Item Search.
View the Waiting List
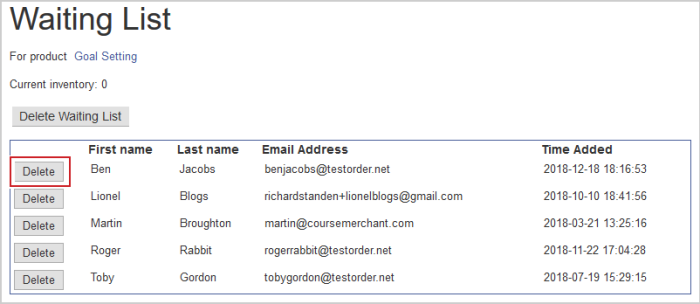
When you click View Waiting List, you are taken to the Waiting List page for that product.

Figure: View and remove users from waiting lists on the Waiting List page.
Note: You can click the name of the product to view it in the storefront.
The following actions are available:
- Delete Waiting List - This deletes the whole waiting list.
- Delete - You can remove an individual person from the waiting list, for example at their request.
Process Waiting List
Once you have added more stock to the product or if you have another product you think might interest those on the waiting list, you can email them.
Note: By default, after an email is sent to a waiting list, it is cleared. This means you can only send someone one email until they sign up to the list again. There is a store configuration option that keeps a person on the waiting list when an email is sent to them. If you would like this enabled, contact Course Merchant Support.

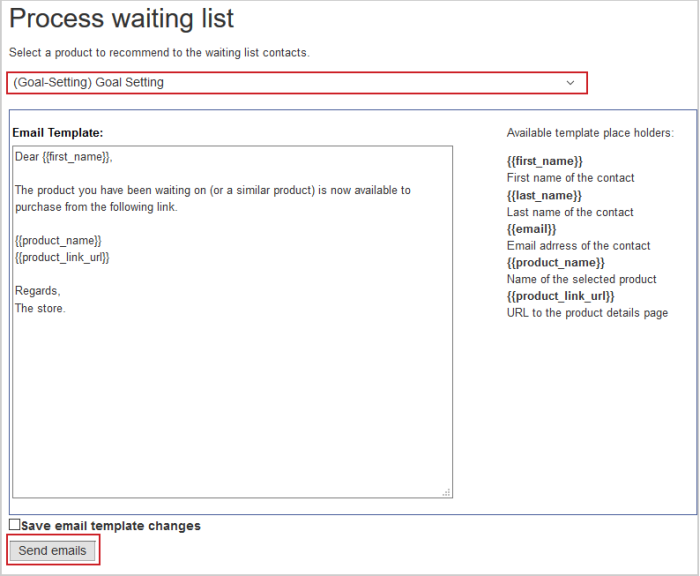
Figure: Inform users of open spots for a product on the Process waiting list page.
The following are input fields and available actions:
- You can select a different product from the drop-down at the top, this changes the {{product_name}} and {{product_link_url}} placeholders in the template. This is useful if you want to recommend a different product to those on the waiting list.
- You can edit the Email Template to change the body of the email sent. Note the Available template place holders.
- Save email template changes - Selecting this box saves any changes to the email template, but only if it is sent.
Note: -This template is shared with all waiting lists.
- Send Emails When you click this, an email is sent to everyone on the waiting list.
Note: By default, this clears the waiting list for this product. A new waiting list is made once someone signs up again. There is a store configuration option that retains the waiting list when a product email is sent. If you would like this enabled, contact Course Merchant Support.
Selective Products Waiting Lists
The selective products waiting list is an optional feature that allows you to choose which waiting list members to send an email to.

Figure: Choose which list members to send an email to with the selective products waiting list feature.
The option adds a checkbox to each waiting list member and an additional checkbox underneath the email template.
By default, you can send an email to every member of the list. However, if you check the box next to one or more waiting list members, the Send only to selected users option is automatically selected, showing you how many users you are sending to.

Figure: Select the Send only to selected users checkbox to send product vacancy emails to certain users only.
Now if you click Send emails, only the selected members have an email send to them. Depending on your store's configuration, they are either removed from the waiting list (Default) or left on the waiting list (Option).
Waiting List - Customer View
An example of how the waiting list looks in the storefront is provided here. How it looks on your store depends on how your template has been set up.

Figure: Click Join Waiting List to register for a product's waiting list.
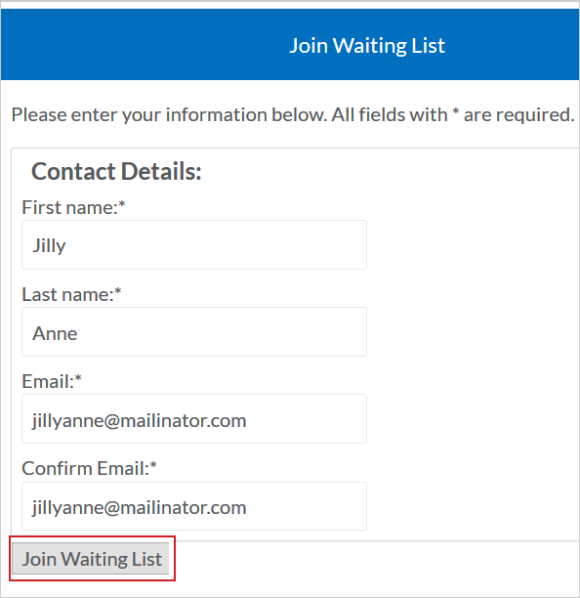
When a customer clicks Join Waiting List, a new page opens where they can enter their details.

Figure: Click the Join Waiting List option after filling in the required fields.
Once the customer has filled in their information and clicked Join Waiting List, they are added to the list and shown in the admin area.

Figure: The customer appears on the Waiting List for a product after joining.
The customer is now on the waiting list.
Video: Waiting Lists