Use the Courses tool to create, copy, and search for courses or course templates.
Before you begin to create a new course, make sure you:
- Have the correct permissions to access and add Courses in Brightspace.
- Know the name, Department, and Semester of the course.
- (optional) Select an existing course template to use as a starting point for the course.
For more information about how the system manages Departments, Semesters, and available Templates, refer to Courses configuration variables.
Important options when creating a new course
The following course creation options available to you when you create a new course are directly controlled by the Courses configuration variables:
- Associations with Departments or Semesters: When you are create a new course, the ability to associate your course with a Department, Template, and Semester is controlled by Courses tool configuration variables. These configuration variables control whether you must select a Department or Semester when creating a course.
- Automatic Course Template creation: You must also set whether a new Course Template is automatically created when you create a new course based on configuration variable settings.
- Selecting or forcing a course Locale: The ability to select a Locale and Force Locale is controlled by a Courses tool configuration variable.
Creating Departments or Semesters
The ability to create a Department or a Semester requires you to have the following Org Unit Editor permissions:
- Org Unit Editor > Can Create and Edit Org Units.
Create a new course with the Courses tool
Watch this video to learn how to create a new course with the Courses tool. Review the written steps below.
Creating a new course involves choosing a name for the course, identifying the correct Department.

|
Important: When you create a new course, Brightspace automatically enrolls you into the new course. Your role in this new course is based on the role assigned to you in the top organization level.
For example, if you are an administrator role at the top organization level, and you create a new course from that level, you are automatically enrolled in that new course as the same administrator role. If you create a new course at the Department Org Unit level, even if you are enrolled in that Department as a different role (for example, an instructor role), you are still enrolled in the course as an administrator, because that is the role you are at the organization level.
If you are operating as a Sub-Org Administrator in a Distributed Administration setup, the same logic applies. If you access the Courses tool from your Sub-Org Unit level, and create a new course at that level, your are automatically enrolled in the new course as a Sub-Org Administrator role. For more information about Distributed Administration, refer to About Distributed Administration.
|
To create a new course
- From your course homepage, click Admin Tools > Courses.
- Click Create Course.
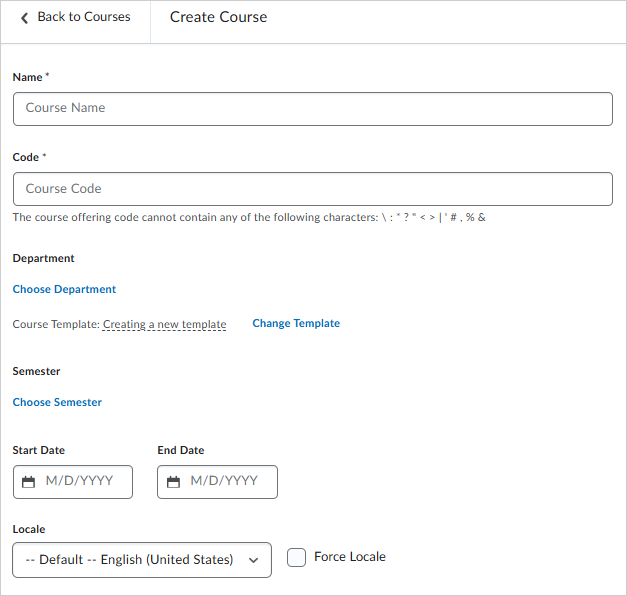
- Enter a required course Name and course Code.
-
To associate your course with a department, click Choose Department and do one of the following:
-
Search for an existing department, select that department, and click Done.
-
Click Create Department, enter a required department Name and Code, click Save, and then click Done.
-
To change the template applied to your new course, click Change Template and do one of the following:
-
Search for an existing course template, select that template, and click Done.
-
Click Create Course Template, enter a required template Name and Code, click Save, and then click Done.
-
To choose the semester applied to your new course, click Choose Semester and do one of the following:
-
Search for an existing semester, select that semester, and click Done.
-
Click Create Semester, enter a required department Name and Code, click Save, and then click Done.
-
To set availability dates for your course select a Start Date and End Date.
-
Select a Locale from the drop-down menu. Select Force Locale to use that selected locale to override the org-level locale set by default.
-
Click Save or click Save and Manage directly to the Course Admin page for your new course.
Your new course is created. You can search for and locate your new course using the Courses tab of the Courses tool.
Copy a course with the Courses tool
Watch this video to learn how to copy a course with the Courses tool. Review the written steps below.
You can use the Courses tool to search for and copy existing courses.
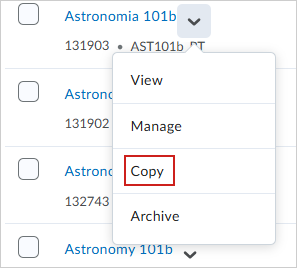
To copy a course
- From your course homepage, click Admin Tools > Courses.
- Optionally use Filters and Search Courses, or scroll to review all available courses.
- Click the drop-down menu next to a course and select Copy.
-
From the Copy Course page, update the required Name and Code for the course.
-
Optionally associate the course with a Semester.
-
Optionally choose a Start Date and End Date for the copied course.
-
If you want to make the course active and visible and accessible to users, click the Active toggle.
-
Do one of the following:
The selected course is copied.
Copying courses with the Courses tool: Frequently Asked Questions (FAQs)
The following section answers questions about copying a course using the Courses tool.
Are course components copied to the new course?
When you copy a course using the Courses tool, Brightspace does not copy any course components from the original course, such as Activity Feed or Discussions. When you copy a course with the Courses tool, it only copies the course details for the purpose of creating a new Course Offering.
You must copy course components into your copied course using the Import, export, or copy course components workflow to ensure those components are included in your copied course.
Are Organization tools settings copied to the new course?
When you copy a course using the Courses tool, the Organization tools visibility are derived from the Organization level defaults you set, not the course you are copying from. You can set Organization level tools by navigating to Admin Tools > Organization Tools and selecting the Org Unit Defaults tab. The default availability of tools that you set at the organization level is included as the default in your copied course. For more information about how to set the default organization tools available in your org unit, refer to Set tool availability.
Once you copy your course, you can set course-specific tool availability by accessing your course and navigating to Course Admin > Tools. This enables you to set the tool availability in your copied course and overwrite the organization level defaults. Refer to the Set Course level tool availability of the About course administration page for more details.
If you use a copy course components workflow to copy components into your course, the tool statuses of the original course are included when you select Copy All Components. There is no option to specify tool statuses when you use the Select Components option to specify specific course components. Refer to Import, export, or copy course components for more details about copying course components to your new course.
Create a new course template with the Courses tool
Watch this video to learn how to create and archive a course template with the Courses tool. Review the written steps below.
If you need to create multiple courses or if your organization requires you to follow specific course guidelines, course templates can make it much faster to create individual courses. A course template is a container used to attach similar courses to the same department. It does not impact the content or design of a course. Creating a new course template with the Courses tool involves selecting the course you want to create a template from, selecting a name, and customizing other settings before saving it.
To create a new course template
- From your course homepage, click Admin Tools > Courses.
- Click the Templates tab.
- Click Create Template.
- Enter a required template Name and Code.

- If you want to associate your template with a department, click Choose Department and do one of the following:
- Search for an existing department, select that department, and click Done.
- Click Create Department and enter a required department Name and Code.
- Click Save, and then click Done.
- Click Save or click Save and Manage to navigate directly to the Course Admin page for your new course template.
Your course template is created. You can search for and locate your new course template using the Templates tab of the Courses tool.
Import course components into your course template
Once you have created a course template, you can import course components into your course template using Import/Export/Copy Components.
To import course components into your course template
- Navigate to Admin Tools > Courses.
- Click the Templates tab.
- Click a Template Name to navigate to the Course Administration page for that template.
- Click Import / Export / Copy Components.
- Select Copy Components from another Org Unit.
- Click Search for offering to search for the course you want to copy.
- In the Select Course Offering dialog, search for a course and select it.
- Click Add Selected.
- Click Copy All Components to copy all the components from the course. Alternatively, click Select Components to copy specific course components:
- Select all the components you want to copy and click Continue.
- If desired, select Offset all dates of copied components and choose the date range.
- Click Finish.
The components are copied into your course. To copy additional components, click Copy Another Package.
Add a course image to your course template
You can also use Import/Export/Copy Components to add a course image to your course template.
To add a course image to your course template
- Navigate to Admin Tools > Courses.
- Click the Templates tab.
- Click a Template Name to navigate to the Course Administration page for that template.
- Click Course Admin > Import/Export/Copy Components.
- Select Copy Components from another Org Unit and click Search for Offering.
- Click Select Components.
- Select Course Appearance > Select individual items to copy.
 | Note: You can view the course banner image from the Manage Files tool. However, it does not automatically appear in the form elements after you copy it. Refer to About Manage Files for more details. |
- Click Continue.
- Select the image you want to copy.
- Click Finish.
Add a custom footer to your course template
You can also add a custom footer to your course template. You can optionally use a Creator+ Template provided by D2L.
To locate and download the custom footer template zip file
- Log in to Brightspace Community.
- In the Learning Centre, navigate to the ID Best Practices Course.
- Download the Creator+ Template Zip File and save it locally.
- Select a template and customize it by adding your custom footer:
- A basic footer typically contains copyright information, contact details, or links to legal information and privacy policy. Below is an example of a basic HTML footer:
<footer><br/><p>©[Client]</p><br/><p><img src="../img/logo.png" alt="logo"></p><br/></footer> - Use CSS to style the footer, enhancing its visual appeal and ensuring it aligns with your organization's design theme. Update or archive the <img> element as needed if you want your institution's logo to be displayed.
Once you have customized your footer using the template, you can upload it to your course template in Brightspace.
To upload and apply your custom footer to your course template
- Navigate to Admin Tools > Courses.
- Click the Templates tab.
- Click a Template Name to navigate to your course template.
- Click Admin Tools > Public files.
- Upload your customized template.
- Navigate to your course and select Content.
- Select a Unit and click Create New > Page.
- Enter a required Page Title. You can also add a Due Date and Standards.
- Click Select Template and choose your customized template.
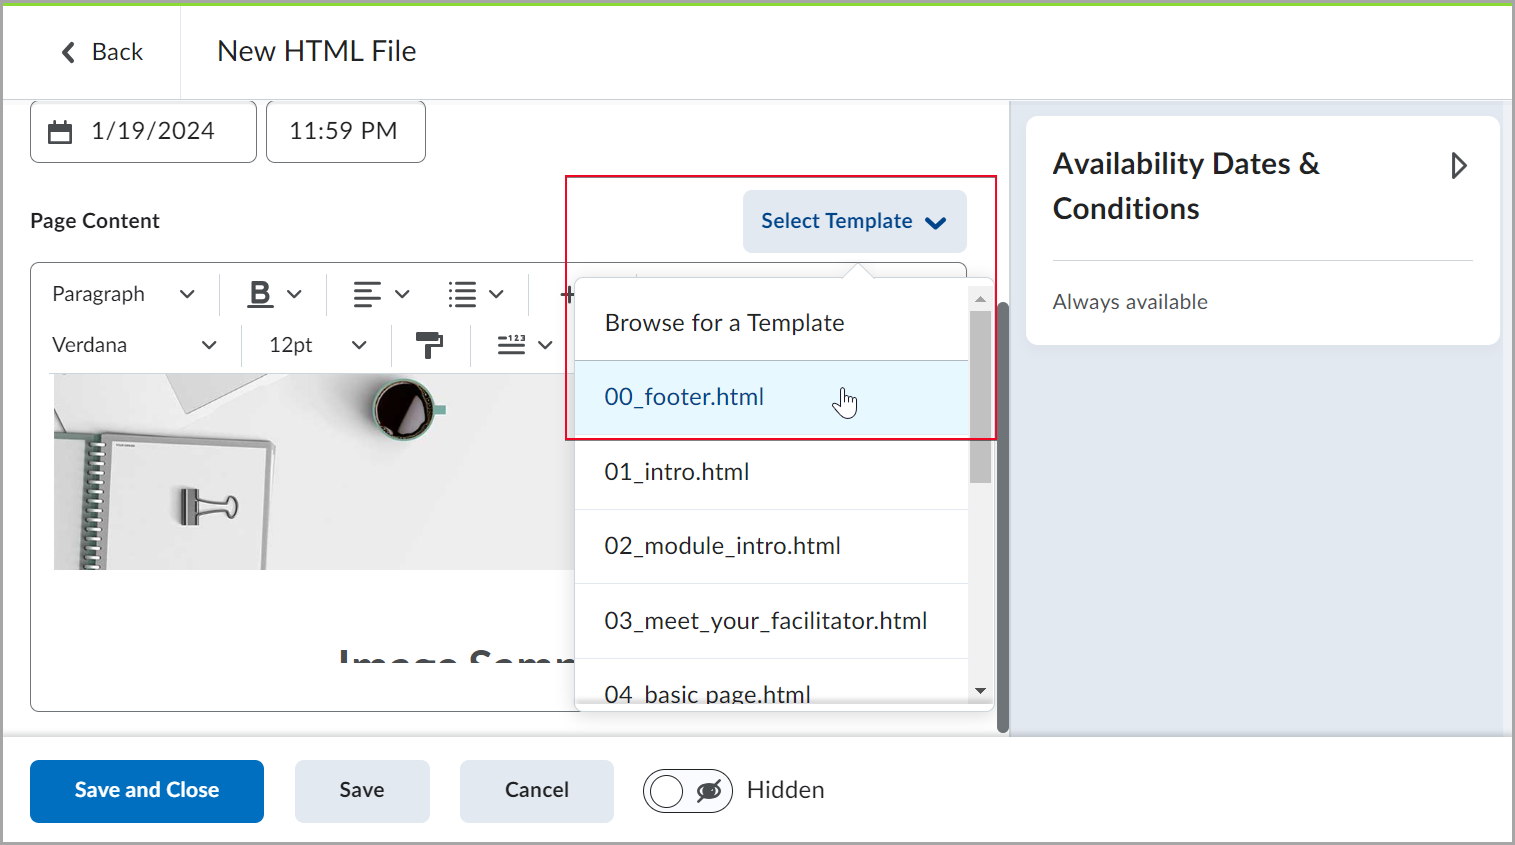
- Click Save and Close.
Make a course offering active or inactive
Activating a course makes the course appear to learners. Activating a course also makes it available to learners if you have not set a Start Date or End Date for your course. You can also deactivate a course offering to hide it from learners without actually deleting it. This way the content (including user data) can be kept for future use.
To activate your course
- From the Admin Tools menu, click Courses.
- From the Courses tab, search for your course offering.
- Click the course offering you want to activate.
- On the navbar, click Course Admin > Course Offering Information.
- Select the Course is active check box. Clear the check box to make your course inactive.
- Click Save.
Archive courses or course templates
Archive courses or course templates individually or in bulk.
|
Important: You can only archive a maximum of 50 selected courses at a time. Archived courses and course templates are placed in the Archived Org Units page in the Org Unit Editor. To permanently archive courses, you must navigate to Admin Tools > Org Unit Editor > View Archive. Select the courses or course templates you want to delete permanently, and click Delete Permanently. Refer to Create and archive org units for more details.
|
To archive courses or course templates
- From your course homepage, click Admin Tools > Courses.
- From either the Courses tab or the Templates tab, do one of the following:
- To archive an individual item, click the context menu next to a course or template and select Archive. Click Archive again to confirm.
- To archive multiple items, select the items and click Archive. Click Archive again to confirm.
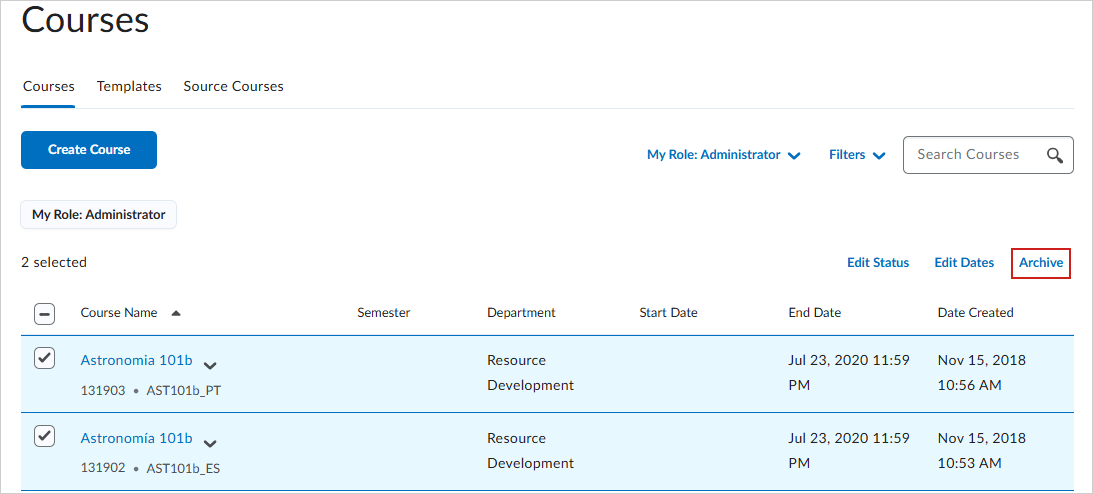
You have archived the selected courses or course templates.
Bulk update course status and dates
Watch this video to learn how to bulk update course status and dates using the Courses tool. Review the written steps below.
You can select multiple courses to bulk change their active and inactive statuses, or bulk change their start and end dates.
|
Important: You should only use the Courses tool to perform bulk updates in systems where course dates and statuses are not managed through an external system such as a Student Information System (SIS). If your courses are managed by SIS integration, bulk updates to status and start and end dates using the Courses tool can cause the values to revert. Contact your D2L Account Manager for guidance.
We do not recommend that you use the Courses tool to perform bulk updates in environments where instructors are permitted to set course dates and statuses individually. Your bulk update actions will overwrite instructor settings.
You must have the following Manage Courses permissions to perform bulk updates to courses from the Courses tool:
- Manage Courses > Change Status
- Manage Courses > Change Start and End Dates
|
To bulk edit the status of selected courses
- Navigate to Admin Tools > Courses.
- From the Courses tab, select courses that you want to edit and click Edit Status.
- From the Edit Status dialog, select one of the following:
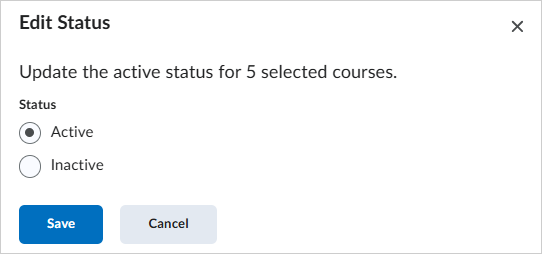
- Active: All selected courses are made active and are visible to users.
- Inactive: All selected courses are made inactive and are not visible to users.
- Click Save.
To bulk edit the start and end date of selected courses
- From the Courses tab, select the courses that you want to edit and click Edit Dates.
- From the Edit Dates dialog, under Course Start Date or Course End Date, select one of the following:
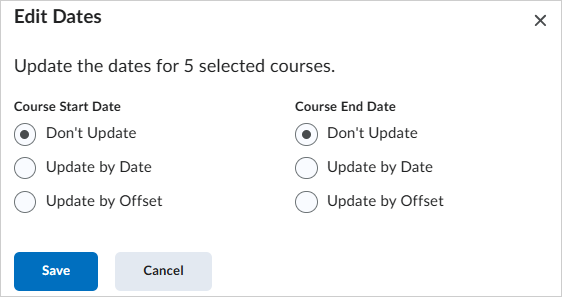
- Don't Update
- Update by Date: Enter a Start Date/Time in M/D/YYYY format.
- Update by Offset: Enter the number of days to offset your course start date or end date and choose to offset the number of days Forwards or Backwards.
- Click Save.
|
Important: From the Courses tab, you can click Load More to load and select up to 250 courses at a time. The system allows you to choose how many courses to display in increments of 50, 100, 150, 200, or 250.
The number of courses displayed when selecting Load More is controlled by the d2l.Tools.Courses.LoadmoreIncrement (OrgUnit) configuration variable.
Refer to Courses Configuration Variables for more information.
|