Create and insert a Video Note in Brightspace Editor
You can use Video Note in a number of places throughout Brightspace, including: Content, Discussions, Activity Feed, and even when grading and providing feedback to learners.

|
Note: The ability to add video notes is controlled by a permission set by your administrator. If you do not see the Add Video Note option, you do not have the required permission. |
Create and insert a Video Note using the New Content Experience
- Navigate to Content.
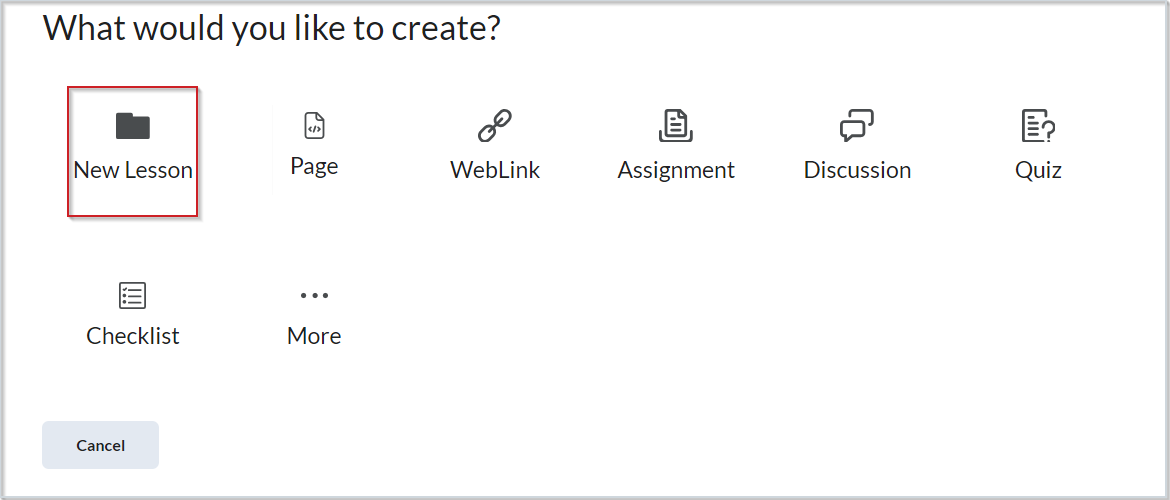
- In the module where you want to add your Video Note, click Create New > New Lesson.
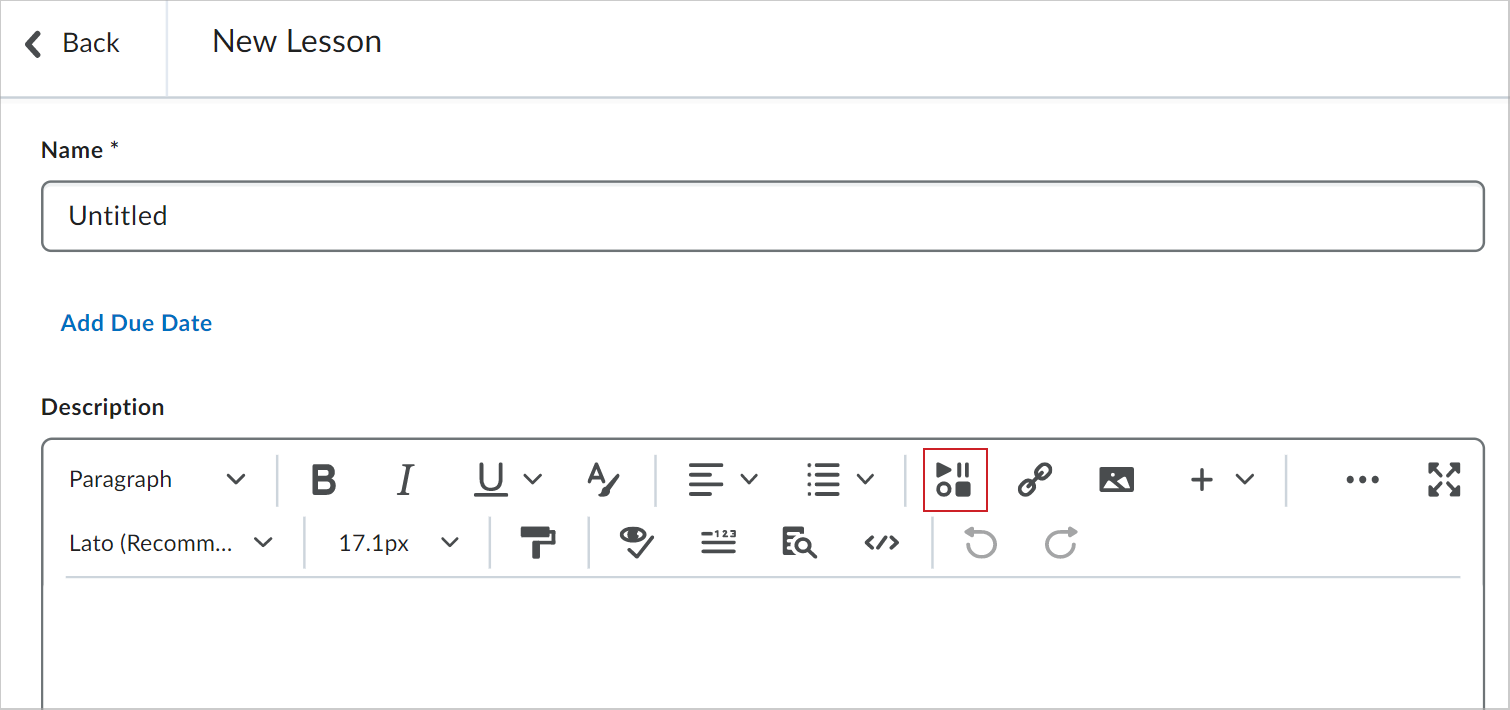
- In Brightspace Editor, click Insert Stuff.
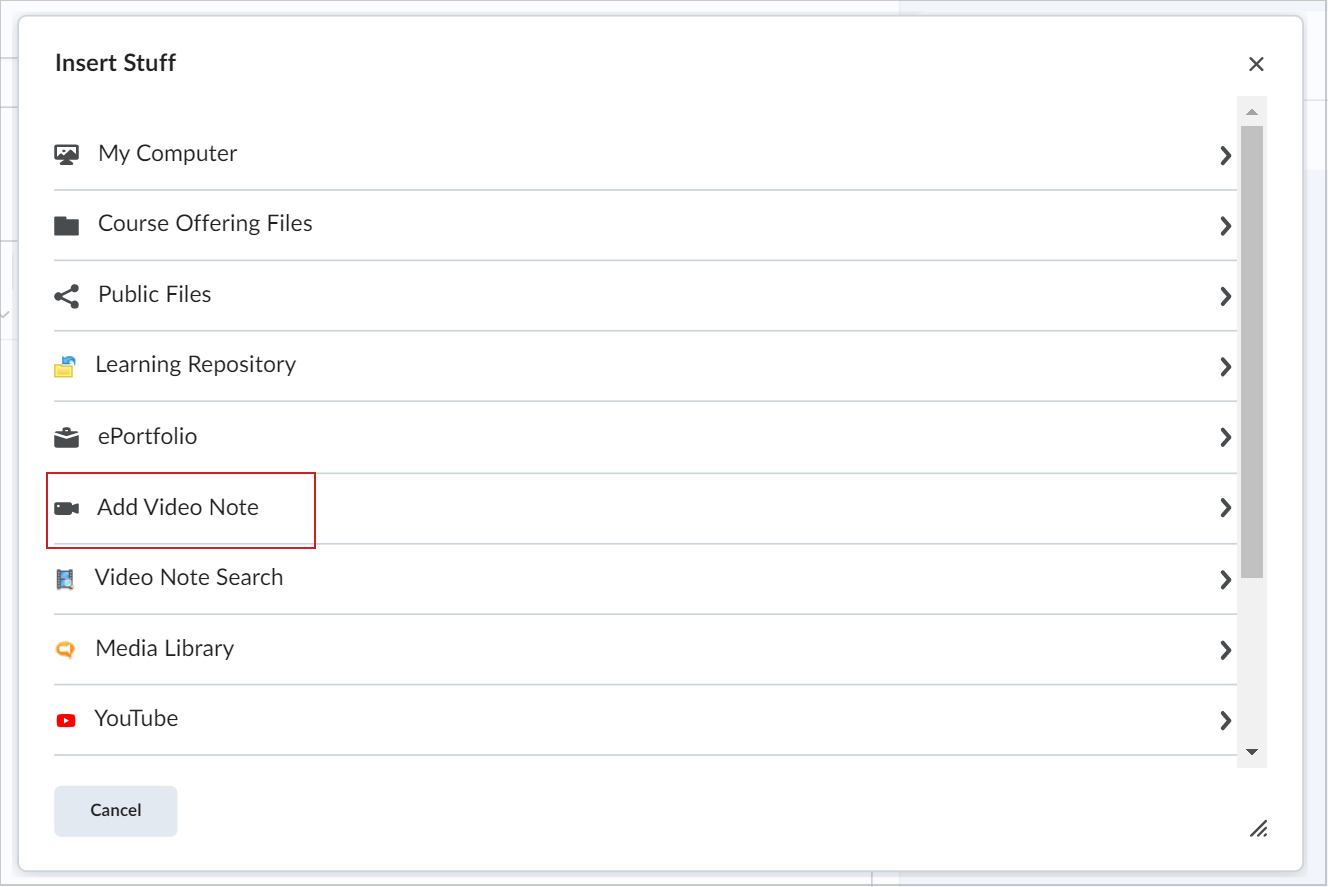
- In the Insert Stuff dialog, click Add Video Note.
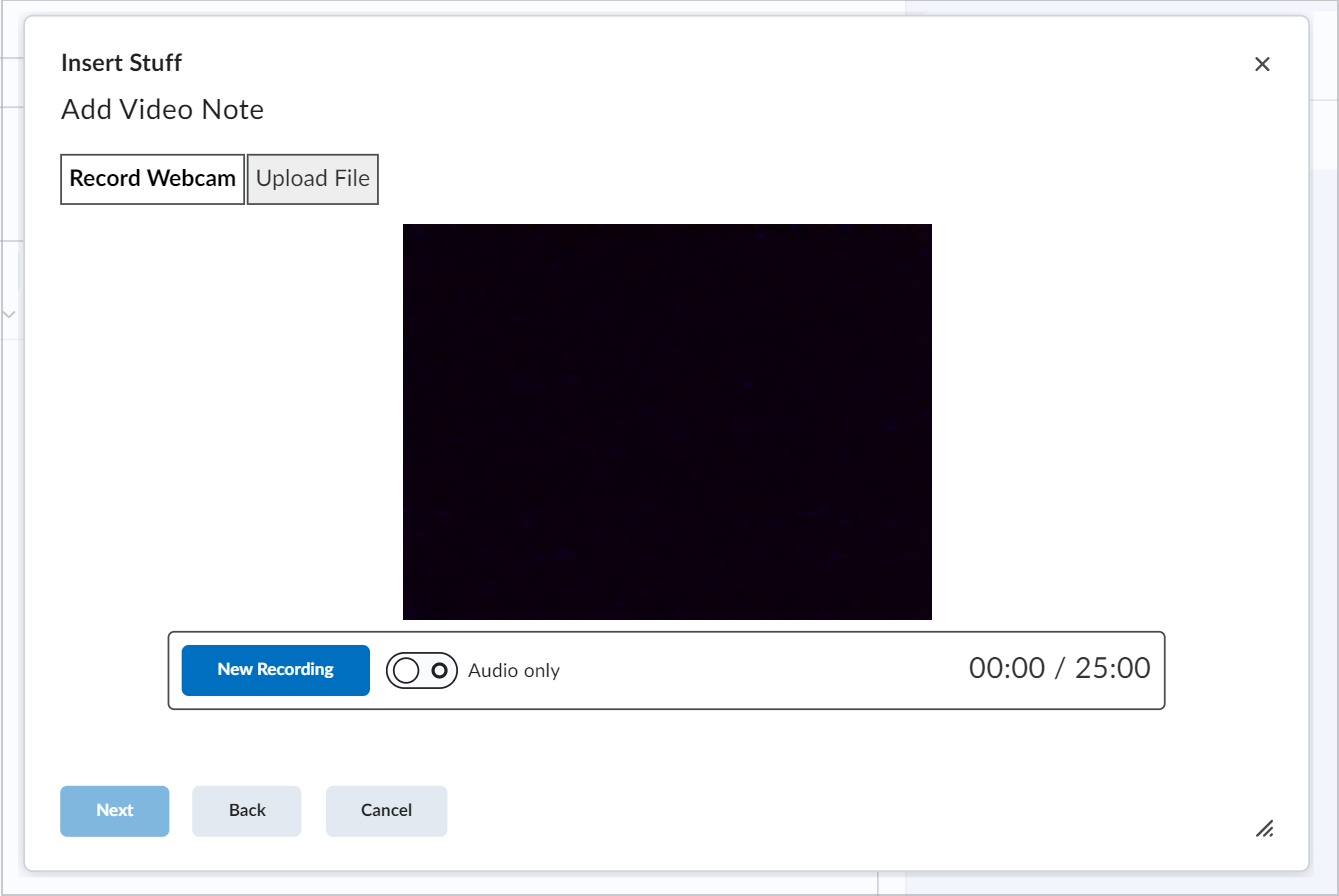
- Change the Audio only toggle to ON if desired. Then, click New Recording.
- Click Next.
- Enter the Title, Description, and select the Audio Language for your Video Note. Select the Automatically generate captions from audio checkbox if desired.
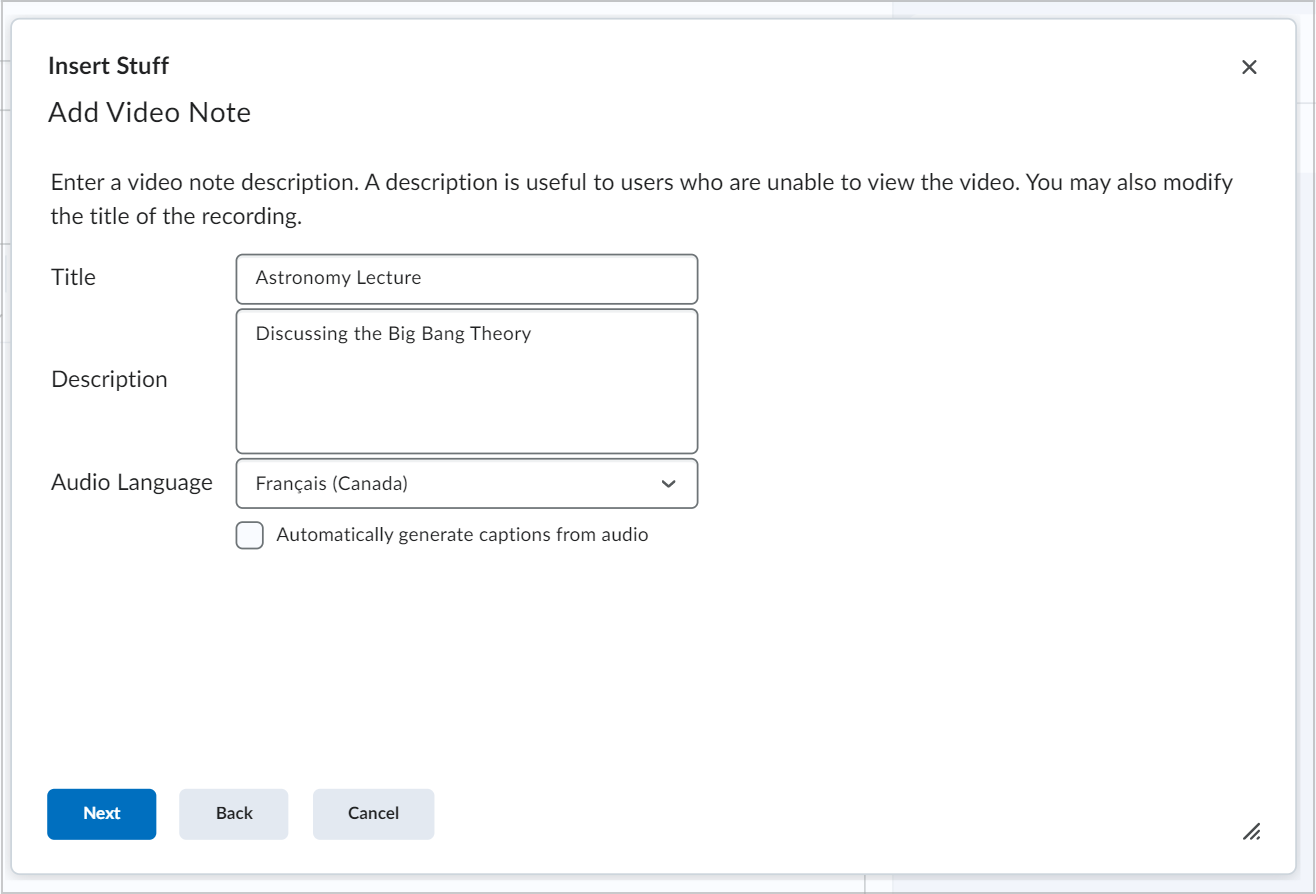
- Click Next.
- Click Insert.
Create and insert a Video Note using Classic Content
-
From Content, click Upload/Create and select Create a File.
- Click Insert Stuff.
- Click Add Video Note.
- To record your message, click New Recording.
- To finalize your message, click Stop Recording.
- Click Next.
- Enter a Title, Description, and select the Audio Language.
- To generate captions automatically, select Automatically generate captions from audio.
- Click Next.
- Click Insert.
To upload a Video Note or to select an existing Video Note file in the New Content Experience
- Navigate to Content.
- In the module where you want to upload an existing Video Note, click Add Existing > More.
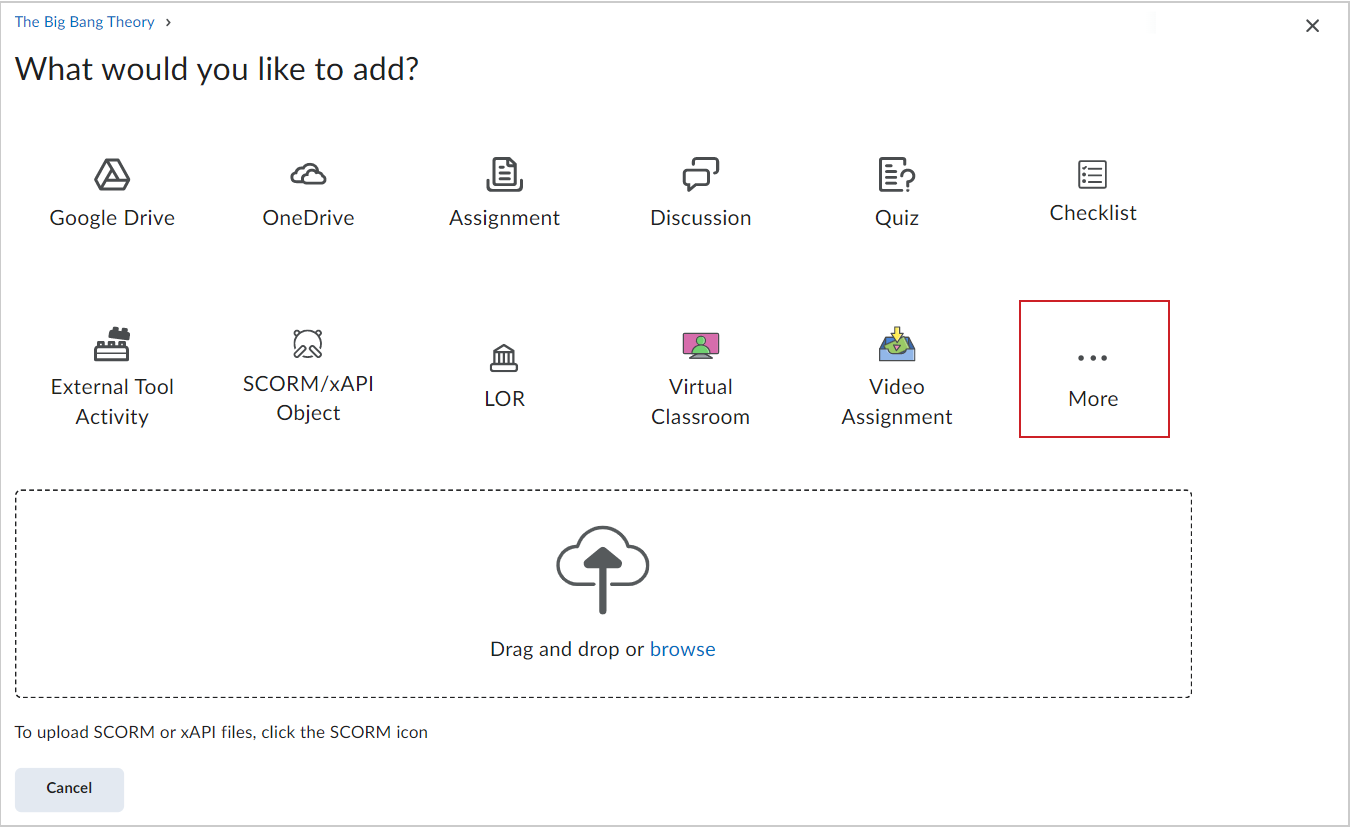
- In the Course Materials dialog, click Media Library.
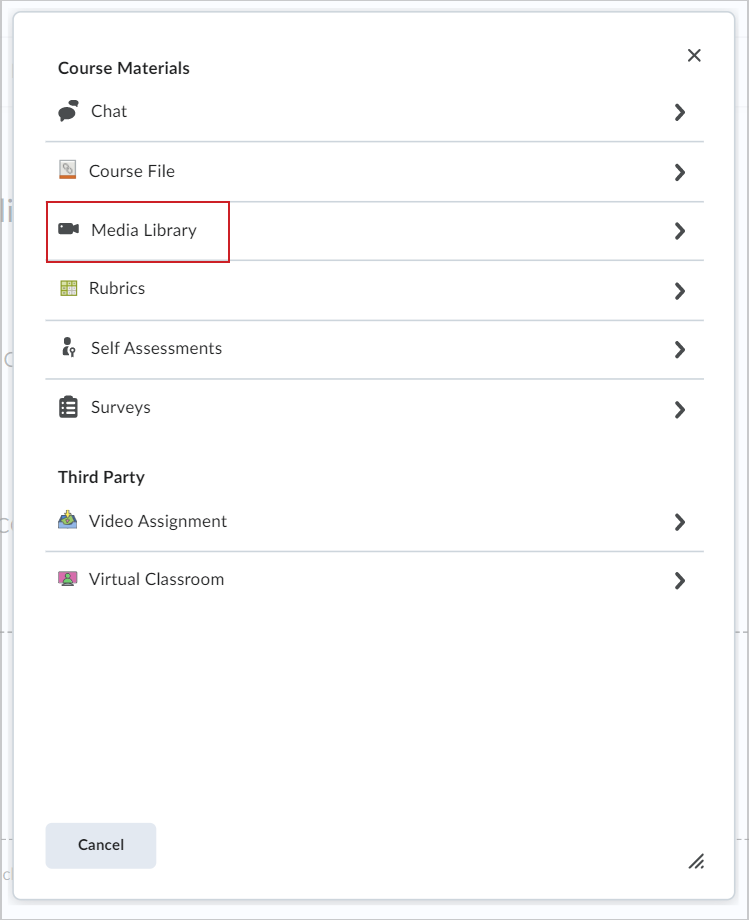
- Select the Video Note you want to upload and click Next.
- Edit the Title for your Video Note if desired. Then, click Insert.
To upload a Video Note or to select an existing Video Note file in Classic Content
- In Brightspace Editor, click Insert Stuff.
- Select Upload File or Choose Existing.
If you select Upload File, do the following:
- Click Choose File and select the locally saved file you want to upload.
 | Note: You can only upload MP4, FLV, F4V, or MOV files that are less than 5.00 MB in size. |
- Click Next, and enter a title and description.
- Click Next, and then Insert.
If you select Choose Existing, do the following:
- Select Video Note Search.
- Enter your search terms in the Search Notes field, then select Search. You can also perform a blank search to see all search results.
- Select the Video Note you want to insert.
- Click Add.
About SRT files
An SRT file is a .srt extension file that contains a formatted plain text list of timecodes (HH:MM:SS,MIL) matched with subtitles. Each item on the list is numbered sequentially starting with 1. You can create your own SRT file with a plain text editor such as Notepad or TextEdit, and save the file with extension .srt. The following is a .srt file example:
1
00:00:00,000 --> 00:00:07,000
Hello, welcome to this CaptureCast presentation.
2
00:00:07,050 --> 00:00:12,000
Today I will be speaking about changes in eLearning technology.
3
00:00:12,050 --> 00:00:20,000
This is a thirty minute seminar. If you wish, you may take notes during this presentation.
Add closed captions to a video note
- Create a video note in Brightspace Editor using Insert Stuff.
-
Using a text editing program such as Notepad (PC), or TextEdit (Mac) create a .vtt file with the following format:
WEBVTT [Required on first line to indicate file type]
00:01.000 --> 00:03.000 [start and end timestamp in minutes:seconds.milliseconds]
Insert caption text here [Type the captions you want displayed during this portion of the video]
00:04.000 --> 00:08.000
Insert caption text here.
00:09:000 --> 00:14.000
Insert caption text here.
-
Save the text file as a .vtt file by including .vtt at the end of the file name, and setting the file type to All files.
-
Return to Brightspace.
- From Admin Tools, select Video Note Captions.
- Search for the video note created in the previous steps and click it.
- Click Choose File, locate the .vtt file created in the previous steps, and click Open.
- Click Save Captions.
- Click the Video Preview, and select the options menu (...).
- Click Captions to change from Captions Off to Captions Default.
- Play the video and confirm the closed captions are visible and display at the appropriate times.Note: Ensure you follow the formatting exactly or the captions won't display. You can use any compatible third-party captioning method to complete this process.
Set up and use Anthology Ally (previously Blackboard Ally) to improve accessibility of courses
Anthology Ally is a content accessibility service that guides instructors on how to improve the accessibility of their course content and alter future behavior. Anthology Ally also automatically checks for accessibility issues and generates alternative accessible formats. Additionally, Anthology Ally provides institution-wide reporting available to administrators on course content accessibility and drives further improvements at their institution.
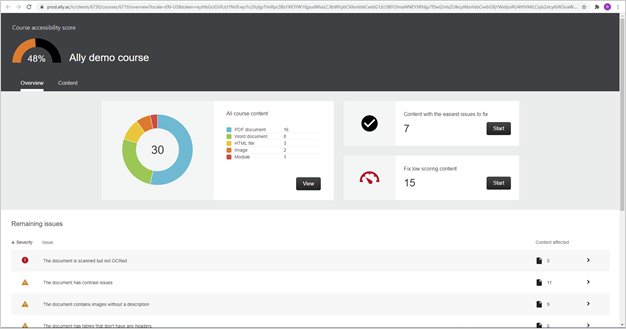
Figure: The Course accessibility score of your course using Anthology Ally.
Set up and administer Anthology Ally
Clients will work directly with Anthology to purchase Ally licenses. Anthology then provides configuration details to add to the d2l.Tools.Content.AllyIntegration configuration variable in Brightspace.
Note: By default, the Instance level of Anthology Ally Integration is ON, and the Org level of Anthology Ally Integration is Off.
Improve the accessibility of course content using Anthology Ally (previously Blackboard Ally)
Anthology Ally is a content accessibility service licensed directly from Anthology. It is designed to help instructors improve the accessibility of their course content. Anthology Ally provides accessibility checks for Course and Lesson content, provides suggestions for improving content, and provides alternative accessible formats to enable learners to use the format that best meets their requirements.
Anthology Ally provides an accessibility score from low to high using a color and gauge icon to indicate the current score of the file:
 Red indicates a low score resulting from many accessibility issues. Files with this rating should be improved as soon as possible.
 Yellow indicates a mid-range score. There are accessibility issues, but there are opportunities for improvement.
 Light green indicates a high score. The file is accessible, but there are still opportunities for improvement.
 Dark green indicates a perfect score. The file is fully accessible, there are no suggestions to improve the accessibility of the file.
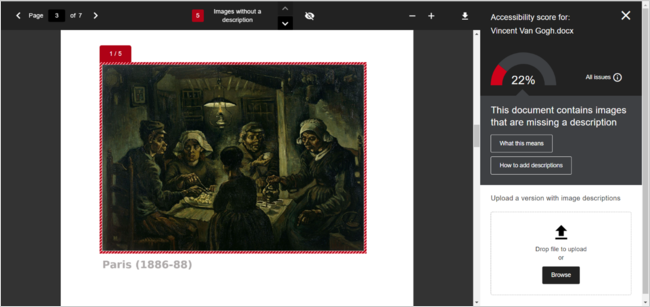
Figure: An example of the Accessibility score for a Content item.
The main accessibility score panel also contains a link that opens the Instructor Feedback panel. The Instructor Feedback panel contains the following information:
- Accessibility score percentage for the entire file with the corresponding color and gauge icon.
- A link to a list of all issues in the file, with a Fix button that you can use to fix, save, and upload the file with the improved accessibility score.
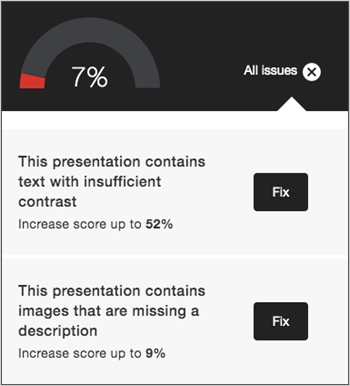
Figure: The Accessibility issues menu with the Fix button beside each issue.
- A description of the issue and how to fix it.
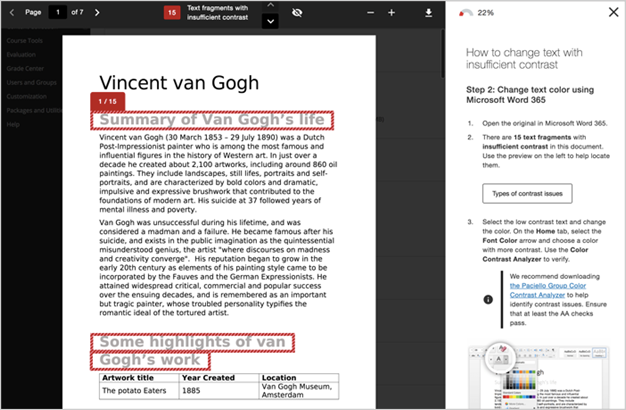
Figure: The Accessibility Fix menu, which highlights areas of the content that have accessibility issues.
- An upload window that you can use to drag-and-drop a new version of the file, or browse to the updated file.
Report on accessibility of existing org structure
Administrators can create an institutional-level report to proactively identify and remove learning barriers for learners. These reports show the types of issues that occur in the total content, which include:
- PDF, .DOC and .DOCX, .PPT, OpenOffice/LibreOffice, and HTML files;
- image files including .JPG, .JPEG, .GIF, .PNG, .BMP, and .TIFF; and
- YouTube videos.
The reports show these issues created over time, sorted by the types of content over time, including filtering for calendar year, academic term, and month. This information shows errors that occur in an organization, course, and file in a course by filtering down from a high level to a very generic level. The report shows a rating based on how the course files were without Anthology Ally intervention compared to an estimate on how the accessibility rating can be improved based on the automated changes available by using the Anthology Ally tools.
Administrators can export the report to CSV for longer term tracking of accessibility improvements.
Using headings and ARIA landmarks with assistive technology
Headings and Accessible Rich Internet Applications (ARIA) landmarks help you navigate pages throughout the system. ARIA is a toolset that helps make websites and web apps easier to use for people with disabilities.
It works by adding extra information to web pages so that screen readers and other assistive technologies can understand and describe interactive elements, like buttons, forms, or pop-up messages, which might not be accessible otherwise. For example, ARIA helps ensure that people using assistive tools can access features like live updates, helpful hints, or error messages on a website. For more information, refer to ARIA Authoring Practises Guide > Landmark Regions.
Using headings and ARIA landmarks help navigate in many ways, including the following:
- Heading 1 and Main landmarks navigate page titles.
- Heading 2 navigates through widgets and major page sections.
- Heading 3 organizes information within widgets and page subsections.
- Navigation, Search, and Complementary ARIA landmarks provide context on a page.
Using keyboard navigation
Certain keyboard keys have specific actions you can use to navigate the system
- Use the Tab key on your keyboard to navigate through the options on a page. Use Shift+Tab to return to a previous option. Brightspace highlights page elements that you can interact with (such as links, fields, and buttons) as you tab through them, which makes it easier for you to complete tasks and select options.
- Press Enter or Return to select a link or button.
- Use the Down Arrow and Up Arrow keys to navigate drop-down lists that have an Apply or Go button to select the option.
- Use Alt+Down Arrow keys (Windows and Linux) or Options+Down Arrow keys (Mac) to open drop-down lists that do not have an Apply or Go button, and then use Up Arrow, Down Arrow, and Enter keys to select an item from the drop-down list.
- Use the Enter or Return key to open a menu (such as a context menu, an alert, or the course selector list). Then, use the Tab or Enter key to select a link.
- Use the Space Bar to select a check box or radio button option.
- Use the Down Arrow and Up Arrow keys to change a radio button option.
- Do not use Alt+F4 to close pop-up windows or pages. This action closes your browser window.
Use the Accessibility Checker on HTML-authored content
The accessibility checker gives you a way to ensure that the content you author in Brightspace Editor conforms to WCAG and Section 508 accessibility standards. The accessibility checker is available within the Editor for use within Content, Widgets, Quizzes, Assignments, Calendar, Assignments, Discussions and any other tools where a user can access the Editor.
- Enter HTML content in Brightspace Editor.
- Click
 to start the checker.

Figure: The Accessibility Checker in Brightspace Editor.
- If there are any compliance issues, read the report for suggestions on how to fix the issue.