You can create quizzes in two locations: The Content tool and the Quizzes tool. After you save the new quiz for your course, it appears in the Manage Quizzes tab. You can apply the Respondus LockDown Browser to any quiz listed in the Manage Quizzes tab using the options available in the LockDown Browser tab.
Note: For more information about how to create a quiz, refer to Create and configure a quiz.
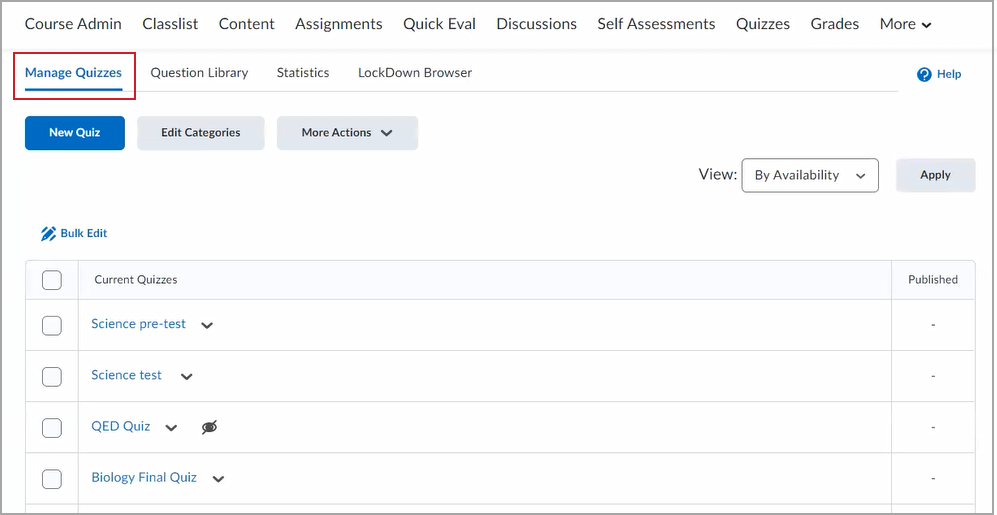
Figure: Click the Manage Quizzes tab of the Quizzes tool to display a list of current quizzes.
- From the Brightspace home page, select the course where you have created the quiz.
- Click Quizzes from the navigation bar. If it does not appear on your navigation bar, click More and then select Quizzes from the list.
- Click the LockDown Browser tab.

Figure: Click LockDown Browser to view the LockDown Browser dashboard.
- On the Dashboard tab of LockDown Browser, click the drop-down arrow beside your quiz and click Settings to open the LockDown Browser settings for the quiz.

Figure: Click the Settings option.
- Click the Require Respondus LockDown Browser for this exam to change the setting.
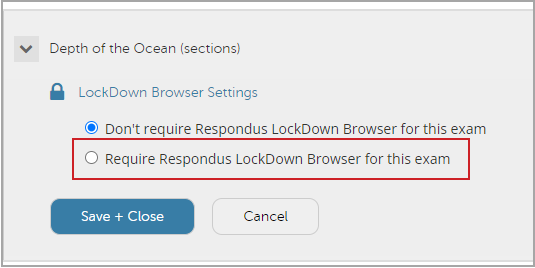
Figure: Click the Require Respondus LockDown Browser for this exam radio button to use LockDown Browser.
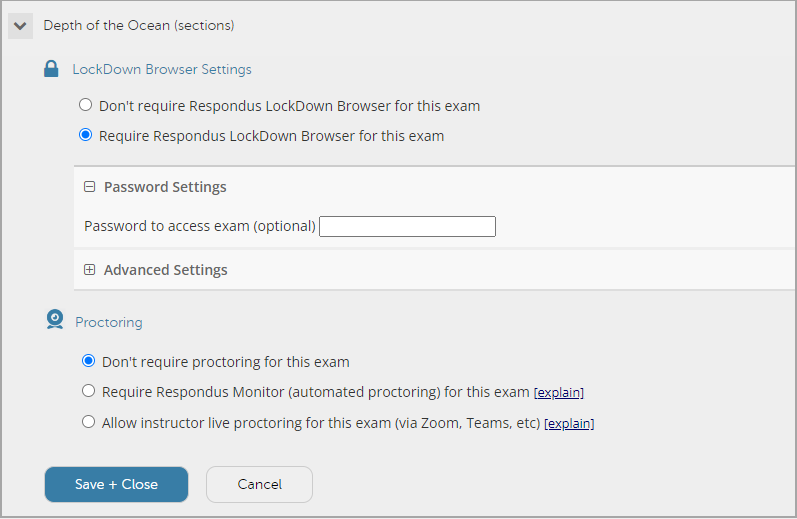
Figure: When you select Require Respondus LockDown Browser for this exam, additional settings become available, including Password Settings, additional Advanced Settings, and Proctoring settings.
- Enter a Password to access exam, if applicable.
- Click Advanced Settings to expand and view additional options.
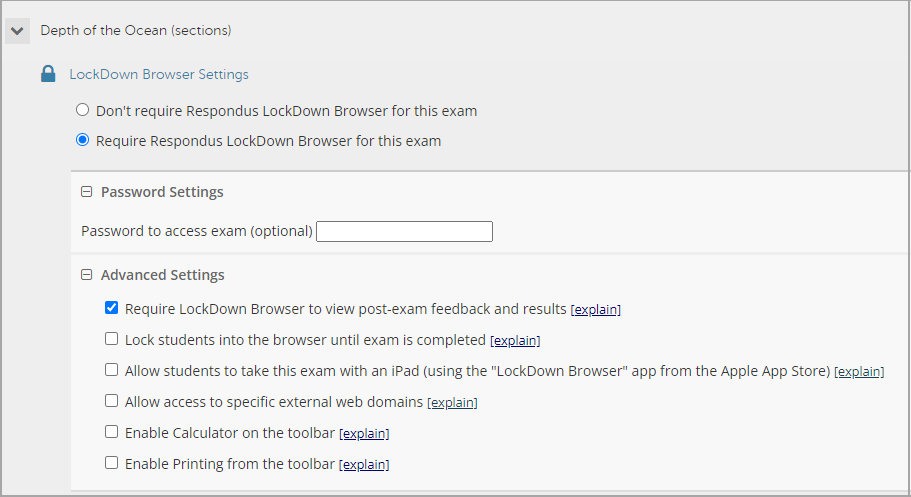
Figure: Check the desired options for your quiz in the The LockDown Browser settings.
Important: The settings in the Lockdown Browser Settings area are an integration with Respondus; only the two options selected in the previous image (Require Respondus LockDown Browser for this exam and Require LockDown Browser to view post-exam feedback and results) are saved to the Brightspace database. The other settings are saved by Respondus on their server. As a result, if this quiz is copied into other courses, those two settings are the only two that are copied with the quiz into the new course.
- Review the available Advanced Settings and select any that apply to your quiz.
Note: For more information about each Advanced Setting, click explain beside each list item.
- Click to select any proctoring settings that are applicable. By default, Don’t require proctoring for this exam is selected.
- Click Save + Close.
When you save the quiz with the Respondus LockDown settings applied, the name of the quiz is appended to include Requires Respondus LockDown Browser, and the Lockdown Browser column displays Required. If you edit the quiz name to remove the appended text, the LockDown Browser column in the dashboard displays Error with a Fix It button. Click Fix It to re-append Requires Respondus LockDown Browser to the quiz name.

Figure: Quizzes with the Error status can be corrected by clicking the Fix It button. Quizzes have Requires Respondus Lockdown Browser appended to the title and Required status when correctly configured to use LockDown Browser.
Using Special Access with Respondus LockDown Browser
Special Access makes a quiz available to select groups of learners or enables instructors to provide individualized due dates and custom timing settings for certain learners. Instructors can set Special Access for their learners in the Availability Dates & Conditions tab of their quiz. For more information, refer to the Set up Availability Dates & Conditions section of the Create and configure a quiz topic.
Within the Manage Special Access settings, there is a setting to specifically indicate if you require learners with special access to use Lockdown Browser for a quiz.
- From within a quiz, click to expand the Availability Dates & Conditions area.

Figure: Click the arrow to expand the Availability Dates & Conditions area of Quizzes.
- Click Manage Special Access.
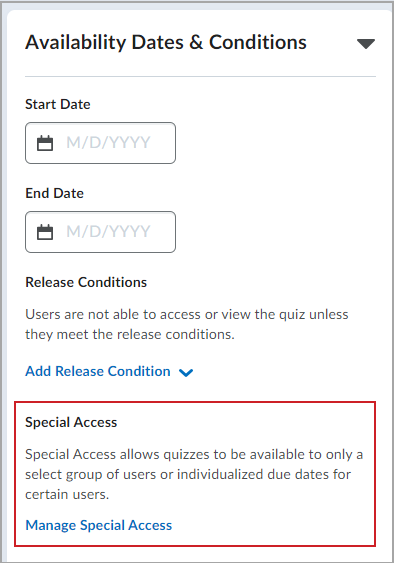
Figure: You can access the Special Access options by clicking Manage Special Access.
- Click Add Users to Special Access.
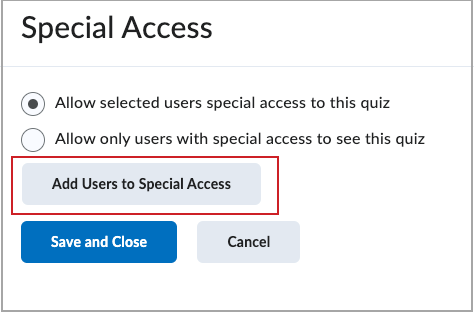
Figure: Click the Add Users to Special Access button to view existing users that have special access and add new users to the list.
- In the LockDown Browser area of the Special Access panel, click Not required to take this quiz.
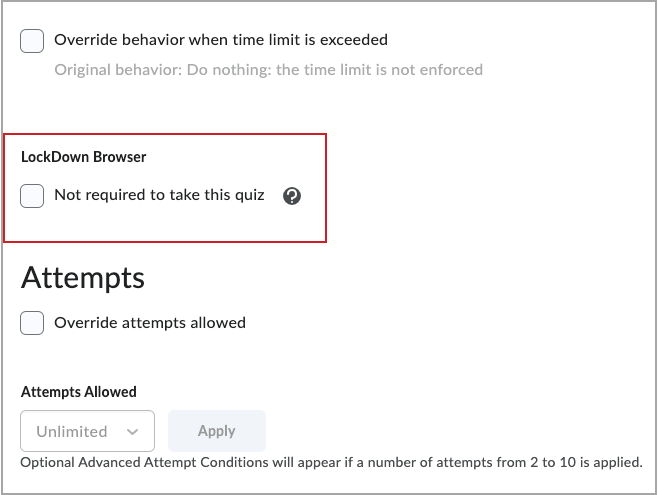
Figure: Check the Not required to take this quiz checkbox.
Important: If the Require Respondus LockDown Browser for this exam option is not turned on for this quiz, the LockDown Browser section does not appear in the Manage Special Access options.
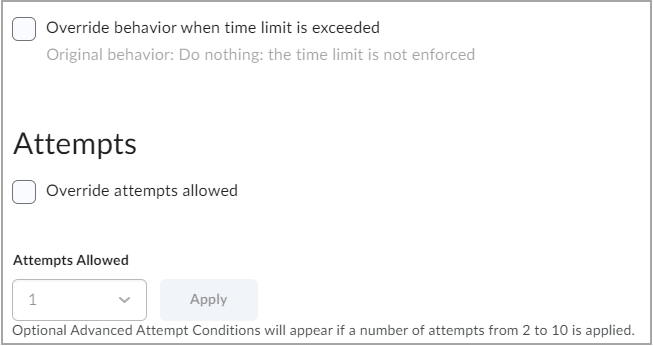
Figure: An example that shows the same area of the Manage Special Access options as in Step 4, above, without the LockDown Browser option available.
Troubleshoot issues with Respondus Lockdown Browser
If you encounter issues while using Respondus LockDown Browser on a quiz, follow these steps to identify and resolve common problems before starting your quiz or exam.
- Restart your computer: Close all unnecessary applications, browsers, and pop-up windows before launching LockDown Browser to prevent interference.
- Run System Check: Inside LockDown Browser, go to the Help Center and select the Run System Check option to diagnose potential issues with your network, operating system, and other applications.
If you are still experiencing issues, visit the Respondus Support knowledge base