Encourage your learners to share thoughts on course material with peers by setting up forums and topics for learners to ask questions, discuss course content and assignments, and work together in assigned groups and sections.
You can start the creation of a discussion forum and associated topics from the following tools:
Choose one of the workflows according to your organization’s setup.
Best practices for using Discussions
- Ensure that there are discussion topics created for your discussion forum(s):
Forums are used to group topics into predetermined themes, course units, etc. You can only post in discussion topics. If there are no topics created for a forum, then learners will not be able to participate in discussions.
On the course homepage, click Discussions. Make sure that there are topics nested under the discussion forum. If you do not see topics nested under the discussion forum(s), you must create topics.
- Ensure that discussion forums and topics are not unintentionally hidden:
The option to hide a discussion forum or topic is located on the Discussion List page, in the context menu for each forum or topic. If you cannot see the ability to hide discussions from users, you need the Discussions > Manage Discussions permission. The Hidden icon appears beside any topics or forums that are currently hidden. Forums and topics can also be hidden on the New Forum or New Topic page (or the Edit page for existing forums and topics), in the Restrictions tab's Availability section.
If you selected Hide this [topic or forum], then learners cannot see it. If a discussion forum has this setting enabled, all the topics nested under it are also hidden.
- Ensure that there are no unwanted date restrictions set for the discussion forum or topic:
Learners cannot access topics that fall outside of set date restrictions. If a discussion forum has date restrictions attached, then all topics nested under it will be hidden outside of those date restrictions.
The option to set date restrictions is located on the New Forum or New Topic page (or the Edit page for existing forums and topics), in the Restrictions tab's Availability section.
- Ensure that the appropriate group restriction settings are applied:
If group restrictions are enabled for the discussion forum or topic, then only learners within the group selected can see the discussion. The option to set group restrictions is located on the New Forum or New Topic page (or the Edit page for existing forums and topics), in the Restrictions tab of the Group and Section Restrictions section. Select Restrict this forum to the following groups and sections to enable group restrictions for a forum or topic.
You can create a discussion forum in the New Content Experience (Lessons). This adopts creation elements from Assignments and Quizzes, making it familiar and easier to create great course content. You must create a discussion forum first, which will contain associated discussion topics. Discussion forums organize course discussions topics into categories such as weekly discussions, open discussions, and group discussions.
Watch this video to learn how to create a discussion forum an topic from Content. Review the written steps below.
To create a discussion forum
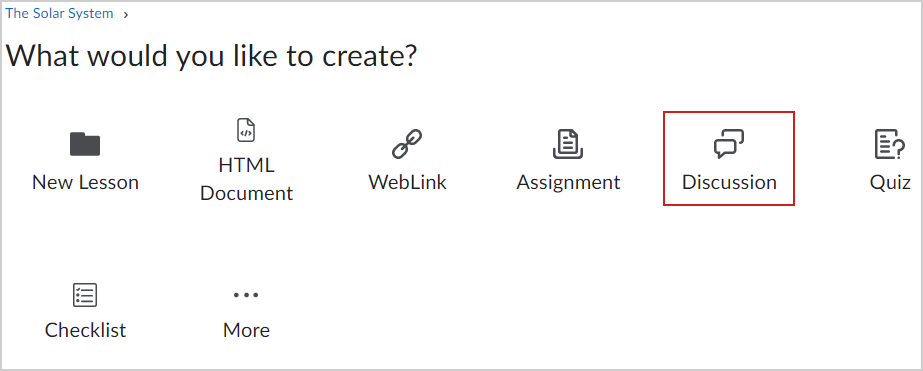
- Navigate to Content.
- Click Create New.
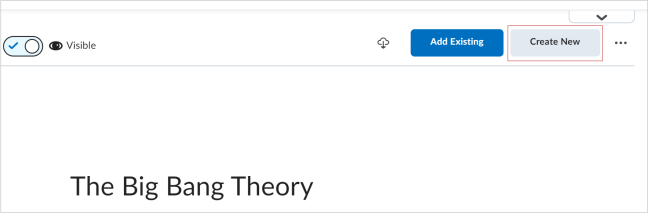
- Click Discussion.
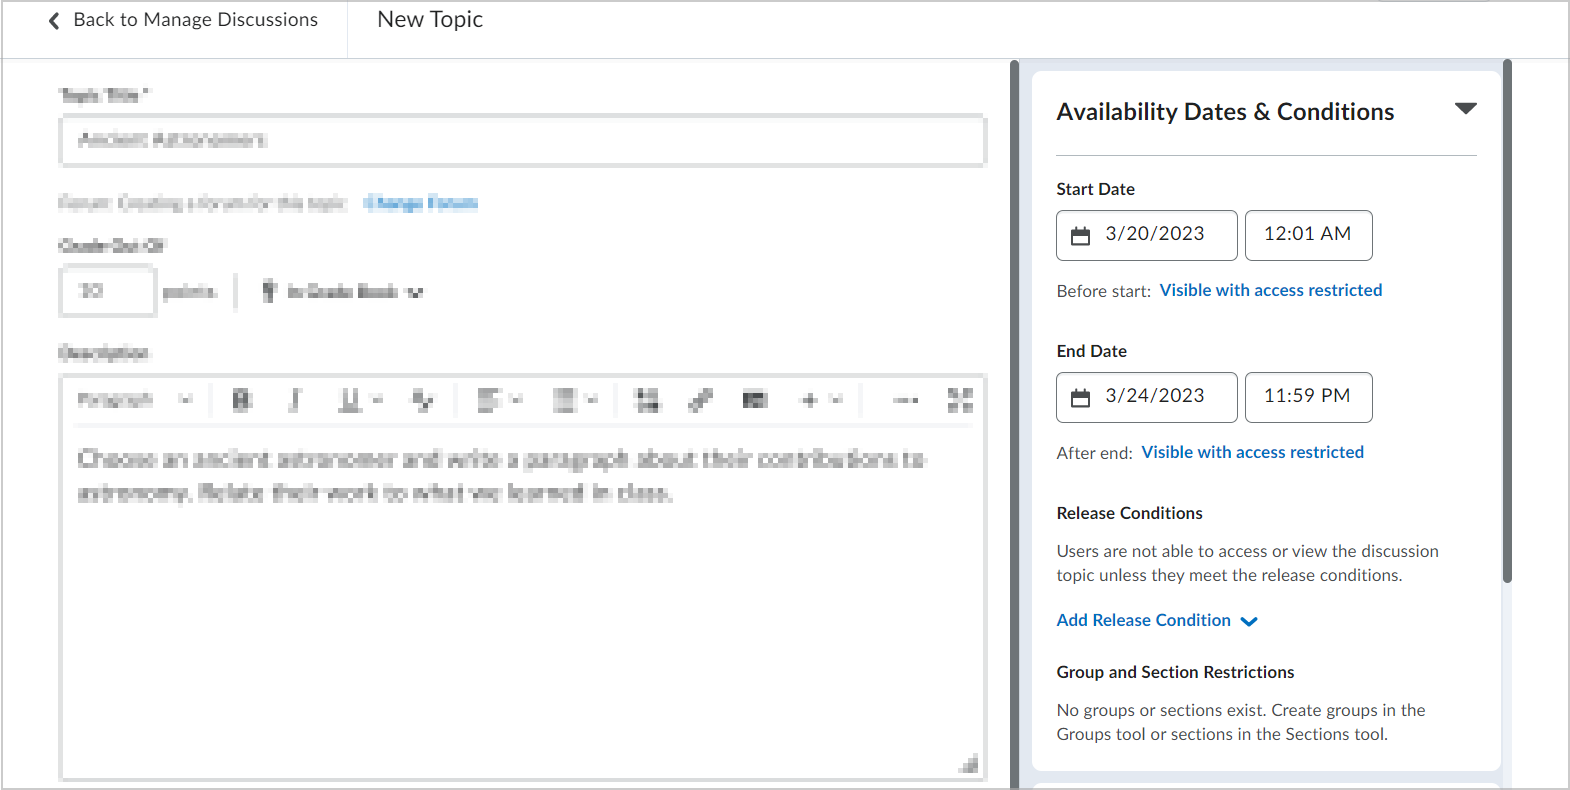
- On the New Topic page, do the following:
- In the Availability Dates & Conditions accordion, enter the following:
- Enter a Start Date and End Date.
- Adjust the Before end and After end restrictions based on your preferences by clicking each option.
- Click Add Release Condition to create a new release condition or add an existing one.
- Under Group and Section Restrictions, you can set different restrictions if you have Groups or Sections set up in your course.
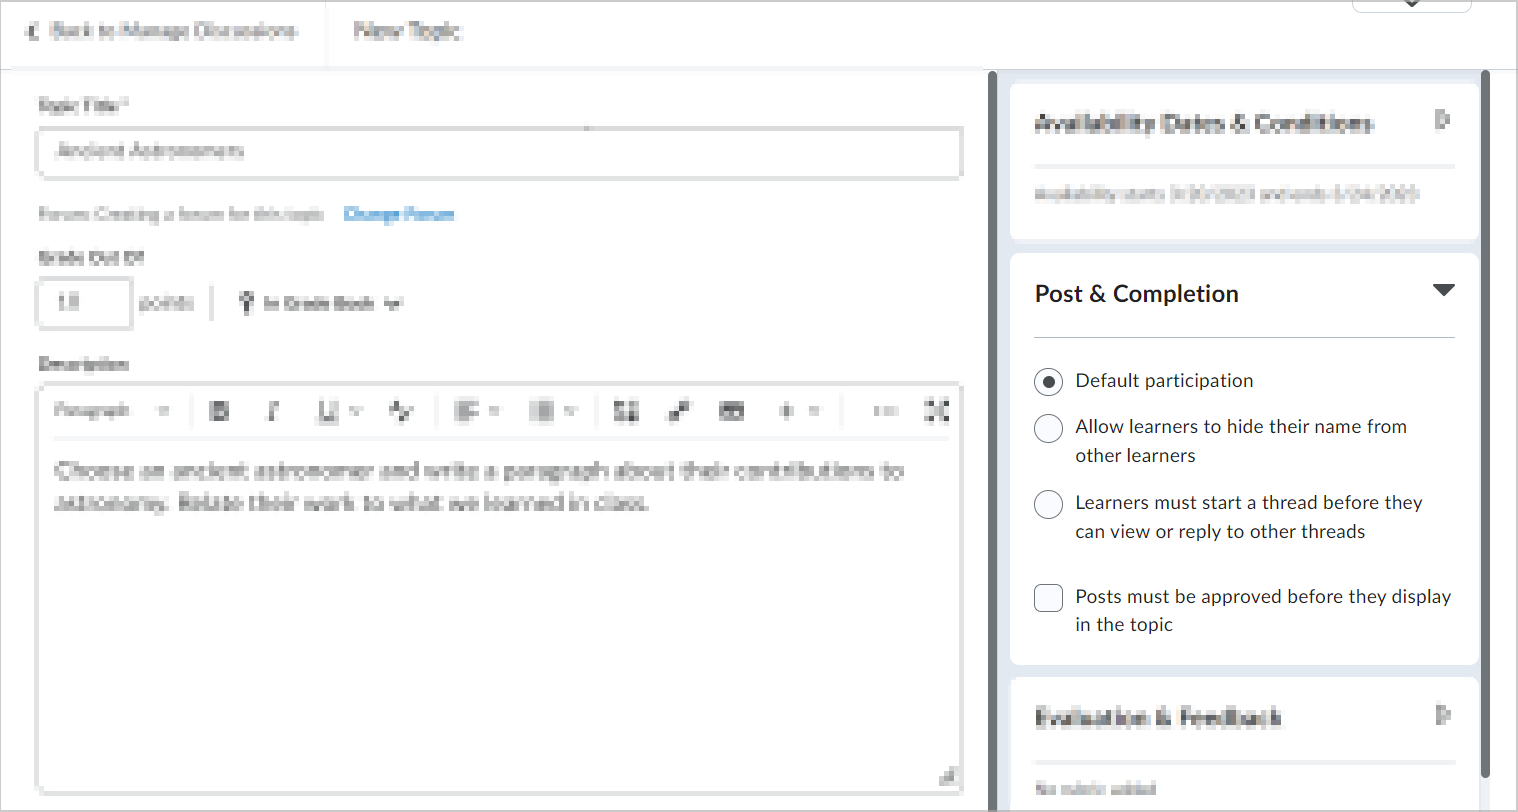
- In the Post & Completion accordion, select from the following options:
- Default participation
- Allow learners to hide their name from other learners
- Learners must start a thread before they can view or reply to other threads
- Posts must be approved before they display in the topic
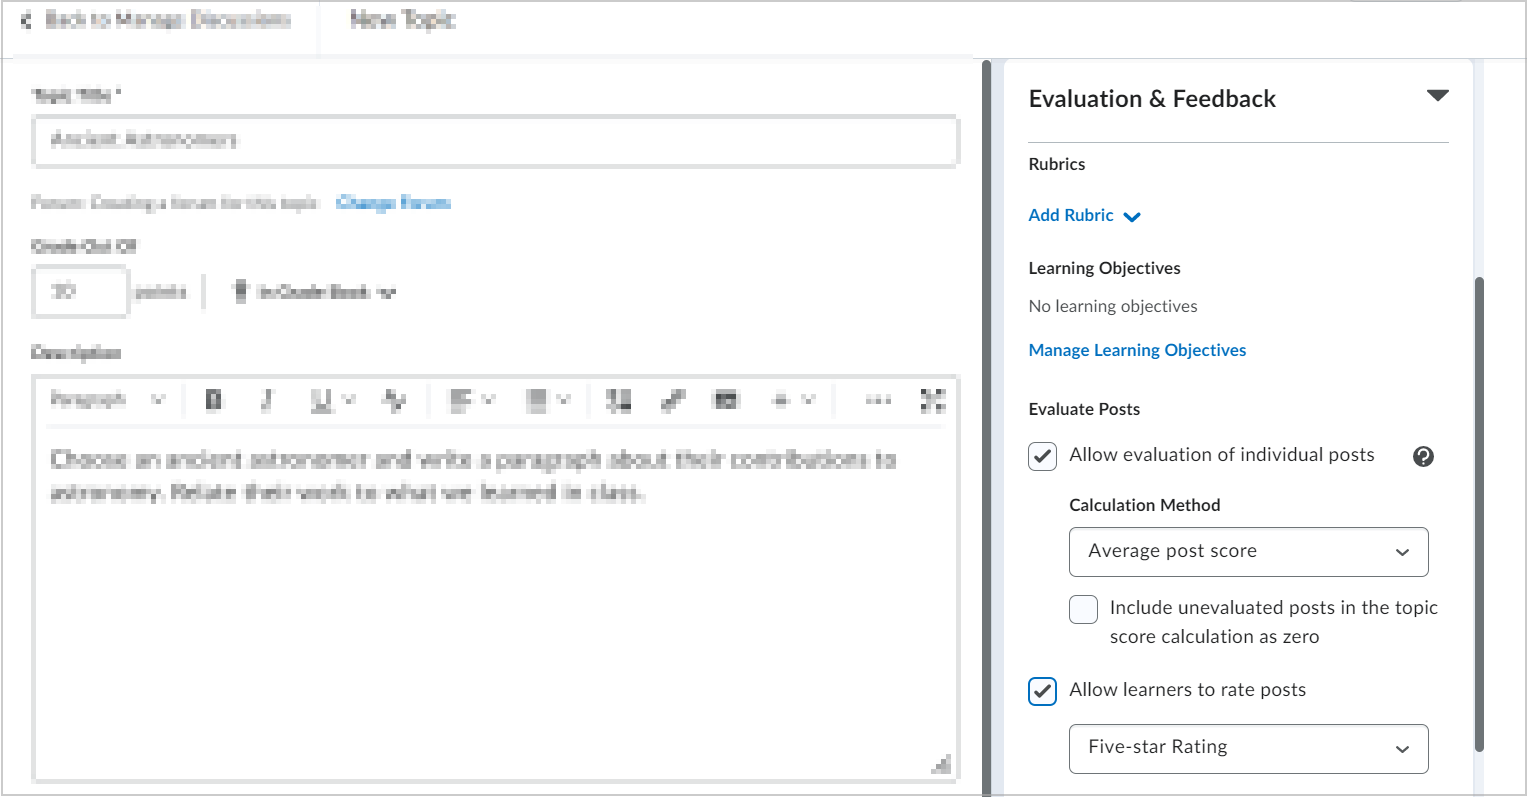
- In the Evaluation & Feedback accordion, do the following:
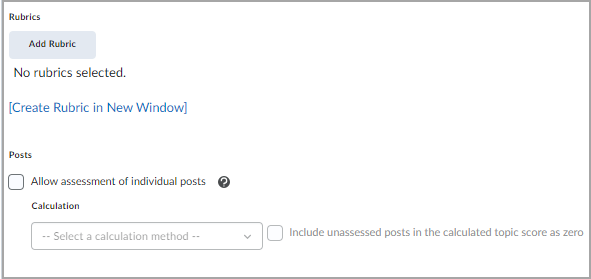
- Click Add Rubric to attach a rubric to your discussion topic.
- Click Manage Learning Objectives to associate learning objectives to your discussion topic.
- Select Allow evaluation of individual posts to assign scores to posts and select your Calculation Method. You can also choose to Include unevaluated posts in the topic score calculation as zero.
- Select Allow learners to rate posts to allow learners to score each other's posts. Then, select a rating type.
- Toggle the Visibility to be either Visible or Hidden.
- Click Save and Close.
Your discussion forum and an associated discussion topic are created.
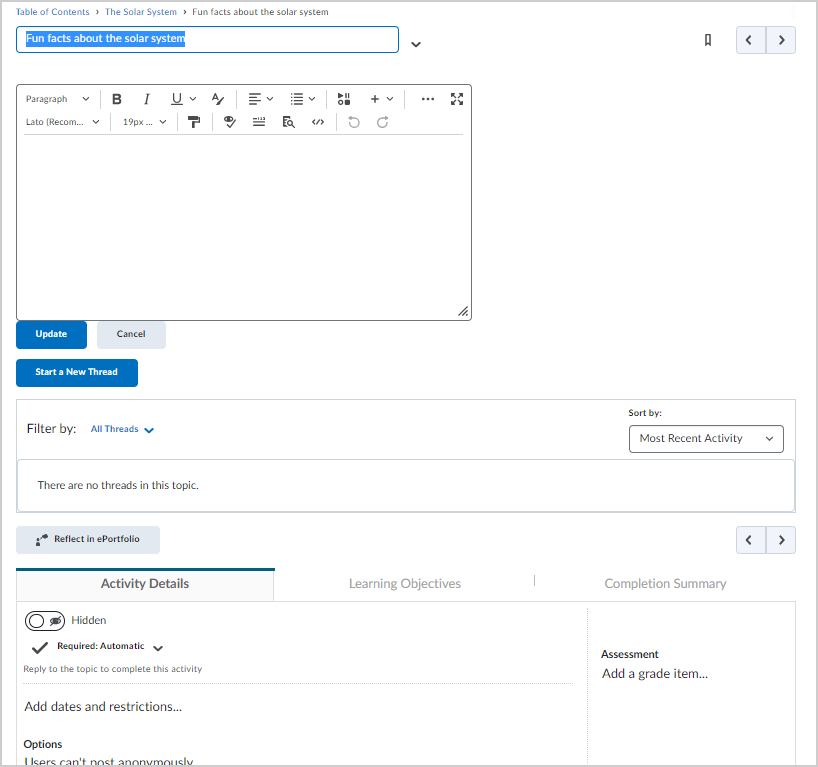
Edit a discussion topic in the New Content Experience (Lessons)
You can edit a discussion topic in the New Content Experience (Lessons). This adopts creation elements from Assignments and Quizzes, making it familiar and easier to create great course content.
To edit a discussion topic in the New Content Experience (Lessons)
- Navigate to Content.
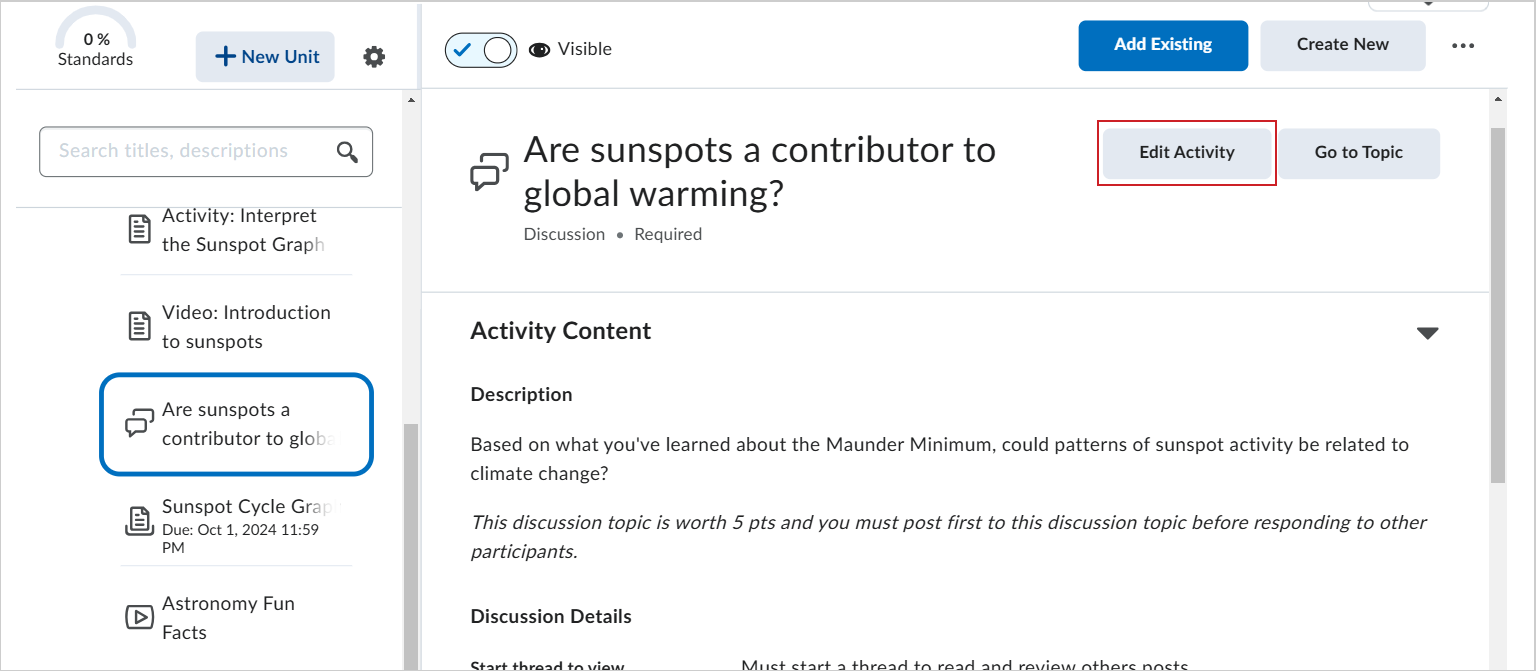
- Locate the module where your discussion topic is posted and click the topic.
- Do one of the following:
- Click Options (...) > and select Edit.
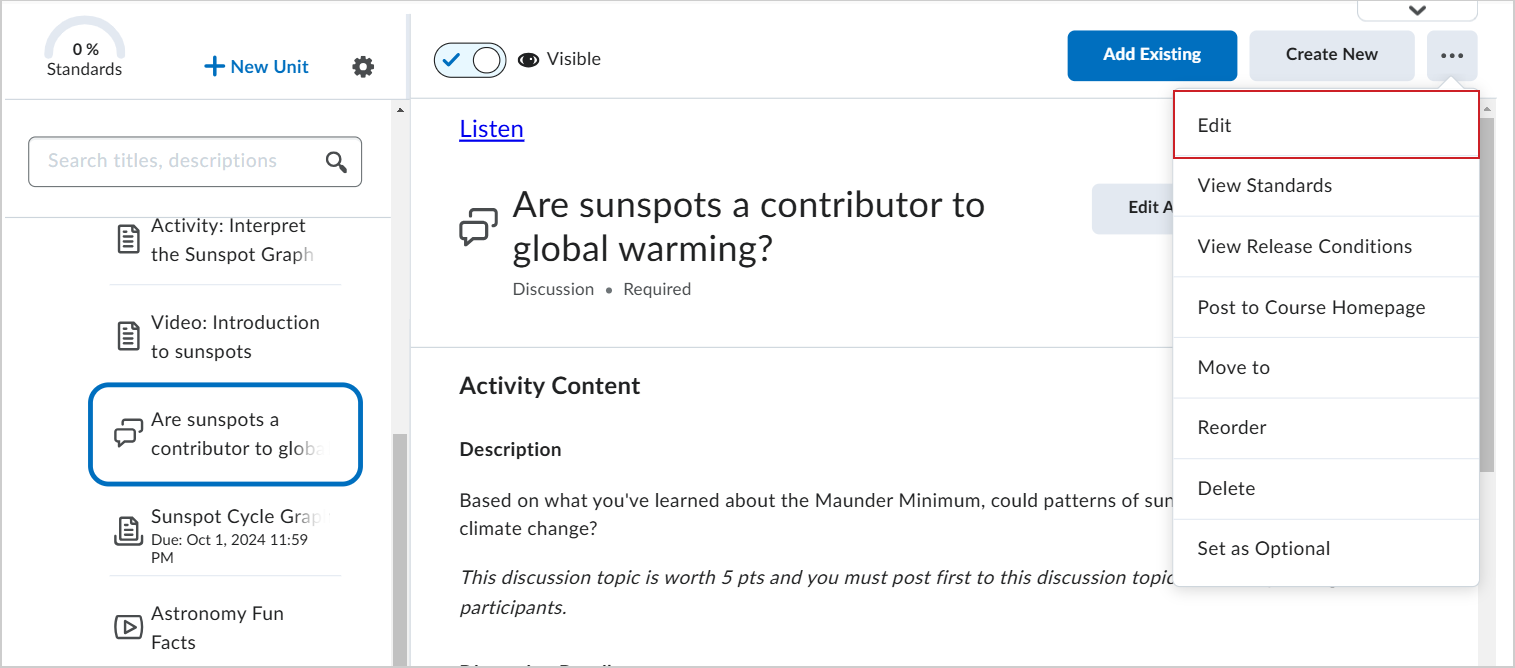
- If your organization has enabled the assessable activities view, click Edit Activity.
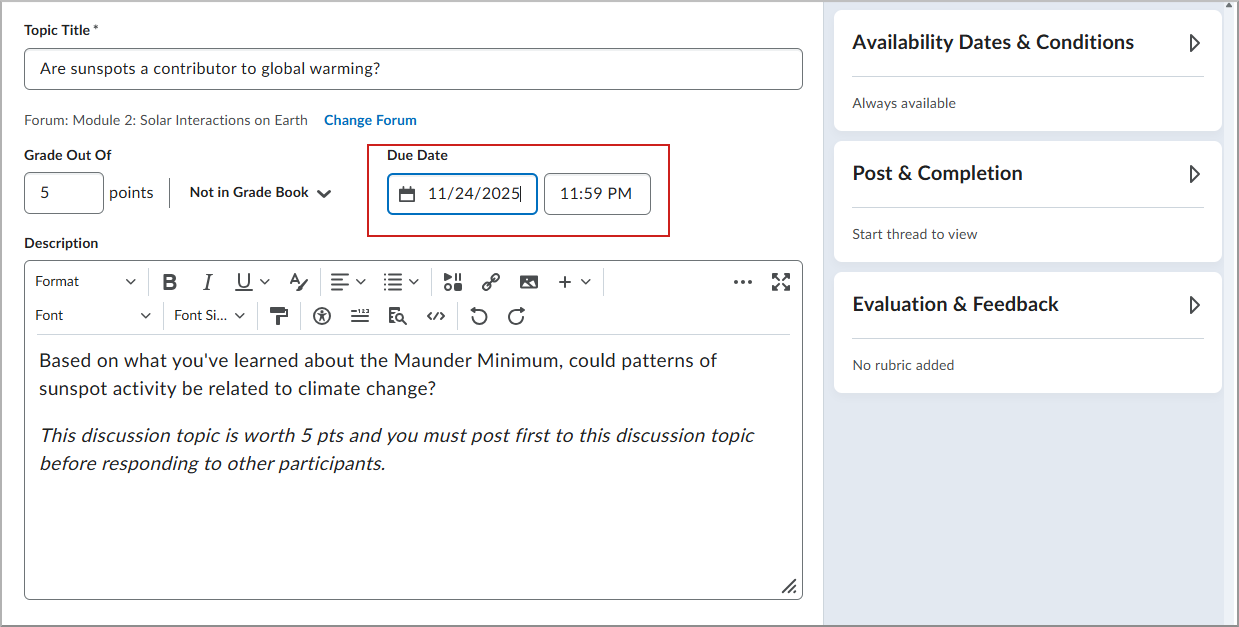
- On your discussion topic's page, edit the Title, Forum, Grade Out Of, Description and Due Date fields.
 | Note: The Description field has a character limit of 65,535 characters. |
- In the Availability Dates & Conditions accordion, edit the Start Date and End Date, Release Conditions, and Group and Section Restrictions.
- In the Post & Completion accordion, edit participation and display options for posts.
- In the Evaluation & Feedback accordion, attach a rubric, add learning objectives, and change evaluation settings for posts.
- Toggle the activity as either Visible or Hidden.
- Click Save and Close.
You have edited a discussion topic.
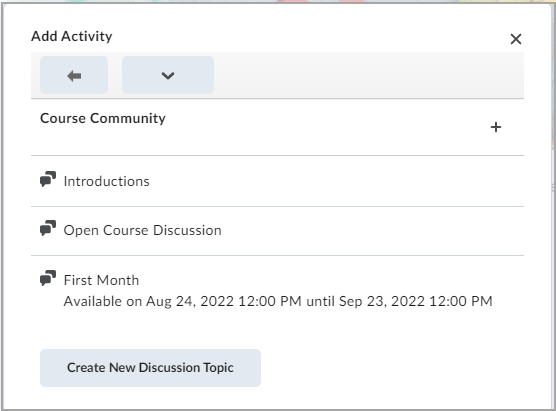
Add an existing discussion from the New Content Experience (Lessons)
You can add an existing discussion forum or topic in the New Content Experience (Lessons).
To add an existing discussion forum or topic
- From your course navbar, click Content.
- Select the unit that you would like to add a discussion topic to and click Add Existing.
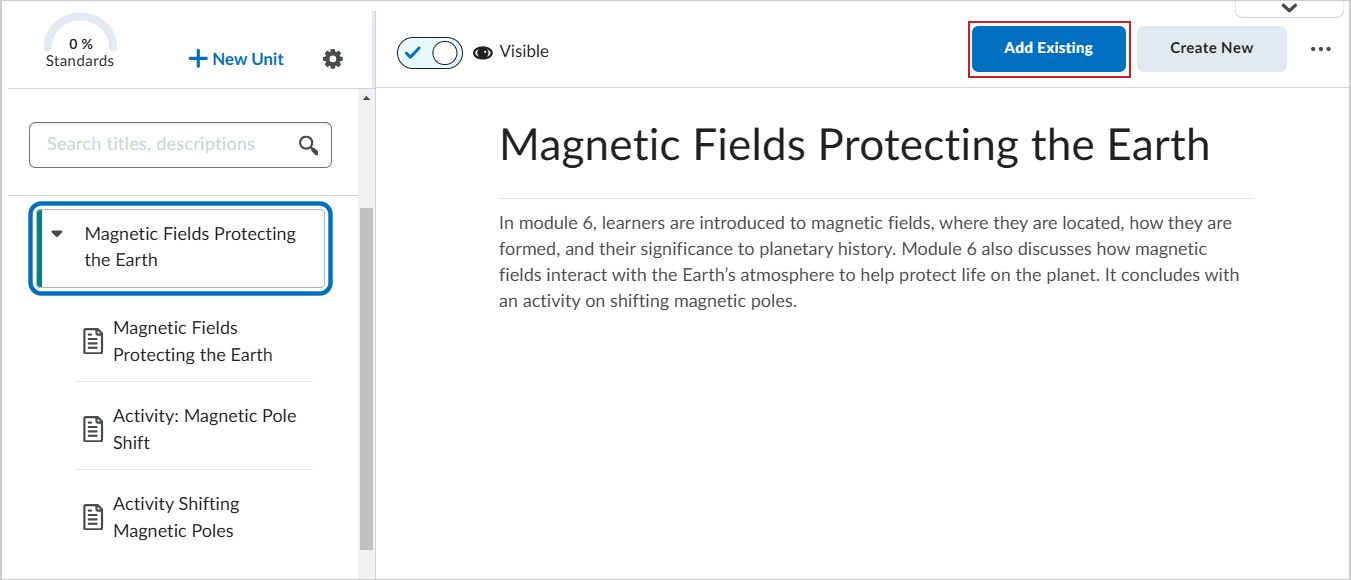
- From the What would you like to add? page, click Discussion.
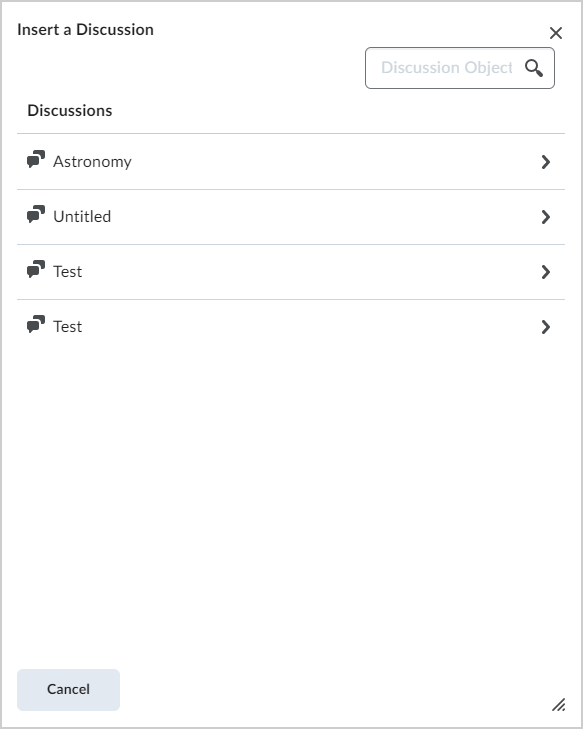
- From the Insert a Discussion dialog, click to select the forum and topic you want to add.
Your discussion topic is added to the selected unit.
You can create a discussion forum and associated topic in the Classic Content Experience. Discussion forums organize course discussions topics into categories such as weekly discussions, open discussions, and group discussions.
To create a Discussion forum in the Classic Content Experience
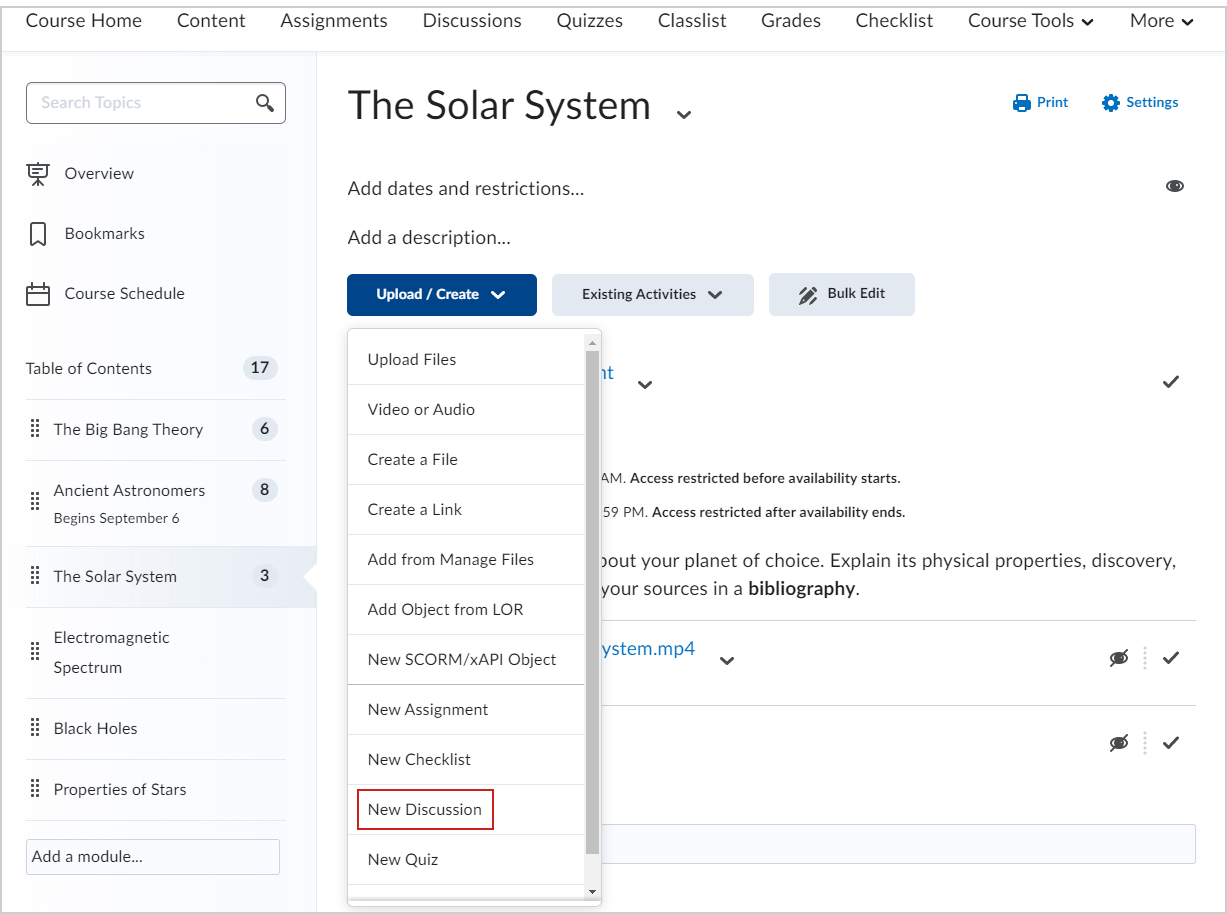
- From your course homepage navbar, navigate to Content.
- Click Upload/Create.
- Click New Discussion.
- Click select a Forum from the drop-down, or click Create Forum.
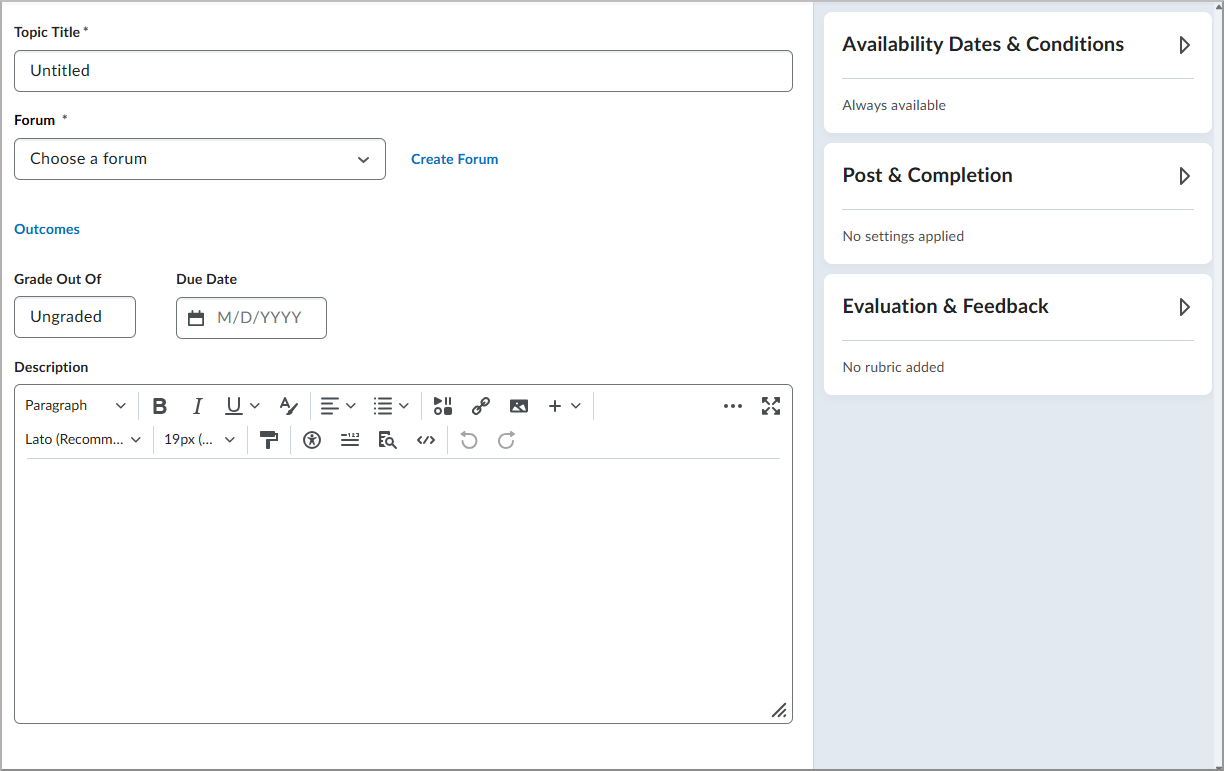
- From the Create forum dialog, enter a Forum Title.
| Note: The editor field has a character limit of 65,535 characters. |
- Click Save.
A new forum is created using the Classic Content Experience. You can now create a topic associated with that forum.
Edit a discussion topic in the Classic Content Experience
You can edit a discussion topic in the Classic Content Experience.
To edit a discussion topic in the Classic Content experience
- Navigate to Content.
- Locate the module where your discussion topic is posted and click the topic. The topic opens for editing.
- Do one or more of the following:
- Click the Title field to edit the title.
- Click Add a description... to edit any instructions.
- In the Activity Details tab, click to change Start Date, End Date, Due Date and Release Conditions.
- In the Learning Objectives tab, click Add Learning Objectives to add learning objectives for your topic.
- Click Update to save the changes.
You have edited a discussion topic in the Classic Content Experience.
Add an existing discussion from the Classic Content Experience
You can also add an existing discussion to a module from the Classic Content Experience.
To add a discussion to a content module
- On your course-level homepage, navigate to Content.
- Select the module where you want to add the discussion.
- Click Existing Activities > Discussions.
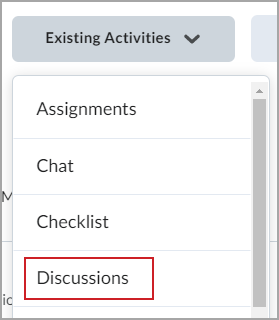
- Click the discussion forum that contains the discussion topic you want to add to the module.
- Select the discussion topic.
The discussion topics appear in the module.
You can also create a discussion forum in the Discussions tool. You must create a discussion forum first, which will contain associated discussion topics. Discussion forums organize course discussions topics into categories such as weekly discussions, open discussions, and group discussions.
To create a discussion forum from the Discussions tool
- From your course navbar, navigate to Discussions.
- Click New > New Forum.
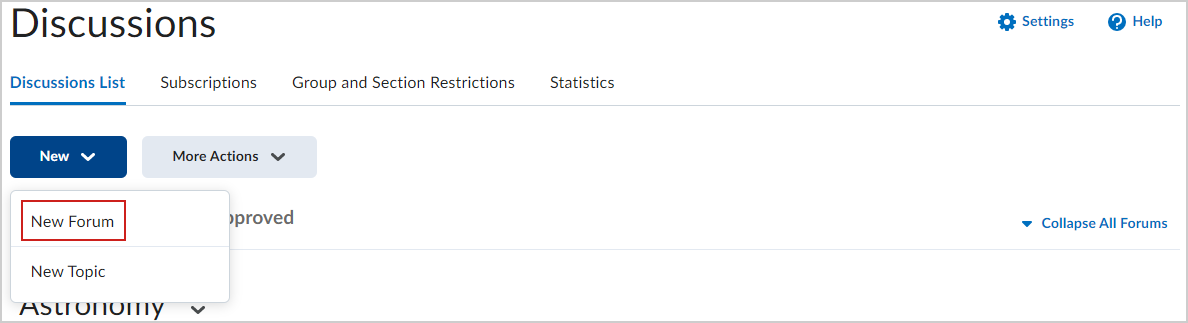
- Navigate to the Properties tab of the New Forum page and set the following:
- Enter a Title for your new discussion forum (1).
- Use Brightspace Editor to add a Description (2).
| Note: The Description field has a character limit of 65,535 characters. |
- Click to select additional forum options, including Allow anonymous posts, participation requirements, and Display forum description in topics (3).
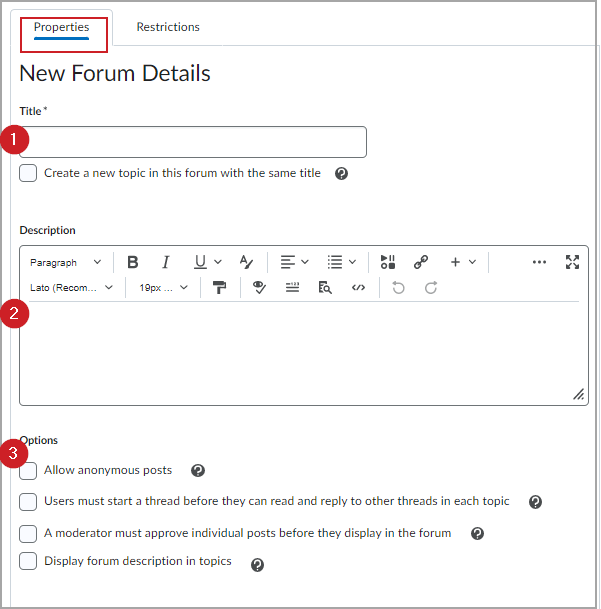
- Allow anonymous posts: Enables users to post anonymously.
- A moderator must approve individual posts before they display in the forum: Ensures that posts are approved by a moderator before they display in the forum.
- Users must start a thread before they can read and reply to other threads in each topic: Ensures user participation by making thread creation mandatory.
- Display forum descriptions in topics: Provides instructors the option to display a discussion forum description within a discussion topic description.
- Click the Restrictions tab and do one or more of the following:
- Under Availability, define the date range when the discussion will be available to users. (1). Availability options specify when learners can access (or view) a forum based on a specific date set by you. For example, you can set a date to make a discussion forum available to learners after the end date for finishing a course module.
- Locking Options specify if learners can post or reply to a forum based on a specific date set by you. For example, you can set a date to lock a discussion forum after making it available, giving learners time to read and understand the discussion forum, but not post replies. You can also set a date to unlock the forum several days later, allowing learners to post their well thought out replies.
- Visible with access restricted before start/end. The forum is visible to learners before or after the start or end date, but they cannot access it.
- Visible with submission restricted before start/end. The forum is visible to learners before or after the start or end date and they can access it, but they cannot post new threads or replies. This effectively makes a discussion read-only.
- Hidden before start/end. The forum is hidden from learners until the start or end date. Calendar events for Availability Start and Availability End are hidden until the start or end date. Notifications are also not sent until the start or end date.
- Add automated conditions for access using Release Conditions. (2)
- Apply restrictions to groups or sections. (3)
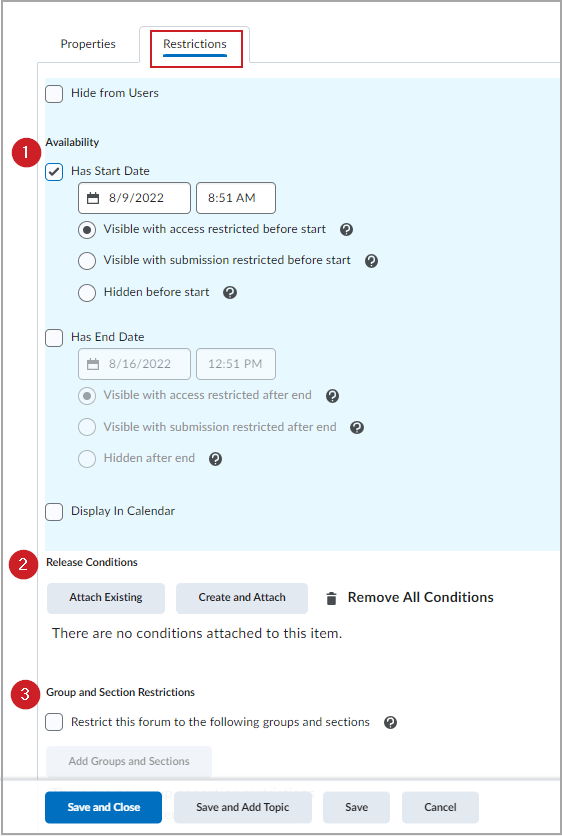
- Click Save and Close to create the forum; or Save and Add Topic to create a discussion topic within your new forum.

You have created a discussion forum using the Discussions tool.
Video: How to create a discussion forum from the Discussions tool
Create a discussion topic using the Discussions tool
You can also create a discussion forum in the New Content Experience (Lessons). This adopts creation elements from Assignments and Quizzes, making it familiar and easier to create great course content.
To create a discussion topic using the Discussions tool
- Navigate to Discussions.
- Click New > New Topic .
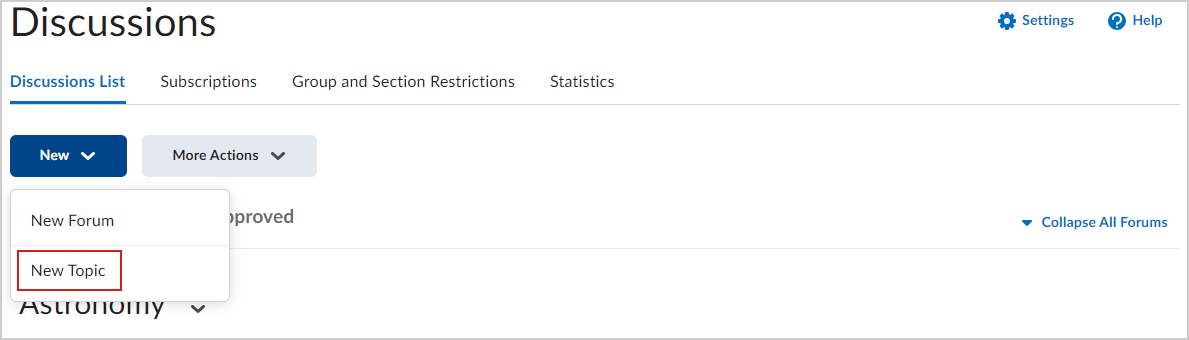
- On the New Topic page, do the following:
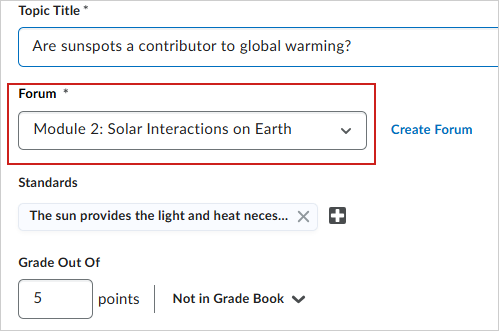
- Enter a Topic Title.
- Click Change Forum to change the topic's forum.
| Note: Depending on how your organization has configured your course, you may need to explicitly select the forum from the Forum drop-down menu instead. |
- To add your topic to your grade book, enter a value in Grade Out Of.
- Enter a Due Date .
- Enter a Description for your topic using Brightspace Editor.
| Note: The Description field has a character limit of 65,535 characters. |
- In the Availability Dates & Conditions accordion, enter the following:
- Enter a Start Date and End Date.
- Adjust the Before end and After end restrictions based on your preferences by clicking each option.
- Click Add Release Condition to create a new release condition or add an existing one.
- Under Group and Section Restrictions, you can set different restrictions if you have Groups or Sections set up in your course.
- In the Post & Completion accordion, select any of the following options to apply them to your discussion topic:
- Default participation
- Allow learners to hide their name from other learners
- Learners must start a thread before they can view or reply to other threads
- Posts must be approved before they display in the topic
- In the Evaluation & Feedback accordion, do the following:
- Click Add Rubric to attach a rubric to your discussion topic.
- Click Manage Learning Objectives to associate learning objectives to your discussion topic.
- Select Allow evaluation of individual posts to assign scores to posts, and then select your Calculation Method. You can also choose to Include unevaluated posts in the topic score calculation as zero.
- Select Allow learners to rate posts to allow learners to score each other's posts. Then, select a rating type.
- Toggle the Visibility to be either Visible or Hidden.
- Click Save and Close.
You have created a topic using the Discussions tool.
Change a topic discussion forum from the Discussions tool
You can change the forum for a topic that you have previously created.
To change the forum using the Discussions tool
- From your course homepage, navigate to Discussions.
- Click the Actions menu for a discussion topic and select Edit Topic.
- From the topic edit page, click Forum and select the desired forum from the drop-down menu.
- Click either Save or Save and Close.
Your new discussion topic forum is changed.
Edit a discussion topic using the Discussions tool
You can edit a discussion topic using the Discussions tool.
To edit a discussion topic using the Discussions tool
- From your course homepage, navigate to Discussions.
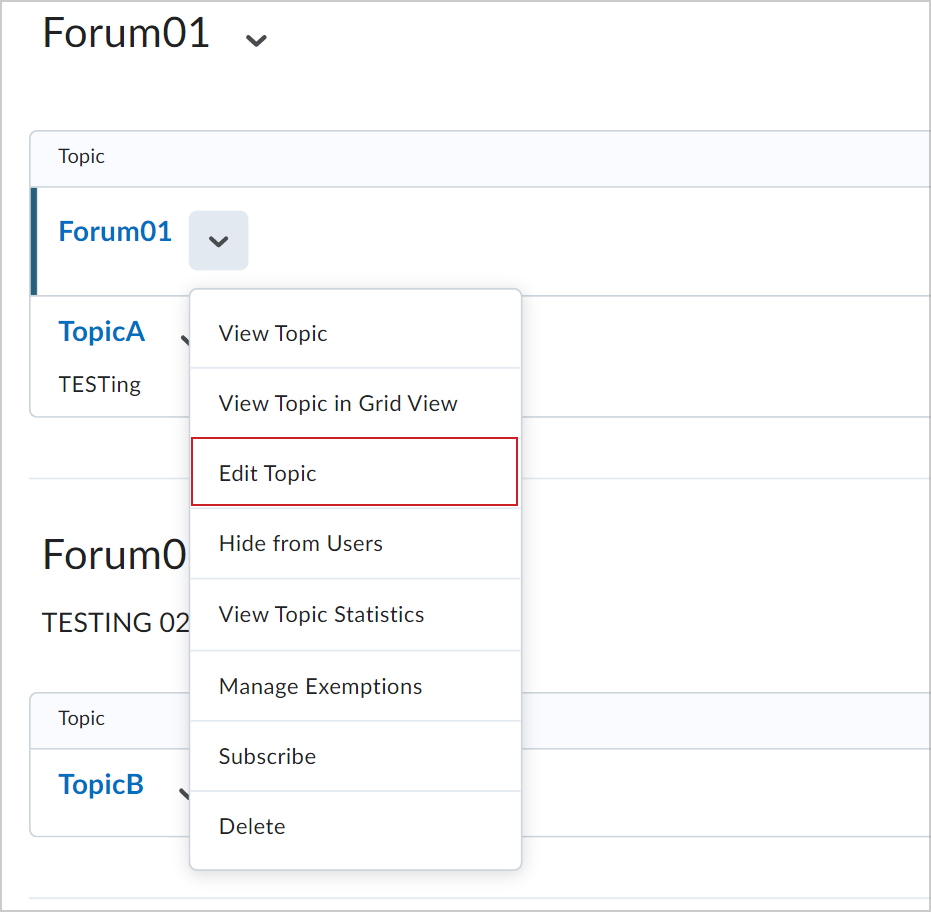
- Find your discussion topic and click the drop-down menu (arrow icon) beside the topic title and select Edit Topic.
- On your discussion topic's page, edit the Title, Forum, Grade Out Of, Due Date and Description fields.
| Note: The Description field has a character limit of 65,535 characters. |
-
- In the Availability Dates & Conditions accordion, edit the Start Date and End Date, Release Conditions, and Group and Section Restrictions.
- In the Post & Completion accordion, edit participation and display options for posts.
- In the Evaluation & Feedback accordion, attach a rubric, add learning objectives, and change evaluation settings for posts.
- Toggle the Visibility to be either Visible or Hidden.
- Click Save and Close.
You have edited a discussion topic.
Create a graded discussion topic with a linked grade item
You can link a grade item to your discussion topic to change it to a graded topic.
To create a graded discussion topic
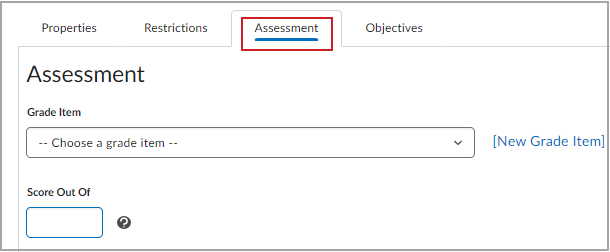
- From the New Topic or the Edit Topic page, click the Assessment tab.
- Do one of the following to associate the discussion with a grade item that counts towards the final grade calculation:
- Choose an existing grade item from the list.
- Click New Grade Item to create and associate a new grade item with the discussion topic.
- Apply a point value in Score Out Of.
| Note: Score Out Of does not need the same value as the associated grade item. Brightspace automatically calculates the Score Out Of value compared to the associated grade item value to include the appropriate score in Grade Book. |
You have created a graded discussion topic with a linked grade item.
Create a graded discussion topic with an associated rubric
Options to enable you to associate the discussion topic with a rubric are located below the grade item information on the Assessment tab.
To create a graded discussion topic with an associated rubric
- Do one of the following:
- Select Add Rubric to apply an existing rubric to the discussion topic.
- Choose Create Rubric in New Window to create and associate a new rubric.
- Click Allow assessment of individual evaluations, if appropriate, and set the calculation method.
|
Note: You can also associate a learning objective with the discussion forum using the Objective tab. |
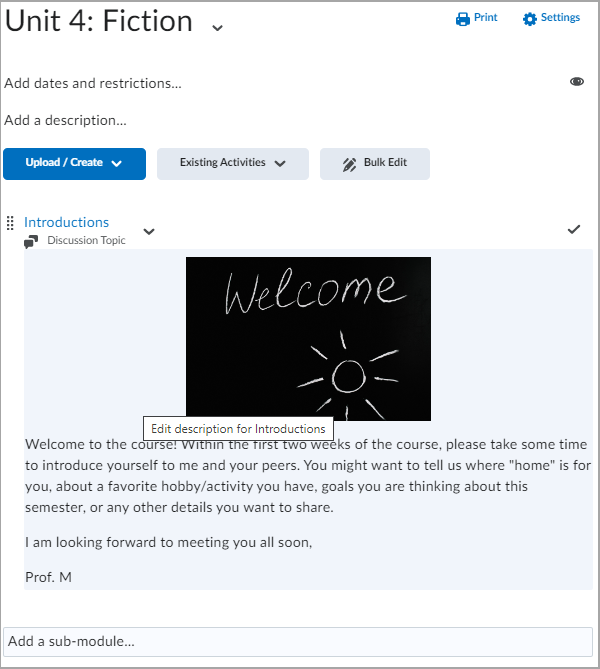
You can add existing discussion topics to a lesson or module from Content.
Delete discussion forums, topics, threads, or posts in the Discussions tool
You can also delete discussion forums, topics, threads, or posts.
|
Important: When you delete a post, any replies to that post are also deleted. |
To delete a forum, topic, thread, or post from the Discussions tool
- On the navbar, click Discussions.
- On the Discussions List page, click the context menu of the forum, topic, thread, or post you want to delete and click Delete, Delete Thread, or Delete Post.
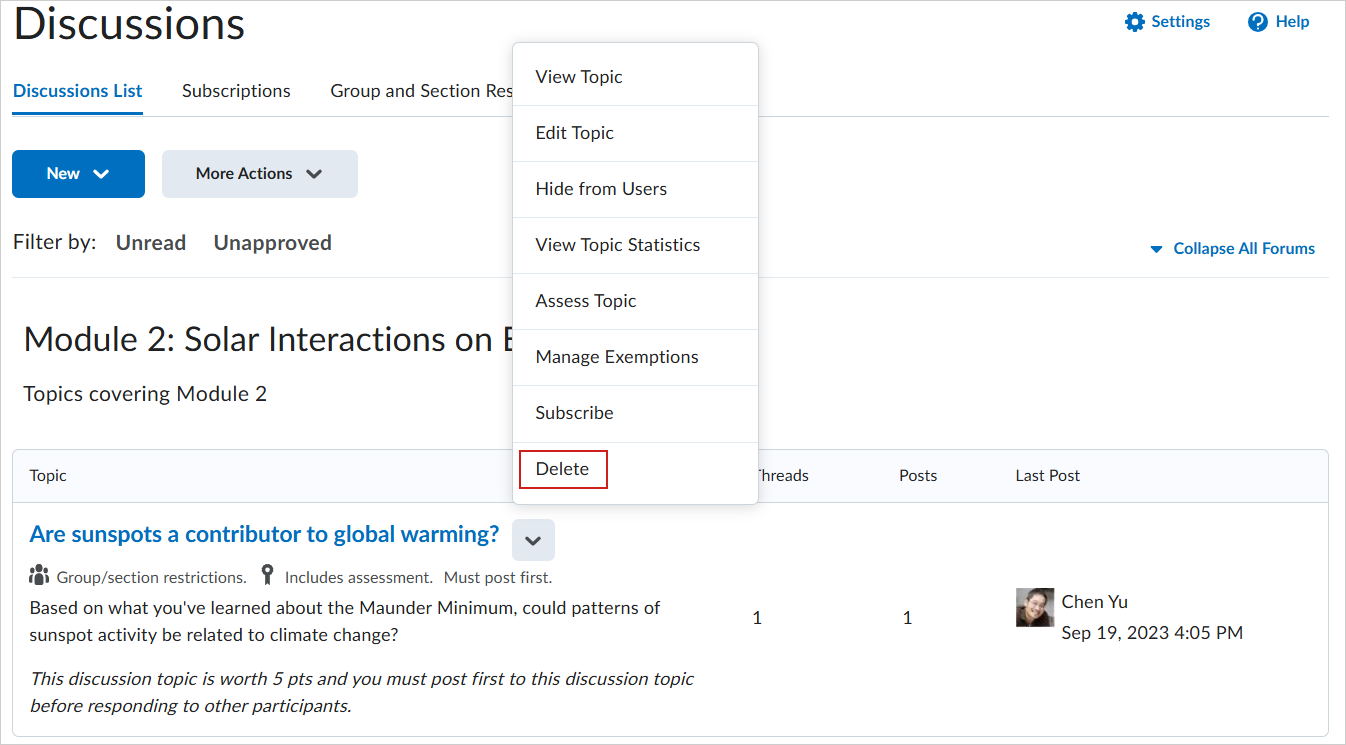
- To confirm the deletion, click Yes.
You have deleted a discussions forum, topic, thread, or post.
Restore deleted discussions from the Discussions tool
You must have the Delete and Restore Forums and Topics permission enabled to restore deleted discussions. If the forum you restore contains any topics, you have the option to also restore the forum's associated topics.
|
Note: To restore deleted threads and posts, you must have the See Deleted Posts permission and Display deleted posts option on the Settings page enabled. If the post you restore is a reply to another post, and the other post was also deleted, both posts are restored. |
To restore deleted discussions
- On the navbar, click Discussions.
- Do one of the following:
- To restore a deleted forum or topic, on the Discussions List page, from the More Actions button, click Restore.
- Click Restore beside the forum or topic you want to restore.
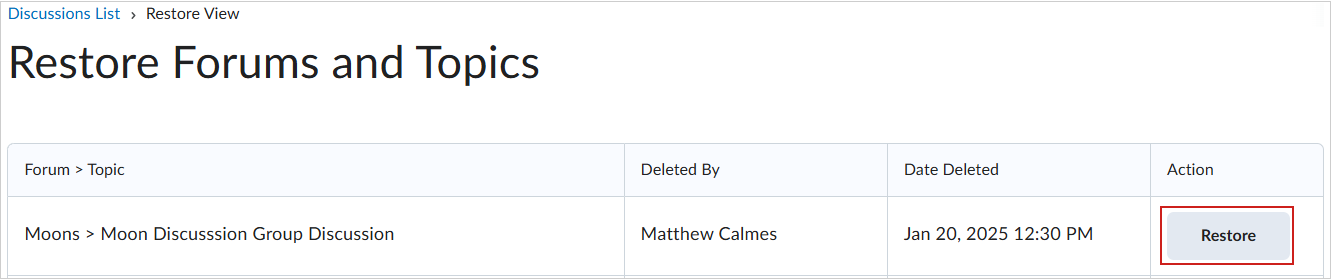
- To restore a deleted thread or post, click the Restore <Thread/Post> link in the thread or post you want to restore.
You have restored a deleted forum or topic.
|
Note: Discussions that are associated with a deleted group or section cannot be restored until the associated group or section is restored. |
Subscribe to discussion forums or topics using the Discussions tool
You can subscribe to a discussion forum from the Discussions tool.
To subscribe to a discussion
- On the navbar, click Discussions.
- Do either of the following:
- On the Discussions List page, from the context menu of the forum or topic you want to receive notifications of new posts for, click Subscribe.
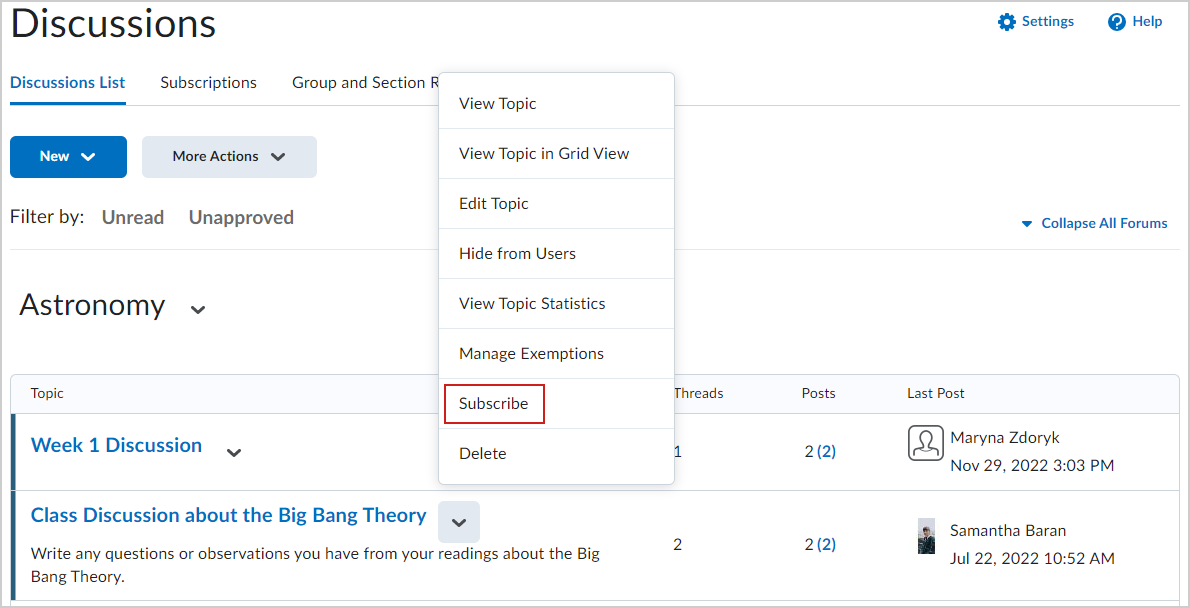
- On the View Topics page, beside the thread you want to receive notifications for, click Subscribe.
- In the Customize Notifications pop-up window, select your Notification Method. If you do not have an email address set up in your user profile to receive notifications, in the Customize Notifications pop-up window, click the Add an email address in a new window link. Click the Enable email notifications link, then set your email preferences in the Email Settings pop-up window. Click Save.
- Click Subscribe.
You have subscribed to a discussion topic using the Discussions tool.
Reply to a discussion thread from the Discussions tool
Reply to discussion threads to engage with your learners, encourage discussion, and support their learning.
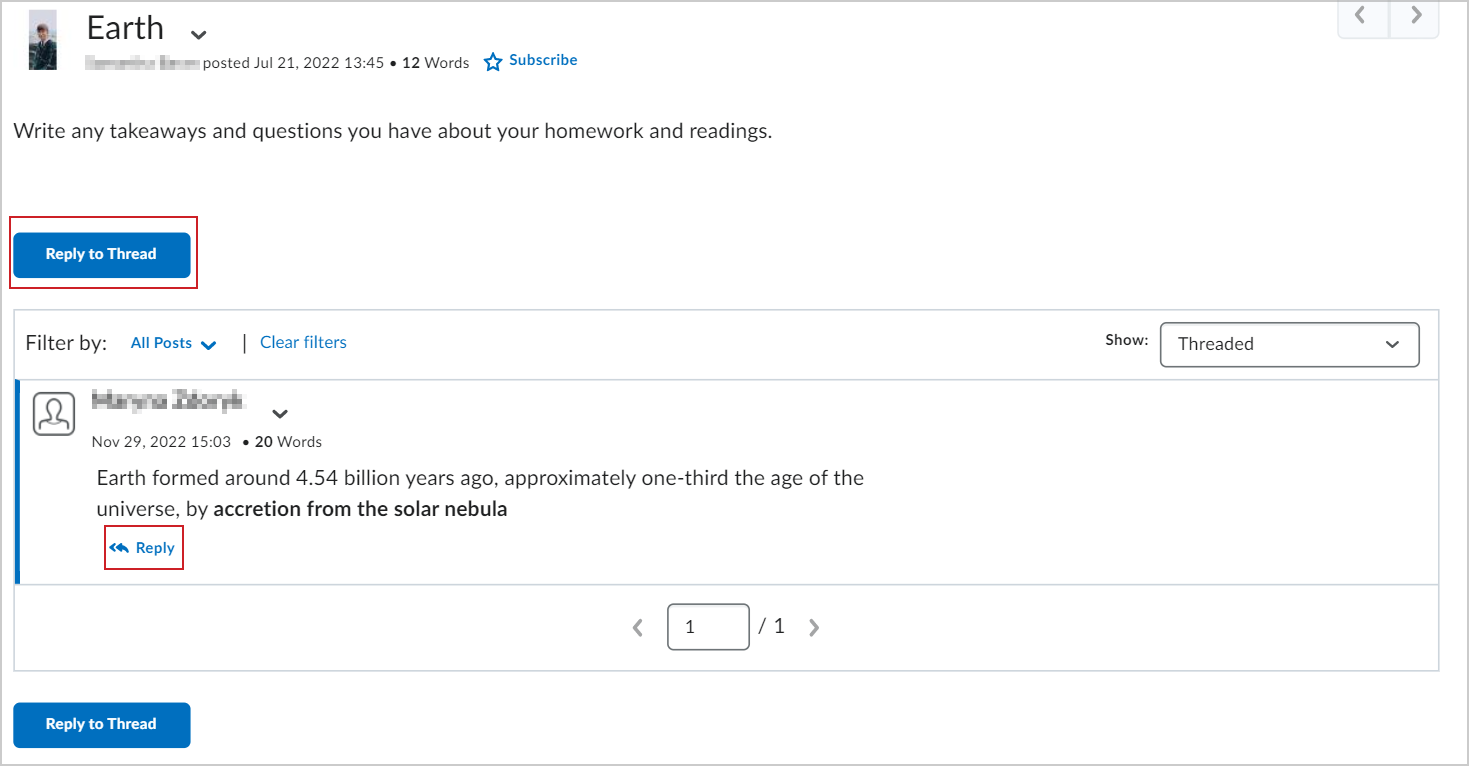
To reply to discussion threads
- Navigate to Discussions.
- Locate the thread you want to reply to and click on it.
- Do either of the following:
- To reply to the main thread post, click Reply to Thread.
- To reply to a particular post inside the thread, click Reply.
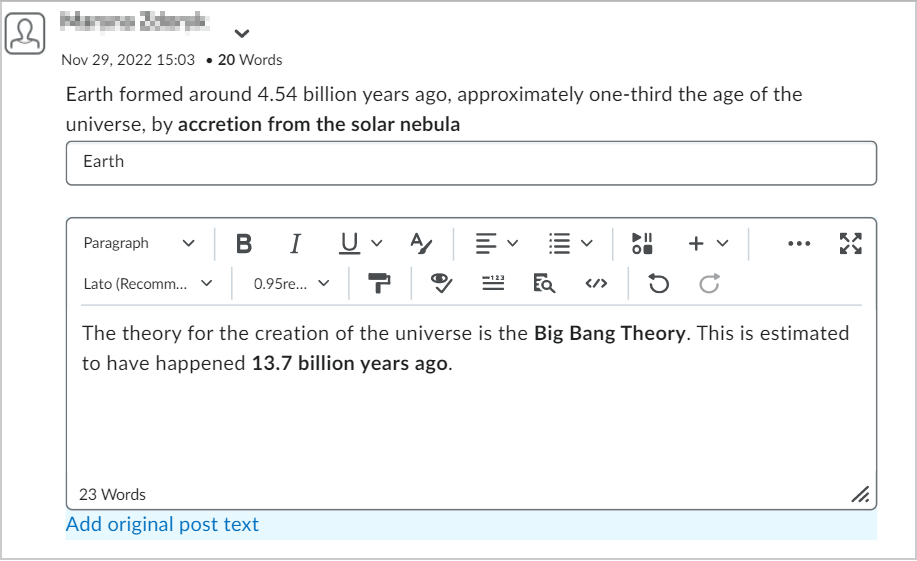
- Enter your reply in the Brightspace Editor. To include the original post’s text in your reply, click the Add original post text link.
| Note: If this option is already enabled by your course administrator, this message will not display. Posts have a character limit of 65,535 characters. |
- Set any of the following options:
- To post anonymously, select Post as Anonymous if it is enabled for the thread.
- To receive updates on the thread using your selected notification method, select Subscribe to this thread.
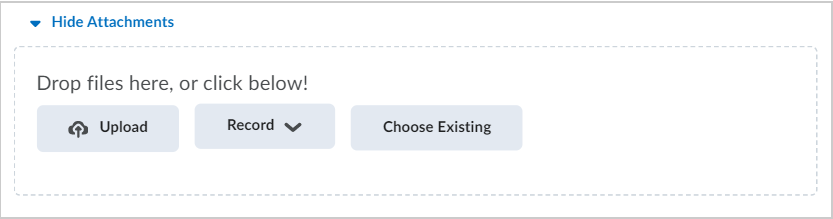
- To attach a file, navigate to the Attachments area and click Browse to locate the file you want to attach.
- To attach an audio recording, navigate to the Attachments area and click Record Audio > Record. To make adjustments to your microphone selection and volume, click Flash Settings. To listen to your recording, click Play. To erase your recording, click Clear. If you have prerecorded audio and are using a supported browser, you can drag audio files onto the attachments upload target.
- To attach a video recording, navigate to the Attachments area and click Record Video > Allow > Record. When you finish recording, click Stop. Click Clear to erase your recording or Add to add the recording. If you have prerecorded video and are using a supported browser, you can drag video files onto the attachments upload target.
- Click Post.
You have replied to a discussion thread.
Post to a group discussion topic from the Discussions tool
Post to group discussions so that learners can discuss topics in independent groups and journal.
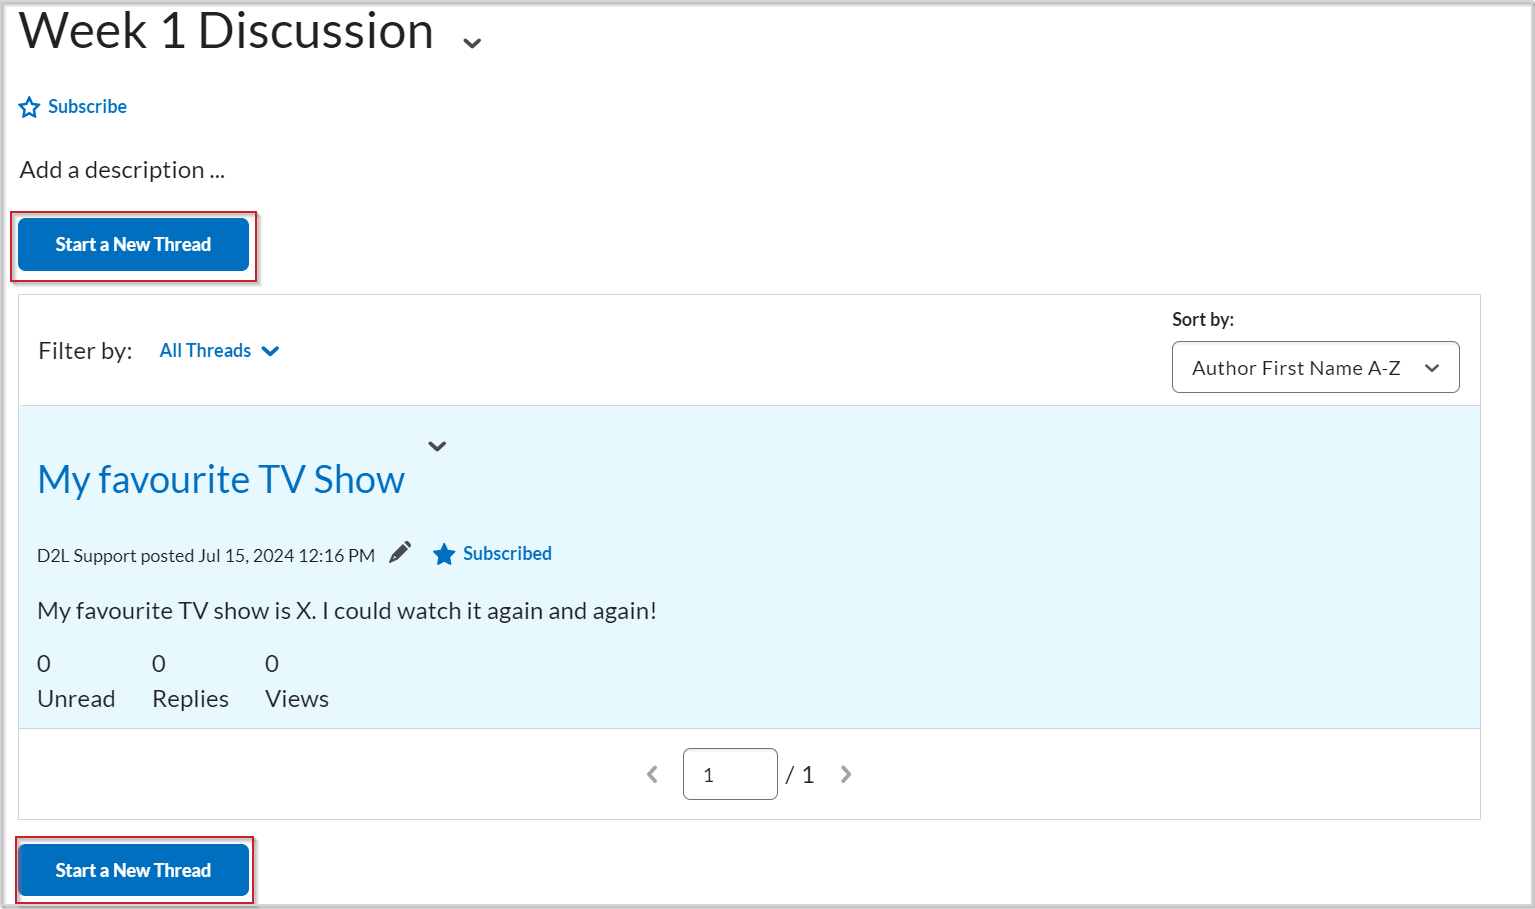
To post to a group discussion topic
- Navigate to Discussions.
- On the Discussions List page, select a group discussion topic.
- Click Start a New Thread.
- From the Post Thread to drop-down list, select All Groups, or a specific group.
- Provide a subject and enter your post in the Brightspace editor.
| Note: Posts have a character limit of 65,535 characters. |
- Set any of the following options:
- To receive updates on the thread using your selected notification method, select Subscribe to this thread.
- To attach a file, navigate to the Attachments area, click Add attachments, click Upload, and locate the file you want to attach.
- To attach an audio recording, navigate to the Attachments area, click Record Audio > Record. To adjust your microphone selection and volume, click Flash Settings. To listen to your recording, click Play. To erase your recording, click Clear. If you have prerecorded audio and are using a supported browser, you can drag audio files onto the attachments upload target.
- To add your post to other topics, click Post to other topics, and then click Add Topics. Select the desired topics and click Add Topics.
- Click Post.
| Note: If you select the option to post to all groups, the Discussions tool creates a copy of the thread for each group to access and reply to. |