The Manage Grades tab enables you to create and edit grade items and grade categories, reorder your grade book, and more.
This video explains how to manage grades in Brightspace.
You’ll learn how to access the Grades tool, create grade categories and grade items, and use bulk editing to efficiently organize your grade book.
Navigate to Manage Grades
From the Grades tool, click the Manage Grades tab.

Create a Grade Category
You can create a grade category with a name and description to organize and group related grade items into sections in your grade book.
To create a grade category
-
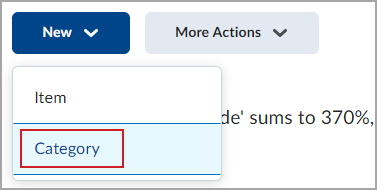
In the Manage Grades tab, click New > Category.
-
Enter Grade Category details, including;
-
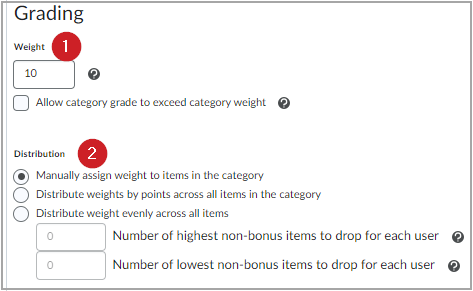
Enter Grading Weight and configure distribution settings, including:
-
The weight (percentage) that you want the category to contribute to the final grade, with grade items within the category contributing to this weight (1)
-
The distribution of how the grade items within the category contribute to the category total. Options include:
- Manually-assigned weight to items in the category.
- Distribute weights by points across all items in the category.
- Distribute weight evenly across all items, with option to drop the highest or lowest grade items from the total calculation. (2)
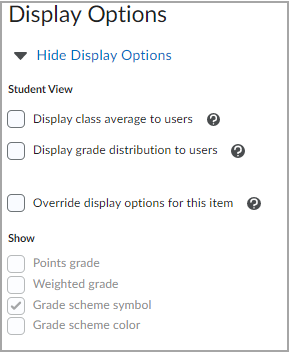
- Select the Display Options for the grade category.
- Click Save and Close to return to the Manage Grades page, or click Save and New to create additional grade categories.
Note: For more information, see Set Date Restrictions for Grades and Set Release Conditions for Grades.
Create a Grade Item
You can create a grade item to represent all the work that you want to evaluate users on in a course.
Note: Assessments you created in other areas of Brightspace, such as Content or Assignments, may already appear in Grades.
To create a new grade item
-
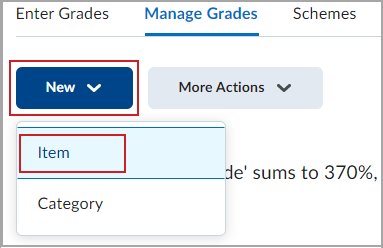
In Grades in the Manage Grades tab, click New > Item.
- Select one of the available Grade Item Types:
- Numeric - Grade learners by assigning a value out of a specified number of points.
- Selectbox - Grade learners by selecting the Grade Scheme level that best matches their achievement.
- Pass/Fail - Grade learners using a simple pass/fail grade scheme.
- Formula - Automatically grade learners using a custom formula based on achievement for other grade items.
- Calculated - Calculate learners' cumulative achievement across multiple grade items.
- Text - Provide comments in Grade book that are not calculated in the final grade.
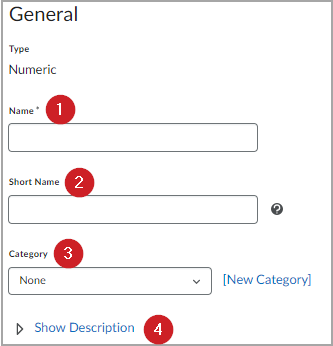
- Enter Grade Item details, including:
- Name (1)
- Short Name (2)
- Category (3)
- Description (4)
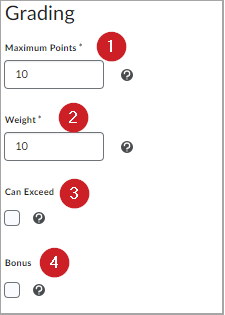
- Enter the Grading properties for the grade item, including:
- Maximum points (1)
- Weight (percentage) that you want the grade item to contribute to the category or final grade. If a grade item exists within a category, the weight is a percentage of the category, not the final grade. (2)
- Can Exceed indicates if you want to allow a learner's grade to exceed the maximum points specified for the item. (3)
- Bonus indicates if you intend to use bonus items. Bonus items are not included in the maximum points for a category or final grade: they are added on top of the calculated grade. Bonus items cannot make the learner's grade exceed the maximum points specified unless you select the Can Exceed option. (4)
- Select a Grade Scheme (if the default is not the scheme you want to use).
- Add or create a rubric to associate to the grade item.
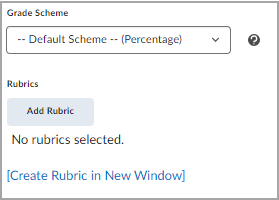
Note: For more information, see the articles: Grading Schemes in the Grades tool and Create a Rubric.
- Select the appropriate Display Options, including Student View options, scheme options, and overriding display options.
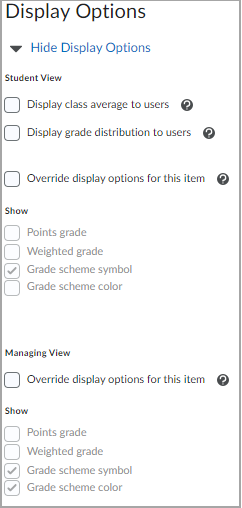
- Click Save and Close or Save and New to create more grade items.
Bulk edit grade items and categories
You can edit multiple grade items and categories at once to save time and ensure consistency across your grade book.
To bulk edit grade items and categories
- In the Grades tool, select the items or categories you want to edit and do one of the following:
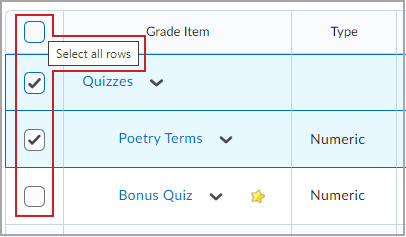
- Click the check box beside each item or category name, or
- Click Select all rows at the top of the column to select everything.
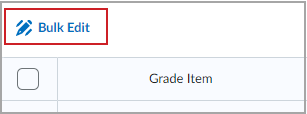
- Click Bulk Edit to open the editing page.
- In the Edit window, update the following fields as needed:
For grade categories:
- Name: The full name of the category as it appears in Grades.
- Short Name: An abbreviated label that appears in select areas of the course.
- Weight: The percentage contribution of this category toward the final grade.
- Can Exceed: Allows scores higher than the item’s maximum points.
 | Note: Recommended to enable if items within the category are using Can Exceed or if items are Bonus |
- Exclude from Final Grade: Removes all items under the category from final grade calculations.
For grade items:
- Name: The full name of the grade item.
- Short Name: A shortened label used in limited display areas.
- Max Points: The total points a learner can earn for the item.
- Weight: The percentage contribution of the item to the final grade (if the category is not evenly distributed).
- Bonus: Marks the item as an optional bonus that can raise a learner’s final grade.
- Can Exceed: Allows scores higher than the item’s maximum points.
- Exclude from Final Grade: Removes the item from final grade calculations.
- Grade Scheme: The grading scale used to convert numeric scores (for example, letter grades or percentages).
- Category: The category to which this item belongs.
- When you finish making changes, click Save.