Seating charts provide a visual representation of your classroom seating arrangement. You can activate and deactivate seats to mimic the physical layout of your class and assign learners permanent spots in the chart.
Using the seating chart, you can view and track learner performance, attendance, and participation for your course and group events on a session-by-session basis. You can also monitor response rates of learners when they are called on in class unsolicited (also known as a cold call).
Seating Chart integrates with both the Locations and Calendar tools. Because seating charts are dependent on Locations, you must first create or activate a location with a layout before you can create any seating charts.
Create a seating chart
You can create seating charts for any group or section in your course.
Important: To create and manage seating charts, you must be grated Seating Chart permissions. Also, you must have existing Locations and associated Layoutscreated and set active. If you are unable to add or edit locations and layouts, contact your administrator as you may not have the necessary permissions.
To create a seating chart
- Navigate to Seating Chart.
- Click Create a Chart.
- From the Create a Chart dialog, do the following:
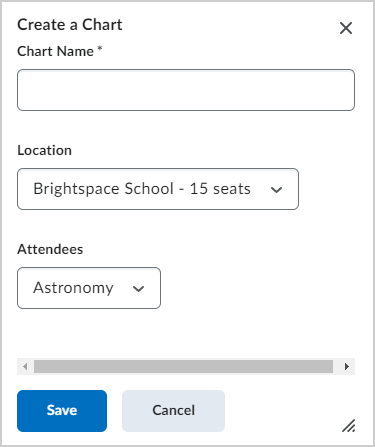
Figure: The Create a Chart dialog.- Enter a Chart Name.
 | Note: The Location is linked to a layout of seat rows and columns. |
- Select the Attendees you want to add to your seating chart. These will be Classlists created for courses.
- Click Save. A new sating chart is created. However, learners are not yet assigned to seats.
Assign a seat
The options for assigning users to seats are only available when setting up the seating chart; after a session launches, these options lock. Any changes made to the seating chart after a session launches apply only to future sessions. All seat assignments and changes to seating charts save automatically.
To assign learners to seats
- From the Seating Chart page, scroll to the bottom of the page.
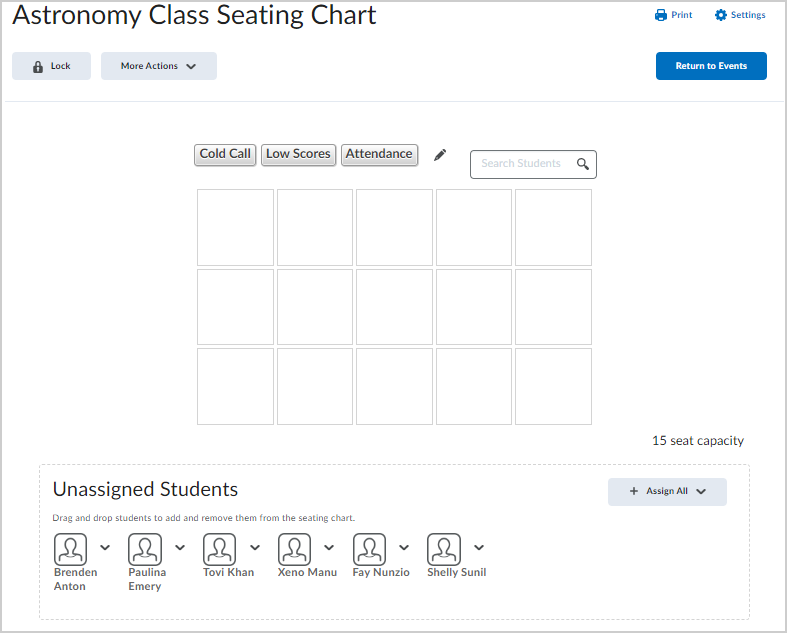
Figure: The Seating Chart page.
- To assign seating from the seating chart view, by do any of the following:
- Drag-and-drop course participants one by one to assign or swap seats.
- To randomly place all unassigned learners on the seating chart at once, or to assign them specific locations in the chart (for example, bottom left), click Assign All.
- To assign seats individually, from the context menu of each unassigned learner, click Assign User.
- To remove all learners from the seating chart, from the More Actions button, select Remove All.
- To randomize seat assignments, from the More Actions button, select Randomize.
- Once your have completed assigning seats, click Lock to lock the seating chart.
Your learners are assigned seats on the seating chart.
Video: Create a seating chart
Create a session
When you create an event using the Calendar tool, you can set the event to use a specific Location and Seating Chart. This automatically creates a session that learners from the specified seating chart can attend. You can also track attendance and participation for sessions and make learner-specific comments.
When you click a session, it starts automatically and remains in progress until you click Set Session Completed. This locks the attendance, participation tracking, and comments that you enter for the session.
Important: To create a session, you must create an event using the Calendar tool and set the event to use a location and seating chart. Refer to the Manage course events with the Calendar tool topic for details.
If you want to add an event that isn't already associated with your location and seating chart, you can add the event and create a session.
To add an event and create a session in seating chart
- Navigate to Seating Chart.
- Click More Actions and select Add Events.
- Select the event you want to add and click Add.
A new session is created based upon the added event date and time.
Video: Create a session in Seating Chart
Session Statuses
The following are possible session statuses that can display beside seating charts:
|
Status
|
Description
|
|
Not Launched/No Session
|
Seating charts with sessions that have not been launched, or that do not have sessions attached to them, display no icons beside their seating chart name.
|
|
In Progress
|
Seating charts with sessions in progress have an  In Progress icon beside the seating chart name. In Progress icon beside the seating chart name.
|
|
Complete
|
Seating charts with complete sessions have a box ( ) where the number indicates the participation score for the session and the color indicates what threshold value the session attained. ) where the number indicates the participation score for the session and the color indicates what threshold value the session attained.
|
Set a target participation score for a session
Once you have created an event and session, you can set a positive threshold (the target participation score expected from learners in a session) and a negative threshold (the minimum score learners need to exceed to pass the session's participation requirements) for your sessions.
Seating Chart uses color coding when viewing a session to help distinguish participation:
|
Color
|
Learner progress
|
|
Green
|
Indicates learners who are achieving or exceeding the positive threshold value.
|
|
Yellow
|
Indicates learners who are below the positive threshold value, but are equal to or above the negative threshold value.
|
|
Red
|
Indicates learners who are below the negative threshold value.
|
To set a positive and negative threshold for a session
- Navigate to Seating Chart.
- Click the Settings icon (gear) to open Participation Options.
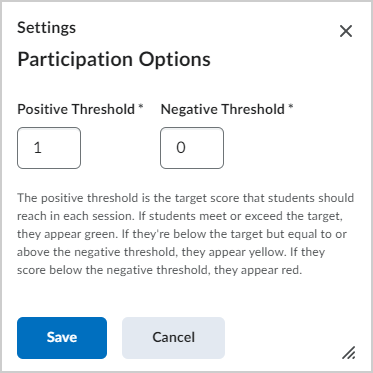
Figure: The Participation Options dialog.
- Enter a Positive Threshold and Negative Threshold.
- Click Save.
The event session now has a target score that learners must meet when they join the session.
What is a seating chart cold call?
The cold call feature tracks the number of times you request a response or comment from a learner in class who has not volunteered to participate.
When you mark a student who has been cold called during the session, the Cold Call icon appears beside the student's name. This helps you track students you have called on in sessions.
Track session attendance
You can use sessions to track learner attendance and participation during lectures. You can also add, edit, and delete user-specific comments during sessions. All changes save automatically inside sessions.

|
Note: Before you can take attendance using Seating Chart, you must create an event using Calendar and assign the location of the event. Refer to the Create and manage seating charts topic for details |
To track attendance
- Navigate to Seating Chart.
- Click a seating chart.
- Click an event for the seating chart.
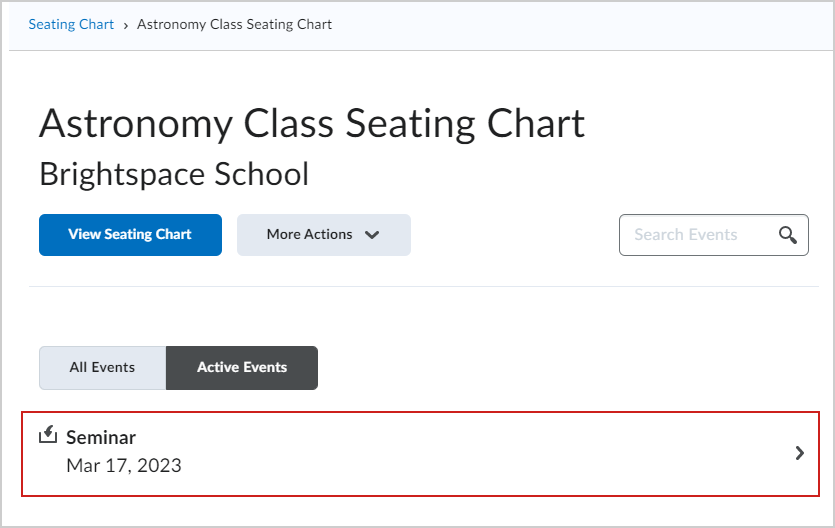
Figure: An event listed for a Seating Chart.
- Click the user you want to track from the session seating chart and do one of the following:
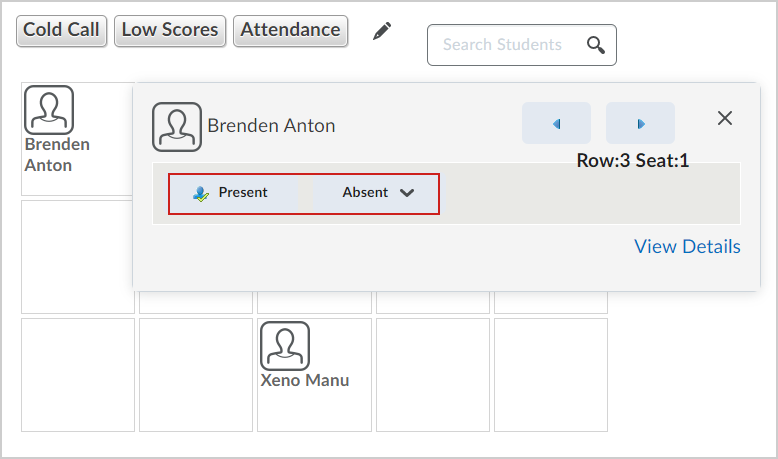
Figure: The Present and Absent buttons for a learner.- To mark a user present, click Present.
- If you mark a user as present, adjust their Participation and Cold Call scores using the Lessand Moreicons.
 | Note: You can award negative scores for participation, but not for cold calls. |
- To mark a user absent, from the Absent button, select Unexcused Absence or Excused Absence.
- To review all attendance, click the Attendance button.
- To give personalized session feedback, click Add Comment.
- Click anywhere outside the user's session summary to return to the session.