Edit properties of a learning object
Once a learning object is in a learning repository, you can edit any of the following attributes:
- Which repository it resides in
- Status (unassigned, approved, archived, draft, or in review)
- Visibility to other users
- External availability
- Creative Commons license rights
- Metadata details
- Classifications applied to it

|
Note: To make further changes to a learning object, you must retrieve it from the repository and then publish it again. You cannot perform edits on non-local learning objects. |
To edit properties of a learning object
- From your course navbar, click LOR.
- On the Search page, under Explore a Repository, locate the learning object you want to edit and click Manage LOR (Pencil icon).
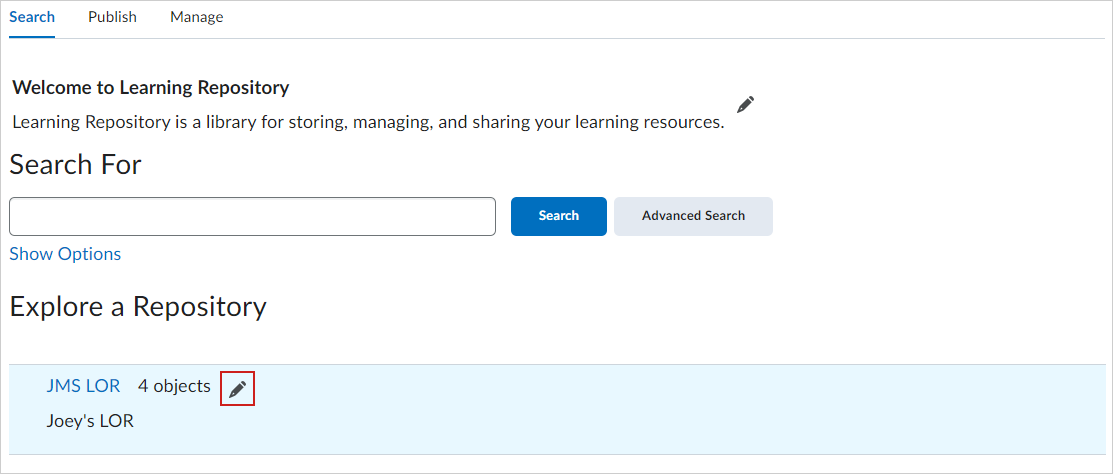
Figure: Locate a learning objective and click Manage LOR to edit it.
- Click the learning object and then click Edit.
- From the Edit Repository page, optionally update the Name, Description, Search by Default, Public Access, and New Learning Object Properties for your learning object.
- Click Save.

|
Important: If you move a learning object to a destination learning repository where you have different permissions than you do in the source learning repository, you might not be able to edit your learning object.
Moving learning objects might cause users who follow links to these learning objects to no longer be able to see them if they do not have the necessary permissions.
D2L recommends caution when you move learning objects to different repositories since their predecessors stay in the repositories where they were overwritten. As a result of moving and overwriting an object, you may lose permission to view the learning object.
Hidden learning objects can only be seen by the user that published them and users that have sufficient permission. Hidden learning objects display the Hidden icon on the search results page.
|
Delete a learning object
Deleting a learning object deletes its current version and all its previous versions.

|
Important: You cannot undo a learning object deletion. When you delete learning objects, links to deleted learning objects or previous versions of the deleted learning objects do not work. You cannot delete non-local (federated) learning objects.
|
To delete a learning object
- From your course navbar, click LOR.
- On the Search page, under Explore a Repository, locate the learning object you want to edit and click Manage LOR (Pencil icon).
- From the manage page of the selected LOR, click More Actions > Delete.
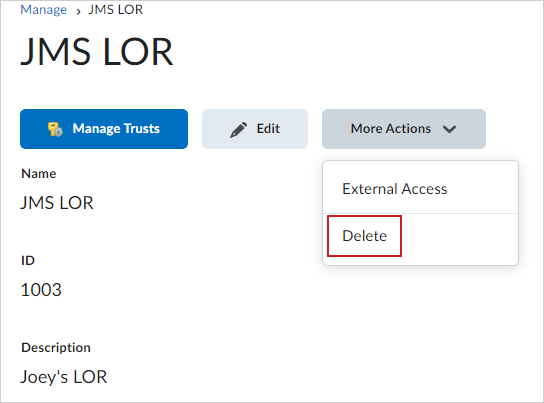
Figure: From More Actions, select Delete.
- Click Yes to confirm.
The selected learning object repository is permanently deleted.
Import a learning object into a quiz or question library
When you want to import a learning object as a quiz, quiz section, or question from a learning repository, you must start in the course that you want the quiz, quiz section, or question to exist in.

|
Important: You can only import quizzes and quiz questions from Brightspace LOR. Linking to quizzes is not available.
|
To import a learning object into a quiz or question library
- On the navbar, click Quizzes.
- To add a learning object to Quizzes, do the following:
- Click More Actions and select Add Learning Object.
- From the Add Object from LOR dialog, click Search.
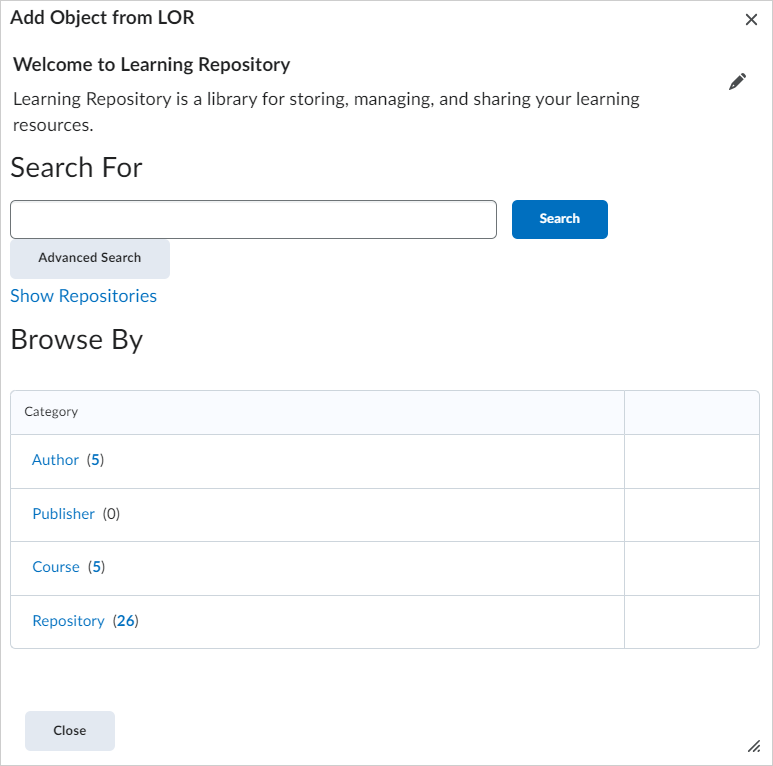
Figure: You can search for a learning object or you can browse by category.
- Select a learning object and click Select to add it to Quizzes.
- To add a learning object to Question Library, do the following:
- From the Manage Quizzes page, click Question Library
- Click Import and select Import from Learning Repository.
- From the Add Object from LOR dialog, click Search.
- Select a learning object and click Select to add it to Question Library.
The selected learning object is added to Quizzes or Question Library.
About Brightspace LOR collections
If you have permissions that allow you to search any repository, you can organize learning objects (including harvested resources) into collections. Collections have the following characteristics:
- Only the user who creates the collection can add items to it.
- Collections aggregate their key words from the learning objects they contain.
- Collections always reference the newest version of the learning object they contain.
When working in a collection, you can do any of the following:
- Include content from any local repository or harvested resource (which you have permission to search) in a single collection.
- Make your collection public or limit it to your personal use by hiding the collection in search results.
- Retrieve a collection to course content.
Add a learning object to a collection
You can add learning objects to a collection to better organize learning objects (including harvested resources).

|
Note: You can only add learning objects to collections that you have created. Only collections that you have created are visible to you when you add a learning object to a collection. |
To add a learning object to a collection
- From your course navbar, click LOR.
- Enter keywords and click Search to locate a learning object, click a repository open the Results page for that repository.
- Locate a learning object from the list and click Actions (arrow icon) >Add to Collection.
- From the Add to Collection dialog, do one of the following:
- Select an existing Destination Collection that you have created.
- Select Create New Collection, enter a collection name, and choose visibility.
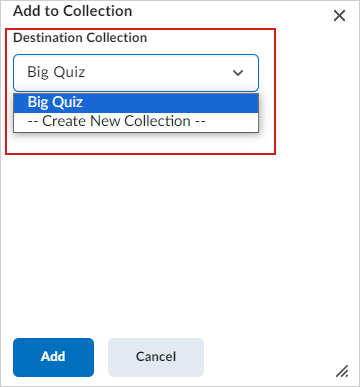
Figure: You can either add the learning object to a collection you have already created, or create a new collection to add your learning object to from the Add to Collection dialog.
- Click Add.
The selected learning object is added to a collection.
Manage a collection's properties
- From your course navbar, click LOR.
- From the Search tab, locate the My Collections area. This lists all collections that you have created.
- Click to open a collection.
- Click Actions (arrow icon) next to the collection name and select Edit [collection name].
- Do any of the following:
- To edit the collection name, in the Collection Name field, enter a new name.
- To add an image to the collection's header, in the Header Image area, click Upload or Choose Existing and locate your image.
- To hide your collection from searches, select Hide collection in search results.
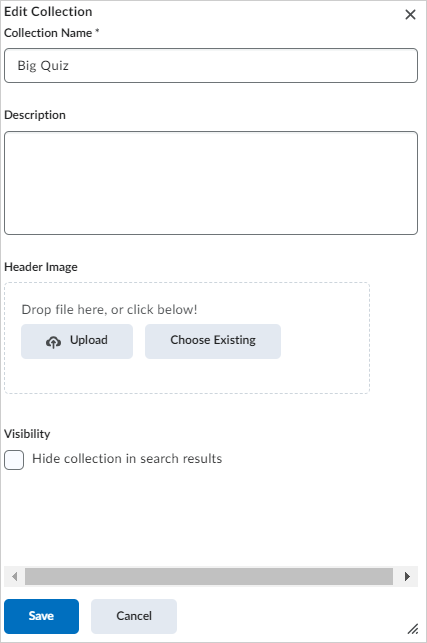
Figure: Use the Edit Collection dialog to update the Collection Name, Description, Header Image, and Visibility.
- Click Save.
The properties the collection are updated.