
|
Note: The maximum number of groups per category is 1000.
|
In addition to managing groups enrollments in the Groups and Sections tools, enrollments can be made through the following methods:
- Groups enrollments, including bulk enrollment via CSV file
- Manage Users tool
- Classlist enrollments that add users to groups
- Enrollment APIs
- Banner integrations
- Self-Registration
These group enrollment methods run as a background job process to reduce timeouts and errors. The background job processing may take several minutes to complete in most cases on average. Some jobs may take longer.
New Manage Groups experience
When enabled by your administrator, you can access the new Manage Groups experience.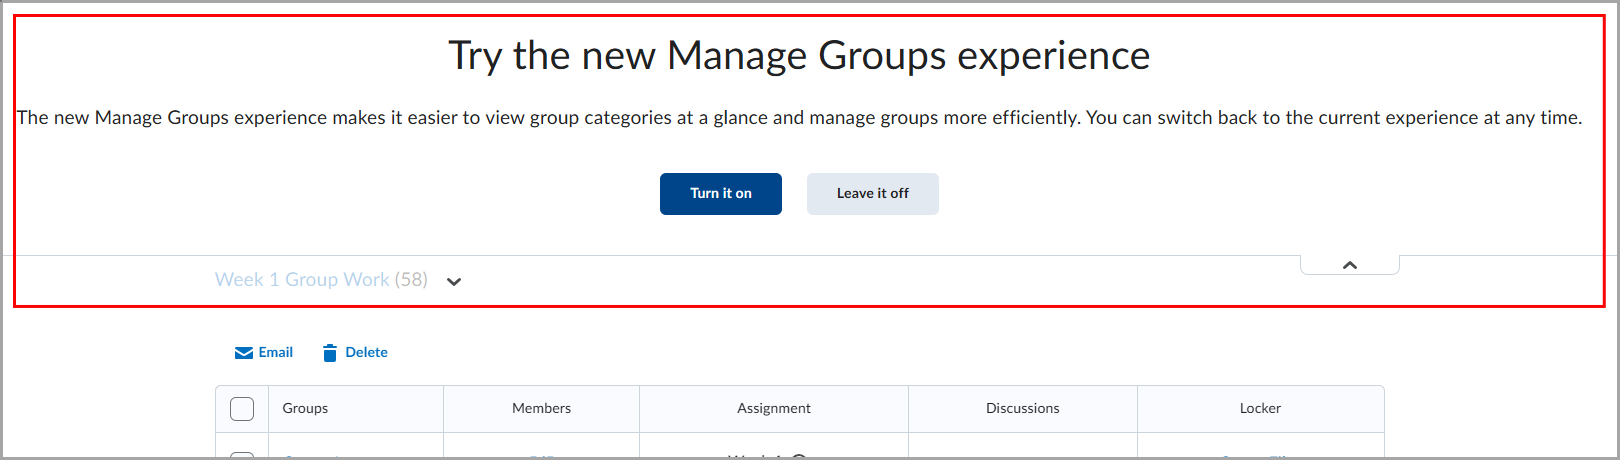
You can opt out at any time and return to the previous experience on the Manage Groups category page.
Once you opt in, all group categories appear on a new page. This page helps you quickly validate group setup by showing existing categories and their configurations. You can view each category’s enrollment type, number of groups, and associated activities. Each activity links to its related locker, discussion, or assignment.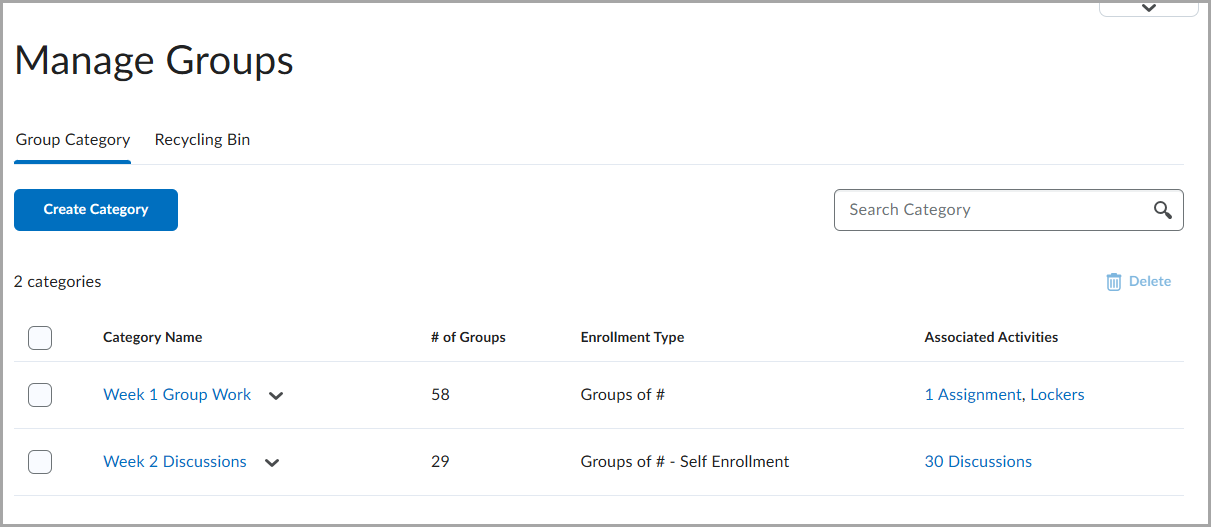
From each category context menu, you can edit the category, add a group, manage members, import users, export member details, email the category, or delete the category.
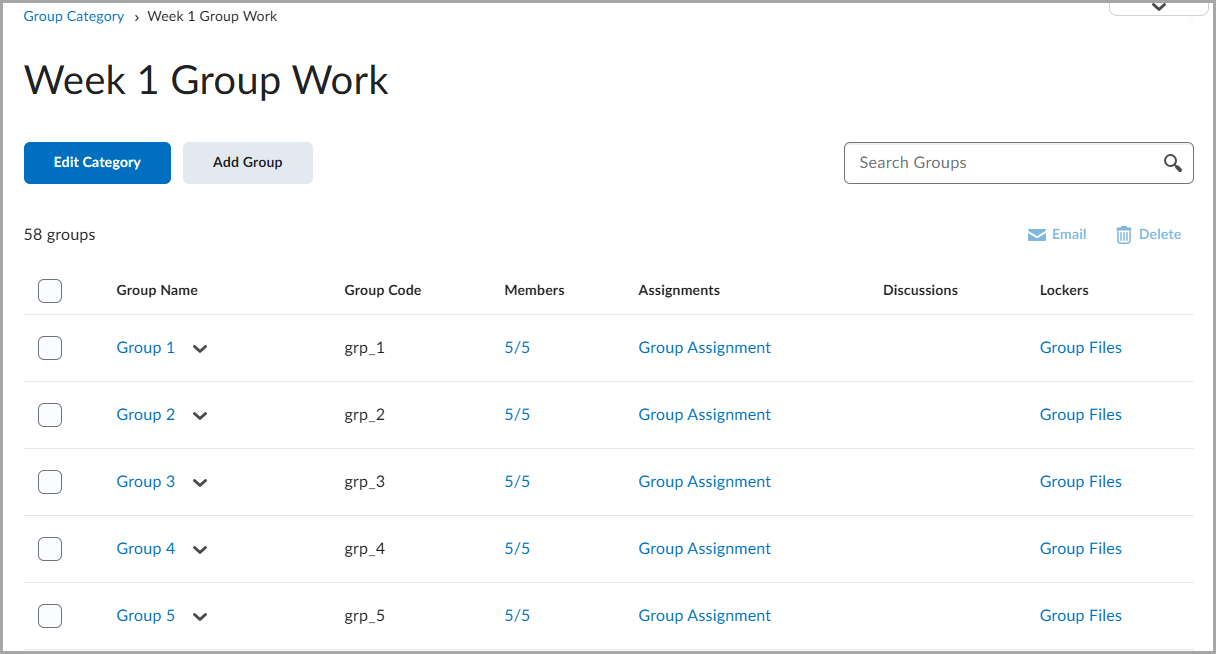
To view and manage individual groups in a category, select a category to open a details page. This page shows each group’s name, code, number of members, and associated assignments, discussions, and lockers. You can edit each group’s name and code, manage members, export members, email the group, or delete the group.
Create a group category
To organize and manage related groups, use categories. For example, you can have a category for Assignment 1, Assignment 2, Seminars, Remedial Help, and Book Reviews.
Before you create a new set of groups, you must set up a category and create restricted work areas for the groups.
To create a group category
- On the Manage Groups page, click New Category.
- Enter a Category Name and Description.
- Select an Enrollment Type from the drop-down list.
- Depending on the chosen Enrollment Type, enter the Number of Groups to create, the Number of Users per group, or both.
- To apply a distinctive prefix to each group name and code in the category, enter it in the Group Prefix field. If you do not fill in this field, the prefix defaults to "Group".
- Depending on the chosen Enrollment Type, do one of the following:
- To automatically enroll users to groups, select Auto-enroll new users.
- To randomly place users in groups, select Randomize users in groups. If you do not choose this option, users are placed alphabetically based on the Classlist.
- To make the description of the groups visible to learners from within their groups, select Make category and group descriptions visible to group members.
- If you select an Enrollment Type that supports self-enrollment, to set enrollment availability times, select the Set Self Enrollment Start Date and/or Set Self Enrollment Expiry Date check boxes and select dates from the mini calendar field.
- If you select Set Self Enrollment Expiry Date, but you want all learners who do not enroll before the expiry date to be enrolled, you can select Allocate unenrolled users after Self Enrollment Expiry Date to automatically, randomly and evenly distribute them into the available groups. This option adds group members beyond the capacity of groups, if applicable. The automatic enrollment recurs at a set interval after the expiry date to ensure that all learners are assigned to a group.
| Note: Enable the options in the Create Workspace area only after you've customized your group names. The Discussions areas are then created with the customized group names right away, and you do not have to edit their names manually later. |
- Click Save.
- To customize individual group names, click the group and enter a new group name.
- Click Save.
- To set up discussion areas, locker areas, and assignments with the customized group name, from the category name's context menu, click Edit Category.
- In the Create Workspace area, select Set up discussion areas, Set up lockers, and/or Set up assignments.
- Click Save.
- On the Create Restricted Topics page, select the Forum in which you want to create restricted topics.
- If you have the new group topic creation feature enabled, do one of the following:
- If you want instructors to manage each topic individually, select the Create one topic per group radio button. Learners can only see topics assigned to their group.
- If you want to enable instructors to manage all activity and assessment from one topic, select the Create one topic with threads separated by group radio button. Learners can only see threads from their own group.
- Click Create and Next.
- Enter a group discussion Title and Description.
- Click Create and Next.
- Click Done.
|
Note: Assignments can be created on the New Category page by selecting the Set up assignments check box, and choosing a submission type. When the new category is saved, you are taken to the Create Assignments page to complete the assignment creation process. |
Use distinct group codes for multiple categories
You can also create distinct group codes for multiple categories and when copying and importing groups into other course offerings to include the OrgunitId in a group code and create a distinct group within a course offering. The setting that your administrator sets in the d2l.Tools.Groups.IncludeOrgUnitIdInGroupCode configuration variable is also used to create distinct group codes in additional scenario:
When creating multiple categories within a course offering, each category has distinct group codes for child groups. Group categories include both the OrgUnitId and the GroupCategoryId to ensure child groups remain distinct. For example, if you have set the Group Prefix field to "grp" in Step 5 above, the categories appear as "grp_[OrgUnitId]_[GroupCategoryId]_1, grp_[OrgUnitId]_[GroupCategoryId]_2".
Copy groups that include an OrgUnitId
When copying groups that include an OrgUnitId, the identifier is updated to match the OrgUnitId of the destination course offering to ensure that the group codes remain distinct.

|
Important: Groups with the Groups of # enrollment style can’t be copied directly because the number of groups created depends entirely on the number of users enrolled in the course.
Since two courses rarely have identical enrollments, Brightspace recreates the groups during the copy process instead of copying the individual groups themselves.
As a result, the system copies the group category and then generates the appropriate number of groups in the new course based on its enrollments.
|
Add a group to a category
To add a group to a category
- On the navbar, click Groups.
- On the Manage Groups page, from the View Categories drop-down list, select the category you want to add a group to.
- From the context menu of the category, click Add Group.
- If you do not want to use the default name provided, enter a group name.
- If you do not want to use the default group code provided, enter a group code.
- Enter a description for the group.
- Click Save.
After clicking Save, the Groups tool displays the category and provides you with a prompt that your group, or groups, are being created in the background and that you will be notified once the group, or groups, are created. This notification appears as an update alert in the minibar that indicates that the group, or groups, have been created.
While this is in process, Brightspace indicates that "Group creation is in progress". While processing, you are unable to make changes to groups or enrollments.
|
Note: You can also copy existing groups using the Copy Courses workflow. The asynchronous creation executes behind the scenes and doesn't block other course copy items from completing. You can check your group creation status in the Groups tool. The copy history log reports that the group creation process has started. The completion status is notified via an update alert. Contact your administrator for more information. |
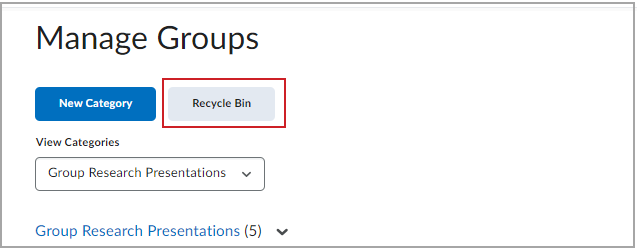
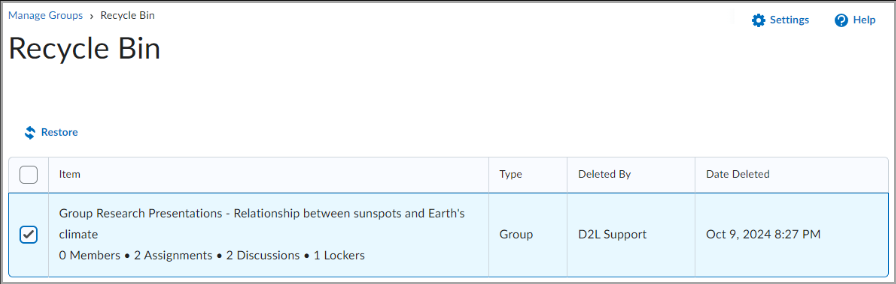
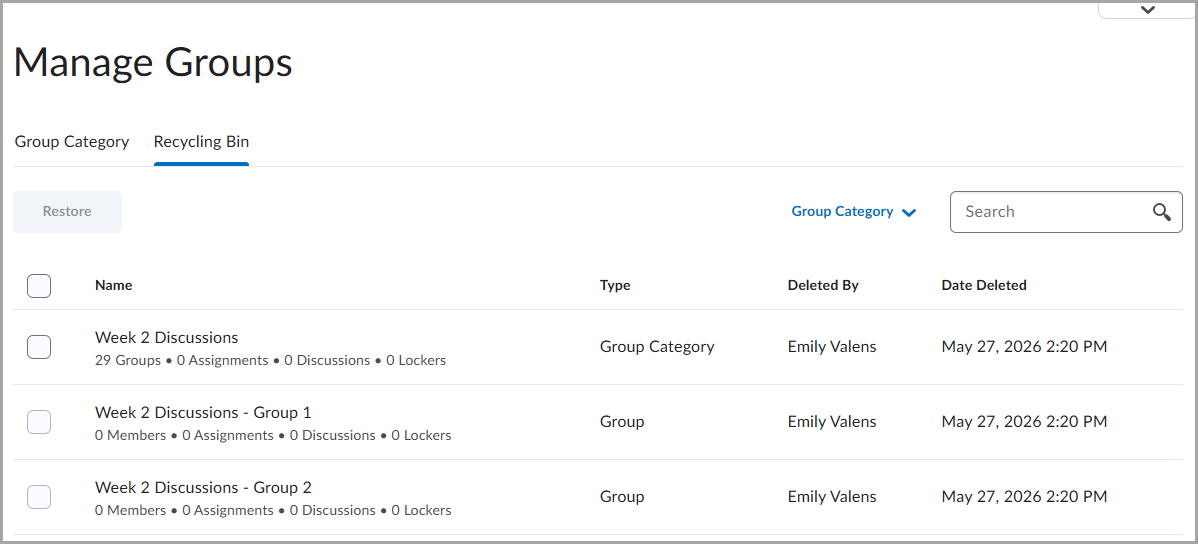
Restore deleted groups and categories
Deleted groups and categories are moved to a Recycle Bin, enabling users to restore individual group units or entire categories within a course offering. When you restore groups, existing enrollments and lockers are also reinstated (if present). Any activities linked to the restored groups, such as discussions or assignments, can then be individually restored through their respective restore pages.
|
Note: Groups and categories deleted before this feature was introduced in November 2024/20.24.11 do not appear in the Groups Recycle Bin. To restore these previously deleted items, contact D2L Support for assistance. |
To restore deleted groups and categories
- On the navbar, or from the Course Admin menu, click Groups.
- On the Manage Groups page, click Recycle Bin.
- On the Recycle Bin page, select the item you want to restore.
- Click Restore.
|
Note: When groups and categories are queued for deletion, they appear in the Recycle Bin but the option to Restore doesn't appear. The Restore option becomes available once the deletion is complete, which may take several minutes.
|
If you use the new Manage Group experience, the Recycle Bin page includes new filtering and search options. However, the process for deletion or restoration of groups and categories remains the same.
Enroll course leaders in groups
|
Note: In the new Manage Groups experience, the Enroll Users option is renamed to Manage Members.
|
The way to enroll a course leader into groups depends on whether they have access to all groups or only select groups. Users should have access to all groups if they are responsible for mediating, grading, and working on material for the entire class. They should have access to select groups if they are only responsible for mediating, grading, or working on material for a particular group.
Add staff that are working with select groups the same way you add users. However, if an administrator enables the Can be auto enrolled into groups permission, users that lead courses and assist users (like teaching assistants) are added to groups at the same time as regular users; this could mean that all or most of your staff end up in the same group. Make sure you even out enrollment using the Enroll Users page.
To enroll course leaders in groups
- On the Manage Groups page, click Enroll Users from the context menu of the category that contains the group (or groups) you want to enroll a user in.
- In the Search For field, search for the user you want to add. To see a list of users that need to be enrolled, use the Not Enrolled search option.
- To add users to groups, select the check boxes beside each user's name. Clear check boxes to remove users from groups.
- Click Save.
Add new group members after evaluation
When you publish an evaluation for a group assignment and later add additional learners to that group, these newly added learners do not automatically receive the group’s already published grade or outcome evaluation.
The newly added learners can see the published evaluation in the Assignments tool, but they do not see it in the Grades tool or in the Class Progress tool unless you update it manually.
You can do one of the following to ensure the grade appears for newly added learners:
- Update the published group evaluation in the Assignments tool, which re-applies the evaluation to all current group members.
- Manually enter a grade for the affected learners in the Grades tool.
This behavior ensures that grade changes made after publication are explicit and under your control.
Enable additional identifiers for learners
Instructors can differentiate between duplicate learner names by displaying the username or Org Defined Id beside a learner's name. Instructors can enable this option in both the Manage Groups and Manage Sections tools.
Ensure that the View User's Org Defined IDs Users permission and the See Usernames User Information Privacy permission are enabled.
- From the Manage Groups or Manage Sections page, click Settings.
- From User Details, ensure Username and Org Defined ID are selected to enable the corresponding user detail.
Delete a user from a group
When you delete a user from a group, all of their files remain in the system, including discussion posts, Assignments submissions, and Locker files.
- On the Manage Groups page, from the View Categories drop-down list, select the category containing the groups with users you want to delete.
- From the context menu of the category, click Enroll Users.
- On the Enroll Users page, beside the user's name, clear the check box for each group you want to remove the user from.
- Click Save.
Bulk enroll and unenroll users by file import
|
Note: If you use the new Manage Group experience, the Import and Export buttons are available from each category's context menu.
|
Import groups enrollment changes using a CSV or TXT file containing user enrollment data. You can manually create files to import or use the downloadable CSV template provided on the Import page in the Groups tool. Click the View instructions on creating your CSV file link to view file formatting, required and optional fields, and available actions.
Before you begin
- Ensure all learners included in the CSV file are currently enrolled in the course.
- You can enroll and unenroll learners in multiple groups with one file, but each line must reference a single learner and group action.
- You can only run one import process at a time. Once initiated, cancelling the import process does not undo actions already completed.
- Prepare a CSV file according to the instructions provided on the Import page.
To import a CSV file of groups enrollment updates
-
On the Manage Groups page, do one of the following:
- Click Import from the page toolbar.
- From the Category drop-down menu, select Import.
- Follow the on-screen instructions to prepare your CSV file. Click Download template CSV to use the provided template.
- Save your file to a folder on your device.
- Select a category from the Select Category drop-down.
- Click Choose File to browse to the location of your CSV file.
- Click Import File.
| Note: The system checks your file and provides feedback. If the file is valid, the actions are applied and a summary displays. If errors are detected, the process halts and an error list appears. |
- After the process completes, do one of the following:
- Click Exit.
- Click See Import Results.
Your enrollment changes to groups take effect immediately.
Prepare a file to import bulk enrollment updates in Groups
To enroll or unenroll learners in groups using a CSV file, you can either create a file manually or download the CSV template on the Import page.
File format requirements
- Save your file with a .csv or .txt extension.
- Use commas to separate all fields.
- Place each learner’s information on a new line.
- The first column in the template is ACTION, which specifies the enrollment type. The system reads each line in the file as a separate action—either enrollment or unenrollment.
Required fields
The following fields must appear in the file in this exact order:
| Field |
Required |
Description |
| ACTION |
Yes |
Must be ENROLL or UNENROLL |
| Username |
Yes |
Unique username for the learner |
| Org Defined ID |
No |
Optional institutional ID for the learner |
| GroupName |
No |
Optional display name of the group |
| GroupCode |
Yes |
Unique code identifying the group |
Blank fields are ignored and cause no change
Actions.
Each line in your file must begin with one of the following actions:
- ENROLL : Enrolls a learner into a specified group
- Format:
ENROLL, *Username, Org Defined ID, GroupName, *GroupCode
- UNENROLL : Removes a learner from a specified group
- Format:
UNENROLL, *Username, Org Defined ID, GroupName, *GroupCode
|
Important: The system does not verify the existence of usernames or group codes before processing. Ensure all values are accurate before you begin.
|
Export group and enrollment details
|
Note: If you use the new Manage Group experience, the Import and Export buttons are available from each category's context menu.
|
Click Export in the Groups tool to download group category information, including user enrollments and enrollment dates. Export only appears if at least one group category exists in your course.
|
Note: You must have the Groups and Sections Management > Manage Groups and Categories permission applied to your role to see the Export button in Groups.
To export user information (such as usernames, first names, and last names), your role must have the appropriate User Information Privacy permissions. |
To export group details:
- Do one of the following:
- On the Manage Groups page, click Export. From the Select Category drop-down menu, select the category you want to include in the CSV.
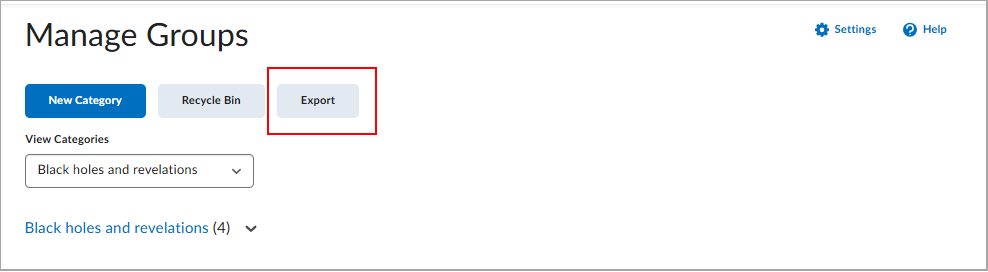
- Select Export from the category drop-down list.
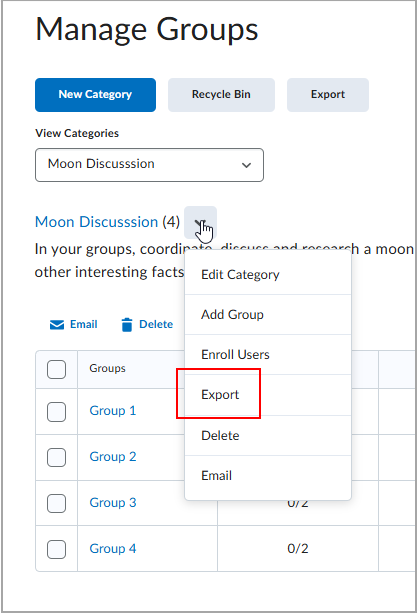
- From the Select Group drop-down menu, select the group you want to include, or Select All.
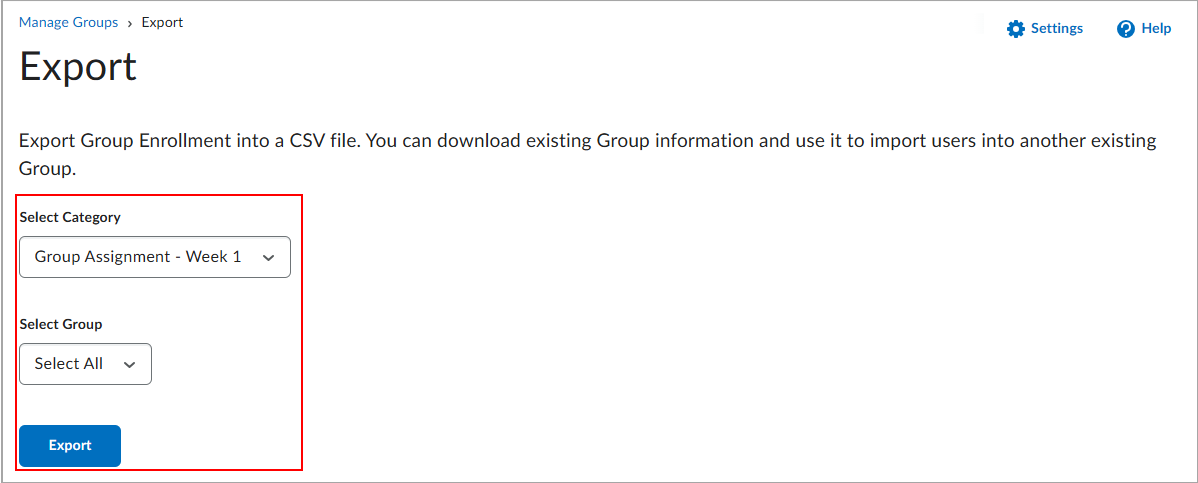
- Click Export.
- Click Download.
The CSV file downloads with group names, user details, and enrollment dates.
Set up self-enrollment in groups
To set up self-enrollment in groups
Self-enrollment allows users to enroll in groups on their own. Use this option when you want users to choose their own group members or to be a part of a group on a topic that interests them.
|
Note: Groups have a maximum enrollment of 3000 users. If there are more than 3000 users in a course, you can create new group categories; there is no limit on the number of group categories in a course. |
Users can self-enroll in groups by clicking the Choose Group link beside the name of a group category set up for self-enrollment. A link displays at the top of the user’s Groups page when self-enrollment is available. By default, users cannot self-enroll in more than one group. Instructors can add users to other groups at any time.
If a group is full, the Members column displays the total number of group members in red with "(Full)" beside it. If a learner wants to leave a group that they self-enrolled in before the date and time specified by the Set Self Enrollment Expiry Date option (if selected), on the My Groups page, learners can click Leave Group if the option is configured.
Clicking the capacity marker or the total listed in the Members column opens the Group Members pop-up, which contains a list of current group members. You cannot click empty groups.
- On the Manage Groups page, click New Category.
- Enter a Category Name and Description.
- Select one of the following options from the Enrollment Type drop-down list:
- Groups of # - Self Enrollment
- # of Groups - Self Enrollment
- # of Groups, Capacity of # - Self Enrollment
- Depending on the chosen Enrollment Type, enter the Number of Groups to create, the Number of Users per group, or both.
- To control self-enrollment availability dates, select the Set Self Enrollment Start Date and/or Set Self Enrollment Expiry Date check boxes and select dates and times from the mini calendar field.
- To associate discussion areas with the groups in the category, select Set up discussion areas.
- To associate locker areas with the groups in the category, select Set up lockers.
- To associate assignments with the groups in the category, select Set up assignments.
- Click Save.
Watch how to self-enroll in a group
Watch how to modify group enrollment
Restrict enrollments to specific groups
Instructors can create sub-groups, based on Section or Group enrollment, within the Groups tool. Instructors can only apply one enrollment restriction to a sub-group.
- From the course navbar, click Groups.
- Under Manage Groups, click New Category and complete the category information.
- Under Restrict Enrollments To, select the relevant group or section. The Group Prefix field auto-fills based on the selected group or section, but you can edit it before saving.
| Note: Sub-groups can only be added once, users cannot create sub-groups of sub-groups. |
- Click Save.
Insert Group Self-Enrollment Link
In the Content tool, instructors can create a self-enrollment link for discussion groups to facilitate sorting the members of a course with many learners into groups.
To insert a Group Self-Enrollment link
- Navigate to Content.
- Click Create New.

- On the What would you like to create? page, click New Lesson.
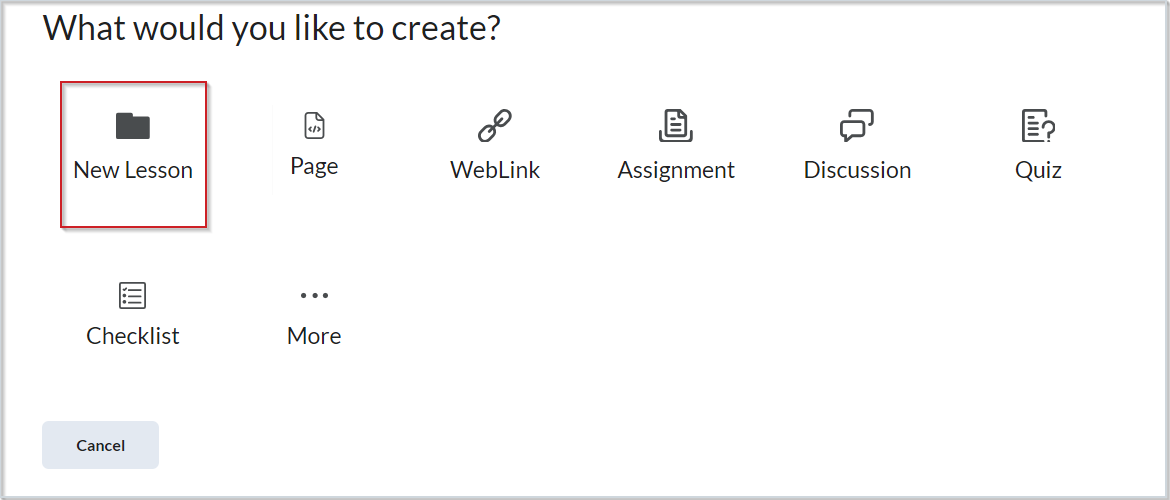
- Enter the details for your topic.
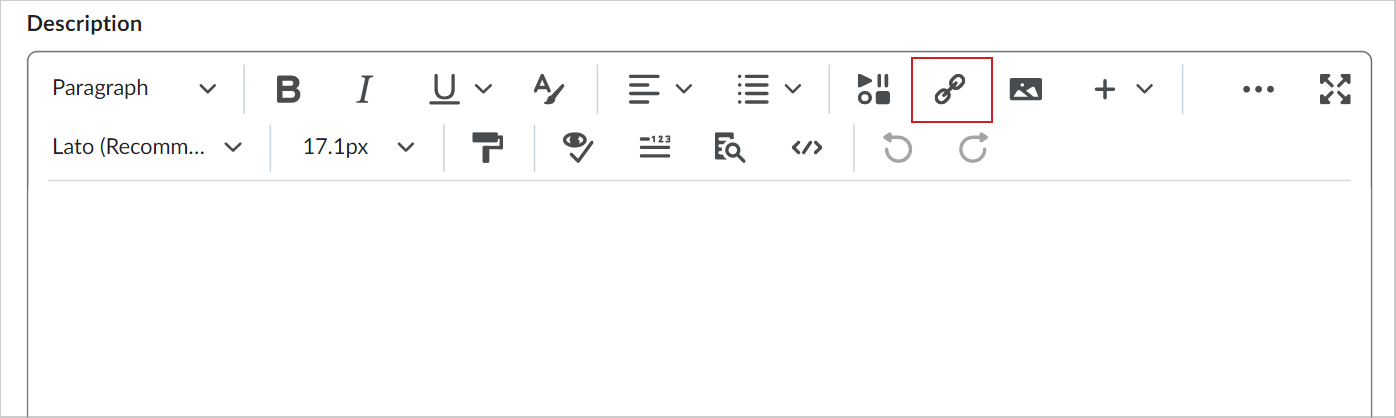
- In Brightspace Editor, click Insert Quicklink.
- In the Insert Quicklink dialog, select Self-Enrollment Groups.
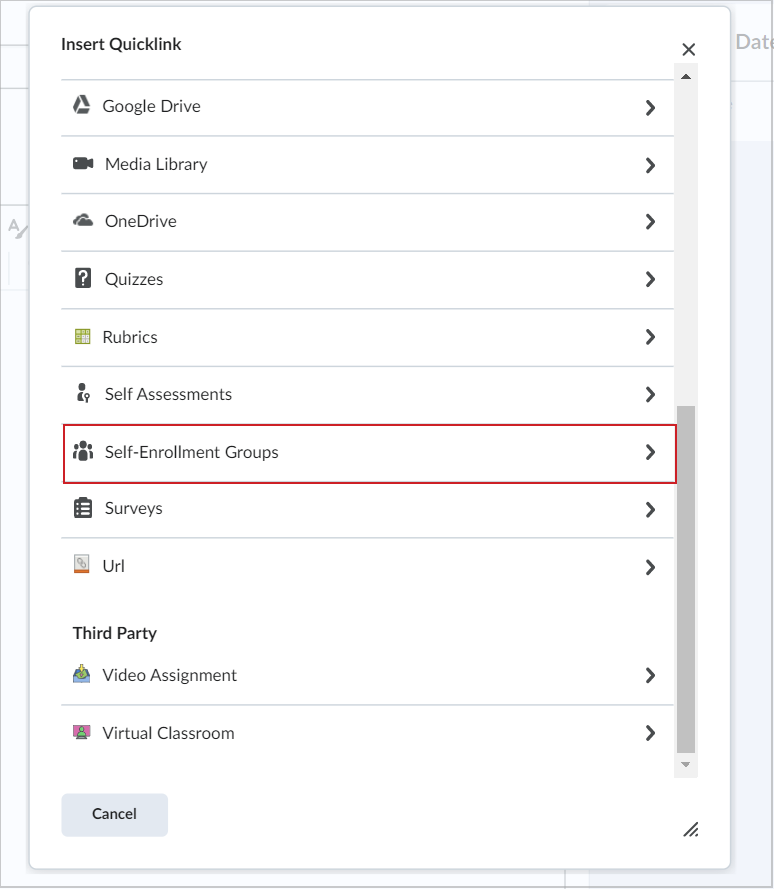
- Select a group in the Self-Enrollment Groups window, and click Select.
- On the New Lesson creation page, make your topic Visible and click Save and Close.

You have created a group self-enrollment link.
Groups FAQ
What happens when you move users to a new group?
|
Important: The information in this section applies to situations before evaluations have been published for a group assignment.
If a group evaluation has already been published, moving a learner into a group does not apply the published evaluation retroactively. You must manually update or assign the grade.
|
When moving users to a new group
Discussion posts remain in the old group and do not count towards a user’s grade if the forum or topic is associated with a grade item. The user must satisfy the discussion post requirements in the new section. You can override a grade using the Grades tool.
Locker files remain in the old group. Users must add any files they want to keep to the new Locker area themselves.
Assignments submissions submitted for the old group remain with the old group. The user receives the grade achieved by the new group on any group assignments. You can change the user’s grade back to the original group’s mark in the Grades tool.
Watch how to modify group enrollment
What happens when you delete a group or group category?
When you delete a group, the following things happen:
- If you've selected the Auto-enroll new users option, users are automatically distributed in the remaining groups.
- If groups are set up for manual enrollment, you must add users to the remaining groups using the Enroll Users page.
- Group discussion forums remain available for reference. You can delete them in the Discussions tool.
- Group Locker areas and the files they contain are deleted.
- Group assignments and the files they contain are deleted.
When you delete a category, the following things happen:
- Users are no longer enrolled in groups because they do not exist.
- Group discussion forums remain available for reference. You can delete them in the Discussions tool.
- Group Locker areas and the files they contain are deleted.
- Group assignments and the files they contain are deleted.
Group and category deletions run as background jobs to reduce timeouts and errors. This applies to all group deletion methods, including via the Manage Groups page, Org Unit Editor, SIS integrations such as Banner or IPSIS, or API deletion routes.
Watch how to delete a group or group category
