Rubrics allow you to provide efficient, timely, and meaningful grades and feedback to learners. They can be tied to assignments, quizzes, and discussions, and give you the opportunity to provide a framework to learners on activity expectations.
Create a Rubric
Use the Rubrics tool to create, name, and customize your rubric to fit your assessment needs.
To create a new rubric
- From Rubrics, click New Rubric.

- Enter a Name for your rubric.
- Choose the appropriate rubric type from the Type drop-down menu:
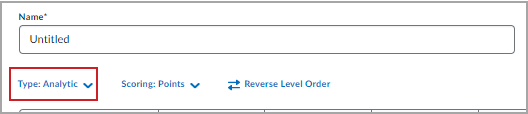
- Type: Analytic provides the ability to add multiple criteria within a rubric.
- Type: Holistic provides a single criterion. You can also assess holistic rubrics using percent scores that are set for each rubric level.
 | Note: If you intend to set a minimum or maximum score for ungraded rubric criteria, that functionality is not available with Holistic type rubrics. |
-
Choose the appropriate Scoring type:
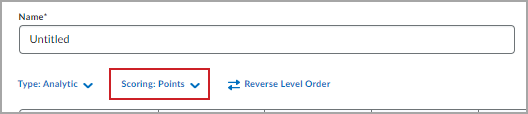
- Scoring: Points results in each rubric level having the same score for each criterion.
- Scoring: No Score indicates that no point values are set.
- Scoring: Custom Points provides the ability to set unique point values for each level in each criterion.
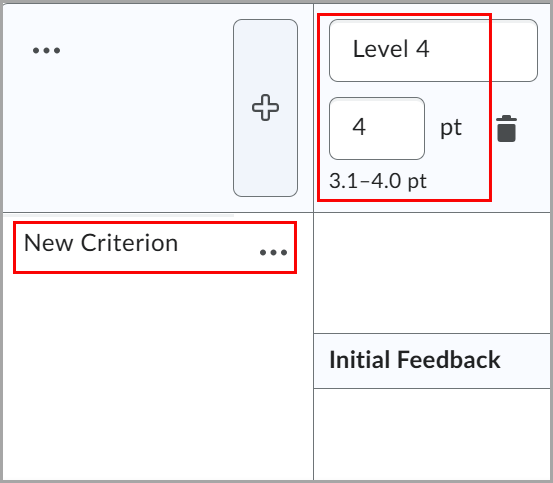
- Click New Criterion to enter the criterion name, enter a rubric Level, and enter the point level.
| Note: You can add up to 500 characters to the description of each criterion. |
- Do any of the following optional steps:
- If you want to add more rubric levels, click the Add new level before (+) button.
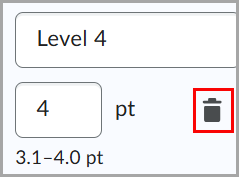
- If you want to delete existing rubric levels, click the trash bin icon.
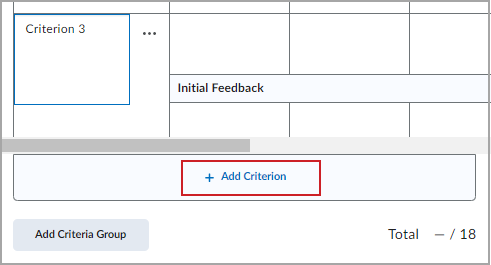
- If you want to add more criteria, click + Add Criterion and enter the criterion name.
- If you want to delete existing criteria, click Delete Row.
- Add a description of each criterion Level, as well as Initial Feedback for that level that will be applied when assessing learner submissions.
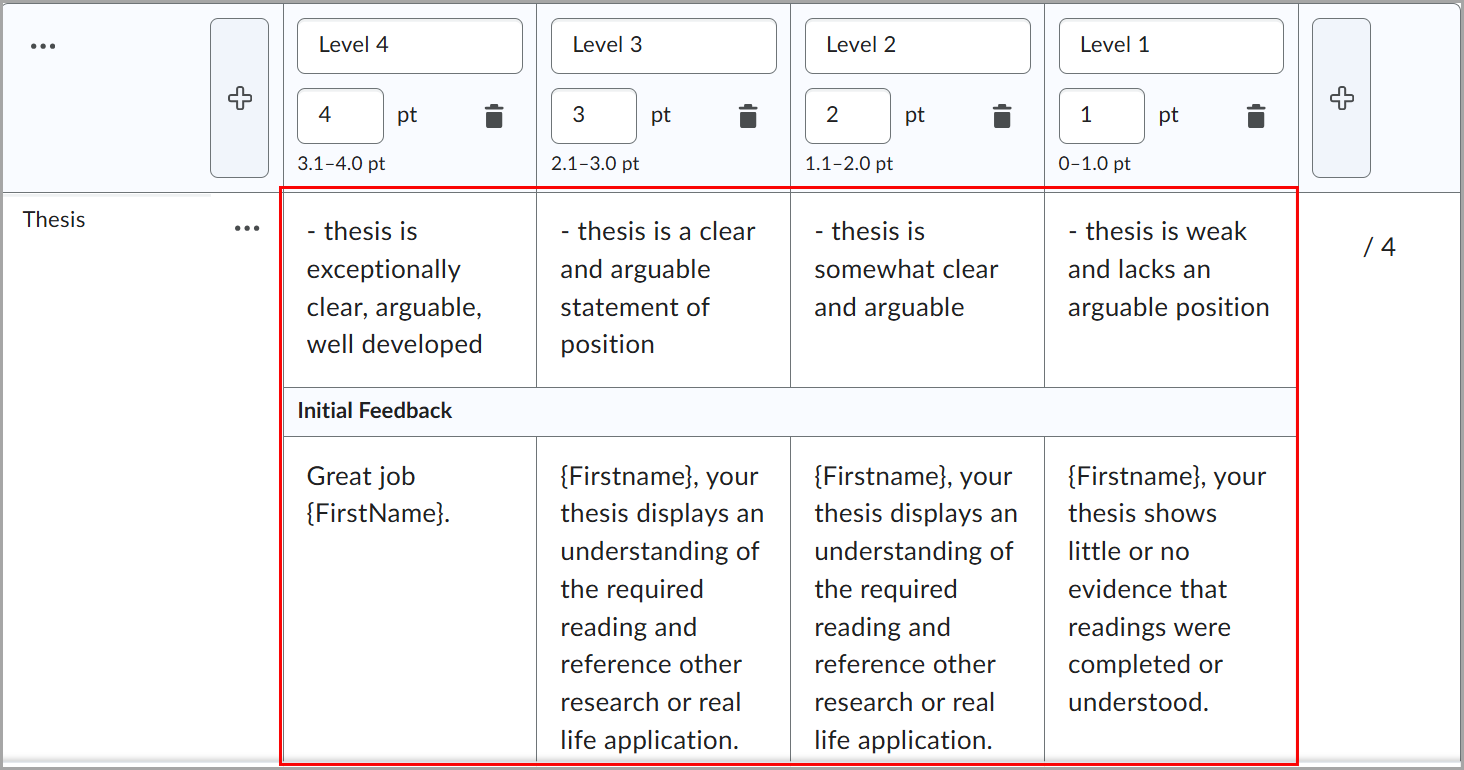
 | Tip: You can click Add Criteria Group to create a separate group of assessment criteria. |
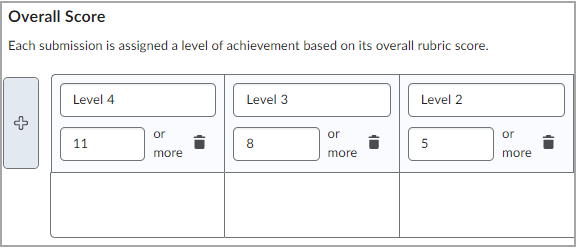
- Adjust the Overall Score parameters to determine the overall level and score that is mapped to achievement levels and assigned to learners based on their submission.
- Click to expand Options, and customize the following:
- Rubric Visibility
- Score Visibility
- Description
- Advanced Availability
- Customize Rubric options.

- Click Close to finish creating your rubric.
For information on how to add a rubric to an assignment, refer to Add a rubric to an assignment.
Video: Create a rubric
Edit a rubric
Use the Context menu of the Rubrics tool to edit a rubric.

|
Important: Rubrics that have been used to assess learners' work are locked, and it is only possible to edit text fields. To edit items such as the number of criteria or the number of achievement levels that would affect the academic integrity of a rubric already in use, you must copy the rubric and edit the new version.
|
To edit a rubric
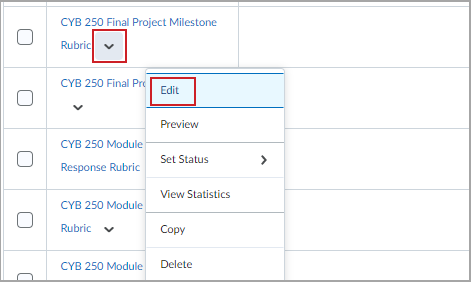
- Navigate to the rubric you want to edit.
- Click the More Options arrow beside the rubric you want to edit.
- Click Edit.
|
Note: You can add up to 500 characters to the description of the criteria when editing rubrics. Existing rubrics retain their original 256-character limit unless manually updated. |
Edit an assessed rubric
Normally, rubrics that have been used for evaluation are locked and cannot be edited. However, if you have the Edit Assessed Rubrics permission, you can correct spelling errors, clarify wording, and make other minor changes that shouldn't impact the academic integrity of the rubric.
|
Important: It is only possible to make changes to assessed rubrics that are created in the current course or are copied from another course. Shared rubrics remain locked.
|
To edit an assessed rubric
- Navigate to Rubrics.
- On the Rubrics page, click the rubric you want to edit.
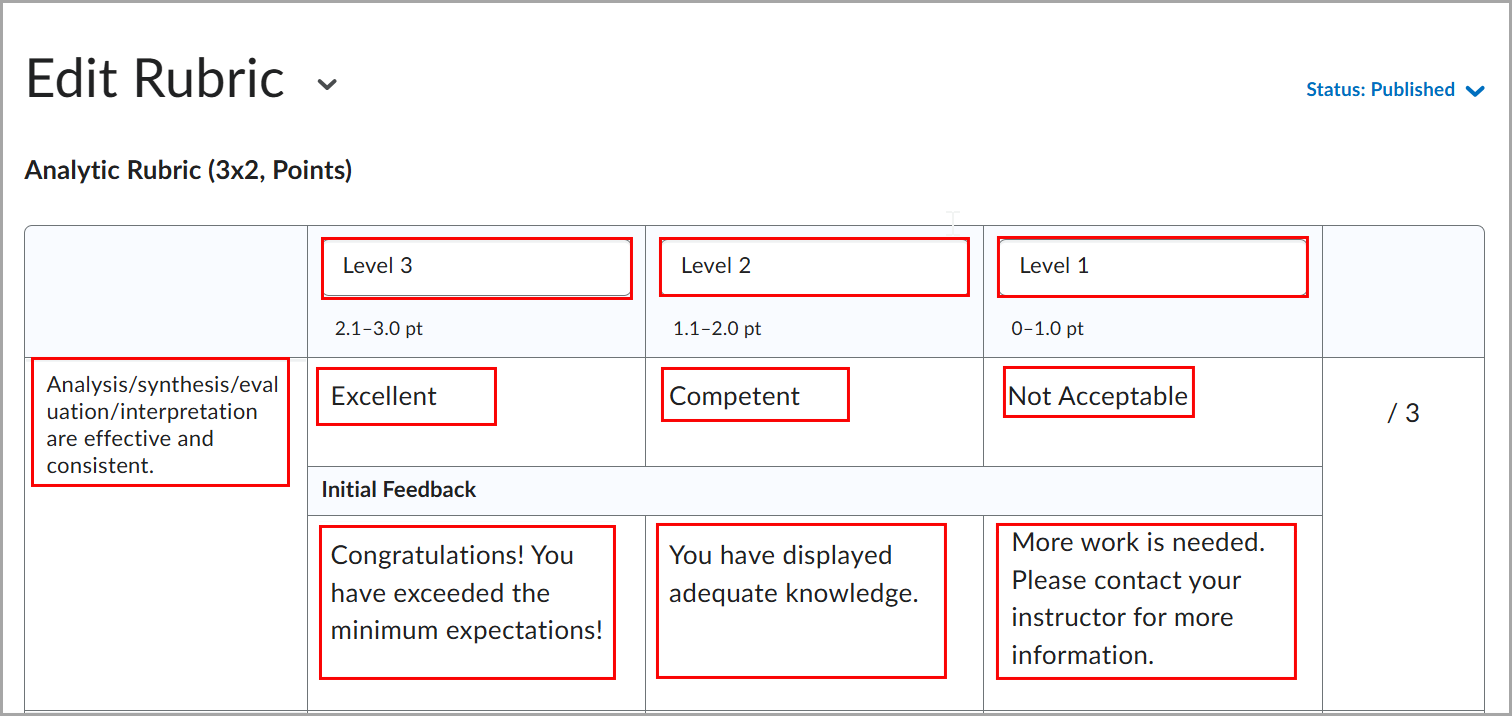
- On the Edit Rubric page, click Edit Text in the alert banner at the top of the page.
- In the Edit this assessed rubric? dialog box, click Edit Text and enter your edits. The red boxes in the following image indicate which fields you can edit:
- Click Close. Your edits are saved automatically.
|
Important: You cannot make structural changes (such as adding evaluation levels or criteria), edit points, or add outcome alignments to assessed rubrics.
|
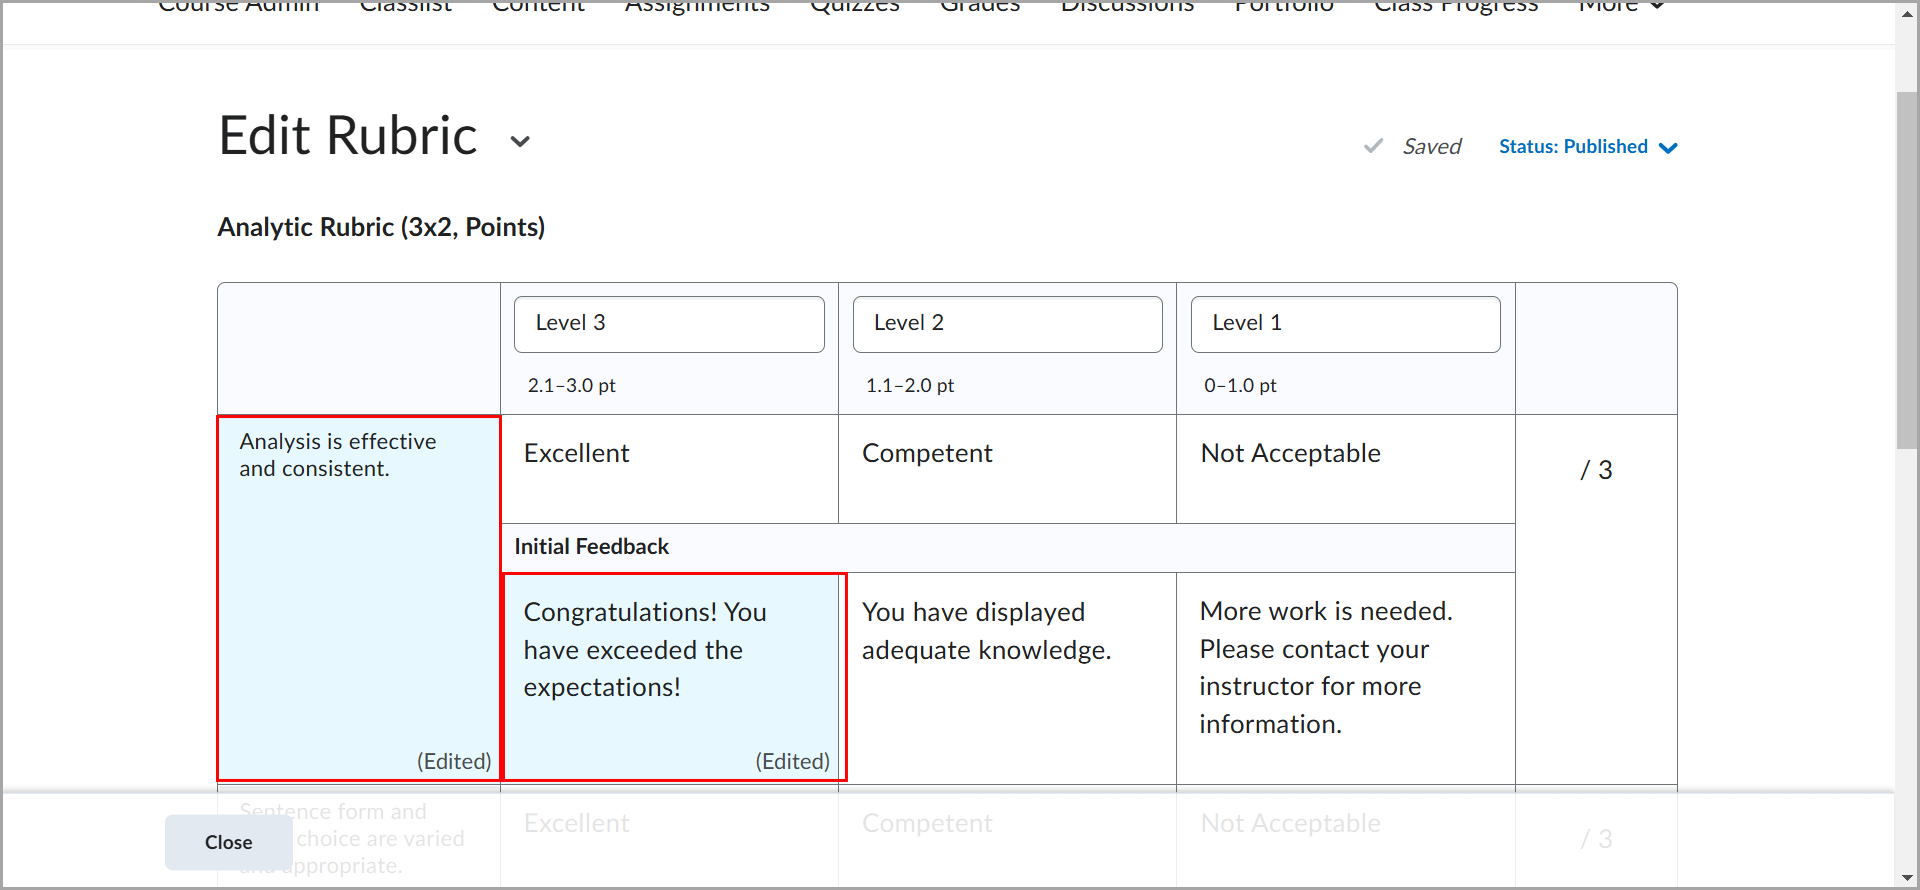
When you make a change to a previously assessed rubric, it is updated with a blue highlight and the text Edited in the lower right corner. When you save and close the rubric, the edit indications no longer appear.
Control the visibility of rubrics
You can control rubric visibility for learners. This is useful for preventing learners from using preview rubrics as answer keys for activities. For example, you can describe assessment expectations in assignment instructions, hiding the associated preview rubric. Once the assignment is graded, you release the graded rubric as part of the learner's assessment details.
Rubric visibility is controlled in the following ways:
- Administrators can set the default visibility of new rubrics at the org unit level.
Teachers can set the visibility of individual rubrics. Creating or editing a rubric includes the following options: Rubric is always visible to learners, Rubric is hidden until feedback published, and Rubric is never visible to learners.
|
Note: If teachers attempt to publish a partially completed rubric evaluation, the Unscored Rubric Criteria dialog appears to warn them that not all rubric criteria have been scored. By default, the Continue Grading option is selected, and the teacher can tap Enter to return to the rubric, or tap Publish Anyway to continue to publish the partial evaluation. This workflow ensures that there is a verification layer to reconsider their action and ensure that teachers are not mistakenly publishing incomplete evaluations.
|
Note the following:
- Feedback copied from hidden rubrics only displays for learners; it is not visible to teachers as they have access to the rubric. The visibility status of a rubric can only be changed at the rubric level, not at the activity level. For example, you cannot change the visibility of a rubric from an assignment.
- Visibility is a property of a rubric and not an individual assessment. Rubric definitions and published feedback appear in the assessment tool where the rubric is used.
- For individual and group discussions, teachers assess the rubric in the assess topic workflow. Upon saving the assessment, the rubric feedback is considered published.
Use Rubrics in mobile view
The Evaluation view for the Assignments and Discussions tools uses a collapsible container component in the right-side panel. Instructors can open or close these panels for Rubrics, Grades & Feedback, Outcomes, and Competencies.
To grade a rubric in mobile view
- Navigate to Assignments or Discussions.
- For the assignment or discussion you want to evaluate, click the Actions drop-down menu and then click View Submissions.
- In the Submissions tab, click the assignment or discussion you want to evaluate.
- As you evaluate, notice the triangle. Click the triangle for the panels for Rubrics, Grades & Feedback, Outcomes, and Competencies to open the evaluation container. Click the triangle again to close the container.
- Add feedback to your desired sections.
- Click Save Draft or Publish.
You have evaluated an assignment or discussion in mobile view.
Print or download a PDF of a rubric
You can print or download a PDF of preview (unevaluated) and evaluated rubrics. Learners can also print or download a PDF of a rubric from the desktop browser implementation of Brightspace.
In all displays of a rubric, the Print button displays above the top-right corner of the rubric.
Printed rubrics include the logo from the organization that issued the rubric; specifically, the image displayed in the course navigation bar. The logo image provides clear organizational recognition for rubrics that were evaluated in courses in your organization and distinguishes rubrics within a learner's Portfolio if they have taken classes from multiple institutions. You can use the brand recognition of the logos to assess the merits for credit from other institutions.
Print a preview of a rubric
- From Course Admin, click Rubrics.
- Do one of the following:
- From the More Actions menu beside the Rubric Name, click Preview.
- Click a rubric to open the Edit Rubric page. From the Edit Rubric More Actions menu, click Preview.
- Click Print Rubric
- Select the printer or PDF driver you want to use and click Print.
Print an evaluated rubric from the Grades tool
- Navigate to Grades.
- Click the action menu to the right of any student name and select Preview Grades.
- Click View Graded Rubric.
- Click Print Rubric.
- Select the printer or PDF driver you want to use and click Print.
Print an evaluated rubric from Outcomes Progress
- Navigate to Class Progress.
- Select a learner from the Classlist.
- Select the Grades option from the left navigation bar.
- Expand the Feedback section for a grade item.
- Select View Graded Rubric.
- Click Print Rubric.
- Select the printer or PDF driver you want to use and click Print.
Copy rubrics
Copying a rubric creates a new rubric based on an existing rubric in the same org unit, allowing you to easily reuse it in a course. The new rubric has the same properties, levels and criteria, and is shared with the same org units as the original rubric.
- Navigate to Rubrics.
- On the Rubrics page, from the context menu of the rubric you want to copy, click Copy.
- Click on the new rubric to edit it.
It is also possible to copy a single rubric criterion to facilitate reusing criteria that have already been created.
To copy a single rubric criterion
- Open the rubric you want to edit.
- On the Edit Rubrics page, click the action menu beside the criterion name.
- Click Copy Row.
| Note: The new criterion is added under the original with the criterion name Copy of [name of original criterion]. It is automatically highlighted so you can rename the new criterion. |
- Rename the newly created criterion.
Delete a rubric
You can only delete a rubric in the org unit where it was created. You cannot delete a rubric that is being used by a Competencies activity or Brightspace ePortfolio item, or attached to a grade item.
To delete a rubric
- Navigate to Rubrics.
- On the Rubrics page, from the context menu of the rubric you want to delete, click Delete.
To delete a single criterion from a rubric
- Open the rubric you want to edit.
- On the Edit Rubrics page, click the action menu beside the criterion name.
- Click Delete Row.
Share a rubric
You can create rubrics at the organization, department, or course level. Rubrics are not automatically shared with all child org units below the org unit where they were created. You must explicitly share them if you want to make them available to child org units. Rubrics created at the course level cannot be shared with other courses, however, you can create a rubric in a course template and reuse it in course offerings for that course template.
If you are using Competencies to evaluate users, we recommend you set up rubrics before you set up your competencies, learning objectives, and activities since you cannot create an activity without associating it with a rubric and you cannot assess whether a user has completed a competency or learning objective without assessing the associated activities using the rubric.
To share a rubric
- On the My Home page, on the navbar, click Rubrics.
- Click on the rubric you want to share with another org unit.
- In the Properties tab, in the Advanced Availability area, click Add Org Units.
- Select the org units where you want to share the rubric. If applicable, you can also select sharing options, including This org unit, All descendants, or All descendants of type.
- Click Insert.
- Click Save.
Copy and delete a criterion group
To better facilitate organizing and reusing rubric content, you can copy or delete an existing criteria group.
|
Important: When a rubric with attached assessment items has submissions evaluated against it, the rubric is locked and can no longer be edited or deleted.
|
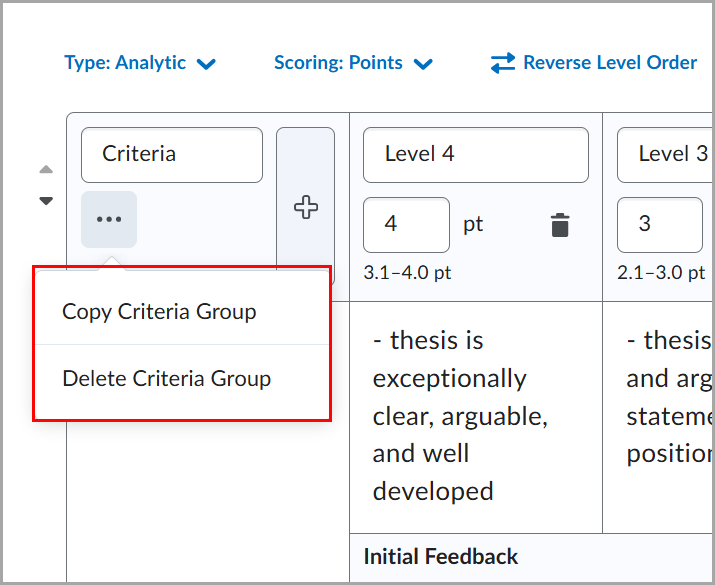
When you have an existing criteria group, the Copy Criteria Group and Delete Criteria Group options appear when you click (...) Action Menu on the Criteria Group header. If you are using keyboard-only navigation, these options are available in the tab order after the criteria group name.
To copy an existing criteria group
- Navigate to Rubrics.
- On the Rubrics page, click the rubric you want to edit.
- Identify the Rubric criteria group that you want to copy and click the (...) Action Menu beside the Criteria Group header.
- Click Copy Criteria Group.
The new criteria group appears below the original criteria group. If you are using keyboard navigation, the keyboard focus moves to the name of the new criteria group.
- Add a new name to the new criteria group.
|
Note: Aligned learning outcomes are not copied when you copy a criteria group. Specific details of the evaluation criterion should be updated and re-aligned with specific learning outcomes which apply to the new criterion elements in the criteria group.
|
To delete an existing criteria group
|
Important: The delete option is only available if there is more than one criteria group.
|
- Navigate to Rubrics.
- On the Rubrics page, click the rubric containing the criteria group you want to delete.
- Identify the Rubric criteria group that you want to delete and click the (...) Action Menu beside the Criteria Group header.
- Click Delete Criteria Group.