Set up an Intelligent Agent to automatically identify users and take action based on defined criteria. This helps you automate outreach, enrollment changes, and other course workflows.

|
Important: Performing any of the actions listed below requires the Intelligent Agents > Manage Agents permission. Contact your administrator if this permission is not assigned to your role. |
Watch this video to learn how to automate course communication using Intelligent Agents. Review the written steps below.
Quick start: Create your first agent
Use this example to build a basic agent that re-engages inactive learners.
- Navigate to Course Admin > Intelligent Agents.
- Click New Agent.
- Enter an Agent Name.
- Set Role in Classlist to Learner.
- Configure Login Activity so the agent identifies users who have not accessed the course for 7 days.
- In Actions, select Send an email when the criteria are satisfied.
- Click Save and Close.
- Run a Practice Run.
- Review the results.
- Enable the agent.
You now have a working agent that can re-engage inactive learners.
Before you begin
- Define the outcome you want the agent to achieve.
- Confirm that you have the required permissions.
- Decide whether the agent should run once, run repeatedly, or run on a schedule.
Add a link to the Intelligent Agents tool to the navbar
You can add a link to the Intelligent Agents tool to your course’s navbar.
To add the link to the navbar
- From the Admin Tools menu, select Navigation and Themes.
- Click the link for the navbar in which you want to add a link to the Intelligent Agents tool.
- On the Edit Navbar page, in the Links area, click Add Links.
- In the Add Links dialog box, select the Intelligent Agents check box.
- Click Add, and then Save and Close.
Create a new agent
Create an agent that performs an action, such as sending an email, based on the criteria you set.
To create a new agent
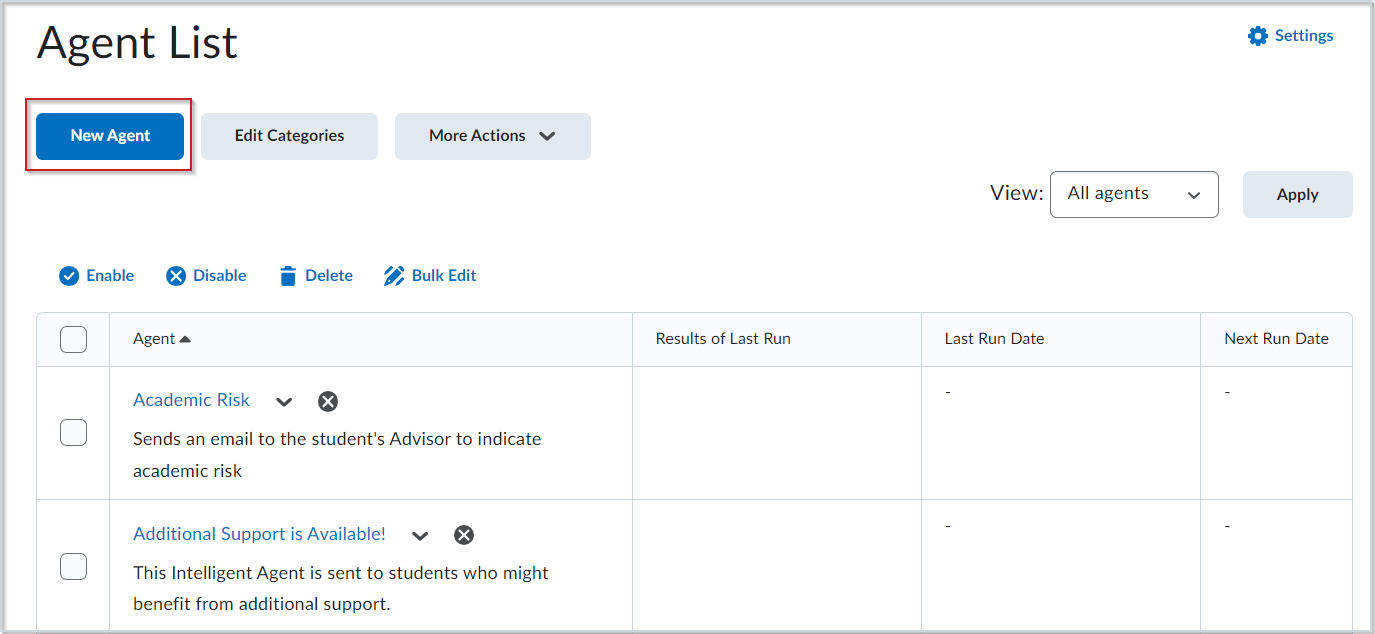
- Navigate to Course Admin > Intelligent Agents.
- Click New Agent.
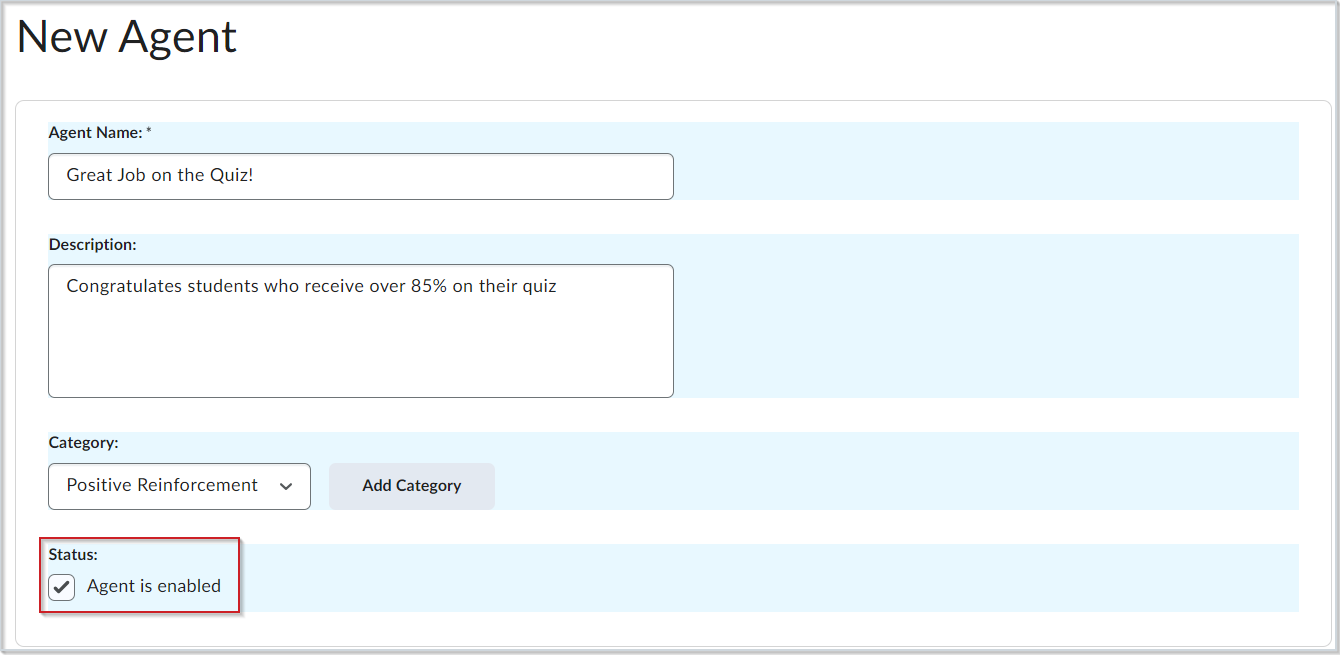
- Enter an Agent Name.
- (Optional) Add a Description of the agent.
- (Optional) Select a Category. To create a new category, click Add Category, add a Name, and then click Save.
- Navigate to Status and select Agent is enabled to have the agent enabled upon creation.
Schedule the criteria check frequency of your intelligent agent
Once you have set the general descriptions and status of your new intelligent agent, you can choose how often the agent runs and evaluates the criteria you define.

|
Note: Intelligent Agents can be scheduled to run before the course start date. Scheduled intelligent agents stop running and are automatically disabled if the course is inactive, past its end date, or deleted. You can still set up a practice run or a manual run of an intelligent agent at any time in a course with a past end date. |
To set the frequency of your intelligent agent
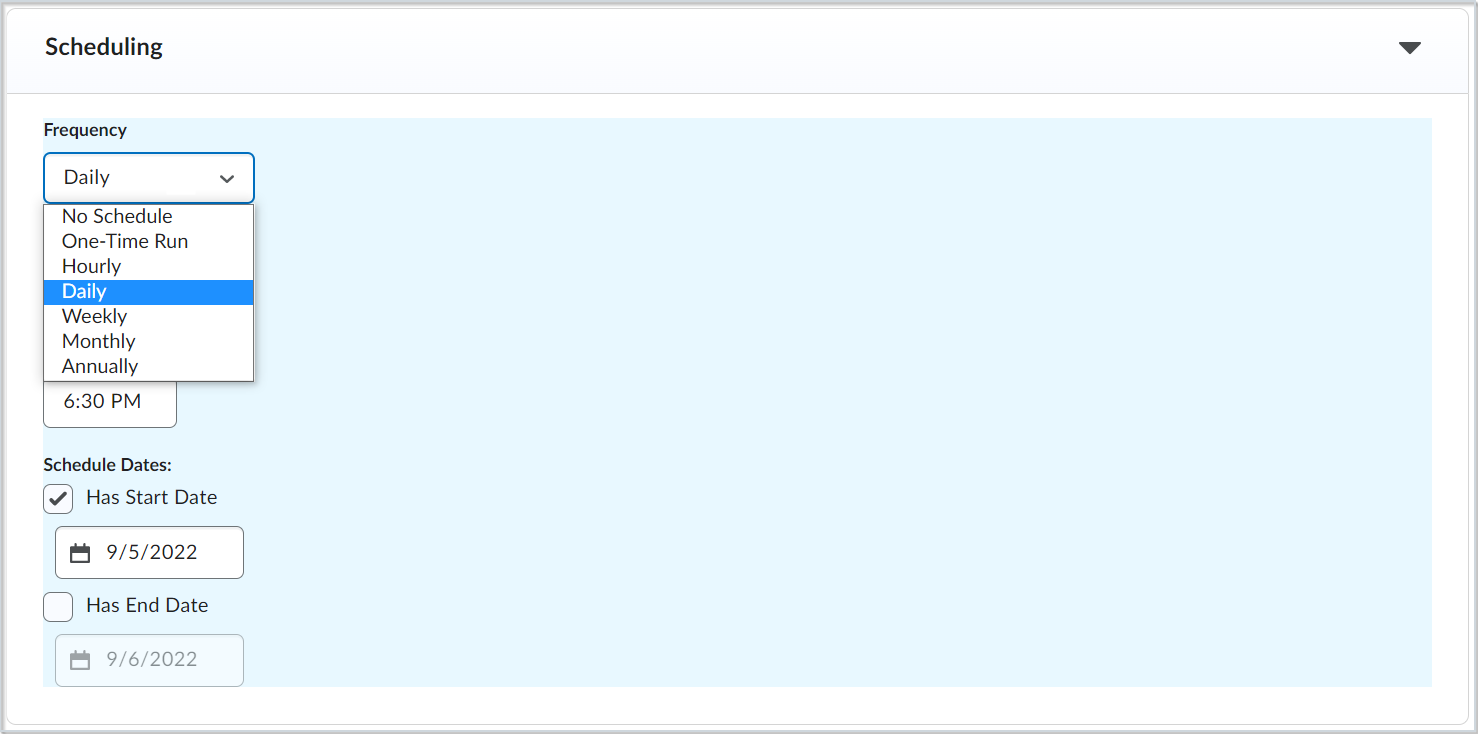
- From the New Agent page, click to expand Scheduling.
- Select a Frequency and enter the criteria based on that frequency.
Define the target roles for your intelligent agent
You must also set the criteria your intelligent agent reviews when it runs. This includes which user roles the agent focuses on.
To define the role your intelligent agent focuses on
- From the New Agent page, expand Criteria.
- Under Role in Classlist, do one of the following:
- To have the agent apply to all roles in the Classlist, select All users visible in the Classlist.
- To have the agent apply to selected roles, select Users with specific roles and select the desired roles.

Define the activity that prompts your intelligent agent to take action
You must choose which activity type causes your intelligent agent to run or take action.
To define the activity that prompts action
- From the New Agent page, expand Criteria.
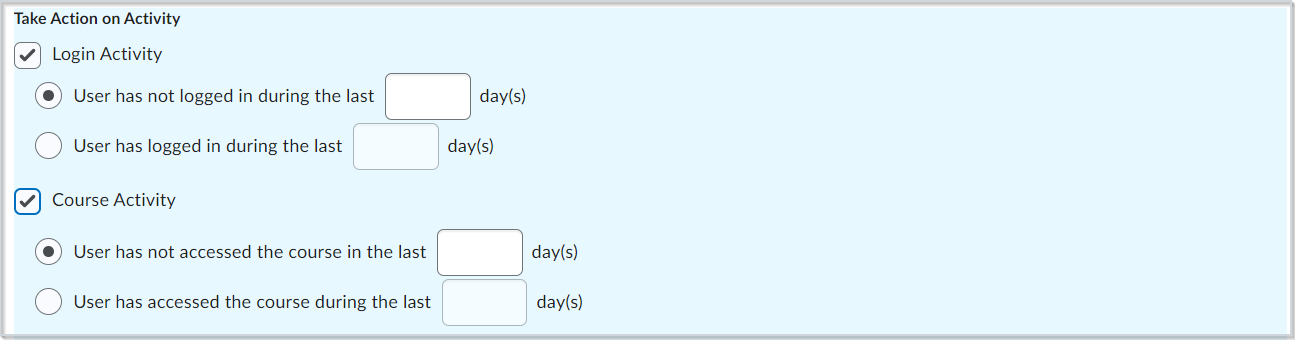
- Under Take Action on Activity, select one or more of the following options:
- Login Activity runs the agent if the user either has or has not logged in to the platform during the last specified number of days.
- Course Activity runs the agent if the user either has or has not accessed the course in the last specified number of days.
| Note: Neither option can be selected if the agent's Frequency is set to Hourly or One-Time Run. |
Attach release conditions to your intelligent agent
You can also select and attach release conditions to your intelligent agent. These prompt your agent to take action once the specified release conditions are met.
To attach release conditions to your agent
- From the New Agent page, expand Criteria.
- Click Release Conditions.
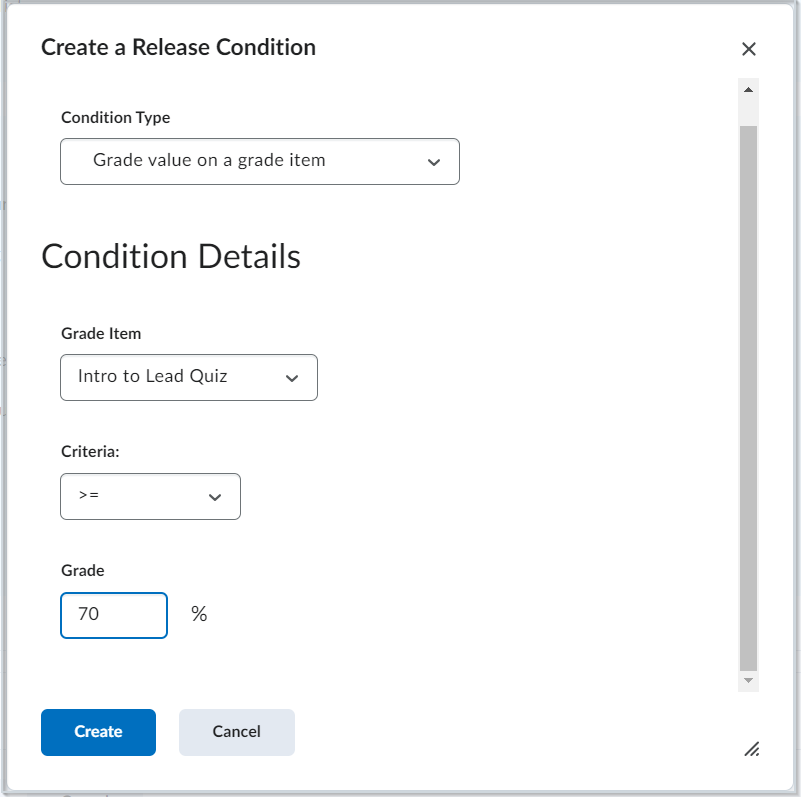
- To create a new release condition, click Create and do the following:
- Select a Condition Type.
- Select your Condition Details based on that type.
- Click Create.
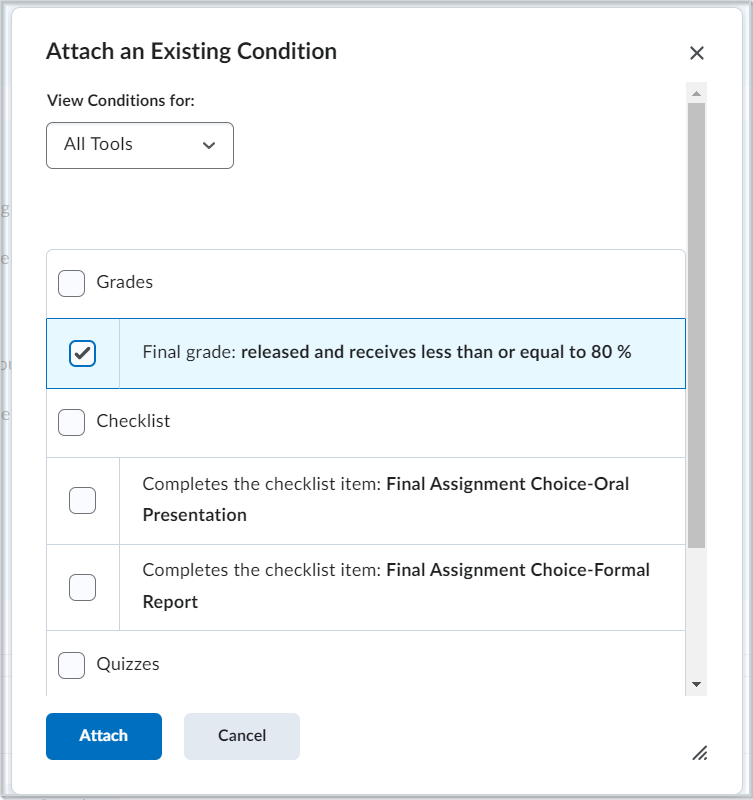
- To select an existing release condition, click Browse and do the following:
- Under View Conditions for, select a tool to filter your conditions.
- Select the desired condition and click Attach. Multiple conditions can be selected.
How conditions are evaluated
When you use multiple conditions, the agent evaluates how those conditions combine.
- All conditions must be met when they are joined with AND logic.
- Some setups can allow alternative conditions with OR logic.
Example:
Condition A: Grade < 50%
Condition B: Not logged in for 7 days
In this example, only users who meet both conditions are selected.

|
Tip: If your agent returns unexpected users, review how your conditions combine. |
Enroll and unenroll users with an intelligent agent
You can define what actions your intelligent agent takes and how often after the defined criteria are met. Actions can include changing a user's role, enrolling a user in a course, or unenrolling a user from a course.
|
Important: You must have the Intelligent Agents > User Agent Enrollment Actions and Intelligent Agents > Perform Unenroll role permissions to access the Change User Enrollments option. If you do not see this option, contact your administrator for assistance. |
To set the type of actions
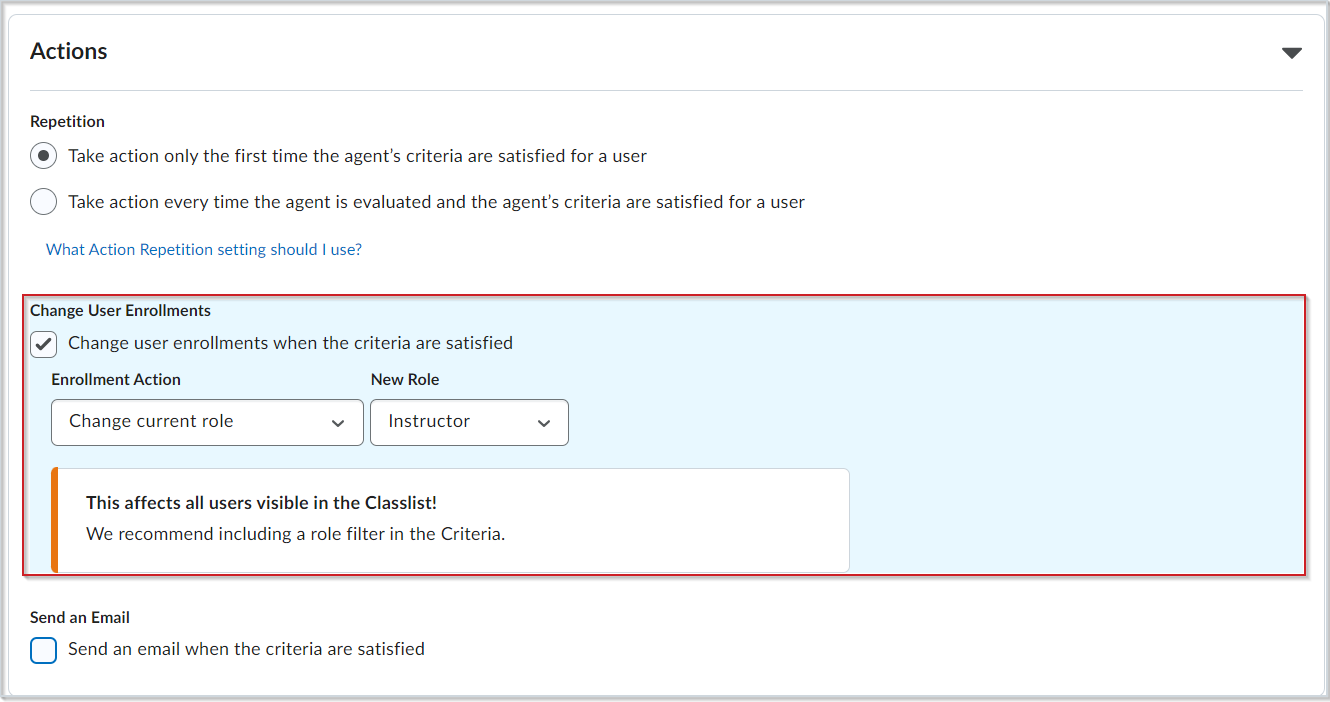
- From the New Agent page, expand the Actions section.
- Under Repetition, select one of the following:
- Take action only the first time the agent’s criteria are satisfied for a user
- Take action every time the agent is evaluated and the agent’s criteria are satisfied for a user
- Under Change User Enrollments, optionally select Change user enrollments when the criteria are satisfied.
- Under Enrollment Action, select one of the following:
- Select Change current role and select a New Role.
- Select Unenroll from current course.
- Select Enroll user in a course and click Select an Org Unit to choose a course offering. Click Update.
|
Note: The Repetition setting applies to all selected actions, including email, enrollment changes, and role changes. |
Send an email with your intelligent agent
You can also choose to have your agent send an email to a specified address when the action is taken.
To have your agent send an email when the criteria are satisfied
- From the New Agent page, expand Actions.
- Under Send an Email, select the Send an email when the criteria are satisfied check box and enter your email details and applicable attachments.
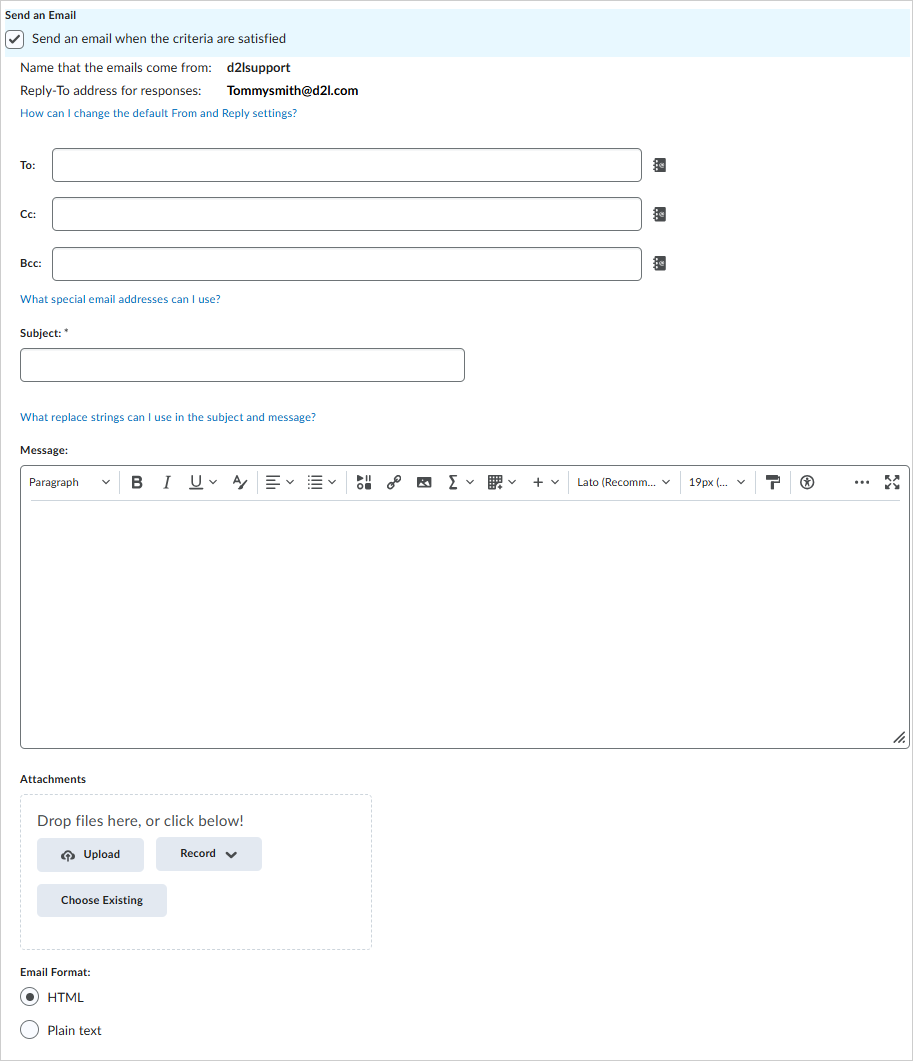
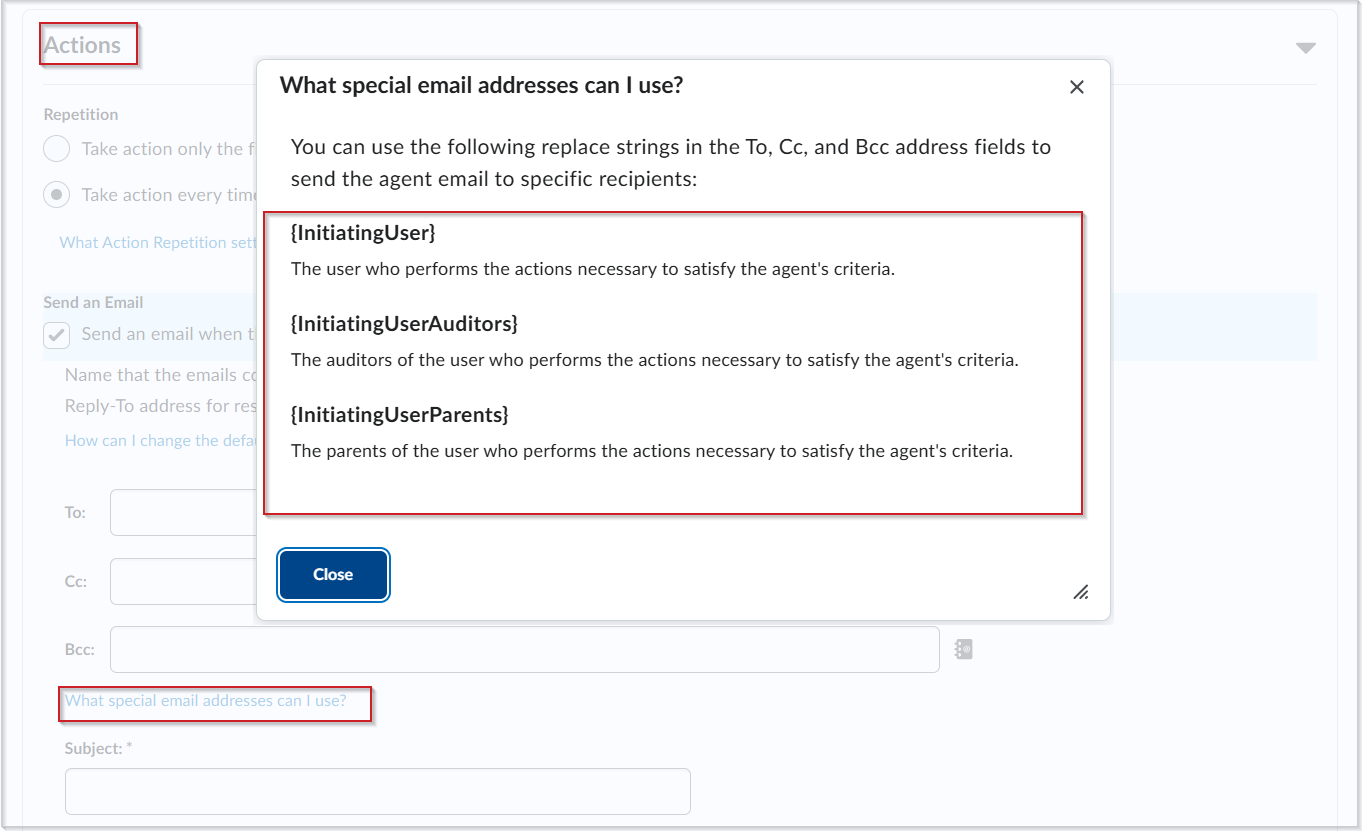
- To send the agent email to specific recipients, click What special email addresses can I use?, then copy the appropriate replacement string and paste it into the To, Cc, or Bcc fields as needed. Special email addresses include, for example, users, auditors, and parents or guardians.
- Click Save and Close.
|
Important: Enter only one email address or one supported replacement string in each To, Cc, or Bcc field. |
Replacement strings available for intelligent agent emails
The following table lists the replacement strings that can be used in an email sent using an intelligent agent. It also specifies which replacement strings are translated in the email body content, based on your organization or course offering locale settings.
|
Important: If your organization is set to a default system locale, but the course that your intelligent agent is sent from is set to Override locale preferences to a different language, the replacement string text will use the course offering locale settings. Also, not all replacement strings are localized or translated based on your locale settings. For more information about setting your default locale, refer to Set a default locale. |
| Replacement string |
Description |
For use in |
Translated using organization or course offering locale settings? |
|---|
| {InitiatingUser} |
The user who performs the action that meets the agent’s criteria |
Email address field |
No |
| {InitiatingUserAuditors} |
The auditors for the user who performs the action that meets the agent’s criteria |
Email address field |
No |
| {InitiatingUserParents} |
The parents of the user who perform the actions necessary to satisfy the agent's criteria |
Email address field |
No |
| {OrgName} |
The name of the organization |
Email body |
No |
| {OrgUnitCode} |
The code for the org unit |
Email body |
No |
| {OrgUnitName} |
The name of the org unit |
Email body |
No |
| {OrgUnitStartDate} |
The start date specified for the org unit |
Email body |
Yes |
| {OrgUnitEndDate} |
The end date specified for the org unit |
Email body |
Yes |
| {OrgUnitId} |
The org unit ID required to make quicklinks work |
Email subject line and email body |
No |
| {InitiatingUserFirstName} |
The first name of the initiating user |
Email body |
No |
| {InitiatingUserLastName} |
The last name of the initiating user |
Email body |
No |
| {InitiatingUserUserName} |
The username of the initiating user |
Email body |
No |
| {InitiatingUserOrgDefinedId} |
The org defined ID of the initiating user |
Email body |
No |
| {LastCourseAccessDate} |
The date the initiating user last accessed the course |
Email subject line and email body |
Yes |
| {LastLoginDate} |
The date the initiating user last logged in |
Email subject line and email body |
Yes |
| {LoginPath} |
The address of the login path for the site |
Email body |
No |
Pre-run checklist
Before you run your agent, confirm the following items:
- Your criteria match your goal.
- Your conditions reflect the correct logic.
- The agent is enabled if you plan to use scheduling.
- Your Repetition setting matches the behavior you expect.
- Your schedule timing is correct.
The most common issue is correct action settings with incorrect criteria.
Try these common goals
- To re-engage inactive learners, configure Login Activity and send an email.
- To identify at-risk learners, configure a grade-based Release Condition.
For scenario examples, refer to About Intelligent Agents.
Next step
To test and validate your agent, refer to Run Intelligent Agents.
Edit an agent
You can make changes to existing agents.
To edit an agent
- Navigate to Course Admin > Intelligent Agents.
- Select a filter option from View. The options are:
- All Agents
- By Category (which sorts the agents by their assigned category)
- Enabled (only those agents that have been enabled)
- Disabled (only those agents that are not currently enabled).

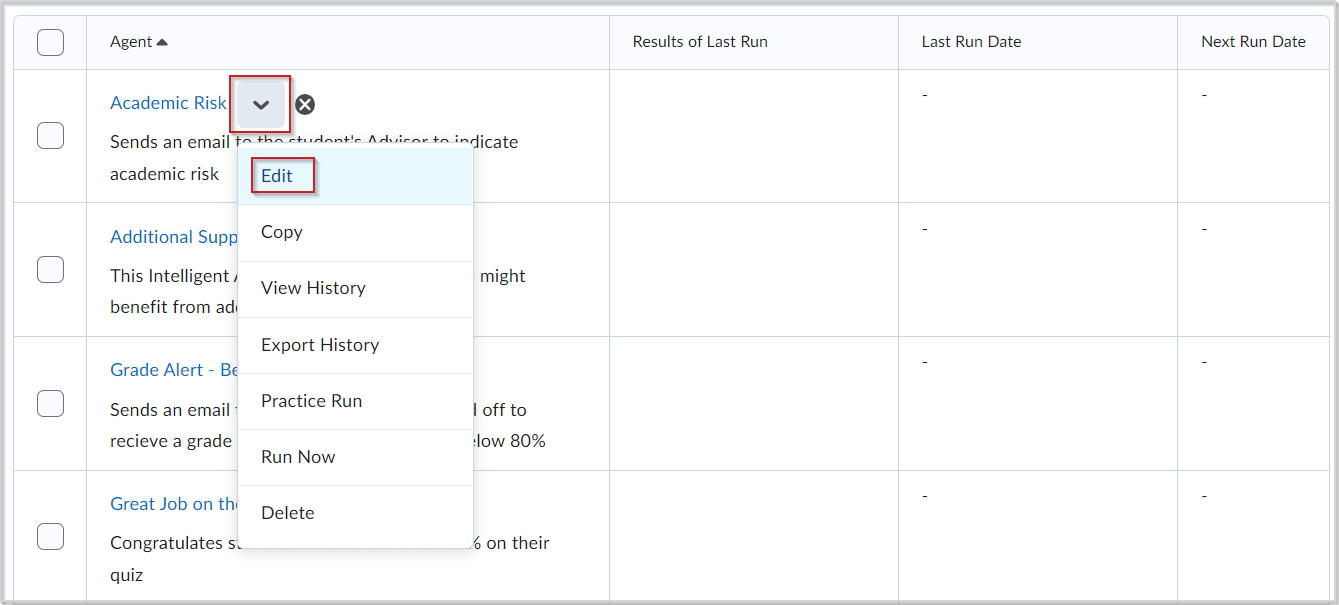
- From the context menu of the agent you want to edit, click Edit Agent.
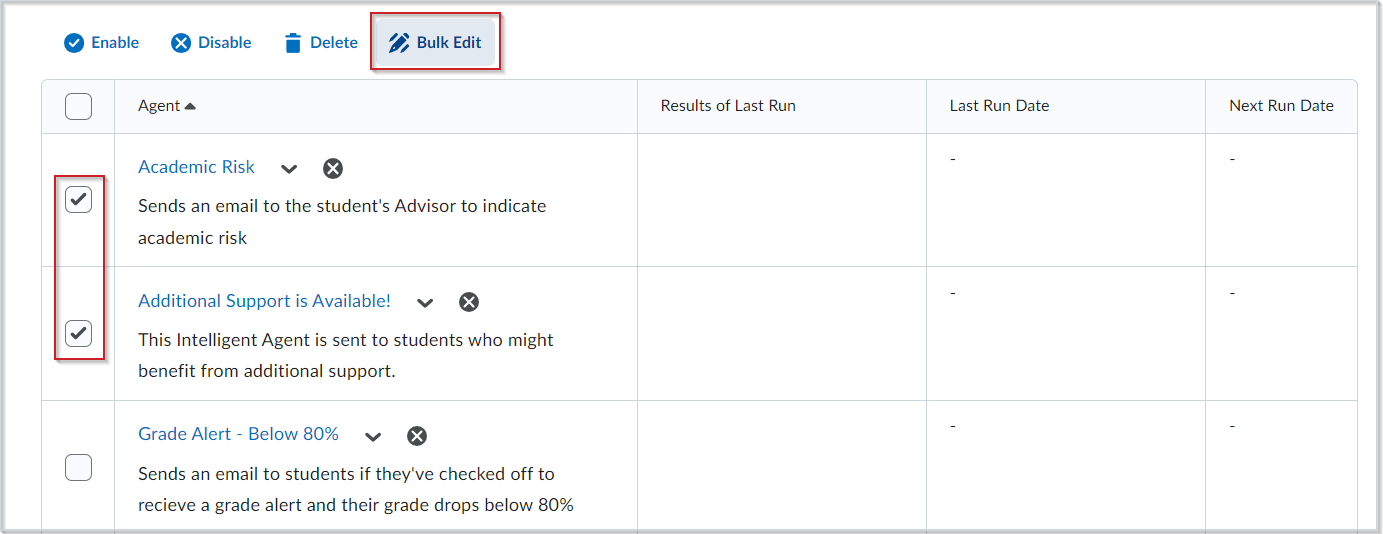
- To edit multiple agents at once, select two or more agents and click Bulk Edit.
| Note: You can only change certain attributes (title, category, active or inactive state) using Bulk Edit. |
- Make your changes.
- Click Save and Close.
Restore an agent
You can restore deleted agents. All restored agents maintain existing properties and history.
To restore a deleted agent
- Navigate to Course Admin > Intelligent Agents.
- Click More Actions and select Restore.
- Click Restore to restore a deleted agent.
Reorder agent categories
You can reorder the list of categories used by Intelligent Agents.
To reorder the list of agent categories
- Navigate to Course Admin > Intelligent Agents.
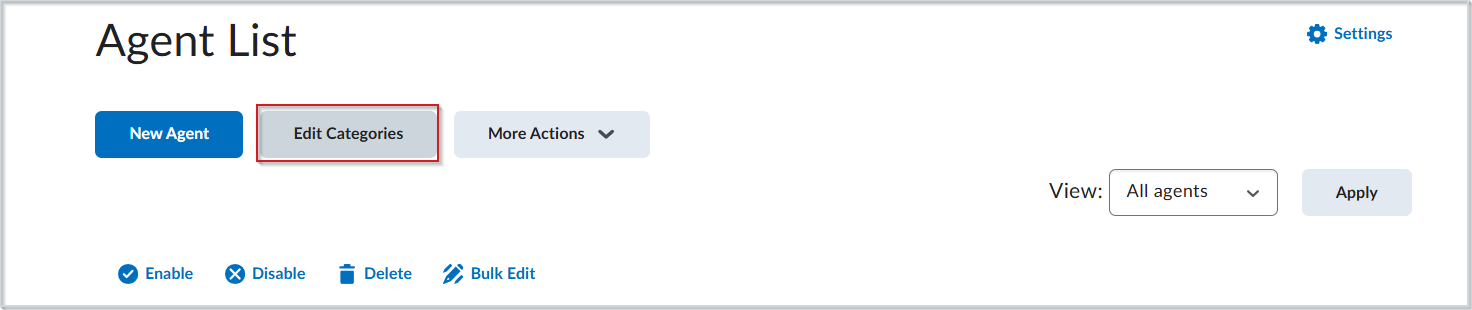
- Click Edit Categories.
- In the Sort Order field for the category, enter the number value, and then press Enter or click away from the field.
- Click Close.
Enable or disable your intelligent agent
You can enable and disable agents individually or in bulk on the Agent List page. Disabled agents display an Agent is not enabled icon (represented by a red circle with a line through it) beside their name.
To enable or disable your agent
- Navigate to Course Admin > Intelligent Agents.
- Do one of the following:
- To enable an agent, select the agent you want to enable and click Enable.
- To disable an agent, select the agent you want to disable and click Disable.

Update Intelligent Agents settings
You can adjust the settings in the Intelligent Agents tool to set custom values for the name that emails come from and the reply-to address that responses are delivered to.
To update Intelligent Agents settings
- Navigate to Course Admin > Intelligent Agents.
- Click Settings.
- Select one of the following:
- Select Use the system defaults.
- Select Set custom values for this course and fill in the available fields.
- Click Save.
Related articles