Use the Import/Export/Copy Components tool to bring content into a course, move content between courses, or create a standards-compliant export package. Components include assignments, discussions, quizzes, question libraries, and more. Refer to About Import/Export/Copy Components for supported package types.
Before you begin
- Ensure you are enrolled in the source and destination courses and have the required permissions.
- Large copy jobs run asynchronously; you can monitor progress from View History on the Import/Export/Copy Components page.
- Names are not de-duplicated on import. If a destination item shares a name with an imported item, both items remain. For example, if your course contains a discussion topic called Exam Review and you import a course package that contains a discussion topic called Exam Review, your course will contain two topics called Exam Review.
- When you are copying course components, Organization tool availability is only copied into your selected destination course when you use the Copy All Components workflow. You cannot select specific tool availability as part of the copy course components workflow. The default visibility of tools in your course is controlled by the tool availability set at the organization level. Refer to Set tool availability for more information. If you want to set tool availability for your specific course after you complete a copy course components workflow, refer to the Set course-level tool availability of the About course administration page for more information.

|
Note:
|
Import course components
To import course components
- Open the destination course.
- On the navbar, click Course Admin > Import/Export/Copy Components.
- Select Import Components.
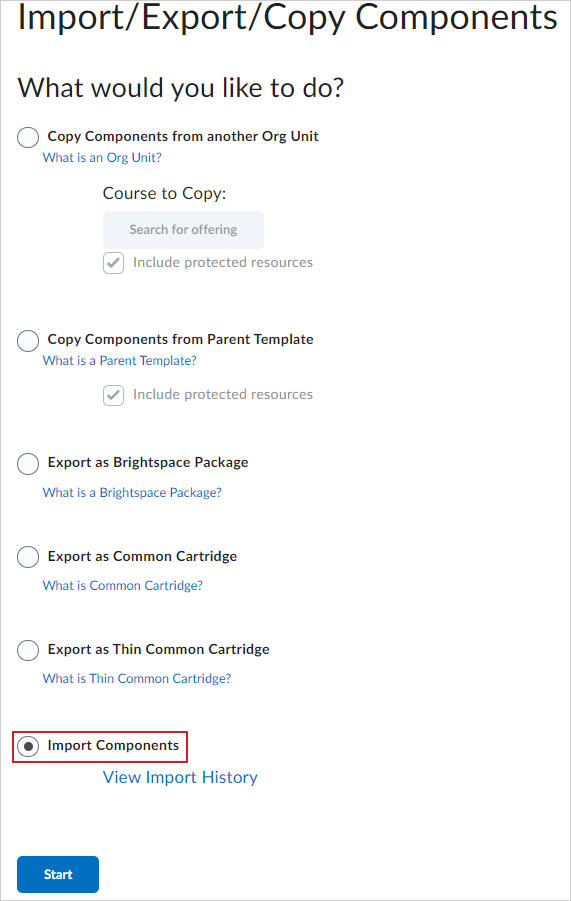
- Click Start.
- From the Import Course Package dialog, select Upload and choose your file.
| Note: Scroll down on the Import Course Package dialog to review information about course packages and what is supported. |
- Choose one of the following:
- Import All Components to import the full package.
- Advanced Options to choose specific items or adjust settings before import.
- (Optional) After the import completes, select Review and Manage Dates to adjust availability and start/end dates.
View course import history
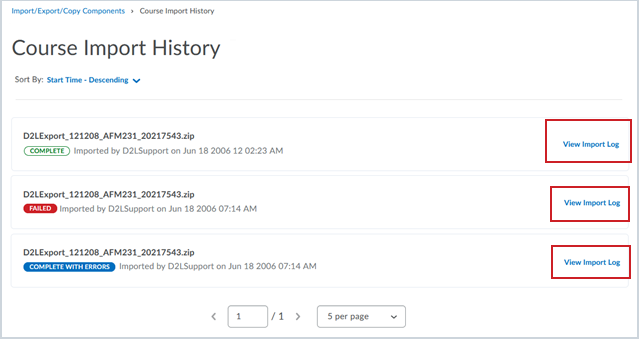
Users can view the history of course import attempts for courses in a specific org unit. From the Import/Export/Copy tool on Course Admin, users can view the Course Import History page, which includes the following information for each course import attempt:
- the original package name
- status of the import
- user who created the import job
- the timestamp for the import attempt
To view course import history
-
In Course Admin, click Import/Export/Copy Components.
-
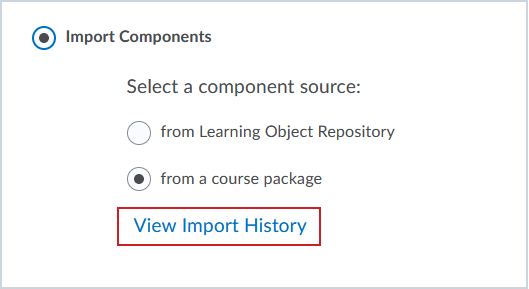
In the Import section, click View Import History.
-
From the list, click View Import Log for a package to open detailed results.
-
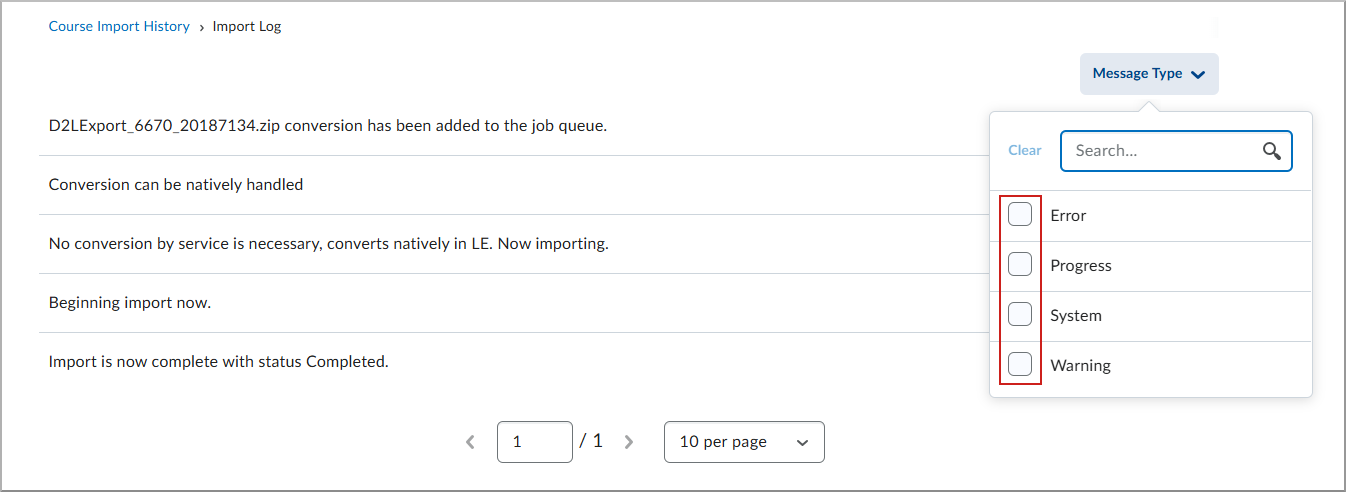
To filter the results by message type, click the Message type drop-down and select one of the following:
- Error
- Progress
- System
- Warning

|
Important: Users can apply multiple filters simultaneously to view combined message types.
|
The log displays the import results in the order of operations. After reviewing the log, use the navigation breadcrumbs to navigate back to the Course Import History page.
Export course components
You can also export components of your course as a course package.
|
Note: If you chose Select individual items to export, on Select Items:
Use + Expand to view sub-items.
Select the items and sub-items to include and select Next.
Review Confirm Components to Export.
|
To export course components
- Open the course that contains the components to export.
- On the navbar, select Course Admin > Import/Export/Copy Components.
- Select one of the following options:
- Export as Brightspace Package
- Export as Common Cartridge
- Export as Thin Common Cartridge
- Click Start.
- In Select Components to Export, choose one:
- Select All Components to export everything
- Select specific component check boxes
- Select Select individual items to export to choose granular items.
- Click Continue. The Export started dialog confirms the export started.
- Click Done.
When ready, open the bell notification on the navbar, follow the link back to the tool, and select Click here to download the export Zip package. Choose a location to save your package. Depending on your export type, the package is saved as either a .zip file for Brightspace packages or an .imscc file for Common Cartridge or Thin Common Cartridge packages.
|
Note: The Bulk Course Export file naming convention now includes the course offering code to make files more identifiable. |
Video: Export course components
Watch this video to learn how to export course components.
Export and import course packages containing SCORM objects across orgs
You can export and import course packages containing SCORM objects across orgs. For example, when you export a course containing SCORM objects from Org A, copies of the SCORM objects are added to the exported course package. The result is a course package available for import and SCORM objects with all references to the SCORM objects retained within the original course.
When you import the course package into Org B, the SCORM objects are added into the org and re-linked to the imported course so references are not broken (the physical copies of the SCORM objects now exist in Org B, separate from Org A, where the course package was exported from). As a result, any instructor with the Can insert new SCORM objects permission for a course can access the SCORM objects that were copied into the imported course.
Note:
- If a course contains multiple links to a single SCORM object, the object is exported multiple times, once for each link, and included as a copy in the exported course package. When importing the course package, the package is imported multiple times, once for each link.
- Bulk Course Copy, Bulk Course Export, and Bulk Course Create also support this functionality.
Copy course components
Your ability to copy course components between course offerings is determined by assigned permissions and enrollment in course offerings and parent templates.
|
Important: To mitigate the risk that large courses may result in timeout failures for users, the Copy Course Components job functions as an asynchronous job. You can view the progress of the copying job by clicking the View History link.
Course files from the source org unit overwrite existing files with the same name in the destination org unit. To preserve any destination course files, it is strongly recommended that you rename them to distinguish them from the files being copied from the source org unit.
|
To copy course components
- Navigate to a course that you want to copy course components into.
- On the navbar, click Course Admin > Import/Export/Copy Components.
- Do one of the following:
- Select Copy Components from another Org Unit.
- Click Search for offering and locate the course offering containing the components you want to copy.
- Click Add Selected.
- Select Copy Components from Parent Template to copy components from the course template the current course offering belongs to.
- Do one of the following:
- To copy all course components, click Copy All Components. D2L recommends that you copy all components between courses to ensure you maintain all desired associations, and then delete any undesired material in the new course.
- To specify the components you want to copy, click Select Components. Select your components. To see details for course components, click the Show the current course components link, then click the View Detail icon beside a component to see existing items. For those course components that provide the option to include associated files, D2L recommends leaving the option turned on. Click Continue.
- Select the Offset all dates of copied components check box and specify the days and hours that the dates should be offset by or calculate the range between two dates.
- Click Finish.
- Do one of the following:
- To copy another package, click Copy Another Package.
- To see the results of your copy, click View Content.
- To review and manage course dates, click Review and Manage Dates.
Notes:
- If you copied a course with S3 model configurations, the course is listed in the Student Success System Administration page (Admin Tools > Student Success System).
- Now when you copy groups to courses, the group setup (grade item, assessment option, and so on) is also copied over.
- A validation logic step is included in the copy process. To help reduce duplicate objects and cleanup from the copy process, the validation logic informs you if you have previously copied from the source course.
For information on the Student Success System permissions, refer to How does Brightspace Student Success System work?.
Video: How to copy course components
Watch the video to learn how to reuse components, add components created by colleagues, or set up standard components in a template and copy them to a new course offering.
Add a course image to an existing course template
Although you cannot directly add an image to a course template, you can import an image from an existing course into the course template. After you have created a course that includes the image you want to use, you can use the Copy Components function to add the image to your course template.
|
Note: The course banner image file does not automatically appear in the form elements when you copy it; however, you can view the image file in the Manage Files tool. |
To add an image to a course template
- In the Manage Courses tool, on the Templates tab, click the existing template where you want to add the My Courses widget image.
- Click Course Admin > Import/Export/Copy Components.
- Select Copy Components from another Org Unit and click Search for Offering.
- Click Select Components.
- Select Course Appearance > Select individual items to copy.
Note: You can view the course banner image from Manage Files; however, it does not automatically appear in the form elements after you copy it.
- Click Continue.
- Select the image you want to copy.
- Click Finish.
Create platform-independent packages of learning resources (IMS Common Cartridge)
The IMS Common Cartridge standard allows publishers and content providers to create platform-independent packages of resources (content, assessments, question libraries, discussions, and other resources) building on existing IMS content and QTI quizzing packaging standards. Package creators can optionally protect the package, requiring users to authenticate with the creator using web services before importing or accessing protected resources. Common Cartridge was designed to provide a standard way to package and protect content, as opposed to each publisher or each learning management system creating a proprietary method of protection and enforcement.
For more detailed information on the Common Cartridge project and its role in the Digital Learning Connection, visit the 1EdTech website.
About importing IMS Common Cartridge packages
You can import IMS Common Cartridge packages and expand your course offerings to include a wide range of innovative, platform-independent, and diverse course content from publishers and content providers.
Importing an IMS Common Cartridge package follows the same process as importing other files of supported import formats. Importing a cartridge automatically creates the applicable content, quizzes, questions, and other components in Brightspace and makes them immediately available for use. Package creators have the option of protecting cartridges on import or forcing the user to enter an access code at the beginning of the import process.
IMS Common Cartridge versions
Brightspace currently supports the following versions of IMS Common Cartridge:
- IMS Common Cartridge 1.0
- IMS Common Cartridge 1.1
- IMS Common Cartridge 1.2
- IMS Common Cartridge 1.3 and IMS Thin Common Cartridge 1.3
The following table provides an overview of each version, including a summary of the features and any other technical details worth noting.
|
IMS Common Cartridge version
|
Summary
|
Technical details
|
|
IMS Common Cartridge 1.0
|
In the resource metadata context, includes the higher education value.
Contains metadata for the intended user roles: Learner and Instructor. These are the user roles that can view the resource.
Contains the intendedUse attribute for Web Content Resources. This attribute must contain one of the following values: lessonplan, syllabus, or unspecified.
|
The package file should have the extension .zip.
Cartridge manifest metadata must refer to version 1.0.0.
|
|
IMS Common Cartridge 1.1
|
Offers easy support and integration with IMS Learning Tools Interoperability (LTI) v1.0 resources. You can integrate rich learning applications or premium content with platforms or other systems from which applications can be launched, without additional customization.
In the resource metadata context, includes the following values: higher education, school, training, and other.
Adds metadata for the Mentor intended user role.
The intendedUse attribute for Web Content Resources is optional in this Cartridge version.
|
IMS Common Cartridge 1.1 supports LTI links through Brightspace User Interface, Bulk Course Create (BCC), and Course Import API.
The package file should have the extension .imscc. This extension helps identify files that are likely to be Common Cartridges.
Users are notified in the processing logs when the resource is imported successfully; however, their intendedUse type is discounted.
Cartridge manifest metadata must refer to version 1.1.0.
|
|
IMS Common Cartridge 1.2
|
Includes metadata for curriculum standards, which provides the option to associate the cartridge, resource, or question item with zero or more curriculum standard identifiers, from one or more providers. Users can use any curriculum standard, provided that it supports unique identifiers.
The intendedUse attribute for Web Content Resources offers a new attribute called Assignment.
|
Curriculum standards metadata is recognized in v1.2, but is not supported by Brightspace. As a result, it is discounted, and users are instead notified in the processing logs whether their data was imported successfully.
Common Cartridge specification has deprecated authorization to the Course Import workflow. D2L still supports it, but recommends that users use Learning Tools Interoperability (LTI) links to access remote/secure content.
Cartridge manifest metadata must refer to version 1.2.0.
|
|
IMS Common Cartridge 1.3
|
Allows you to import multiple question banks within a single cartridge.
Provides the ability to specify Common Cartridge XML descriptions within an imsmanifest.xml file, which are imported by Brightspace.
Provides the option to add metadata to LTI links. In Brightspace, this metadata is incorporated into the content topic so that it can point to the LTI link.
|
Question banks have no titles, so they are categorized as "Section 1", "Section 2", and so on, in Brightspace. Question banks can be translated into any language that D2L supports.
For multiple imports of multiple question banks, section numbering does not increment; it is constrained to the number of banks within the package. For example, if users import a package containing two question banks, and then again with only a single question bank, the following occurs:
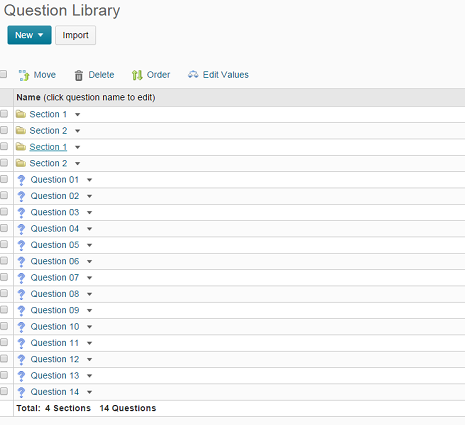
Multiple question banks in a question library
The following new features are not entirely supported by Brightspace:
- ePub3, Interactive Whiteboard (IWB), and Accessible Portable Item Profile (APIP) file extensions for resources
- Other unknown extensions for resources
Brightspace imports files with these extensions into the Manage Files tool, but does not create a content topic because the content type is not currently supported in the application. Users will receive a message about this in the processing logs.
Cartridge manifest metadata must refer to version 1.3.0.
|
To view IMS official specifications on Common Cartridge for each version, refer to 1EdTech Common Cartridge® Specification.