The Activity Feed widget is a course homepage widget that provides a central location for you and your learners to post messages that are visible to the entire class. For example, you might post reminders about upcoming assignments and links to course materials.
Requirements
To see and use Activity Feed and other widgets, you must have the required Homepages permissions applied to your role. These permissions can only be accessed by your organization administrator.
Add the Activity Feed widget to your homepage
The first step in using the Activity Feed widget is to add it to your course homepage.
To add the Activity feed widget to your course homepage
- From your course navbar click Course Admin and then click Homepages.

Figure: Click Homepages on the Course Administration page.
- Click the homepage that you want to add the widget to.
- In the Widgets section, click Add Widgets.
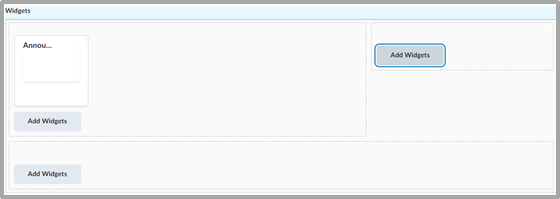
Figure: Click Add Widgets to begin customizing your course homepage's widgets.
- Search for the Activity Feed widget and click Add.
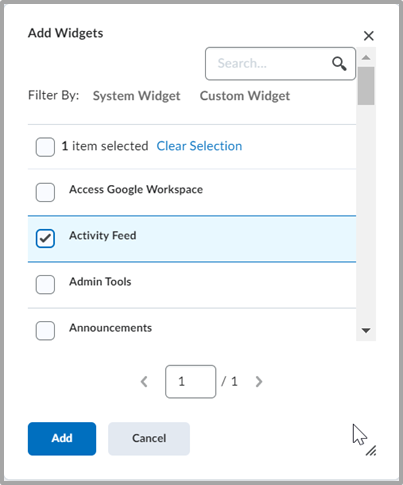
Figure: Select Activity Feed in the Add Widgets dialog.
- To access the properties for Activity Feed, click on the Activity Feed widget.
- To hide the widget title and prevent users from expanding and collapsing the widget, deselect the Display a title option and select the Prohibit minimizing widget option, respectively.
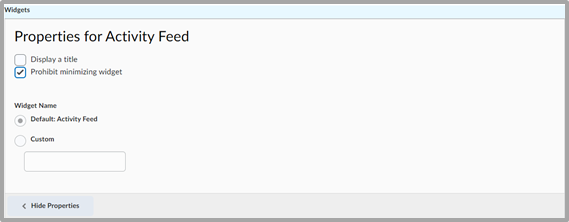
Figure: Customize how your widget functions using the Display a title and Prohibit minimizing widget options.
- Click Save and Close.
- Use the Active Homepage drop-down menu to select the updated homepage and click Apply.

Figure: Select your course from the Active Homepage drop-down menu and click Apply.
You have added your customized Activity Feed widget to your homepage.
Video: How to add Activity Feed to a course homepage
Create a post with Activity Feed
Add posts, which can include audio-video content and new assignments, to your course homepage.
To create an activity feed post
- In the Activity Feed widget on your course homepage, click the Create a post textbox.
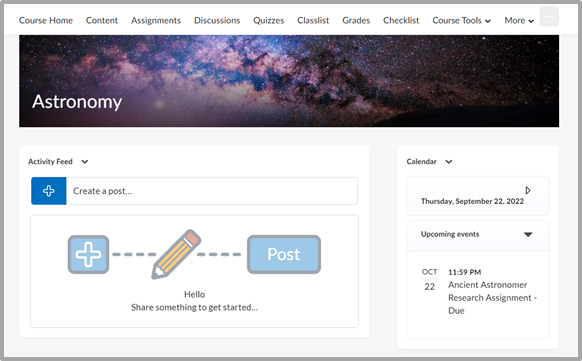
Figure: Click Create a post in the Activity Feed widget.
- To create a message, click the Message tab and enter your message.
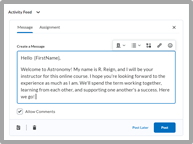
Figure: Create a message in the Activity Feed widget.
- Optionally, add an attachment by doing one of the following:
- To attach a web link or embed code, copy and paste the link or embed code in the message.
- Click the
 attach icon, and do one or more of the following:
- To upload a file from your computer, click the
 file upload icon.
 - To attach a link to course materials, click the
 existing activity icon.
 - To attach a web link, click the
 weblink icon.
 - To attach a link to a Google Drive file from your Google account, click the
 Google Drive icon.
Before attaching the link, ensure that the file has proper visibility permissions in Google Drive. - To attach a link to a OneDrive file from your OneDrive account, click the
 OneDrive icon.
Before attaching the link, ensure that the file has proper visibility permissions in OneDrive. - To insert videos external videos, like from YouTube, click the
 video icon and add a URL.
 | Important: Activity Feed does not store attachments; it only stores a link to the attachment. Files uploaded on a post are stored in the Manage Files area of a course. All other attachments, like an attachment of a OneDrive link, Google Drive link, Quicklink, or YouTube video, are only links to items that are elsewhere and, therefore, are not stored as files. |
If your course includes sections, use the Send To drop-down menu to select which section(s) you want to receive the post. Ensure you are enrolled in each section of a course you plan to communicate with or send posts to.
Click Post.
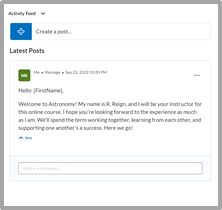
Figure: Click Post after creating your post.
Your message and attachments are added to the Activity Feed widget on your course homepage.
Video: How to add attachments and links to posts
Video: Optimize Posts
About assignment posts in Activity Feed
Instructors can use the Activity Feed to create new assignments and post them directly to their course homepage. The simplified assignment creation process allows you to set a name, instructions, due date, and the option to add the assignment to grades. If your course includes sections, you can create section restricted assignments directly from Activity Feed. Instructors must be enrolled in each sections of a course they plan to communicate with or send posts to.
Instructors can also choose from four different submission types: file submissions, text submissions, on paper submissions, and observed in person assignments. On paper submissions and observed in person assignments have additional completion type options that are set when the assignment is created. These assignments can be marked as completed manually by learners, automatically on evaluation, or automatically on due date. Files can be uploaded and attached to the assignment post to provide additional details to learners. For file based submissions, instructors can view how many submissions have been made to the assignment directly from the Activity Feed post, and access the submissions from the Activity Feed with a single click.
Pin post to top of feed
Bring attention to an Activity Feed post by pinning it to the top of the feed. If you have a reminder or announcement for learners, this is an easy place to make it visible.
To pin or unpin a post
- Locate the post you would like to pin in your Activity Feed.
- Click Options, and select Pin Post to Top.

Figure: Select Pin Post to Top in the Options menu.
- To unpin a post, click Options, and select Unpin Post or click the
 pin icon. Multiple posts can be pinned to the top of your feed.

Figure: Click Unpin Post in the Options menu.
Schedule Activity Feed posts
Scheduling Activity Feed posts for a later time lets you create assignment posts and other important messages about coursework and other events in your course. You can ensure that learners are notified of due dates and events before they happen.
To schedule Activity Feed posts that you would like to make visible at a future date and time
- From your course homepage, in the Activity Feed, click Create a post.
- Choose the type of post and enter the required information.
- Click Post Later.
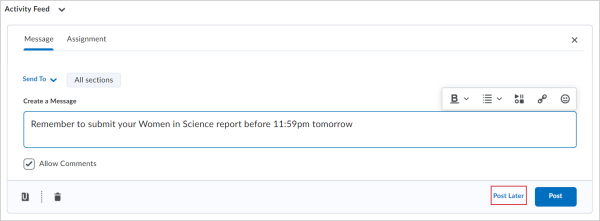
Figure: Click Post Later to prepare your post for a later publication.
- In the Post Later dialog, select a date and time.
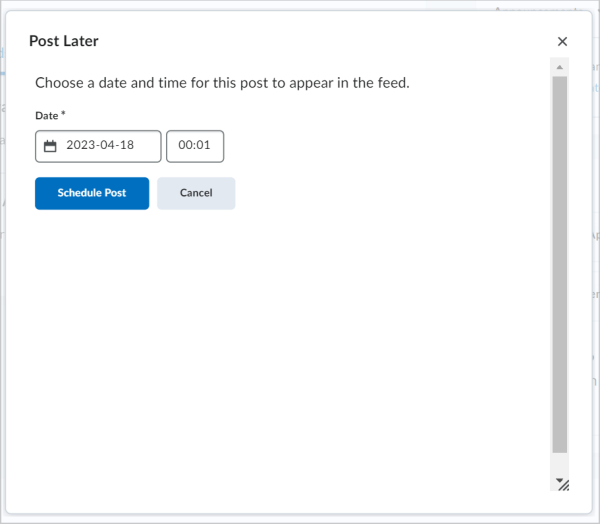
Figure: Select a date and time for your post's publication in the Post Later dialog.
- Click Schedule Post.
Scheduled posts are not visible to users until the scheduled date and time is reached. Planned assignments are hidden from users until the scheduled date and time is reached. Previously-scheduled posts can be modified by clicking on the View Planned Post link. Planned posts are removed from the planned post list once live in Activity Feed.

Figure: Click View Planned Post to view posts with future publication dates.
Video: Schedule Activity Feed posts
Remove posts
- In the Activity Feed widget, in the post you want to delete, click Options > Delete Assignment or Delete Message.

Figure: Click Delete Assignment in the Options menu.
Receive Activity Feed instant notifications
Instructors can choose to receive instant notifications when new comments are added to their posts. Learners can choose to receive instant notifications when new posts are created in a course they are enrolled in. Instant notifications are sent by email or SMS.
To receive Activity Feed instant notifications
- Click your name and select Notifications.
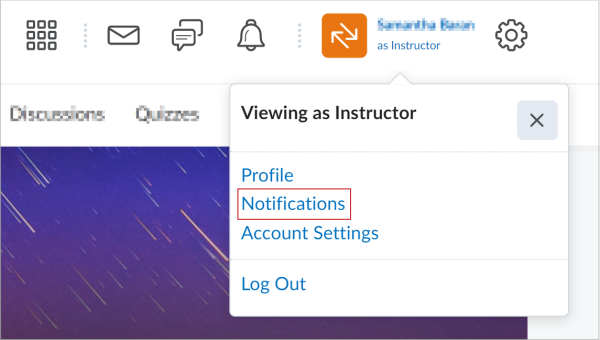
Figure: Select Notifications on your profile menu.
- Under Instant Notifications, select the desired delivery method for the available Activity Feed options:
- Activity Feed- new comments from others on a post
- Activity Feed - new posts created by others

Figure: Click Instant Notifications to select your posts' delivery method.
Click Save.
You have set up your instant notifications for Activity Feed.

|
Note: Activity Feed posts and comment notifications are not included in daily summary emails. |
Video: Receive Activity Feed instant notifications