Provide more efficient, timely, and meaningful grading and feedback. Create and edit assignments, see submission details, view submissions, associate assignments to rubrics and competencies, and return submissions with grades and feedback. On paper and observed in person assignment formats are also available.
The Create and Edit Assignments page has a fully immersive page layout. This layout is consistent with other areas of Brightspace including Assignments, Content, and Lessons, where you can upload and create a new assignment.
Create a new assignment in the Classic Content Experience
You can create a new assignment from Content in the Classic Content Experience.
To create an assignment in the Classic Content Experience
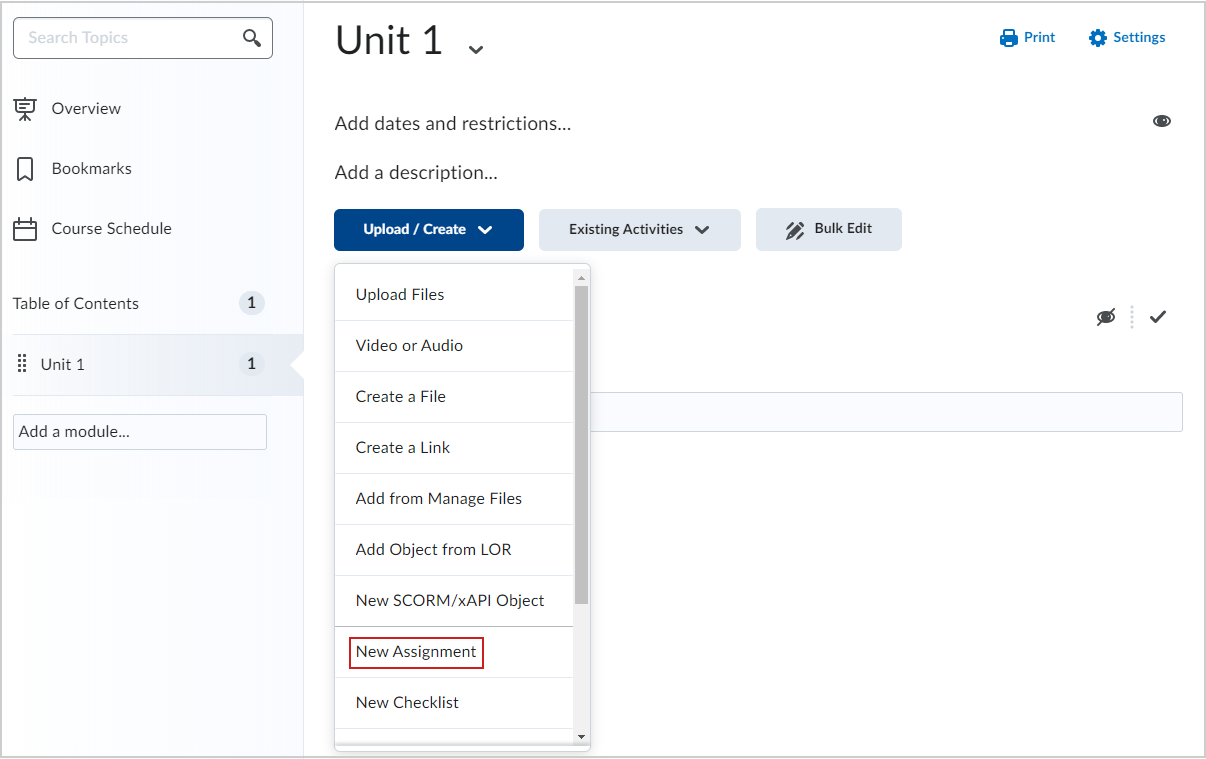
- In Content, select the module where you want to create an assignment.
- Click Upload/Create.
- Click New Assignment.
![Figure - The New Assignment option of the Upload Create button.](https://us.v-cdn.net/6036482/uploads/TBCES6FTMKW0/figure-the-new-assignment-option-of-the-upload-create-button.png)
Video: Create an assignment in the Classic Content Experience
Create a new assignment in the New Content Experience (Lessons)
You can also create a new assignment from Content in the New Content Experience (Lessons).
To create an assignment from the New Content Experience
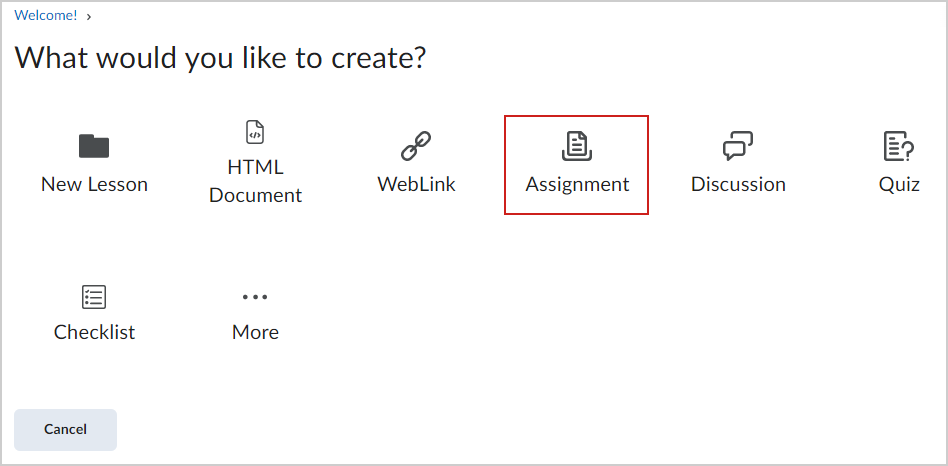
- From your course homepage, navigate to Content.
- In your desired module, click Create New.
- On the What would you like to create? page, click Assignment.
![The Assignment option of the What would you like to create.](https://us.v-cdn.net/6036482/uploads/B8XQASFGOIPS/assignment-what-would-you-like-to-create.png)
Video: Create an assignment in the New Content Experience (Lessons)
Create an assignment from the Assignments tool
You can also create an assignment directly from the Assignments tool.
To create an assignment from the Assignments tool
- Navigate to Assignments.
- Click New Assignment.
Add an Assignment Title, Grade Out Of, Due Date, and Instructions
When creating a new assignment, start by entering basic details such as name, grading information, due date, and instructions.
![This is the lightbulb icon used for tips.](https://us.v-cdn.net/6036482/uploads/KV8I9BXG7Y3C/lightbulb.png)
|
Tip: You can set assignment availability dates without setting a due date. Conversely, you can set a due date without setting availability dates. |
To fill in assignment details
- From the New Assignment page, enter an Assignment Title for the assignment.
![Brightspace New Assignment page. The interface includes fields for Assignment Title, Grade Out Of, and Due Date, as well as a rich text editor for instructions. Below the editor, buttons for Record Audio and Record Video are available.](src)
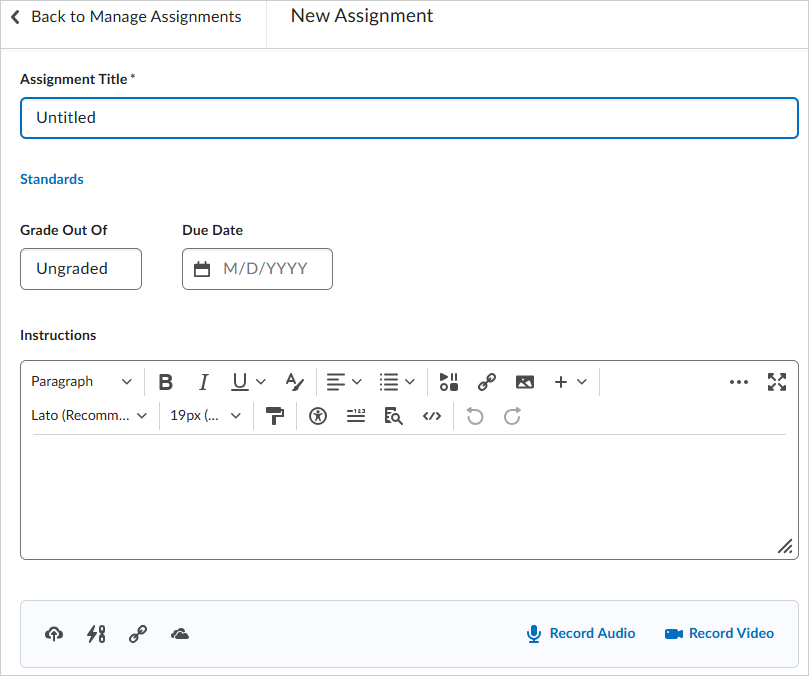
- For Grade Out Of, enter the number of points for the assignment.
- Select whether the assignment will be in the Grade Book by clicking the drop-down menu.
- Edit or Link to Existing: Choose to either create and link to a new grade item, or link to an existing grade item.
- Add to Grade Book
- Enter the Due Date for your assignment.
- Enter Instructions for your assignment.
![This is the paper note and pencil icon used for notes.](https://us.v-cdn.net/6036482/uploads/CVD8LAOU0OFM/print-notes.png) | Note: You can click the icons to upload any files, link to any existing activities or external weblinks, attach any files from Google Drive or OneDrive, and record and/or upload any audio or video files. |
- If you do not wish to configure your assignment further, toggle the assignment to Visible and click Save and Close.
The new assignment is created and available to students.
![This is the lightbulb icon used for tips.](https://us.v-cdn.net/6036482/uploads/KV8I9BXG7Y3C/lightbulb.png)
|
Tip: You can set assignment availability dates without setting a due date. Conversely, you can set a due date without setting availability dates. |
Set start, end, and availability dates
You can further customize your assignment by setting
To set a start date and end date
- From the New Assignment page, expand the Availability Dates & Conditions accordion.
![The Availability Dates & Conditions accordion showing the Start Date and End Date fields. Visibility states are below these fields.](https://us.v-cdn.net/6036482/uploads/P5DDYW9SIHY4/assignments-availability-dates-start-end.png)
- Set a Start Date and an End Date.
- Click the assignment availability field below the start and end date. In the Availability dialog, choose from the following for each date:
- Visible with access restricted: The assignment will be visible to learners before the Start Date or after the End Date, but they cannot click or open it. Learners can see the name, dates, and restrictions but cannot see the assignment description or attachments.
- Visible with submission restricted: The assignment will be visible to learners before the Start Date or after the End Date, and they can click or open it, but they cannot submit or mark it as complete. Learners can see all details about the assignment, including description, attachments, and rubrics, but they cannot upload files, enter comments, or mark the assignment as complete (for observed in person / on paper submission).
- Hidden: The assignment is hidden to learners until the start date is reached or after the end date passes. Learners can not see the assignment anywhere, including corresponding Calendar events and Notifications.
- In the dialog, choose to select Add availability dates to Calendar if you want the start or end date available in your course calendar.
![The three options for assignment availability are shown in the dialog with the option to add the availability dates to the Calendar.](https://us.v-cdn.net/6036482/uploads/QIEPI7AP2LFY/assignments-availability-dates-dialog.png)
The new assignment is created with specified start and end dates.
![This is the paper note and pencil icon used for notes.](https://us.v-cdn.net/6036482/uploads/CVD8LAOU0OFM/print-notes.png)
|
Note: You can also click the link below the start and end date fields to change the default settings for availability dates. When you collapse Availability Dates & Conditions, the summary text displays the selected start and end date information. The default time for an assignment start date is set to 12:00 AM. The default end date time is set to 11:59 PM. The default settings are available on the Availability Date Defaults page, which can be found under Course Admin. |
Create a release condition for your assignment
You can add release conditions to your assignment. Release conditions are conditions that must be met for an assignment to be made visible to students. For example, you can set your assignment to only be available to students when they achieve a specified score on a quiz.
To create a new release condition
- From the New Assignment page, expand the Availability Dates & Conditions accordion.
- Under Release Conditions, click Add Release Condition and select Create New.
![Create a Release Condition.](https://us.v-cdn.net/6036482/uploads/GH2VRKLMH9T1/figure-create-a-release-condition.png)
- Under Condition Type, select the condition that must be met.
- Under Assignment Submission Folder, select the assignment submission folder in which this condition must be met.
- Click Create.
- If you do not wish to configure your assignment further, toggle the assignment to Visible and click Save and Close.
A new release condition is added to your assignment.
Attach an existing release condition to your assignment
You can also attach an existing release condition to your assignment.
To attach an existing release condition
- From the New Assignment page, expand the Availability Dates & Conditions accordion.
- Under Release Conditions, click Add Release Condition and select Add Existing.
![Add an Existing Release Condition.](https://us.v-cdn.net/6036482/uploads/9EZFAEXDFTTT/figure-add-an-existing-release-condition.png)
- Select an existing release condition from the list and click Attach.
![This is the paper note and pencil icon used for notes.](https://us.v-cdn.net/6036482/uploads/CVD8LAOU0OFM/print-notes.png) | Note: Use the View Conditions for drop-down menu to filter the existing release conditions by tool. |
- If you do not wish to configure your assignment further, toggle the assignment to Visible and click Save and Close.
An existing release condition is added to your assignment.
Manage special access for your assignment
You can Manage Special Access for your assignment. Special access permissions allow you to set different availability dates and times for specific users. For example, you could extend the deadline for users who require remedial help or who are submitting work beyond the original scope of the assignment. You can also add special access after an assignment’s end date has passed for users who have a legitimate excuse for missing the deadline or for users you want to submit additional material, such as planning notes or a bibliography. The special access icon displays on the Assignment list page beside any assignment that includes special access settings.
To make your assignment available to select users
- From the New Assignment page, expand the Availability Dates & Conditions accordion.
- Click Manage Special Access.
![The Manage Special Access page.](https://us.v-cdn.net/6036482/uploads/WLEIWYD39BGT/figure-the-manage-special-access-page.png)
- Select one of the following options:
- Allow users with special access to submit outside the normal availability dates for this folder.
- Allow only users with special access to see this folder.
- To add users, click Add Users to Special Access.
![The Properties and Users sections in the Special Access dialog.](https://us.v-cdn.net/6036482/uploads/LAWR3PX2Q3KS/assignments-adding-users-special-access.png)
- To give users that have special access a different assignment due date, select the Has Due Date check box and set the due date for the assignment.
- Under Availability, select the Has Start Date and Has End Date check boxes and set the date availability for when you want users to have special access to the assignment.
- In the Users area, select the users you want to give special access to.
- Click Save and then click Save and Close.
- If you do not wish to configure your assignment further, toggle the assignment to Visible and click Save and Close.
Your assignment is configured to give special access to specific users.
Set assignment as an individual or group assignment
You can choose whether your assignment is an individual assignment or a group assignment. If you choose to create a group assignment, you can also align your group assignment to a group category. Categories enable you to organize and manage related groups. For example, you can have a category for Assignment 1, Assignment 2, Seminars, Remedial Help, and Book Reviews.
![This is the paper note and pencil icon used for notes.](https://us.v-cdn.net/6036482/uploads/CVD8LAOU0OFM/print-notes.png)
|
Note: You must have groups set up in your course to set an assignment as a group assignment. Refer to Create and manage categories and groups. You can edit the name of an existing category from the Assignments page. On the Assignments page, click Edit Categories. |
To choose your assignment type
- From the New Assignment page, expand the Submission & Completion accordion.
![The Submission & Completion accordion. Under Assignment Type, there are radio buttons with the option to select Individual Assignment or Group Assignment.](src)
- For the Assignment Type, select one of the following:
- Individual Assignment
- Group Assignment: From the Category drop-down menu, select an existing category to align your assignment to.
- If you do not wish to configure your assignment further, toggle the assignment to Visible and click Save and Close.
Add categories from Assignments
Organize your assignments into categories to make it easier for students to navigate to the appropriate assignment. For example, you can create separate categories for course units, summative projects, bonus assignments, and individual submissions. Your new category will appear on the Assignments page only if there are assignments associated with it.
- Navigate to Assignments.
- On the Assignments page, click Edit Categories.
![The Edit Categories option on the Assignments page.](https://us.v-cdn.net/6036482/uploads/KQUAIKU9HIFM/assignments-edit-categories-option.png)
- Do any of the following:
- Click Add Category to create a new category.
- Click the name of an existing category to modify it. Hit Enter, or click outside of the current cell to save your changes.
- Adjust the Sort Order of existing categories.
- To delete a category, select the check box next to its name and click the delete icon.
- Click Close.
Configure your assignment submission
You can choose what type of submission is required for your assignment, as well as allowable file extensions for that submission, how submissions are kept, and whether you receive a notification email when assignments are submitted.
To configure your assignment submission
- From the New Assignment page, expand the Submission & Completion accordion.
![The Submission Type, Submissions, and Notification Email sections. Text-only submissions and All submissions are kept are selected.](src)
- Under Submission Type, select one of the following:
- Text or file Submission: set the number of Files Allowed Per Submission.
- Text-only submission
- On paper submissions: set Marked as completed to one of the available options:
- Manually by learners
- Automatically on evaluation
- Automatically on due date
- Observed in person: set Marked as completed to one of the available options:
- Manually by learners
- Automatically on evaluation
- Automatically on due date.
![This is the paper note and pencil icon used for notes.](https://us.v-cdn.net/6036482/uploads/CVD8LAOU0OFM/print-notes.png) | Note: When you collapse Submission & Completion, the summary text displays your selection. |
- UnderAllowable File Extensions,select an option to restrict file extensions on submissions for the assignment.
- To receive email notifications when an assignment is submitted, under Notification Email, enter an email address or multiple email addresses separated by a comma.
![This is the paper note and pencil icon used for notes.](https://us.v-cdn.net/6036482/uploads/CVD8LAOU0OFM/print-notes.png) | Note: Notification emails are only available when the assignment Submission Type is set to Text or file submissionText-only submission. |
The assignment type and acceptable file type for submission is set.
Display annotations and use anonymous marking
You can use Annotation Tools when evaluating your assignment. This also enables you to set up your evaluation so that you can evaluate assignments without seeing the names of your students.
To display annotations and use anonymous marking
- From the New Assignment page, expand Evaluation & Feedback.
- To display annotation tools in the document viewer, under Annotation Tools, select Make annotation tools available for assessment.
- To enable anonymous marking, under Anonymous Marking, select Hide student names during assessment.
- To make your assignment visible to students, click on the Visibility toggle.
![This is the paper note and pencil icon used for notes.](https://us.v-cdn.net/6036482/uploads/CVD8LAOU0OFM/print-notes.png) | Note: If Visibility is not turned on when creating the assignment, the assignment is hidden from students. |
- Click Save and Close.
Use multiple evaluators for an assignment
You can also use Advanced Assessments to better manage courses with large class sizes and multiple evaluators, delegate and manage evaluator workflows, and reduce bias in marking. Refer to Advanced Assessment for Assignments in test, development, and staging environments of Brightspace for more information.
To set up delegation, co-marking, or multi-evaluator workflows
![This is the bullhorn icon used for warnings.](https://us.v-cdn.net/6036482/uploads/E8VNGV60YPWG/bullhorn.png)
|
Important: If you don't have access to the features listed below, including delegation, co-marking, the multi-evaluator workflow, and Turnitin integration, please contact your organization administrator.
When the d2l.Tools.Activities.AdvancedAssessmentsEnabled configuration variable is On, you can access Advanced Assignments features to create, edit, and evaluate assignments. The Assignments > Give Feedback permission is required to populate both the evaluator and publisher lists.
|
- From the New Assignment page, expand the Evaluation & Feedback accordion.
- In Evaluators > Select Evaluators, choose who can evaluate this assignment and click Done.
![The Select Evaluators dialog with three evaluators checked. Options at the bottom include Done and Cancel](https://us.v-cdn.net/6036482/uploads/QY0LERPSUL64/assignment-shared-select-evaluators.png)
- In the Publishers field, select one of the following options:
- All evaluators can publish any evaluations
- Evaluators can only publish their evaluation
- Manually select publishers > select publishers who can publish grades for the assignment and click Done.
![The Select Publishers dialog with one publisher selected. The dialog states that at least one publisher must be selected. Options at the bottom include Done and Cancel](https://us.v-cdn.net/6036482/uploads/9NFL962BCMD0/assignment-shared-select-publishers.png)
![This is the paper note and pencil icon used for notes.](https://us.v-cdn.net/6036482/uploads/CVD8LAOU0OFM/print-notes.png) | Note: Only publishers can retract evaluations already released to students. |
-
To match evaluators to students, in Allocate Evaluators to Learners > Manage Allocations > manually pair students with evaluators or select one of the following options:
- Allocate all evaluators to every learner
- Randomly allocate 1 evaluator to every learner evenly
- Randomly allocate 2 evaluators to every learner evenly
- Randomly allocate 3 evaluators to every learner evenly
Click Apply Allocation Method > Done.
![This is the paper note and pencil icon used for notes.](https://us.v-cdn.net/6036482/uploads/CVD8LAOU0OFM/print-notes.png)
|
Note: By default, selected evaluators can evaluate any student. Evaluator can also be assigned to groups and or sections using the Groups or Sections drop-down menu. Students in the group or section can be mapped to an evaluator.
When evaluators are not assigned to a student due to section restrictions or changes to enrollment, a warning message in the Manage Allocations dialog informs you that some evaluators are being removed during the unenrollment event. Once the unenrollment is complete, a warning appears in the Manage Allocations table beside the learners who should be redistributed to other evaluators.
|
-
To choose a multi-evaluator workflow, navigate to Coordinate Multiple Evaluators, select one of the following options:
-
One shared evaluation to allow all evaluators to work on the same evaluation together. Publishers release this evaluation to students.
![This is the lightbulb icon used for tips.](https://us.v-cdn.net/6036482/uploads/KV8I9BXG7Y3C/lightbulb.png)
|
Tip: When using the One shared evaluation workflow, each assigned evaluator can edit a shared evaluation. The evaluation change history is not saved and evaluators may not notice changes made by other assigned evaluators. Therefore, D2L recommends that you use this option for real-time, collaborative evaluation between multiple people (for instance, when an instructor and a teaching assistant are evaluating an assignment together and discussing the evaluation as they are doing it). Select Multiple individual evaluations if you need independent evaluations.
|
-
Multiple individual evaluations to allow evaluators to work on their own evaluations separately. Publishers aggregate results into one final evaluation and release it to students.
![This is the paper note and pencil icon used for notes.](https://us.v-cdn.net/6036482/uploads/CVD8LAOU0OFM/print-notes.png)
|
Note: When enrollment changes are made for evaluators in a course, it may take longer than expected (more than two minutes) for these changes to be processed and reflected in the Edit Evaluators list and the Evaluators section. This is based on the number of users in the course and the number of Advanced Assessment activities.
|
-
If Turnitin is enabled for your role in the course, you can use the Similarity Report options while the Online Grading tools are disabled by doing the following:
- Under Turnitin Integration, click Manage Turnitin.
- Enable the Turnitin integration and click Save.
- To make your assignment visible to students, click the Visibility toggle.
![This is the paper note and pencil icon used for notes.](https://us.v-cdn.net/6036482/uploads/CVD8LAOU0OFM/print-notes.png) | Note: If Visibility is not turned on when creating the assignment, the assignment is hidden from students. |
- Click Save and Close.
![This is the bullhorn icon used for warnings.](https://us.v-cdn.net/6036482/uploads/E8VNGV60YPWG/bullhorn.png)
|
Warning: You can still access the Online Grading option called Feedback studio in Turnitin when you access the tool on Turnitin's page. However, any inputs in the tool are not restricted by the evaluators defined in Advanced Assessment. Additionally, any grades or feedback are not auto-synchronized with the Consistent Evaluation Experience or Grade Book.
|
Add a rubric to an assignment
You can add rubrics to your assignment.
To add a rubric to an assignment
- On the Assignments page, click the Actions drop-down menu for the assignment where you want to add a rubric. Click Edit Assignment.
![The Edit Assignment option in the Actions drop-down menu for an assignment.](https://us.v-cdn.net/6036482/uploads/0XVHAFZDPC07/assignments-edit-assignment-option.png)
- In the Evaluation & Feedback menu, Click Add Rubric > Add Existing.
![The Evaluation & Feedback menu with the Add Rubric drop-down option showing the Add Existing option.](https://us.v-cdn.net/6036482/uploads/BW7C53NRMSLW/assignments-evaluation-feedback-add-rubric.png)
- In the Add Existing Rubric dialog, click the checkbox for the rubric you want to add.
![This is the paper note and pencil icon used for notes.](https://us.v-cdn.net/6036482/uploads/CVD8LAOU0OFM/print-notes.png) | Note: You can add more than one rubric to an assignment. |
- Click Add Selected.
![The Add Existing Rubric dialog showing two checkmarked rubrics and the Add Selected option](https://us.v-cdn.net/6036482/uploads/JBJ2TO3TUJU4/assignments-add-existing-rubric-dialog.png)
Submit a preview assignment
You can go through the process of viewing and submitting an assignment and have your preview submission available in the evaluation workflow.
![This is the paper note and pencil icon used for notes.](https://us.v-cdn.net/6036482/uploads/CVD8LAOU0OFM/print-notes.png)
|
Note: Your preview submissions will not impact the statistics for your course. |
To preview an assignment submission
- Navigate to Assignments.
- Click More Actions > Preview.
![The Assignments page showing the More Actions drop-down menu. The Preview option is highlighted.](https://us.v-cdn.net/6036482/uploads/NJ3XZ0OK9QWC/assignments-more-actions-preview.png)
- Select the assignment you want to preview.
- Select Allow this preview submission to be available in the folder.
- Click Add a File to submit a test assignment.
- Click Submit.
![The Submit Assignment page showing the options for adding a file and the checkbox for the option Allow this preview submission to be available in the folder.](https://us.v-cdn.net/6036482/uploads/PLAIC4V269DI/assignments-preview-submission-checkbox.png)
- On the Review Assignment Submission page, click Exit Preview.
- If you want to view the evaluation workflow for your assignment submission, click on the assignment where you just made the submission.
- Click Show Search Options.
- In the Users tab in the Submissions section, select Users with preview submissions.
![The Users tab. The Submissions section shows the selected option User with preview submissions.](https://us.v-cdn.net/6036482/uploads/80NC5XW9EW3N/assignments-users-preview-submissions.png)
- Click Apply and find your assignment submission.
You now have access to the to the evaluation screen for your assignment submission.