In the Discussions tool, you can review and evaluate discussion topics, assess individual participants, and submit bulk feedback seamlessly, ensuring consistency in grading and feedback distribution.
Make a discussion topic gradable and link it to a grade item
When you add a discussion topic’s score to a grade item in your grade book, your students' scores automatically transfer to the grade book. This enables you to factor the topic score into their final grades for the course.

|
Note: You can only link numeric grade items to discussion topics. |
To make a discussion topic gradable and link it to a grade item
-
You can edit an existing topic or create a new discussion topic:
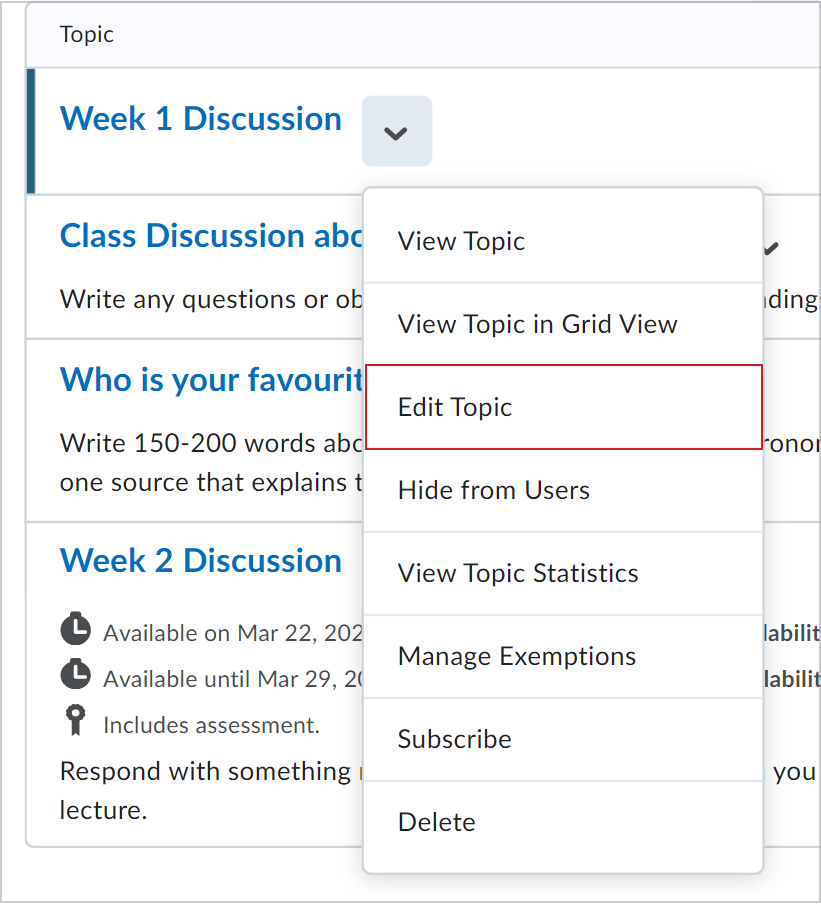
- Navigate to Discussions. In the Actions menu for a discussion topic, click Edit Topic.
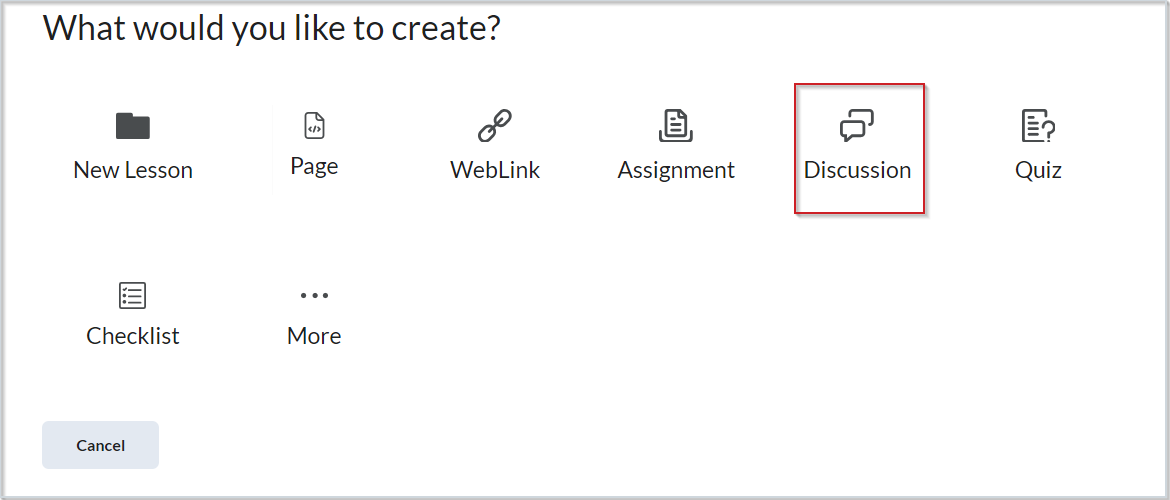
- Navigate to Content. In the module where you want to create your discussion topic, click Create New > Discussion.
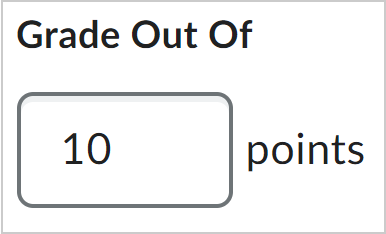
- On the topic creation or edit page, enter a numeric value in Grade Out Of.
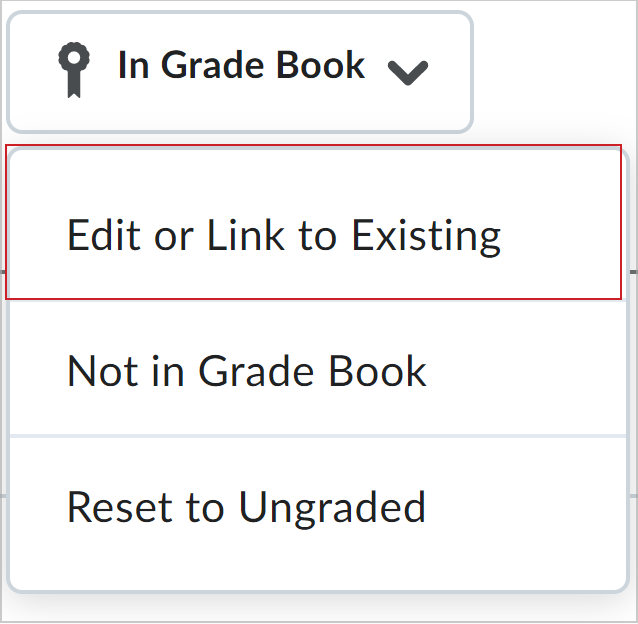
- In the Grade Out Of section, click the drop-down menu and click Edit or Link to Existing.
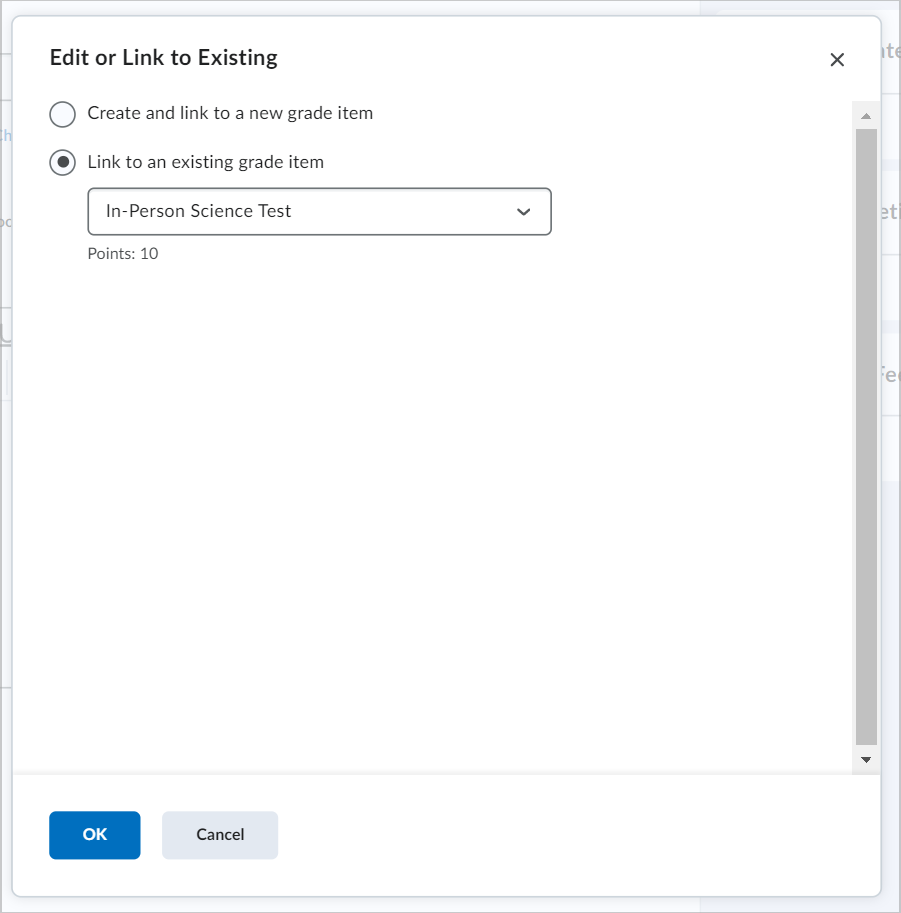
- In the Edit or Link to Existing dialog, select one of the following:
- Select Create and link to a new grade item to create a new grade item associated with your discussion topic. Choose the Grade Scheme for your new grade item.
- Select Link to an existing grade item to link your discussion topic to an existing grade item. Select the existing grade item from the drop-down list.
- Click OK.
- Toggle the Visibility of your discussion topic to be Visible or Hidden.
- Click Save and Close.
Your discussion topic is now linked to a grade item.
Consistent Evaluation experience in Discussions
Consistent Evaluation is an optimized experience applied to assessable tools in Brightspace, including Discussions. This experience allows instructors to better review and evaluate both discussion topics and individual participants, without changing their workflow.
Consistent Evaluation includes the following features:
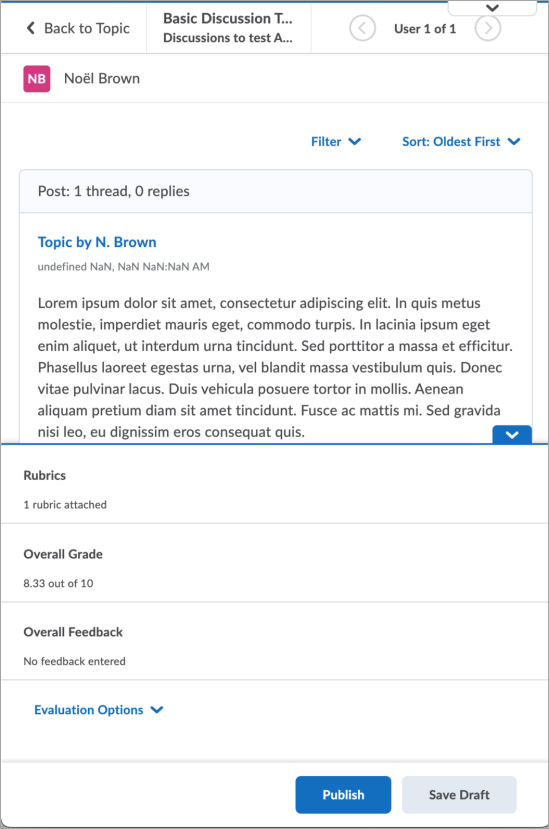
- The name of the activity, navigation arrows, and student name and profile card appear in the header panel at the top.
- The discussion topic and replies appear in the submission panel on the left. The title of the topic or the reply is a link that will open the post in a new window so you can get an idea of the context in which the post was made.
- Evaluation tools like Grades, Rubrics, Grading Rubric, and Feedback appear in the evaluation panel on the right. When you open the Inline Rubric, it expands within the panel or pops out into a new window for grading.
- You can drag the divider between the submission panel and the evaluation panel to resize them to suit your preferences and screen size. The divider stays in the same position as you navigate through your students' submissions.
- In adaptive mobile view, the evaluation tools are hidden in a drawer at the bottom of the screen. Tap the drawer to display the tools.
Assessment methods available for a discussion
If you have allow evaluation of individual posts (under Evaluate Posts) selected, any grades you enter in Grade Book for discussion grade items are also synchronized back to Discussions. This ensures data consistency between Discussions and Grade Book. In addition, feedback from Discussion grade items is synchronized with the grade book when the evaluator clicks Update. This ensures that any feedback saved in draft is also automatically saved to the grade book.

|
Note: Currently, Discussion grades are not synchronized when the Discussion tool is updated by the Brightspace API or when Grade Book is exported and imported. |
The following calculation methods are available to assess discussions.
|
Calculation method
|
Definition
|
|
Average post score
|
This calculation method averages all of the post scores included per user.
|
|
Maximum post score
|
This calculation method identifies the highest score of all the post scores included per user.
|
|
Minimum post score
|
This calculation method identifies the lowest score of all the post scores included per user.
|
|
Mode post score - Highest on multiple
|
This calculation method looks at the frequency of scores on posts, then selects the highest occurrence of a score per user. Once it picks the frequency, the system looks to see if multiple scores occur at that frequency. If not, it assigns that score to the user. If there are multiple scores with the same frequency, it will choose the highest of those scores. For example, if a score of 7 occurs 2 times, a score of 8 occurs 3 times, and a score of 9 occurs 3 times, the system will choose the frequency 3 and the score of 9.
|
|
Mode post score - Lowest on multiple
|
This calculation method looks at the frequency of scores on posts, then selects the highest occurrence of a score per user. Once it picks the frequency, the system looks to see if multiple scores occur at that frequency. If not, it assigns that score to the user. If there are multiple scores with the same frequency, it will choose the lowest of those scores. For example, if a score of 7 occurs 2 times, a score of 8 occurs 3 times, and a score of 9 occurs 3 times, the system will choose the frequency 3 and the score of 8.
|
|
Sum of post scores
|
This calculation method sums up all the scores on posts within a topic.
|
Assess a discussion topic
The discussion topic and replies appear in the submission panel on the left. The title of the topic or the reply is a link that opens the post in a new window so you can understand the context in which the post was made.
You can drag the divider between the submission and evaluation panels to resize them. The divider stays in the same position as you navigate your students' submissions.
You can assess individual students' contributions to a discussion topic and provide personalized feedback based on their posts. Follow the steps below to evaluate learners and submit their grades and feedback.

|
Tip: Alternatively, you can evaluate individual students and, once assessments are complete, submit bulk feedback to multiple learners at once. Instructions for providing bulk feedback are outlined in the section To provide feedback to all students. |
To evaluate a topic and provide individual feedback
-
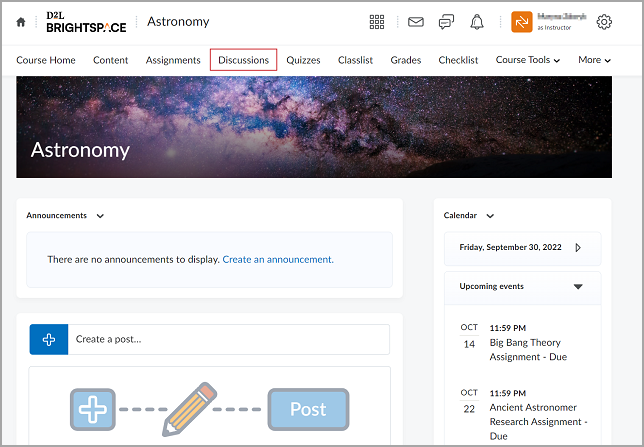
On your course homepage, navigate to Discussions.
-
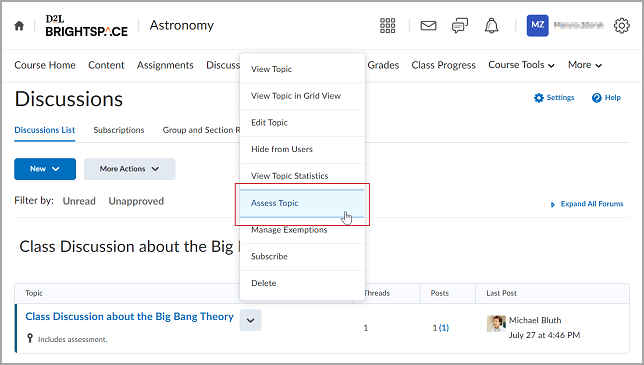
On the Discussions List tab, click the drop-down menu next to a topic name and select Assess Topic.
-
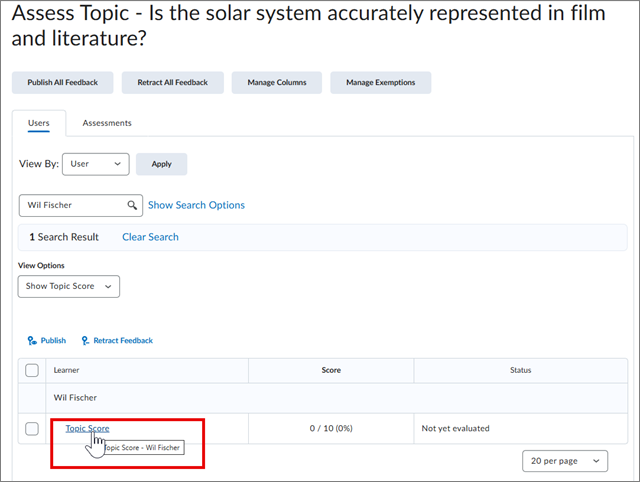
A new page loads that lists students who have posted a thread to the chosen topic. Click Topic Score under a student's name.
-
Once the thread has loaded in a new page, enter the following:
- In the Overall Grade field, add the student's grade.
- In the Overall Feedback field, add your comments or feedback.
- Use the Attachments section to add text and audio-video files.
 | Note: Students can review feedback files in the discussion or in the Grades tool. |
-
Do one of the following:

|
Note: When evaluating Discussion from the Evaluation page, you can click and drag the boundary between the Post pane and the Overall Feedback pane to change the size of each. If you reduce the size of the Overall Feedback pane past a break point, the icons change in appearance. The File Upload, Attach Link to Existing Activity, Attach Weblink, Attach from One Drive, Record Audio, and Record Video icons change to only show Attach, Record Audio, and Record Video icons as part of the adaptive experience. You can click Attach in this case to access the same options. |
You can save time by providing bulk feedback to multiple students directly from the Assess Topic page in Discussions. This feature allows you to add feedback to selectedstudents or all students simultaneously, streamlining the evaluation process.
To provide feedback to selected students
-
Navigate to Discussions.
-
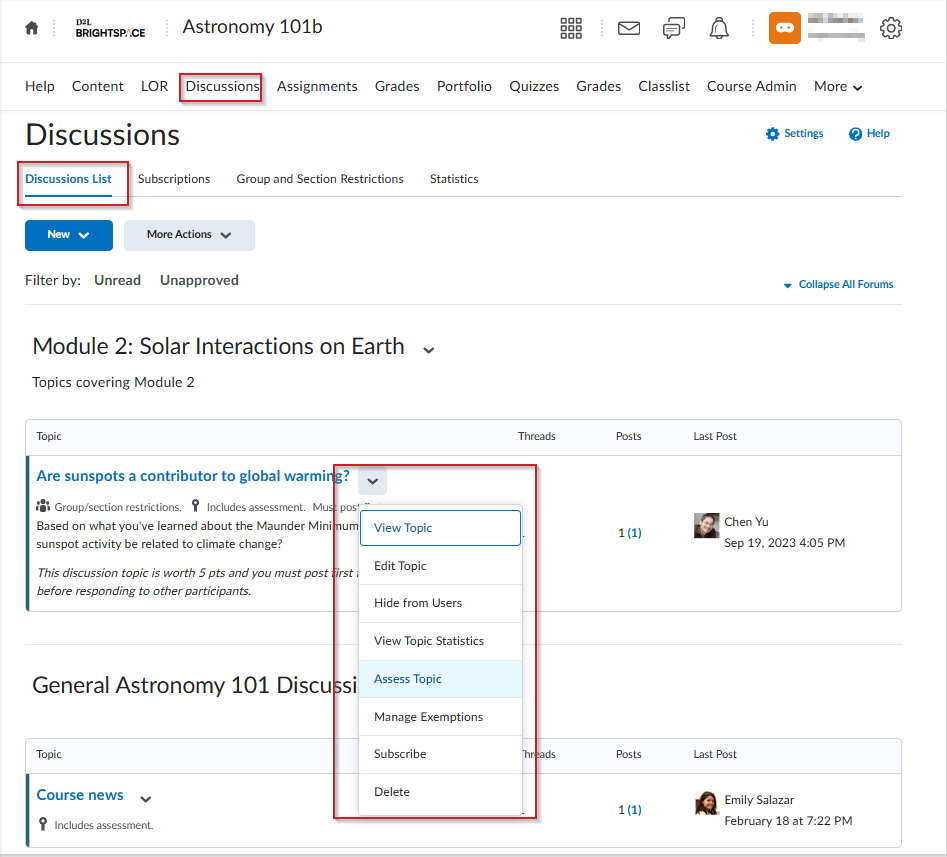
On the Discussions List tab, click the drop-down menu next to the related topic's name and select Assess Topic .
-
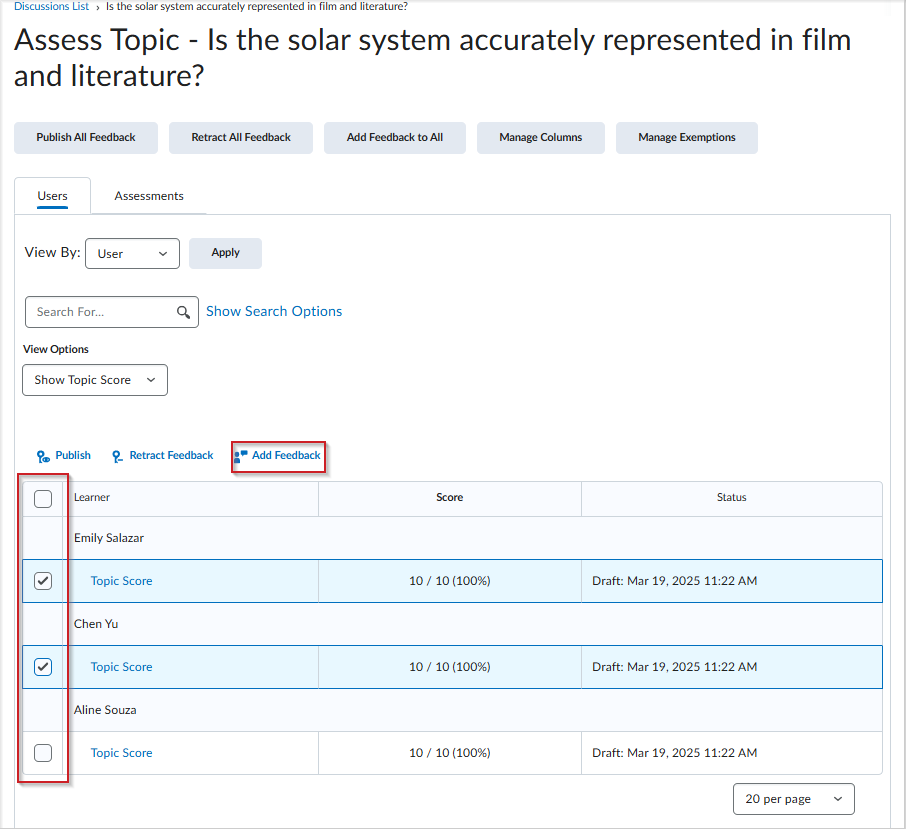
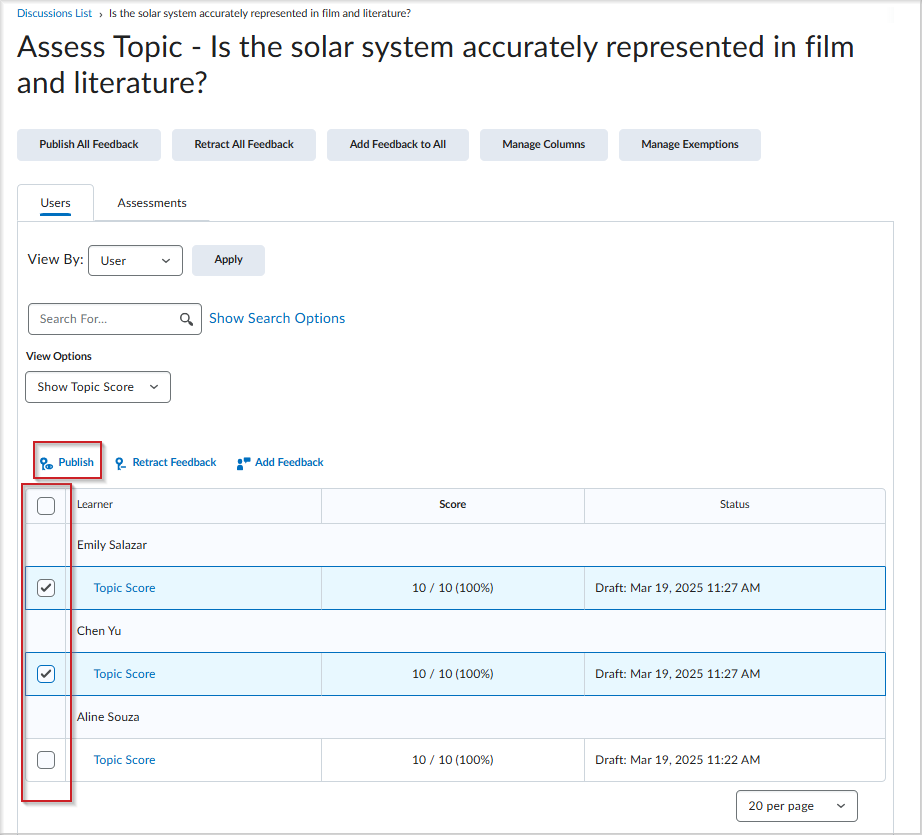
Select the students you want to provide feedback to, then click Add Feedback.
-
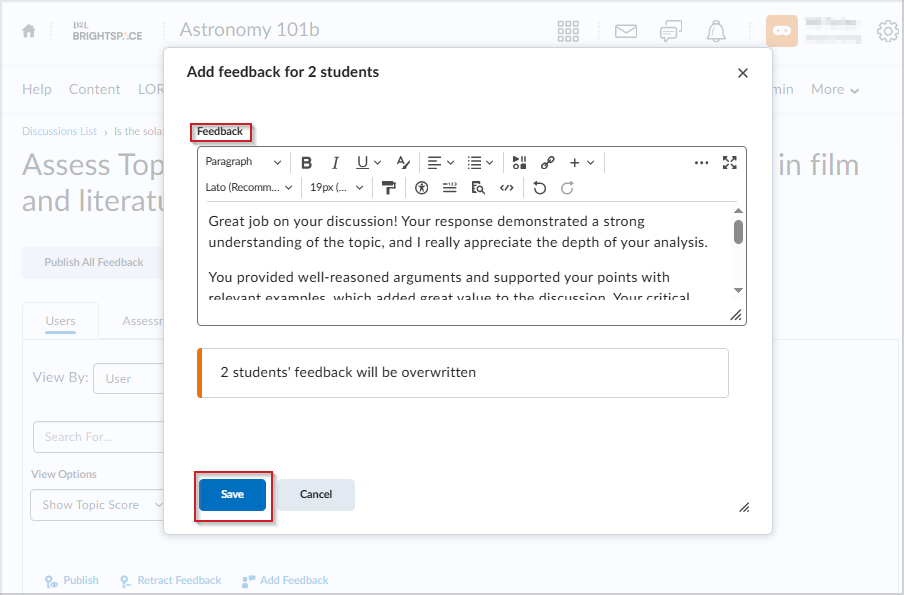
Enter your feedback and click Save. The feedback is saved as a draft.

|
Note: If you add feedback for students who already have feedback, an inline message will appear warning you that their existing feedback will be overwritten. If you attempt to save blank feedback for students who already have feedback, a separate confirmation dialog will appear. |
-
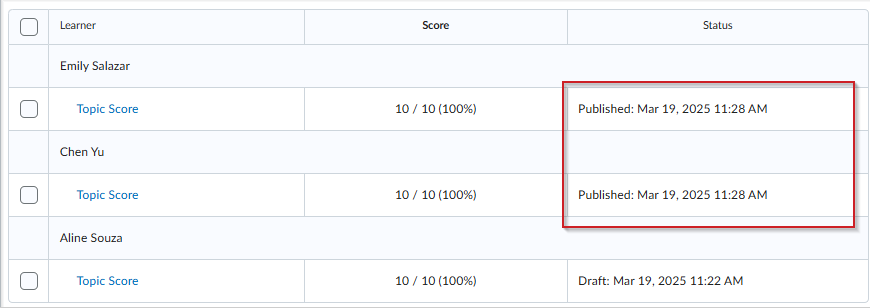
To publish the feedback, select the users you provided feedback to, and click Publish. The feedback Status for selected learners will change to Published.
To provide feedback to all
students
-
Navigate to Discussions.
-
On the Discussions List tab, click the drop-down menu next to the related topic's name and select Assess Topic .

-
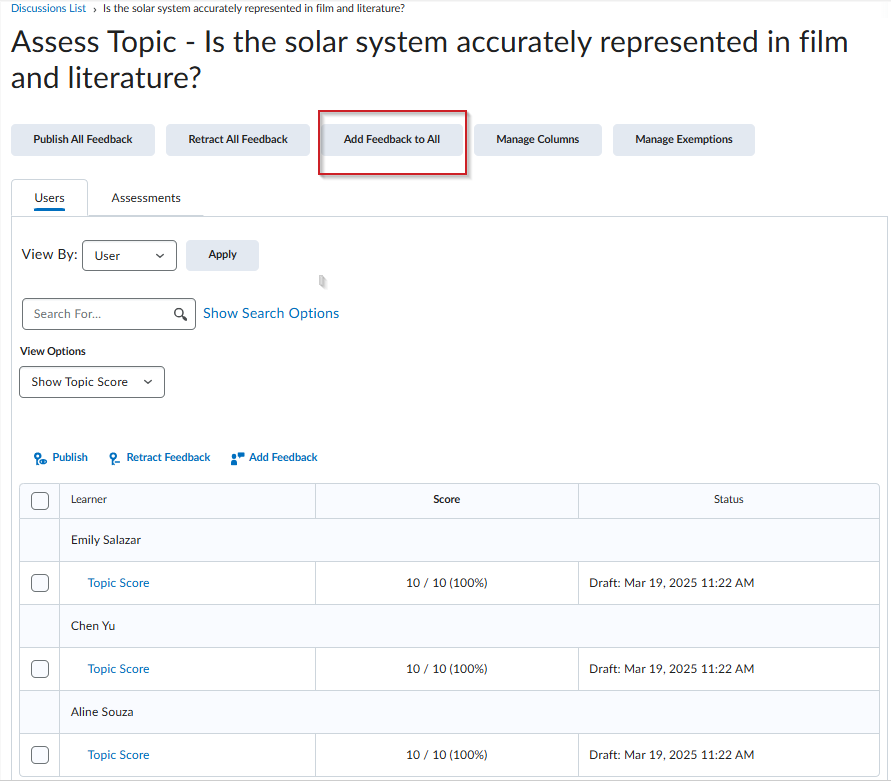
Click Add Feedback to All.
-
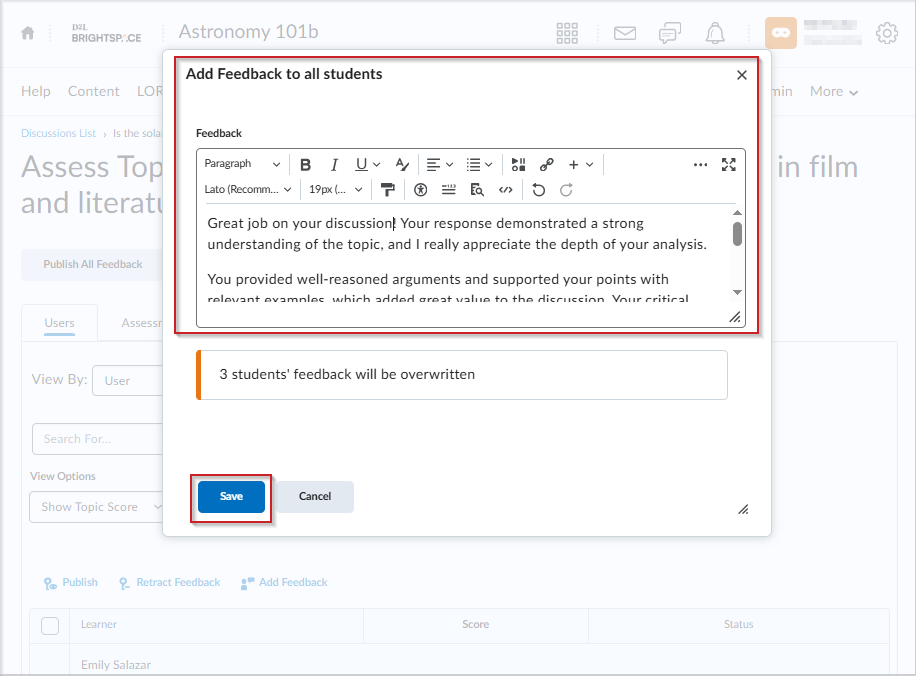
Enter your feedback and click Save. The feedback is saved as a draft.

|
Note:If you add feedback for students who already have feedback, an inline message will appear warning you that their existing feedback will be overwritten. If you attempt to save blank feedback for students who already have feedback, a separate confirmation dialog will appear. |
-
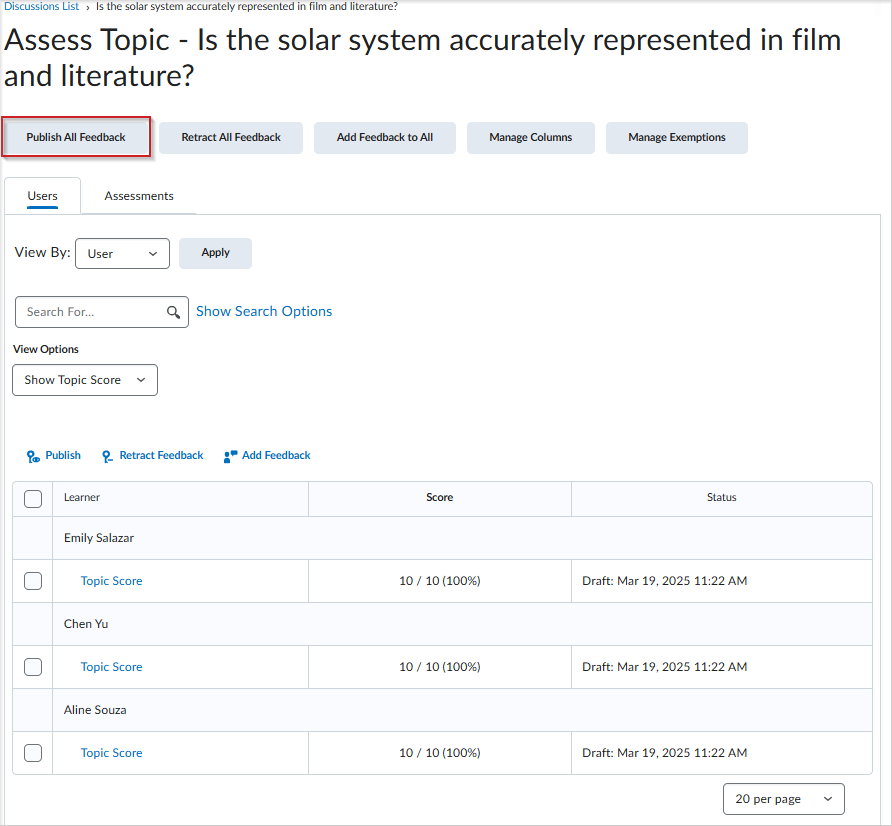
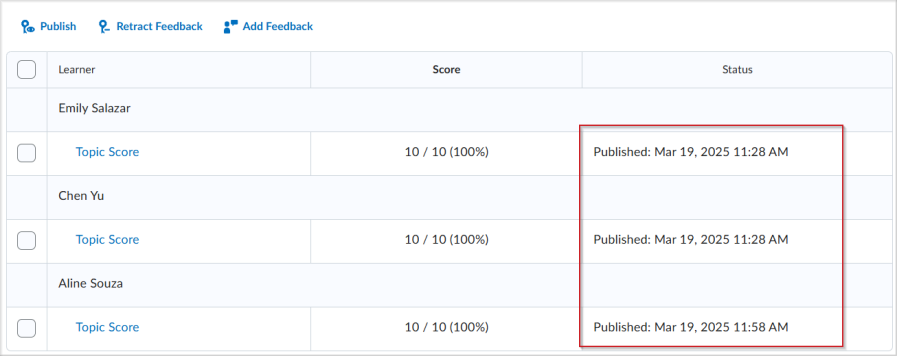
To publish the bulk feedback, click Publish All Feedback. The feedback status for all students will change to Published.
Assess a specific user's discussion posts
You can also assess all discussion posts from a specific student.
To evaluate a student
- On your course homepage, navigate to Discussions.

-
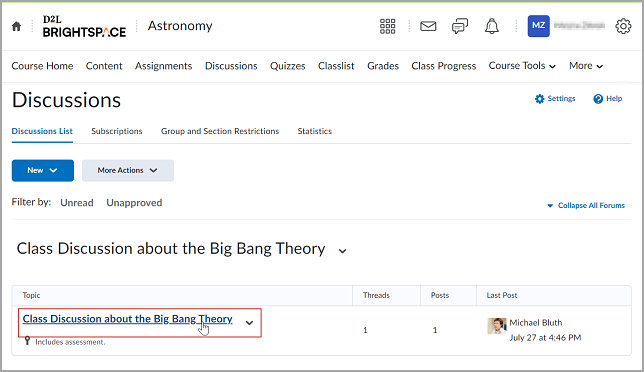
On the Discussions List tab, select the topic you want to assess.
-
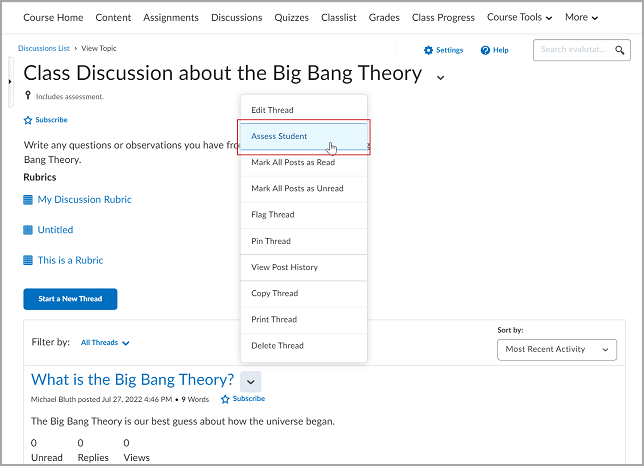
From the View Topic page, select the Assess Student option by clicking the drop-down menu next to the corresponding thread's name.
-
Once the thread has loaded in a new page, populate the following fields:
-
In the Overall Grade field, add the student's grade.
-
In the Overall Feedback field, add your comments and feedback.
-
Use the Attachments section to add text and audio-video files.

|
Note: Students can review feedback files in the discussion or in the Grades tool. |
-
Do one of the following:
Your grade will be published on the Assess Topic page.

|
Tip: You can also evaluate both topics and students using the following way: From the View Topic page, click the needed thread and select the Assess Topic or Assess Student option next to this thread name. |
View applied course grade scheme as you assess a discussion
If you have applied a grade scheme to your course, you can view that grade scheme as you enter a grade on a specific discussion topic. For example, if you have applied a Percentage grade scheme to your course and linked a discussion topic to a grade item, you can enter an Overall Grade and then see the student grade scheme under Learner View of Grade. This assists you in understanding what your entered grade will look like to a student viewing their final grade with the grade scheme applied.

|
Important: The appearance of Learner View of Grade is controlled by a Grades configuration variable. Contact your organization administrator for assistance. Also, you must link your discussion topic to a grade item and associate it with a course grade scheme before you can see Learner View of Grade. Refer to the Make a discussion topic gradable and link it to a grade item topic on this page for details. For more information about how to set up Grade Schemes, refer to Create Grading Schemes using the Grades tool.
|
To view an applied course grade scheme as you assess
- Navigate to Discussions.
- From the Discussions List tab, click the Actions for (arrow icon) next to a discussion topic and select Assess Topic.
- From the Users tab of the Assess Topic page, click a Topic Score to open a discussion post and assess it.
- Assess the topic and enter an Overall Grade. The Learner View of Grade updates automatically to represent the grade scheme applied.
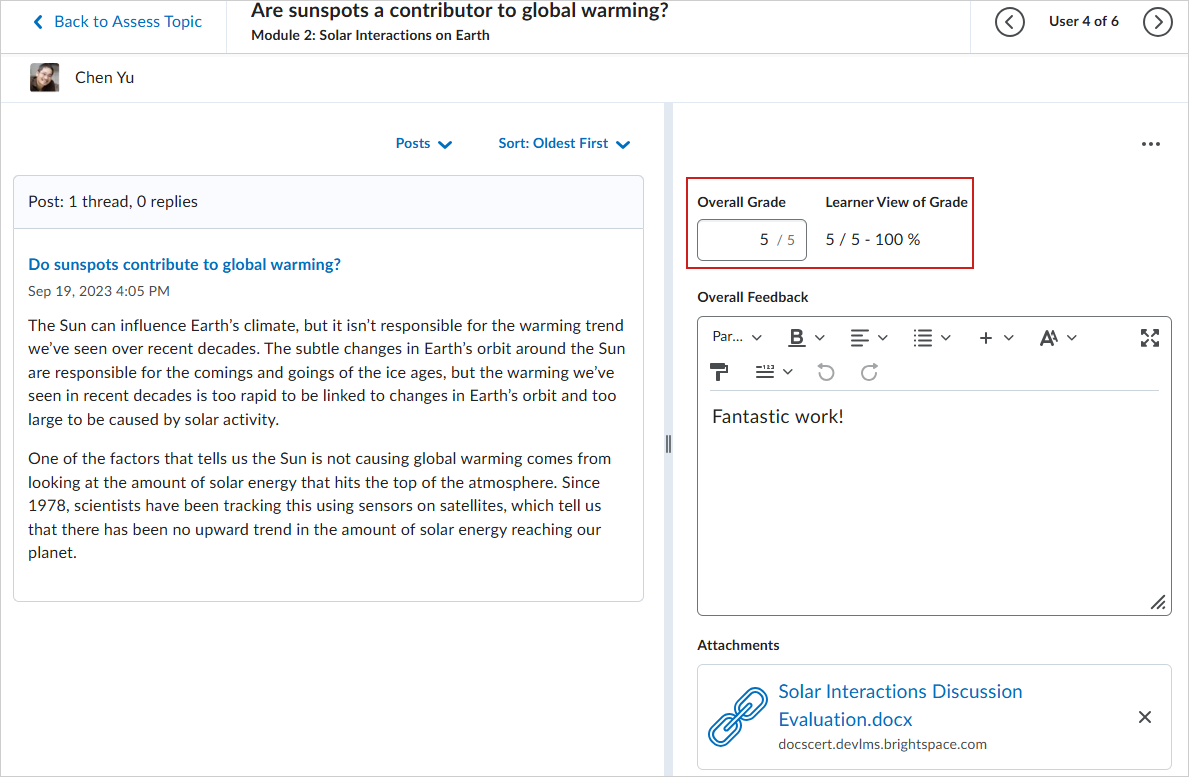
Figure: In this example, the applied grade scheme is a percentage. This percentage displays under Learner View of Grade as you enter an Overall Grade.

|
Tip: You can also choose to Hide Learner View of Grade or Show Learner View of Grade by selecting those options from the Evaluation Options (...) menu. |
Retract and re-publish assessments of discussions
You can retract published assessments from student view if you need to re-assess discussion posts. This option is available for individual users, or you can use the bulk retract and publishing features for larger numbers of users or the entire class.
- Navigate to Discussions.
- From the context menu of the topic you want to assess, click Assess Topic.
- Select the checkbox next to a student's name and click Publish Feedback, or Retract Feedback.

|
Tip: Use the Status column to view information on when feedback was published, if a topic has not been evaluated, or if feedback is currently saved as a draft. |
Video: Grade and provide feedback on a discussion topic in Discussions
Assess a discussion topic
Use discussions to assess your students' knowledge and let them apply their learning from course content.
- Navigate to Discussions.
- On the Discussions List page, from the Actions menu of the topic you want to evaluate, click Assess Topic.
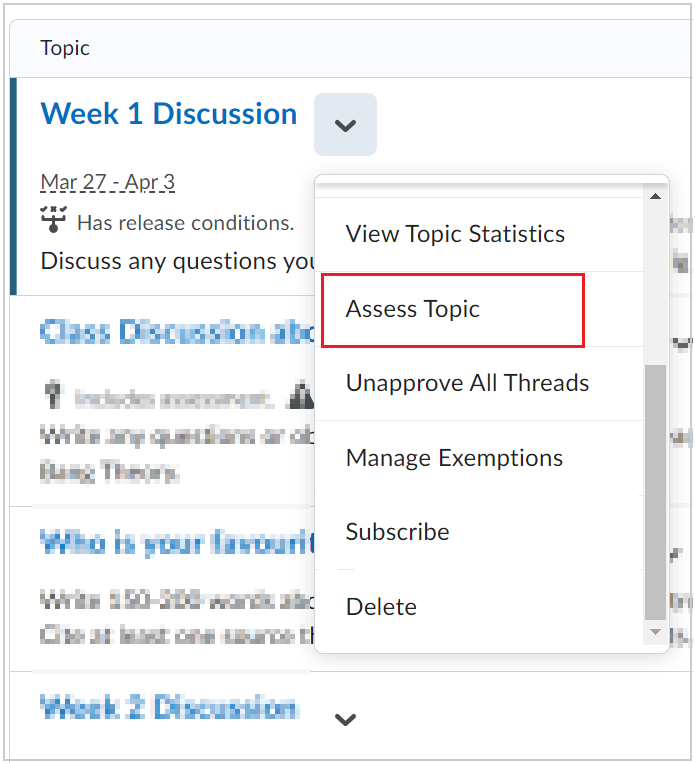
- Click the Topic Score link beneath the name of the user you want to assess. This will bring up all of their posts for the topic, which you can then assign either individual scores or an overall topic score for.
You have graded your students' discussion posts.
Assess individual discussion topic posts
- Navigate to Discussions.
- In the Actions menu of your discussion topic, click Edit Topic.
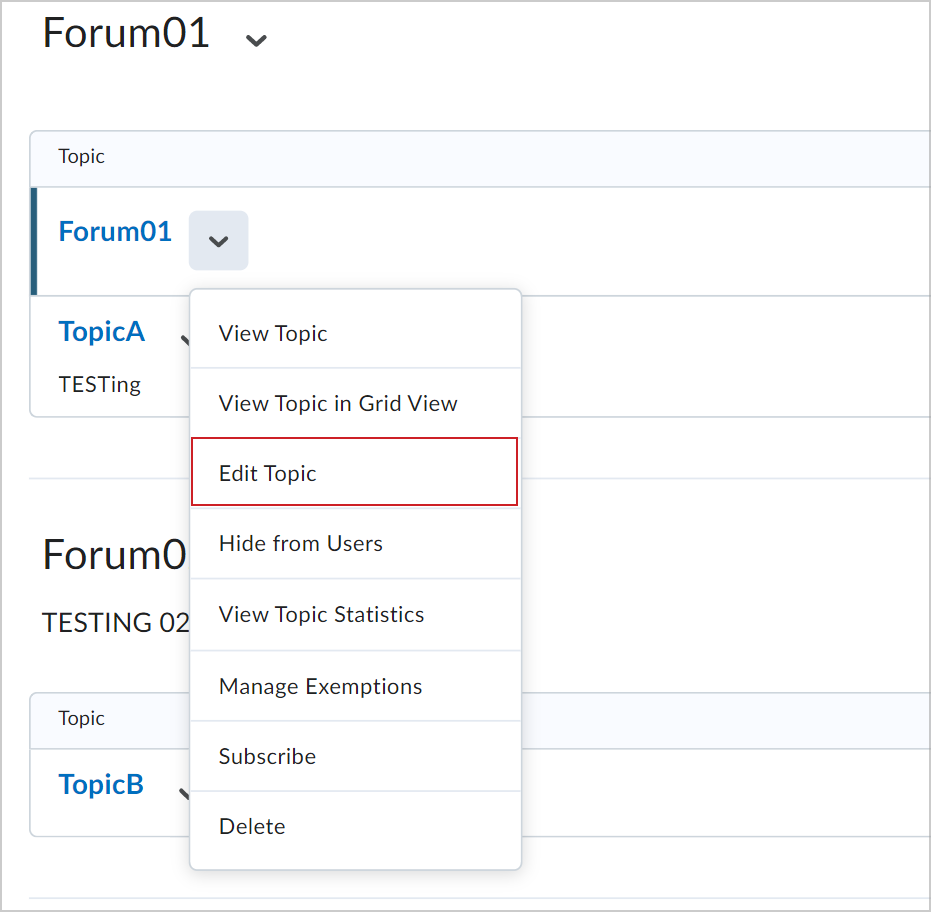
- On the Edit Topic page, expand the Evaluation & Feedback accordion.
- Select Allow evaluation of individual posts. Select your Calculation Method.
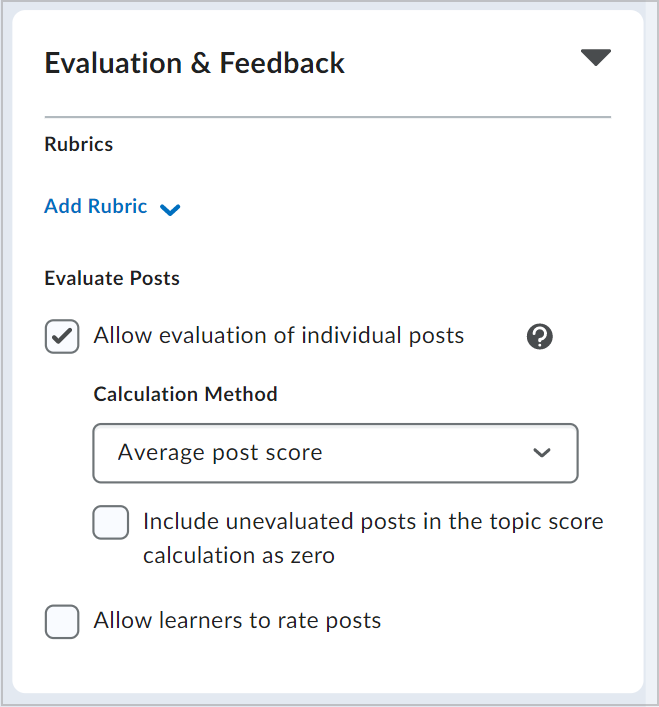
- Click Save and Close.

You have enabled the evaluation of individual posts for your discussion topic.
Assess discussions using the New Content Experience
In the Discussions tool, you can review and evaluate discussion topics and individual participants without changing your workflow.
Evaluate discussion topics and individual posts directly from the Content tool to avoid jumping back and forth between different tools in Brightspace.
To evaluate a topic
- On your Content page, do one of the following:
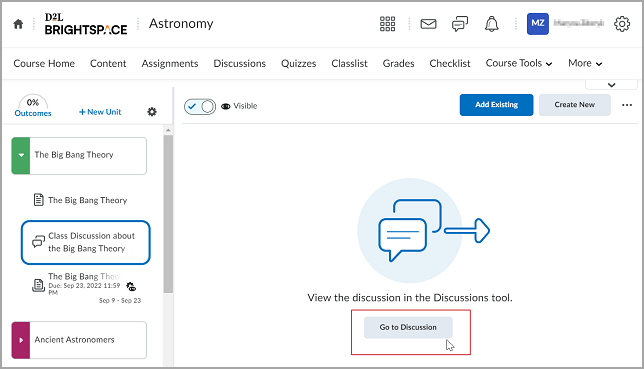
- Navigate to the lesson containing your discussion and click Go to Discussions.
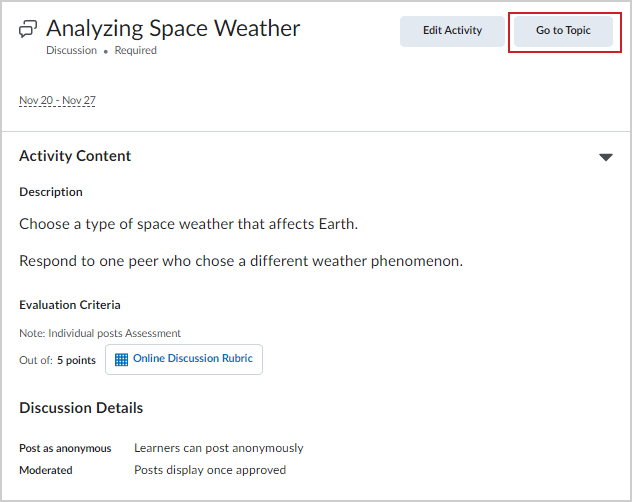
- If you are using the assessable activity view, click Go to Topic.
On the Discussions List tab, click the drop-down menu next to the related topic name and select Assess Topic.
 Once the new page has loaded that lists users who have posted a thread to the chosen topic, click Topic Score under a student's name.
Once the thread has loaded in a new page, populate the following fields:
Once the new page has loaded that lists users who have posted a thread to the chosen topic, click Topic Score under a student's name.
Once the thread has loaded in a new page, populate the following fields:- In the Overall Grade field, add the student's grade.
- In the Overall Feedback field, add your comments or feedback.
- Use the Attachments section to add text and audio-video files.
 | Note: Students can review feedback files in the discussion or in the Grades tool. |
Do one of the following:- Click Publish for the student to be notified of their activity grade.
- Click Save as Draft to publish the grade and feedback later.

|
Note: You cannot publish or save your draft if the Overall Feedback field exceeds 300,000 characters. If the Overall Feedback field exceeds the character limit or if the Grade field contains an invalid grade, a dialog pops up and the tooltip "There is one or more errors in the information entered appears" when you try to save or publish. |
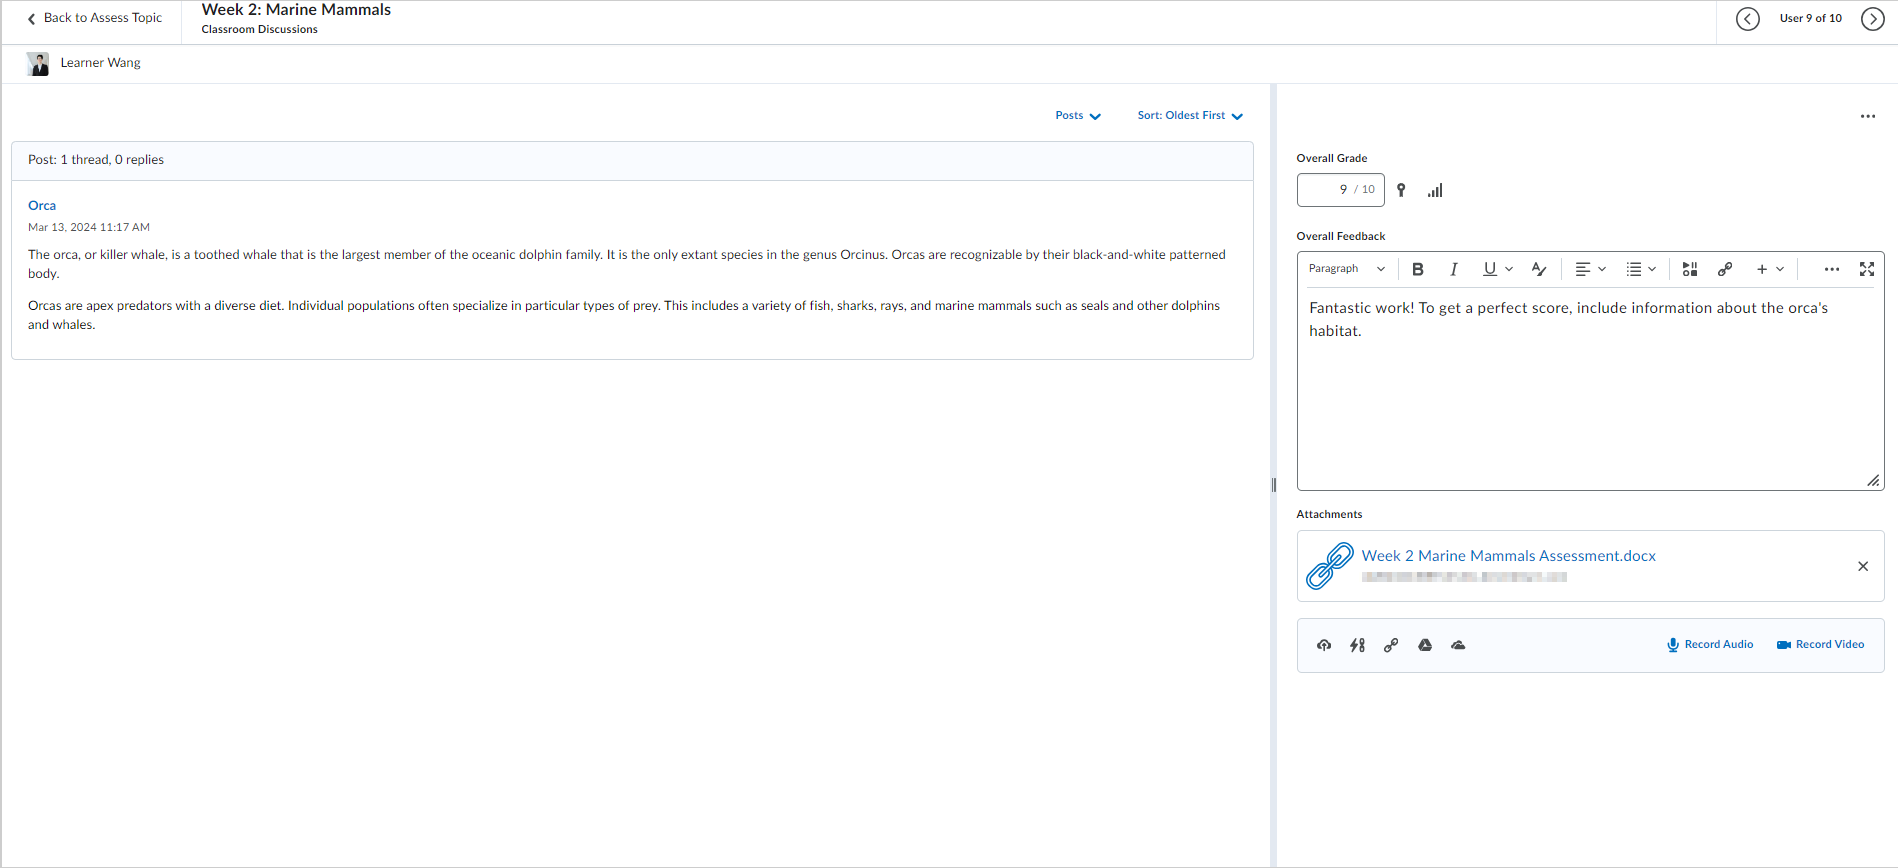
The discussion topic and replies appear in the submission panel on the left. The title of the topic or the reply is a link that opens the post in a new window so you can get an idea of the context in which the post was made. You can drag the divider between the submission and evaluation panels to resize them to suit your preferences and screen size. The divider stays in the same position as you navigate your students' submissions.
To evaluate a student:
- On your Content page, do one of the following:
- Navigate to the lesson containing your discussion and click Go to Discussions.

- If you are using the assessable activity view, click Go to Evaluation in the Completion Summary section for the student you want to evaluate.
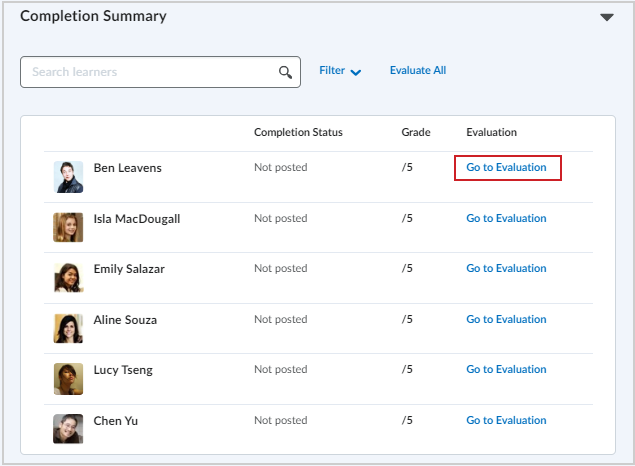
- On the Discussions List tab, select the topic you want to assess.

- From the View Topic page, select the Assess Student option by clicking the drop-down menu next to the corresponding thread's name.

- Once the thread has loaded in a new page, populate the following fields:
- In the Overall Grade field, add the student's' grade.
- In the Overall Feedback field, add your comments and feedback.
- Use the Attachments section to add text and audio-video files.
 | Note: Students can review feedback files in the discussion or in the Grades tool. |
- Do one of the following:
Your grade will be published on the Assess Topic page.
Assess discussions using the Classic Content experience
In the Discussions tool, you can review and evaluate discussion topics and individual participants without changing your workflow.
Evaluate discussion topics and individual posts directly from the Content tool to avoid jumping back and forth between different tools in Brightspace.
To evaluate a topic:
- On your Content page, navigate to the desired module that your discussion lives within and click on the title of the topic that you want to evaluate.
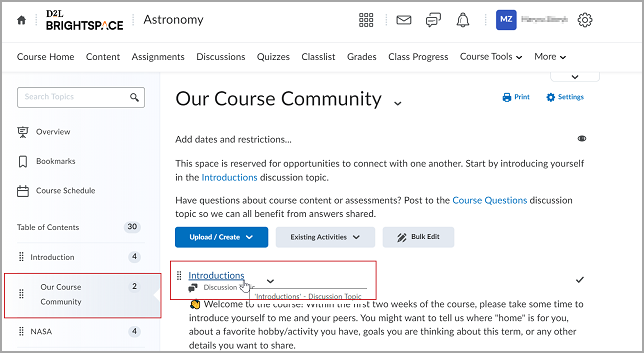
Figure: Click on the discussion topic in Content.

Figure: Click Assess Topic in the context menu.
- On the Discussions List tab, select the Assess Topic option by clicking the drop-down menu next to the related topic's name.
- Once the new page has loaded that lists users who have posted a thread to the chosen topic, click Topic Score under a student's name.

To evaluate a student:
- On your Content page, navigate to the desired module that your discussion lives within and click on the title of the topic that you want to evaluate.

- On the Discussions List tab, select the topic you want to assess.

- From the View Topic page, select the Assess Student option by clicking the drop-down menu next to the corresponding thread's name.

- Once the thread has loaded in a new page, populate the following fields:
- In the Overall Grade field, add the student's grade.
- In the Overall Feedback field, add your comments and feedback. Use the Attachments section to add text and audio-video files.
 | Note: Students can review feedback files in the discussion or in the Grades tool. |
-
Do one of the following:
- Click Publish for the student to be notified of their activity grade.
- Click Save as Draft to publish the grade and feedback later.
 | Note: You cannot publish or save your draft if the Overall Feedback field exceeds 300,000 characters. If the Overall Feedback field exceeds the character limit or if the Grade field contains an invalid grade, a dialog pops up and the tooltip "There is one or more errors in the information entered appears" when you try to save or publish. |

Figure: Evaluate students on the evaluation page.
The discussion topic and replies appear in the submission panel on the left. The title of the topic or the reply is a link that opens the post in a new window so you can get an idea of the context in which the post was made. You can drag the divider between the submission and evaluation panels to resize them to suit your preferences and screen size. The divider stays in the same position as you navigate your students' submissions.

|
Tip: You can also evaluate both topics and students using the following way: From the View Topic page, click the needed thread and select the Assess Topic or Assess Student option next to this thread name. |
As a result, your grade will be published on the Assess Topic page.
Video: Evaluate discussions