The Evaluate Submission page enables you to evaluate and leave feedback on assignment submissions. It contains two main sections: The Submissions List panel and the Evaluation panel. Use the Evaluation panel to grade and provide comments on submissions. On paper submissions and observed in person assignments display only the Evaluation panel, as no submissions are made in Brightspace.
In addition, feedback from Assignments grade items is synchronized with the grade book when the evaluator clicks Update. This ensures that published feedback is also automatically saved to the grade book.

|
Note: The grade book does not support drafts, so only published feedback is updated and synced from Assignments, Discussions, and Quizzes to the grade book. |

|
Tip: For more information about evaluating and adding feedback to assignments using a screen reader or keyboard-only navigation, refer to How assistive technology interacts with the inline grading experience. |
Evaluate assignment submissions
When evaluating assignment submissions, the bulk feedback feature allows you to efficiently provide feedback to multiple learners directly within the Assignments submission pages. This improves workflow and enhances the user experience.
Key capabilities:
- Add and save bulk feedback as a draft if no previous feedback exists.
- Update existing drafts or published evaluations for multiple learners at once.
- Apply feedback selectively or to all :
- Use Add Feedback to apply feedback to selected .
- Use Add Feedback to All to apply the same feedback to all in the course.
- Receive a warning when saving an empty Feedback dialog as bulk feedback. This ensures that instructors are aware that saving empty feedback will overwrite any existing drafts or published evaluations.
You can either publish feedback immediately or save your feedback as a draft and release it later. This enables you to revise and review evaluations and publish your feedback to multiple users at the same time. You have the option to retract published feedback to provide an update to past evaluations, ensuring students access your most recent feedback.
Assignment submissions have status indicators to note the state of the evaluation.


|
Notes: You cannot publish or save your draft if the Overall Feedback field exceeds 300,000 characters. If the Overall Feedback field exceeds the character limit or if the Grade field contains an invalid grade, attempting to save or publish causes a dialog to appear with the tooltip "There is one or more errors in the information entered appears". When using bulk feedback in Assignments, Brightspace Editor includes the Insert Stuff functionality but does not support file uploads from My Computer. Instructors can insert links to YouTube videos or other external resources. These links are stored in Manage Files.
Insert Image supports image file uploads from My Computer and the system stores them in Manage Files. |
To provide feedback to selected learners
- Navigate to Assignments.
- On the Assignments page, click on the assignment for which you want to provide feedback.
- Select the students to whom you want to provide feedback and click Add Feedback.
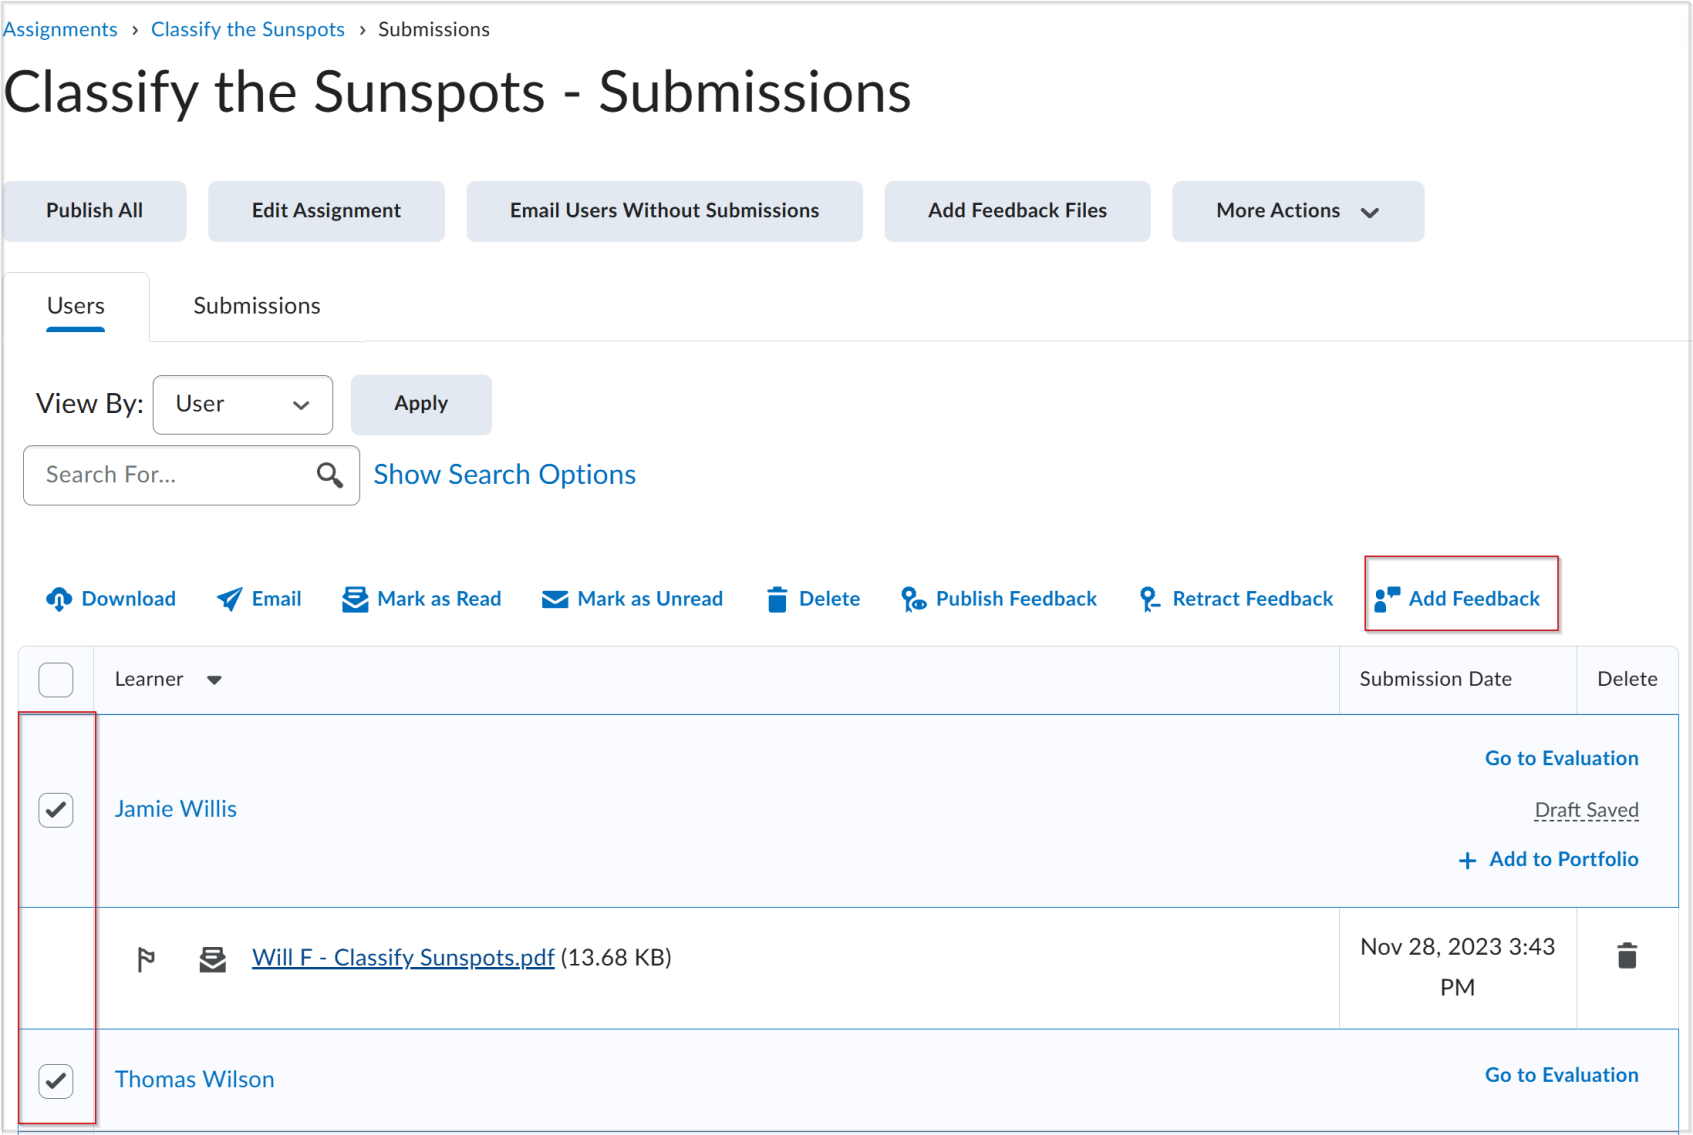
- Enter the feedback you want to provide and click Save. The feedback is saved as a draft.
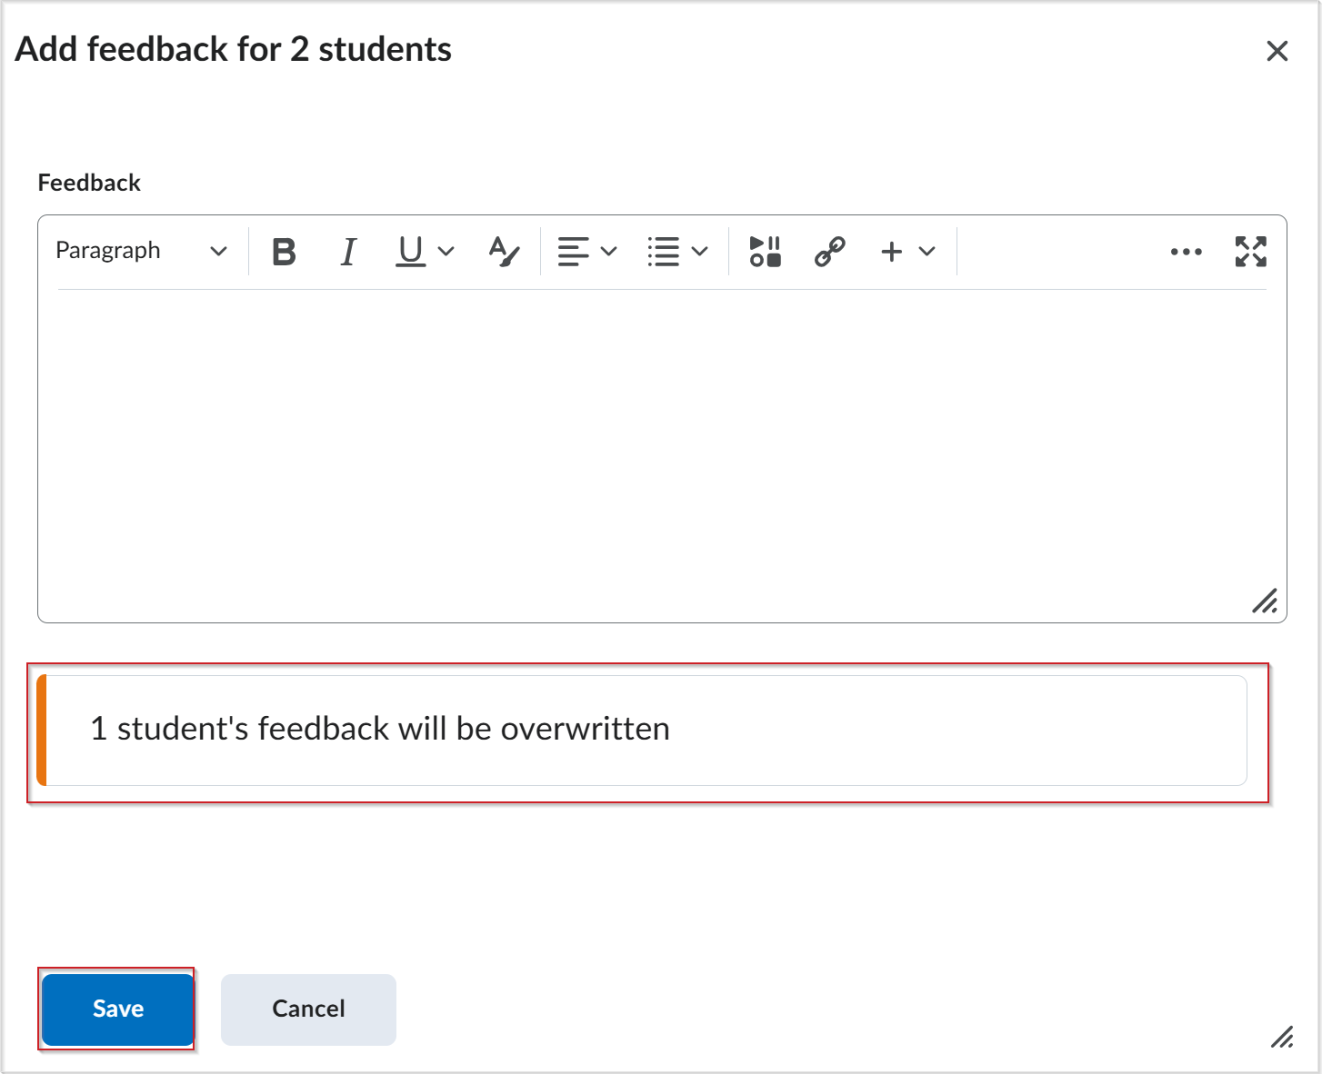
 | Note: If you add feedback for students who already have feedback, an inline message will appear warning you that their existing feedback will be overwritten. If you attempt to save blank feedback for students who already have feedback, a separate confirmation dialog will appear. |
- To publish the feedback, select the users you provided feedback to, and click Publish Feedback.
To provide feedback to all learners
- Navigate to Assignments.
- On the Assignments page, click on the assignment for which you want to provide feedback.
- Select the students to whom you want to provide feedback and click More Actions > Add Feedback to All.

- Enter the feedback you want to provide and click Save. The feedback is saved as a draft.
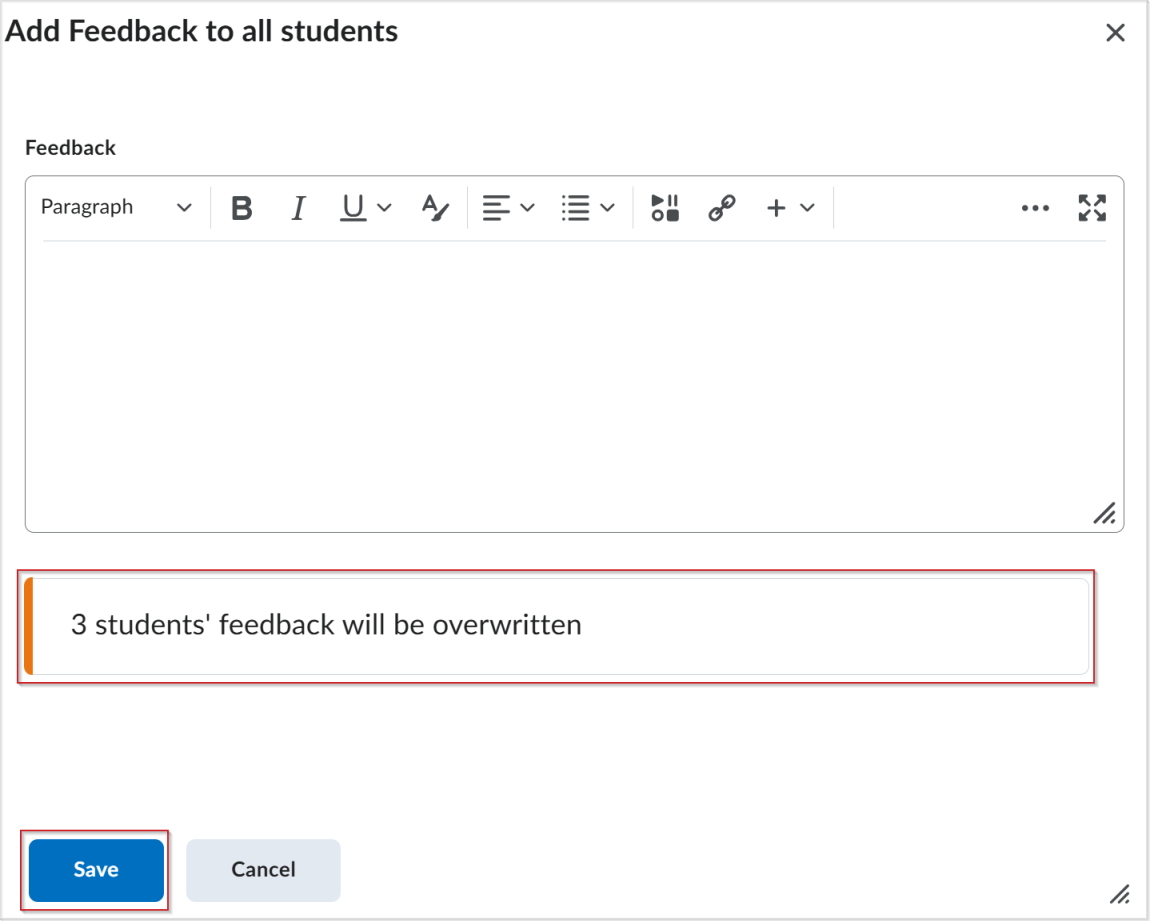
 | Note:If you add feedback for students who already have feedback, an inline message will appear warning you that their existing feedback will be overwritten. If you attempt to save blank feedback for students who already have feedback, a separate confirmation dialog will appear. |
- To publish the feedback, select the users you provided feedback to, and click Publish Feedback.
Add special access dates to an assignment from the Submissions page
You can change the due date and availability for a submitted assignment to give a student more time to complete their assessment.
To add special access dates to an assignment from the Submissions page
- Navigate to Assignments.
- On the Assignments page, under the name of the student you want to set special access for, click an assignment to evaluate.
- On the right evaluation pane, click the Evaluation Options (...) drop-down menu.
- Click Special Access Dates.
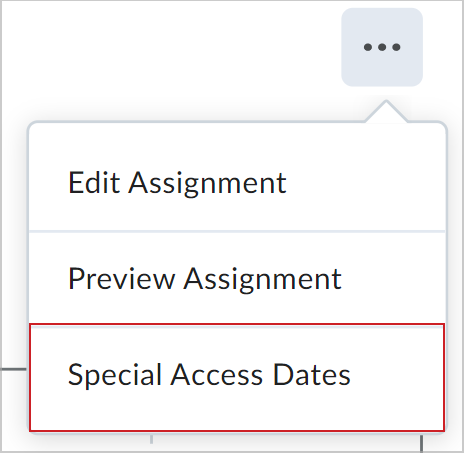
- Set the Due Date and Availability.
- Click Save.
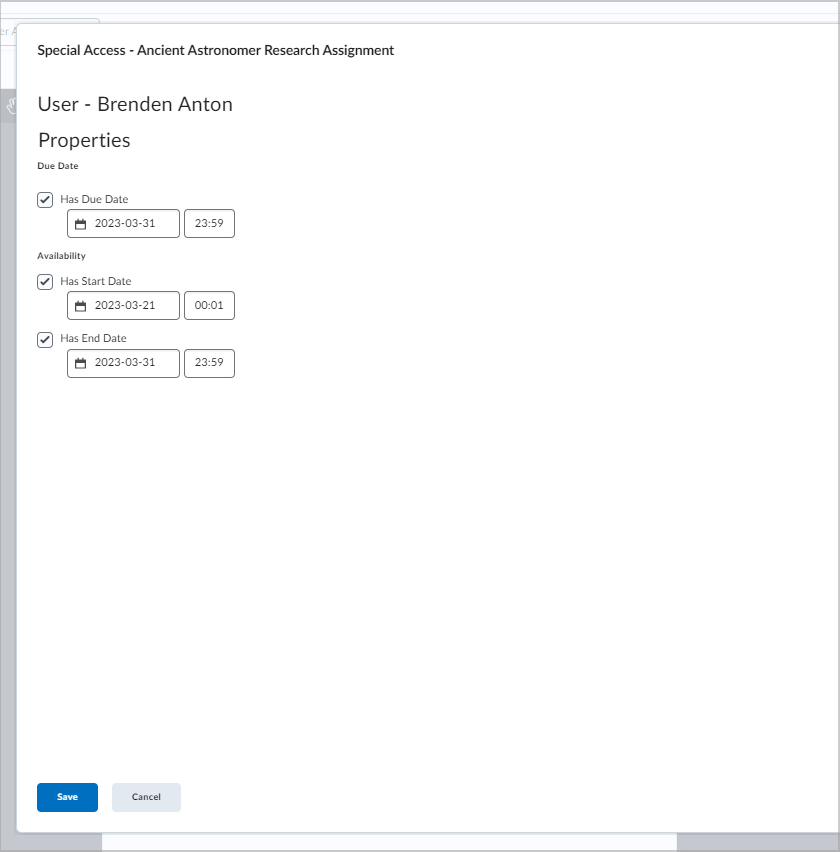
- Click Back to Submissions.
Special Access Dates inherit date properties as follows:
- When the parent assignment has an availability date set, its Date property is inherited by the corresponding special access date. For example, if the assignment is hidden before a start date, then the special access start date is also treated as hidden.
- When the parent assignment does not have an availability date, the special access date inherits its Date property from the course default. For example, if the assignment does not have an end date, then a special access end date is set for a learner. This also occurs if the course default for assignment end dates is submission-restricted, making the special access end date be treated as submission-restricted.
Check an evaluation status
When there are multiple evaluators assigned, you can check assignment status and additional information with hover text.
To check an evaluation status
- Navigate to the Assignments tool.
- Open an assignment which status you want to check.
- In the Users tab, hover over the status of the assignment to find more information.
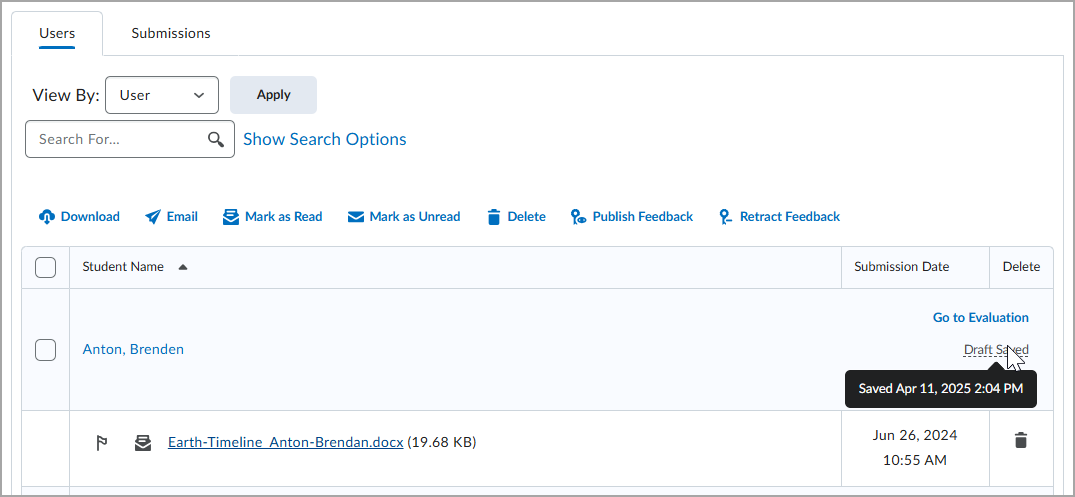
Refer to Advanced Assessment for Assignments in test, development, and staging environments of Brightspace for more information.
Make one shared evaluation ready for review
As an evaluator, you can reduce communication errors during the evaluation of co-marking and delegation assignments when publishers and evaluators are not the same person. When you have completed your evaluation, set the evaluation to Ready for Review to inform the publisher that the evaluation is ready and can move on to the next phase.
To use one shared evaluation and ready for review
- Navigate to the Assignments tool.
- Click Create an assignment and in Evaluation & Feedback > Coordinate Multiple Evaluators select One shared evaluation.
- Click Save and Close.
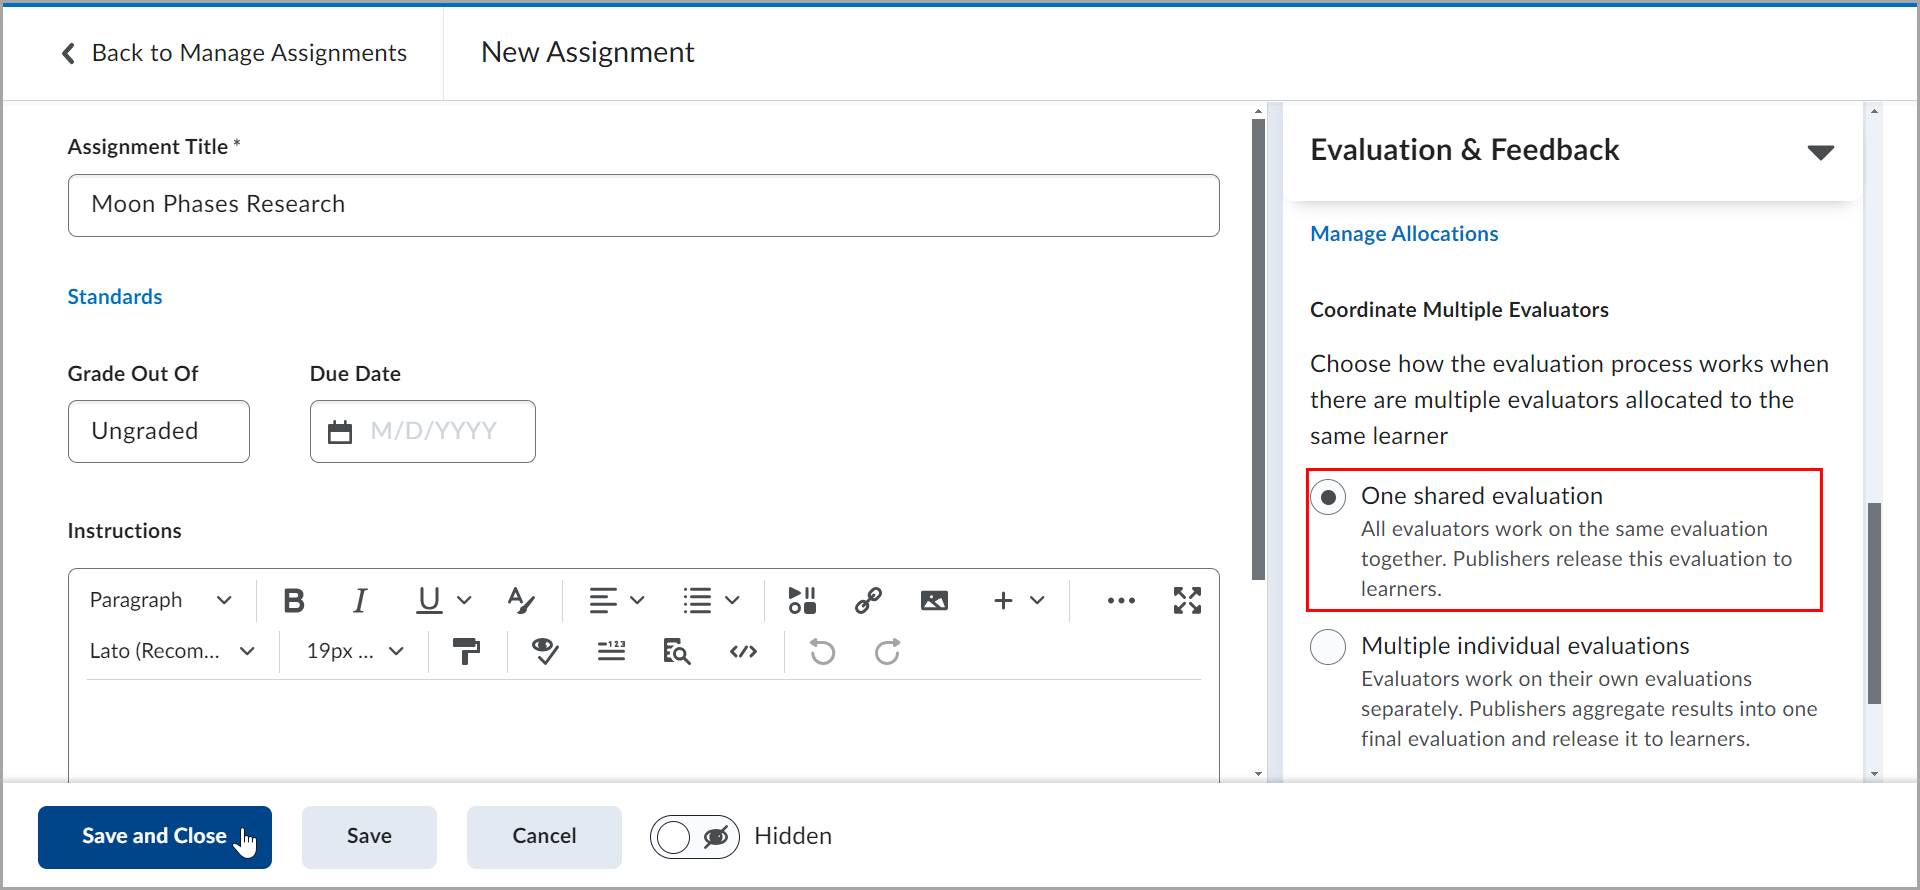
- When the assignment is submitted, on the Assignments page, click on your assignment.
- On the Submissions page, click the assignment.
-
Click Ready for Review.
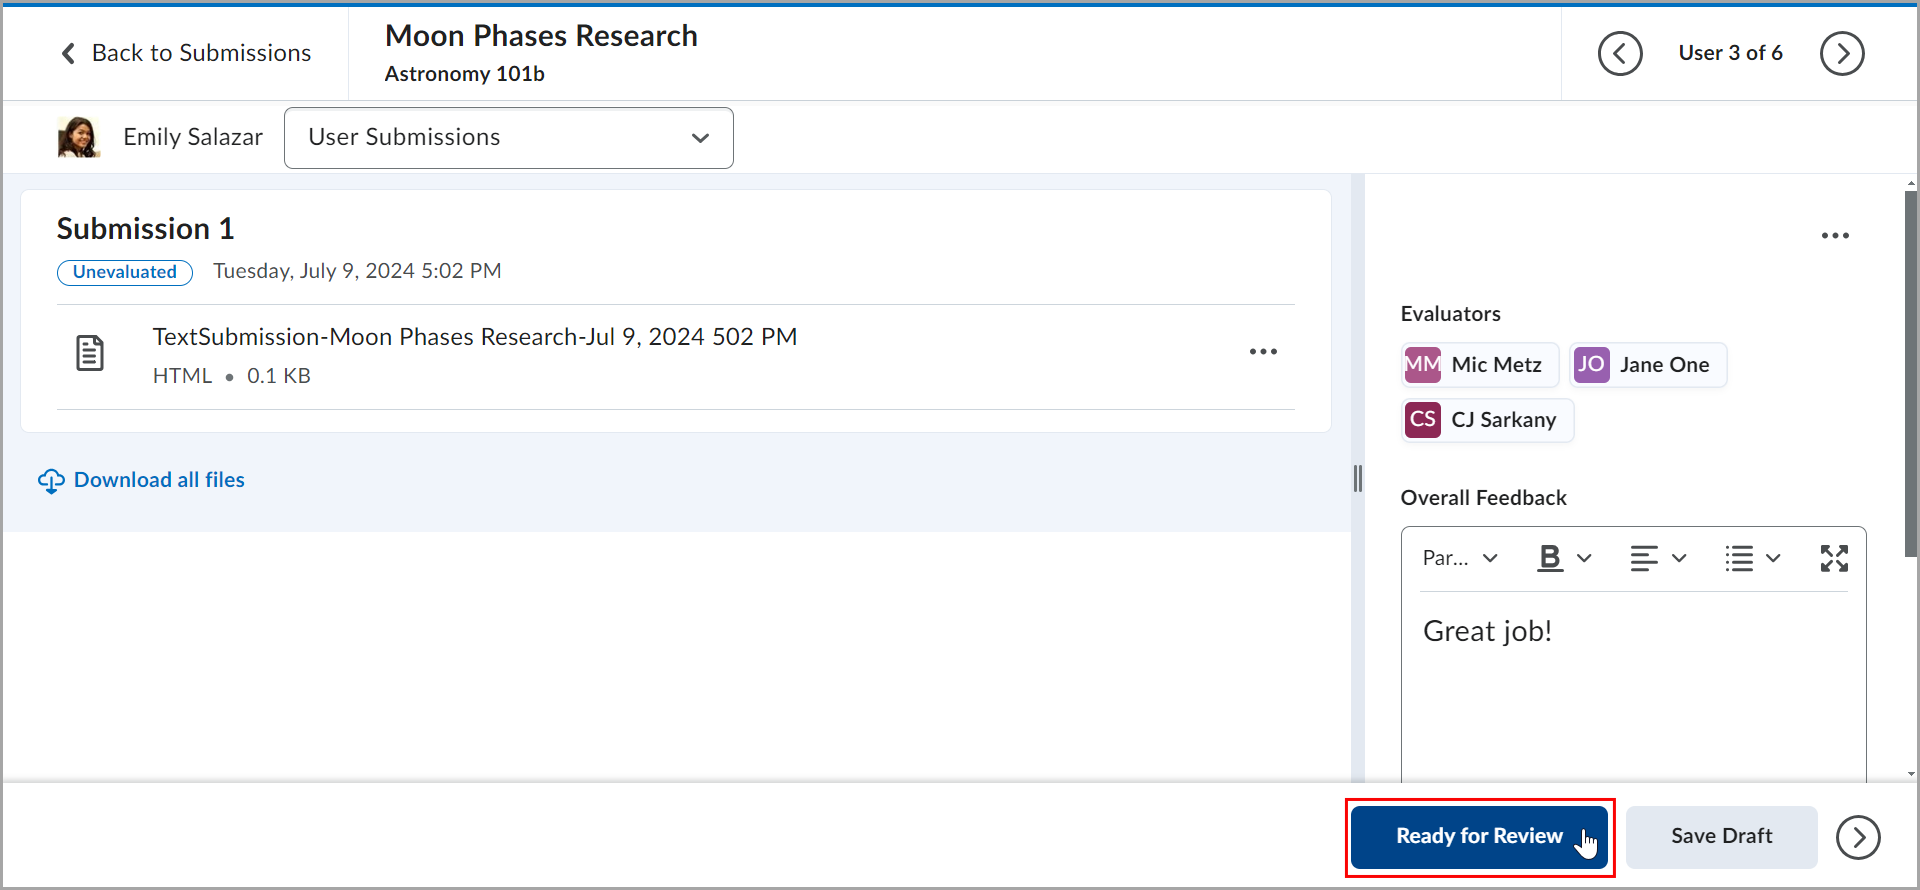
A dialog appears stating that the Evaluation is ready for review, and the button at the bottom changes to Update.
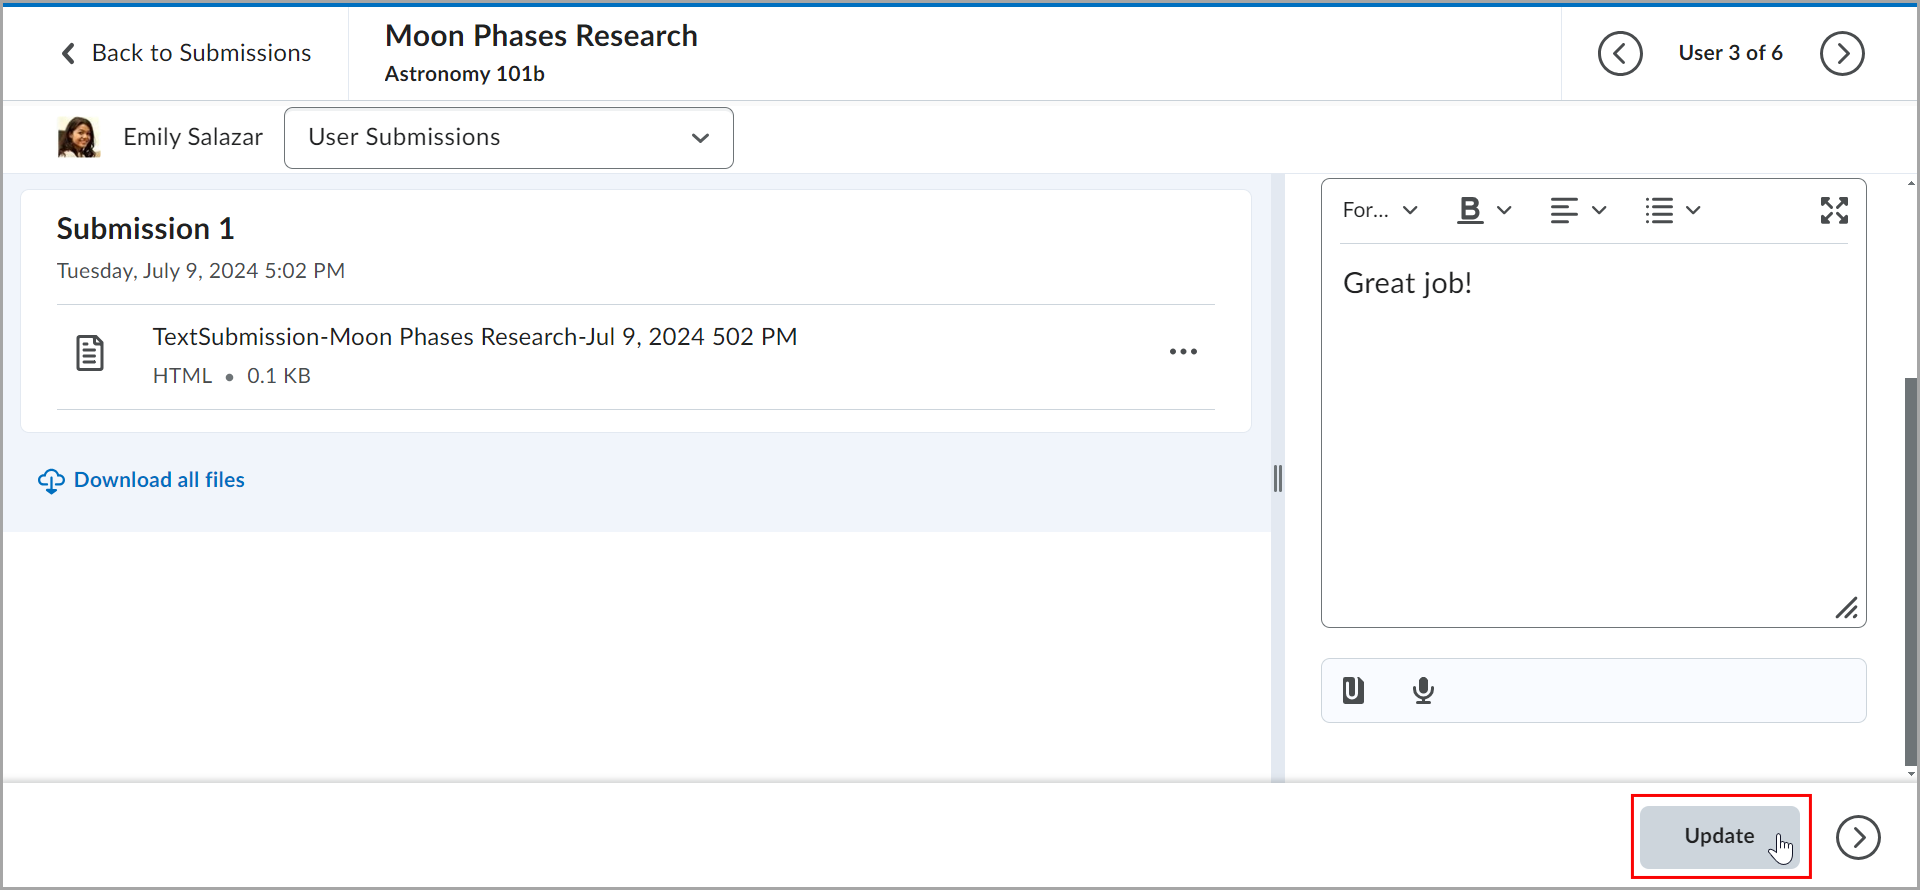
Once you, as an evaluator, click Ready for Review, the evaluation is ready for reviewing and publishing. Publishers have access to the Publish button.
Refer to Advanced Assessment for Assignments in test, development, and staging environments of Brightspace for more information.
View applied course grade scheme as you assess an assignment submission
If you have applied a grade scheme to your course, you can view that grade scheme as you enter a grade on a specific assignment submission. For example, if you have applied a Percentage grade scheme to your course, and correctly linked an assignment submission to a grade item, you can then enter an Overall Grade and then see the student grade scheme under Learner View of Grade. This assists you in understanding what your entered grade will look like to a student viewing their final grade with the grade scheme applied.

|
Important: The appearance of Learner View of Grade is controlled by a Grades configuration variable. Contact your organization administrator for assistance. Also, you must link your assignment to a grade item and associate it with a course grade scheme before you can see Learner View of Grade. For more information about how to set up Grade Schemes, refer to Create Grading Schemes using the Grades tool.
|
To view an applied course grade scheme as you assess
- Navigate to Assignments.
- From the Assignments page, click the Actions menu (arrow icon) next to an assignment and select View Submissions.
- From the Users tab of the Submissions page, click an assignment submission to open and assess it.
- Assess the assignment and enter an Overall Grade. The Learner View of Grade updates automatically to represent the grade scheme applied.

|
Tip: You can also choose to Hide Learner View of Grade or Show Learner View of Grade by selecting those options from the Evaluation Options (...) menu. |
Video: Assign Evaluators and Publishers in Assignments
View reports from external learning tools while evaluating assignments
If you have added an external learning tool integration to an individual assignment, you can view the reports from these tools while evaluating learner submissions. This feature allows you to leverage external tools that check learner submissions for academic integrity, providing you with detailed insights during your evaluation process.
To view reports from external learning tools in assignments:
- From the Submission Details page in Consistent Evaluation, click View External Tool Results to open the External Tool Results for [student name] window. Click Details to open the detailed report in a new window.
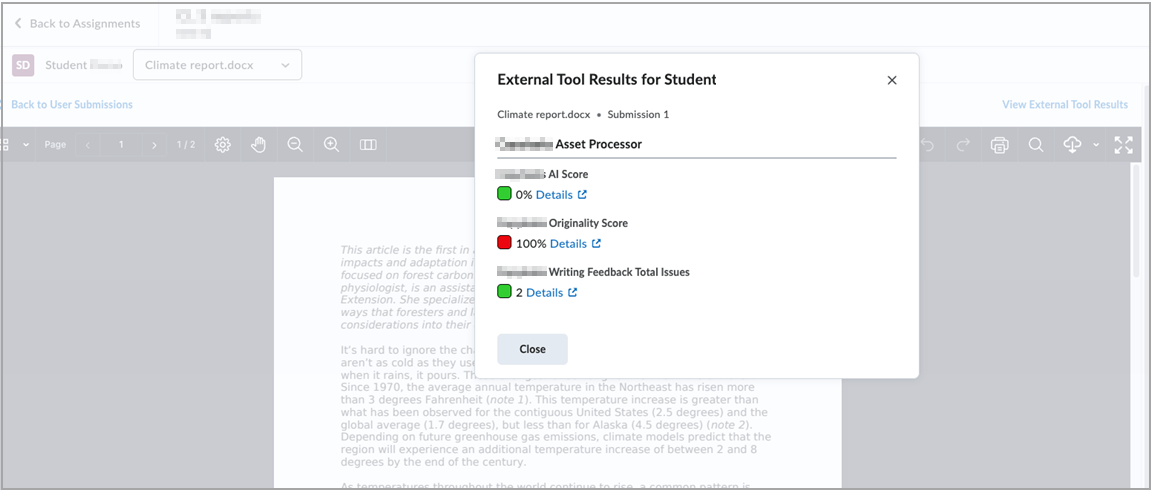
- From the Users and Submissions tabs for an assignment, click View from the External Tool Results column to open the External Tool Results for [student name] window. Click Details to open the detailed report in a new window.

If multiple external learning tools are attached or multiple reports are available from one learning tool, all links to detailed reports will appear in the External Tool Results for [student name] window.
Depending on the external learning tool you are using, report details may include any of the following information:
- Submission title
- Comments
- Short and long descriptions of results
- Processing progress indicators
- Error codes

|
Notes:
- Reports only appear for text and file submissions.
- You can only add external learning tools to individual assignments.
- There is no grade passback or grade syncing between the external learning tool and Brightspace.
|
Download and evaluate assignment submission files
If you download user submissions and leave feedback within the files, you can upload them back to the appropriate assignment so they appear as attachments to each user's submission evaluation. To ensure successful feedback upload and distribution back to students, do not rename the downloaded files' names after you enter feedback and save changes.
To evaluate and add feedback to downloaded submissions
- Navigate to Assignments.
- Click the Actions drop-down menu and then click View Submissions.
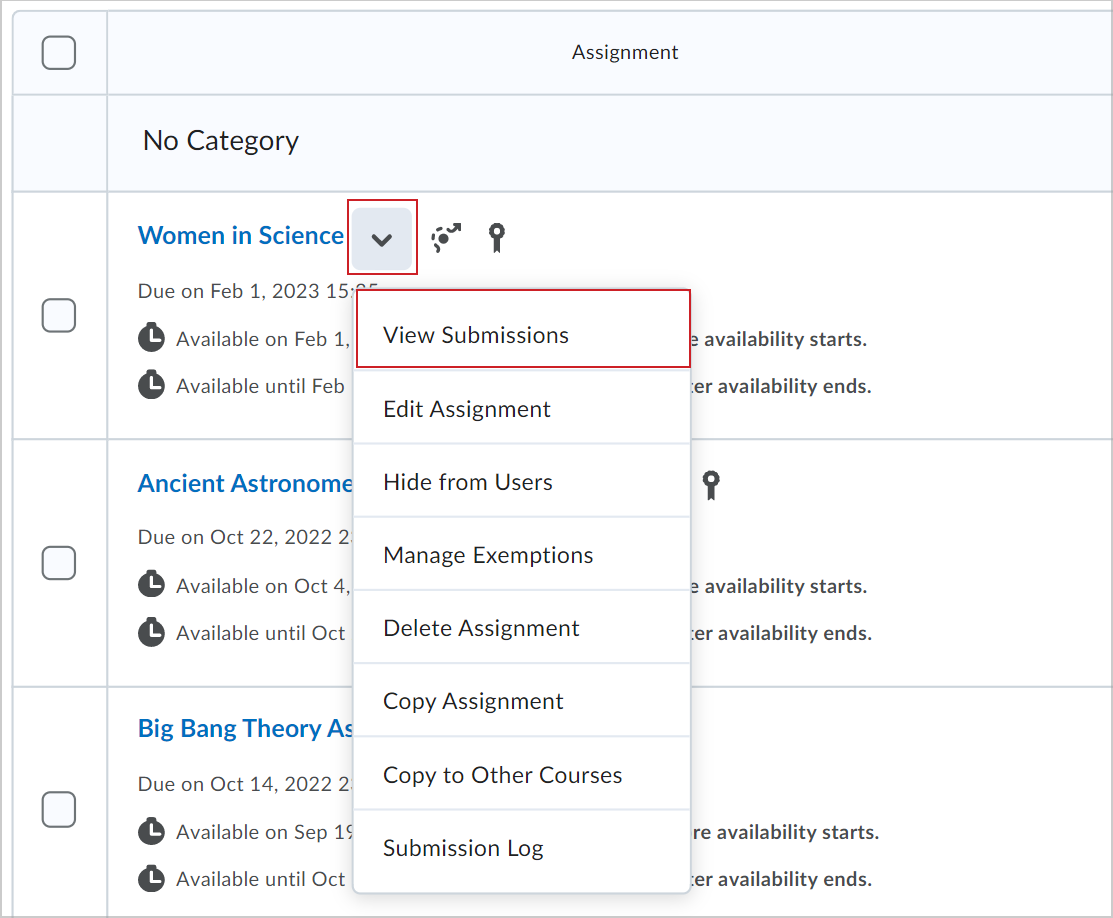
- On the Submissions page, do one of the following:
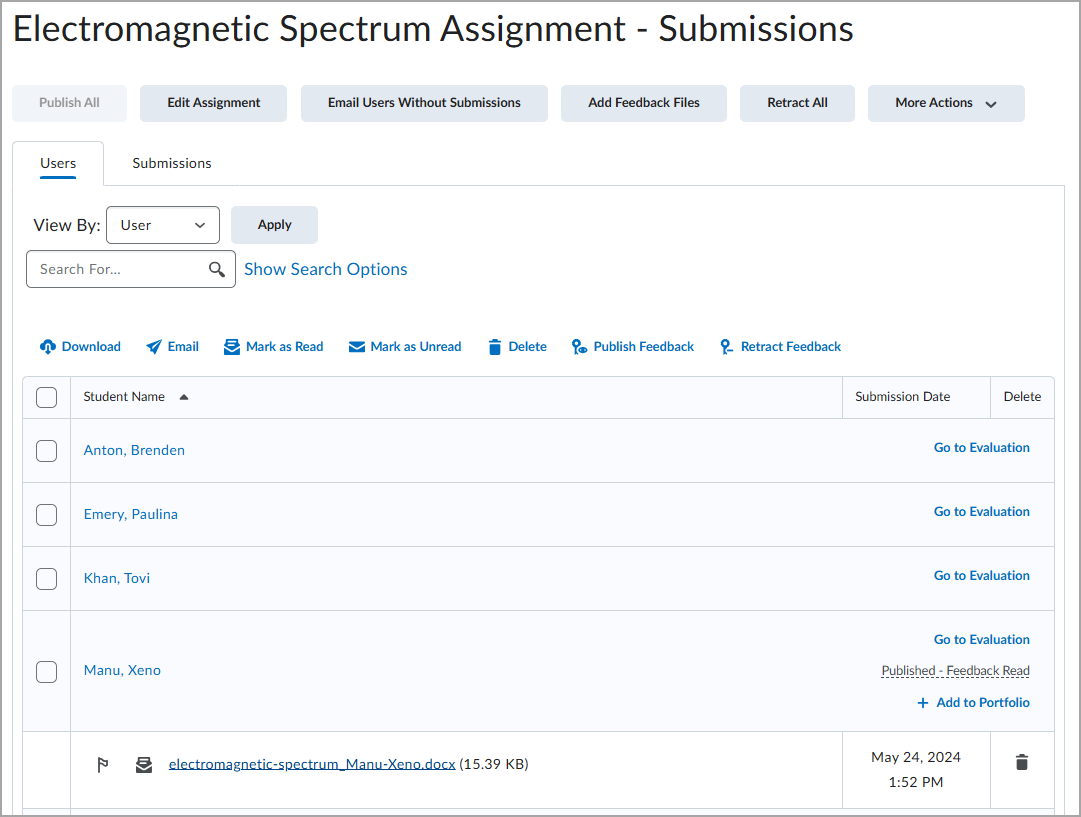
- If you want to return feedback on multiple submissions at once or evaluate and grade submissions offline:
- To publish feedback to selected students select these students and click Publish Feedback.
- To publish feedback to all students, click Publish All Feedback.
If the Publish All Feedback button is grayed out, you have no draft feedback to publish. If you have Anonymous Marking enabled, you must click Save Draft and save your feedback for each anonymous user, then click Publish All Feedback on the assignment page to submit feedback to the anonymous users.
- If you have any rubrics attached to student submissions and if these student submissions have not been evaluated on all rubric criteria, a Confirmation dialog box appears indicating the same. Click Continue Grading or Publish Anyway, as applicable.
- If you want to evaluate an individual user, click on their name, or the Evaluate link for their submission.
 | Tip: The Evaluate link appears when you have the Give Feedback permission turned on for your role. |
- To evaluate using learning outcomes, select the desired level of achievement below the outcome.
- When you leave feedback in Turnitin, the feedback icon on the assignment submission page, in the Turnitin Online Grading column.
- If you added an Online Grading score, the score displays on the submissions page, in the Turnitin Online Grading column.
Add assignment submissions to Brightspace Portfolio
You can add assignment submissions to Brightspace Portfolio. When you add an assignment submission to Portfolio, all submission versions, feedback, and grades are added to Portfolio.
You can then review the submission as evidence in Brightspace Portfolio and share that evidence with Parents and Guardians.
Once you add a student's submission to Portfolio as evidence, it is treated as a record of work as assignment evidence independent of the Assignments tool. Assignment submissions added to Portfolio as evidence remain in the student's Portfolio after the course has ends.

|
Important: You must ensure that your administrator has correctly set up Brightspace Portfolio for your instance of Brightspace before starting this process. As part of this setup, your administrator must assign you appropriate role permissions to enable you to add assignment submissions to Portfolio from the Assignments tool. You must also ensure that students have permission to view the assignment being added to Portfolio. Refer to Set up Portfolio for more details.
|
To add an assignment submission to Portfolio
- Navigate to the Assignments tool and click on an assignment.
- From the Submissions page of that assignment, click Users.
- Locate a user that has completed an assignment submission.
- Click +Add to Portfolio.

- From the Add this Assignment to Portfolio? dialog, click Add.
The selected student's assignment submission is added to their portfolio as evidence. This evidence remains in the student's Portfolio after the course has ended.

|
Important: Assignment submissions that are added to Portfolio do not automatically update when you add grades or feedback to the assignment submission from the Assignments tool. If you want updated grades or feedback to be included with a submission added to Portfolio, you must add the submission to Portfolio again to update. The newer version of the submission is added as a new and separate piece of Portfolio evidence and does not replace the original submission.
|
Evaluate video submissions
You can give grades and feedback for video files that students attach and submit as part of an assignment.
To evaluate video submissions
- Navigate to Assignments.
- Click the Actions drop-down menu beside your desired assignment and then select View Submissions.
- Click the Submissions tab.
- Select the video submission and click Download. Save the .zip file and review.
- To grade and add feedback to the submission, click the video submission's file name.
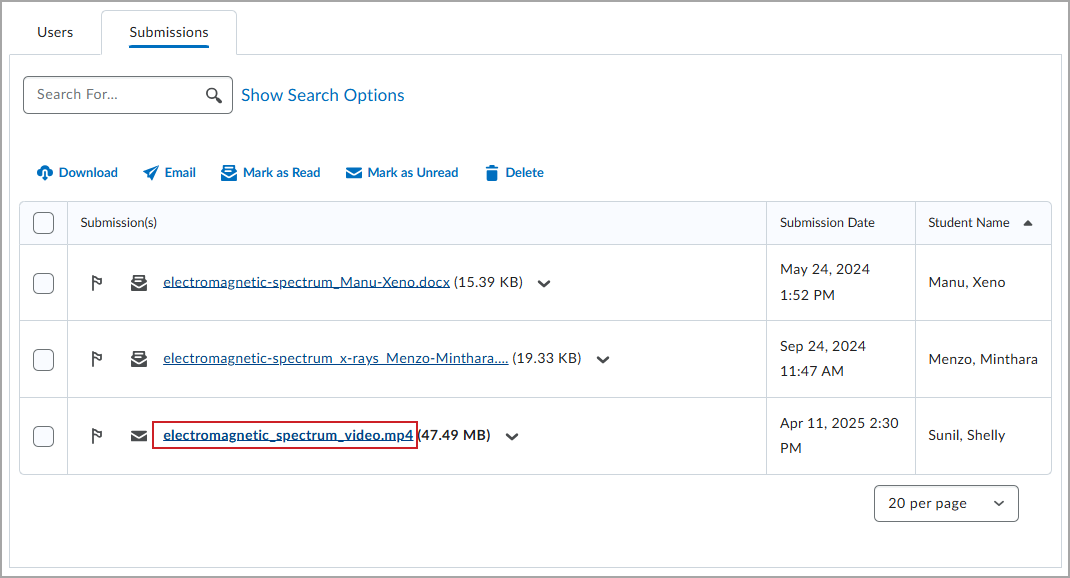
 | Tip: You can also provide feedback by attaching a separate file to a submission. On the Submissions page, click Add Feedback Files. Select your compressed .zip file and then click Add.
|
- Enter your Overall Grade and Overall Feedback.
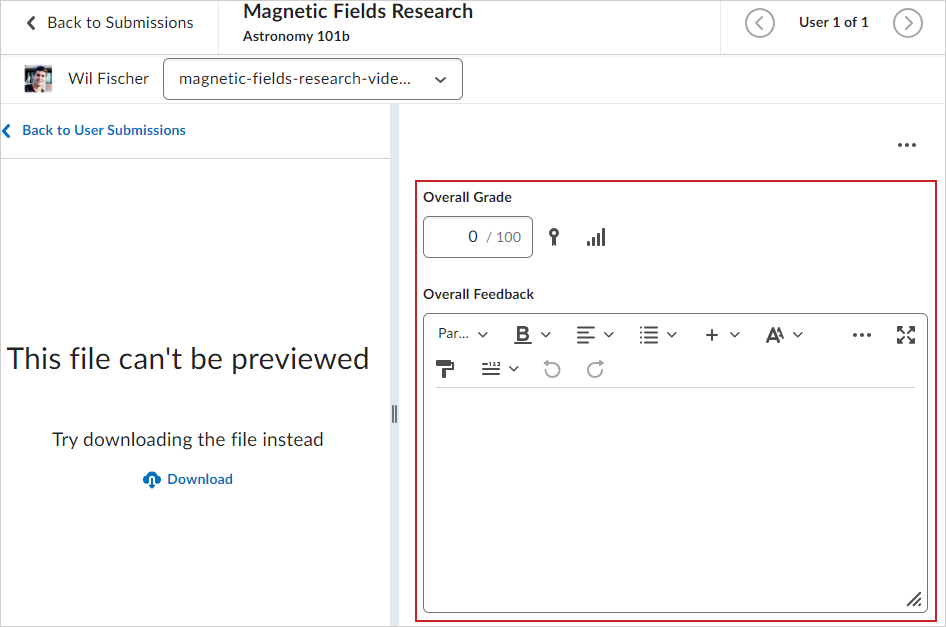
- Click Publish.
If your assignment is associated with a grade item in your Grade Book, the Overall Grade you entered is automatically added to your grade book. To review and edit the Overall Grade of all evaluations applied to that grade item, click the Assignment attached icon next to the Overall Grade field to open your grade book. For more information about grade items, refer to Create and delete grade categories and items.

|
Note: You cannot publish or save your draft if the Overall Feedback field exceeds 300,000 characters. If the Overall Feedback field exceeds the character limit or if the Grade field contains an invalid grade, a dialog pops up and the tooltip "There is one or more errors in the information entered appears" when you try to save or publish. |
Video: Grading submissions and adding feedback in Assignments
About the Assignment Evaluation Experience
The evaluation experience brings consistency to evaluating in Brightspace.
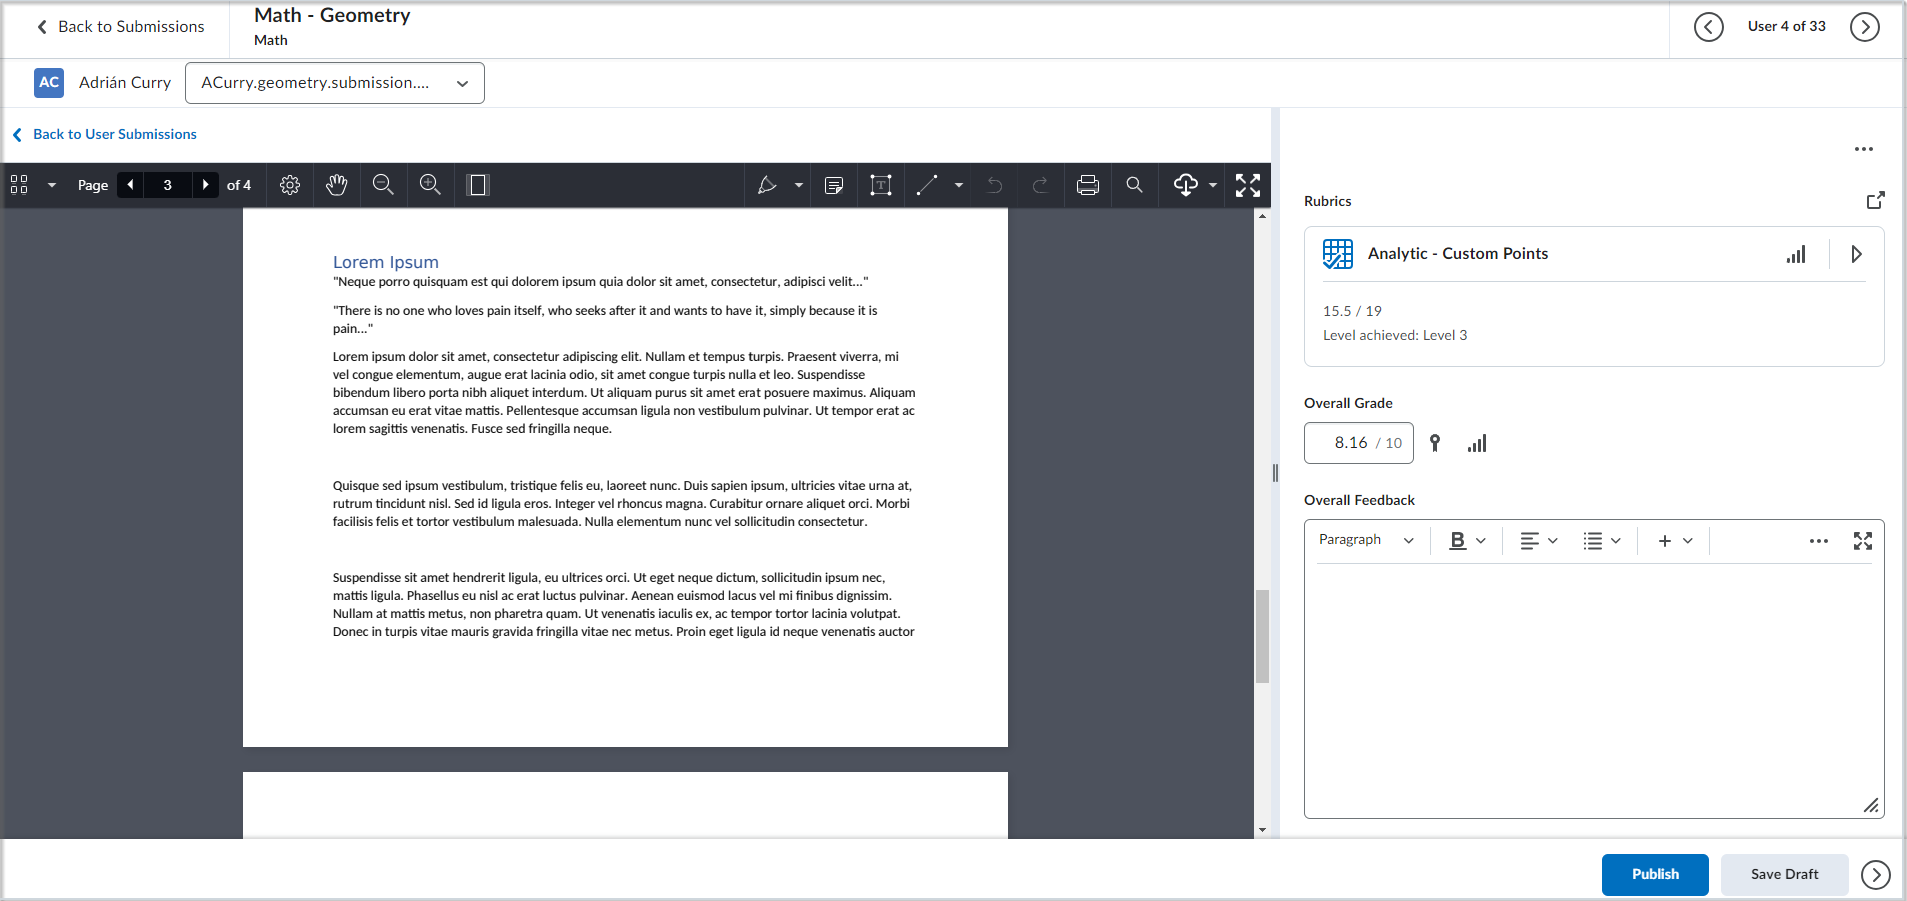
The assignment evaluation experience includes the following features:
- The user context bar includes a menu to choose a student, and another menu to choose a submission. On the user submission list, files are grouped by submission without repeating comments to make it easier to distinguish between submissions. On group assignments, the user context bar includes a drop-down action menu with links to view all group members, email the group, and instant message the group.
 | Note: If a group has no members or if the users in the group do not have an internal D2L email set up or an external email linked, the Email Group button does not appear. This ensures that the button only displays when it is actionable. |
- If you added an External Learning Tool to an individual assignment, the View External Tool Results link appears in the header beside the evaluation panel. Click the link to view the report(s) for the user submission you are evaluating.
 | Note: This link will only appear if the integration of external learning tools is enabled for your organization. |
- The evaluation pane divider can be dragged to suit a user’s preferences and screen size. Rubrics are located at the top of the evaluation panel. To add a rubric, use Edit Assignment.
- A context (ellipsis) menu appears with the following options:
- Edit Assignment: Opens the Assignment page in a new tab (requires the See and Manage Assignment Submission Folders permission).
- Preview Assignment: Opens the Assignment Preview page in a new tab, allowing evaluators to reference the instructions for the assignment.
- Special Access Dates: Opens the Edit Assignment screen as a pop-up (requires the Set Special Access on Assignment Submission Folders permission).
- The overall grade remains as an icon that indicates if that grade is tied to the grade book. Existing outcomes and competency web components are also visible.
- You can provide feedback for the submission by either entering it manually into Overall Feedback or by uploading an attachment.

 | Note: Students can review feedback files in the assignment or in the Grades tool. When you attempt to delete a rubric that is attached to an evaluated assignment, you must confirm that you want to detach the rubric from the assignment. This alert is intended to prevent potential data loss, because once a rubric is detached, the existing assessments for that rubric are deleted and cannot be restored. |
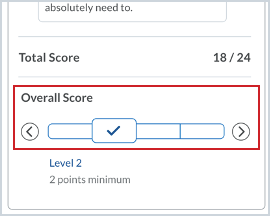
- When you open a new window to evaluate text-only rubrics, the Overall Score displays for each rubric, and you can override the level if necessary.
Evaluate using annotations
If you have built-in annotations turned on, you can mark up submissions using highlighting, free hand drawing, shapes, and associated commenting directly from the Evaluate Submission page of a submitted assignment.

|
Note: Text annotations have a character limit of 1,048,576 characters. |
To access and evaluate with annotations
- Navigate to Assignments.
-
Click an assignment to open it in that assignment’s Submissions page.
- Click Submissions.
- Click a submission to open and evaluate it.
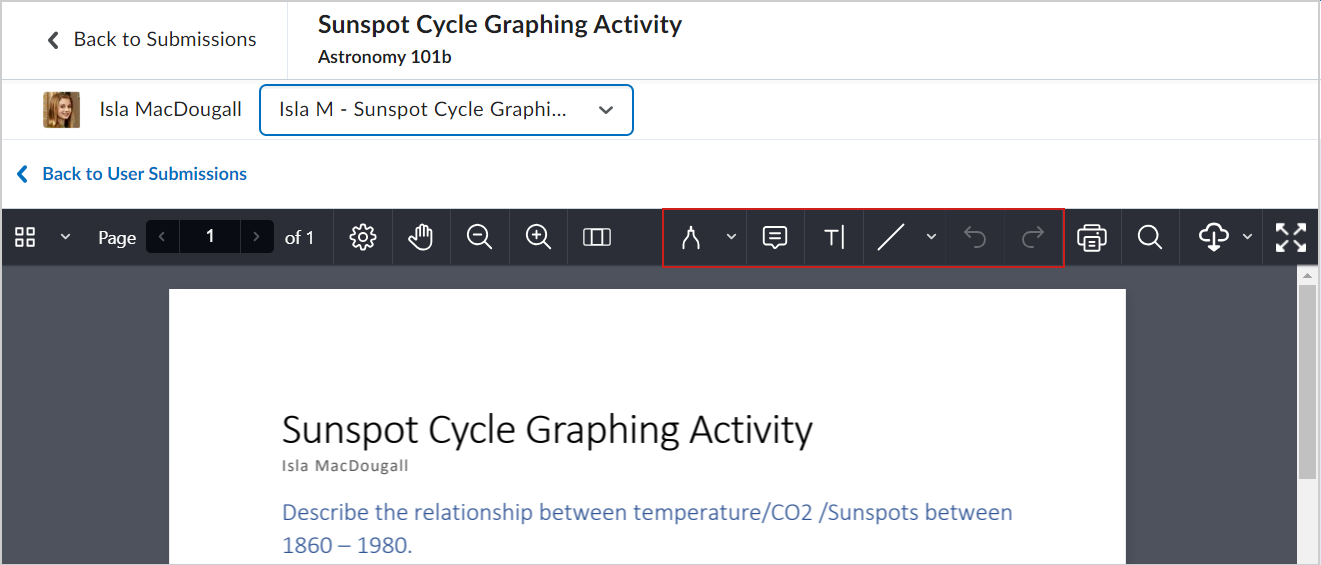
- On the top navigation bar, locate the following annotation icons:
- Drawing: Adjust color, fill color, opacity, thickness, and blend mode. Draw in the assignment submission.
- Note: Select a note color and icon shape and add that to your assignment submission.
- Text: Adjust text color, fill color, opacity, and font style. Type text into the assignment submission.
- Line: Adjust line color, fill color, opacity, thickness, and line style.
- Undo: Remove the last annotation added.
- Redo: Apply the last removed annotation.
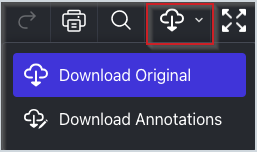
- You can download the original submission file or the annotated PDF file by clicking Download in the annotations viewer.

|
Tip: The keyboard shortcuts for PCs are Ctrl+z for undo and Ctrl+Shift+z for redo. For MAC OS, the shortcuts are Command+z for undo and Command+Shift+z for redo. |
Once you publish the annotation feedback, students can view their submission with the annotations visible, providing additional context.
Manage Evaluation status
To determine whether evaluation information will persist or need to be re-entered, you must understand what happens to an assignment submission’s evaluation status when a student unenrolls from a course and later re-enrolls.
When a student submits work for an assignment, and you evaluate the submission, the restoration of that evaluation depends on two factors:
- Whether the evaluation was published
- How long the student was unenrolled from the course
The following scenarios describe the expected behavior:
- Published evaluations. If you publish the evaluation, the published status is restored automatically when the student re-enrolls within 30 days of unenrollment.
- Ready for review evaluations. If the evaluation is set to Ready for review and not published, this status is not restored when the student re-enrolls. The evaluation must be reapplied.
- Re-enrollment after 30 days. If a student re-enrolls more than 30 days after being unenrolled, the evaluation status is not restored, even if it was previously published. This is because evaluation records are soft-deleted upon unenrollment, and a system cleanup process permanently removes soft-deleted records after 30 days.
Supported file types for annotating submissions
The following file type submissions are supported when evaluating with annotations in the Assignments tool:
- .doc
- .docx
- .rtf
- .odt
- .ppt
- .pps
- .pptx
- .ppsx
- .odp
- .xls
- .xlsx
- .txt
- .jpg
- .jpeg
- .png
- .tif
- .tiff
- .gif (once converted to PDF, only the first frame of the .gif displays)
- .pdf