Use the Enter Grades tab to easily view all learner grades, grade categories and grade items. From this tab, Instructors can assess and evaluate grades, as well as import and export grade books.
Navigate to the Enter Grades tab
The Enter Grades tab of the Grades tool provides an overall view of learner grades, the grade categories (such as Quizzes, Assignments, and Discussions), and the grade items in those categories. You must navigate to the Grades tool to access the Enter Grades tab.
To navigate to the Enter Grades tab
- Navigate to Grades.

- Click the Enter Grades tab.
Enter Grades tab overview
On the Enter Grades tab, you can:
- Import and export your Grade Book.
- Use the View By setting to indicate that you want to show all the users in a class, groups, or sections within the course.

Visual Tour
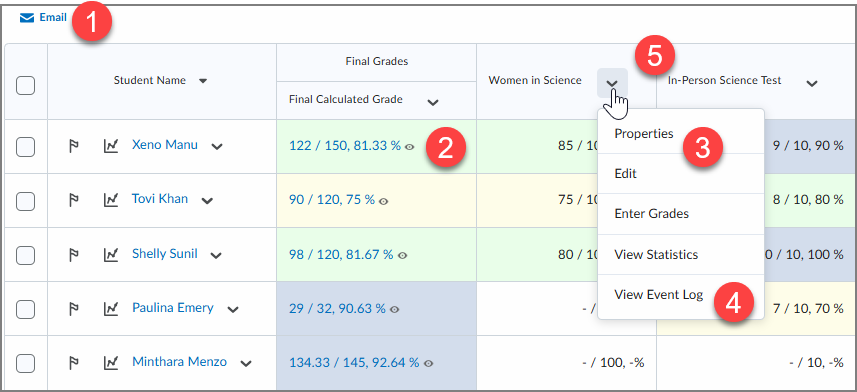
- Communicate with learners by sending a bulk email to learners by clicking either the checkbox beside specific learners names or the box in the table header to select all learners in the filtered range.
- Evaluate learner submissions.
- Review and update all grade items for the course.
- View the Event Log to review historical changes to the grade item, such as scheme changes, description changes, or category changes.
- Use the drop-down menu next to a column title to hide or show columns. Click a column header to sort the table by that column.
 | Note: If your Grade Book is weighted and does not equal 100%, an error appears stating "Final Calculated Grade sums to x%, not 100%. Verify the total weight of all top-level categories and items is 100%". To update the total, use the Manage Grades tab. For more information, see the article: Manage Grades in the Grades tool. |
Enter grades
To enter grades
- On the navbar, click Grades.
- On the Enter Grades page, do one of the following:
- To manually enter grades for an individual user, click the user name.
- To manually enter grades for a grade item, from the context menu of the grade item, click Enter Grades.
- To manually enter grades for a category, from the context menu of the grade item, click Enter Grades.
- Enter your grades.
- Click Save and Close.
Video: Enter Grades with the Grades Tool
Video: Grading in Brightspace
Import your Grade Book
Using the Import feature, instructors can use the Grades tool to import existing grade books.
Note: For reference, the Import page provides a sample Grade Book import file. This gives instructors the option to create a grade book structure, including grade items and categories, using this sample file rather than using Manage Grades. For more information, see the article: Manage Grades in the Grades tool.
To import your Grade Book
- Navigate to Grades.
- In the Enter Grades tab, click Import.

- Click Choose File to select a file from your device.
Note: Brightspace supports the following grade book file formats: .CSV, .TXT, and .TSV. If your grade Book is in Microsoft Excel format, you must convert to one of the supported formats before you can import it into Grades.
- To create new grade items that do not already exist in your Grade Book, select Create new grade item when an unrecognized item is referenced.
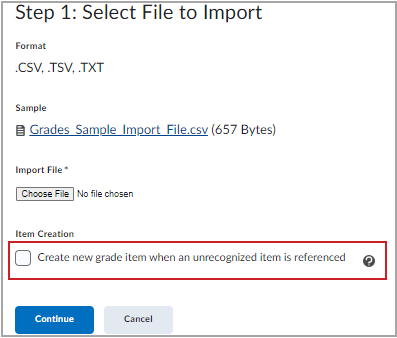
- Click Continue to start the guided steps through the import process.
When you complete the process, you receive a message stating the import was successful.
Export your grade book
You can export your Grade Book from Brightspace as a .CSV or Excel file.
To export your Grade Book
- Navigate to Grades.
- In the Enter Grades tab, click Export.

Figure: The Export option in the Enter Grades tab.
-
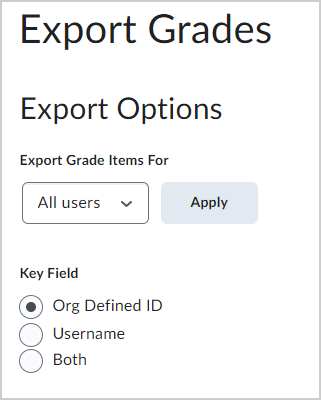
Under Export Grade Items For, select whether you want to export grade items for all users or specific groups or sections.
-
Click Apply.
-
Under Key Field, select which learner identifier you are including in the export file.
-
Under Sort By select how identifiers are displayed, from left to right, in the export file.
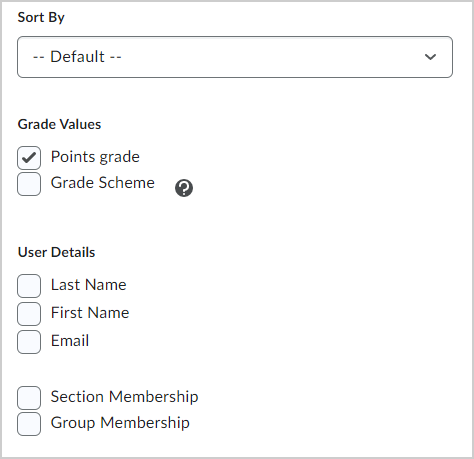
- Use Grade Values to define which grade details are exported. Choose one or more of the options: points grade, weighted grade, grade scheme.
- Select the User Details you want to include in the export.
- Select the grade categories and grade items you want to include in the export.
- Select the export file type.
- Select from the following:
- Export to CSV
- Export To Excel

- The Export Grades window opens. When the export is complete, click Download.
Grades are exported and downloaded as a .CSV or Excel file.
To print your grades, in your exported file, select the Print option.
Video: Evaluating Learner Submissions
Evaluate individual learner submissions
There are multiple ways to enter grades for learner submissions and edit existing grades. D2L recommends using Quick Eval to assess all learner submissions. However, the following optional methods are also available to evaluate by assessment, learner submissions, and manually enter grade items across entire courses with the Enter Grades tab.

|
Note: There is an enrollment limit of 1000 courses for users in Quick Eval. If the user is explicitly enrolled in more than 1000 courses, a dialog warning appears and activities and submissions will not be shown to that user. |
To evaluate individual learner submissions
-
Navigate to Grades.
-
In the Enter Grades tab, under the grade item, click the associated icon next to the learner submission.
Note: Each submission type has a unique icon; and new learner submissions are identified with a dot on the corner of the icon.

Evaluate with Spreadsheet view
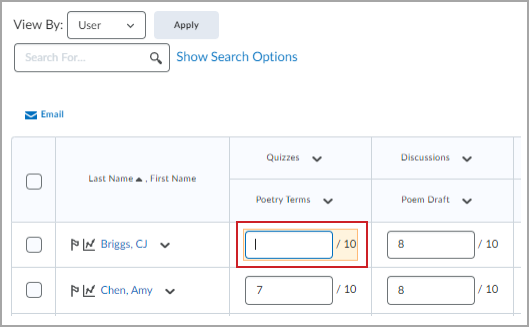
Grades can also be entered manually using Switch to Spreadsheet View on the Enter Grades tab. The spreadsheet view enables you to enter numeric grades for all grade items. You can also override previously-entered grades using the spreadsheet view.
To enter grades in spreadsheet view
-
Navigate to Grades.
-
From the Enter Grades tab, click Switch to Spreadsheet View.

-
Locate the item you want to enter or overwrite.
-
Enter the new value.
-
If you want to switch back to the standard view, click Switch to Standard View.

-
Click Save.
Grades are updated in the Grade Book.
Release final grades
Instructors can release or post final grades to learners to reveal their overall course evaluation. Learners can only see their Final Calculated Grade or Final Adjusted Grade once it has been released.

|
Note: If learners report not seeing their final grade, ensure the grade has been released. Unreleased grades are not visible, even if calculated. |
To release (post) final grades
- Navigate to Grades.
- Select the Enter Grades tab.
- In the Final Calculated Grade column, click the grade of the learner you want to release.
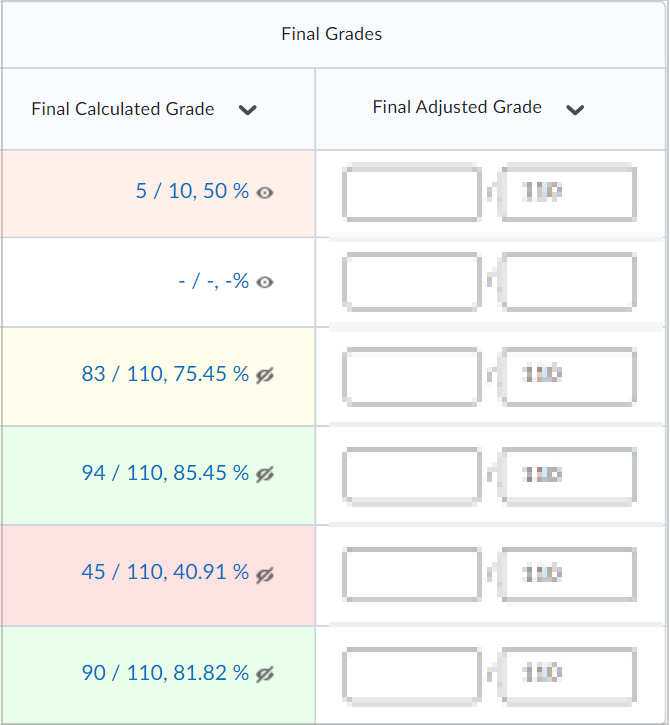
- Under Final Grade, select Release Final Calculated Grade.
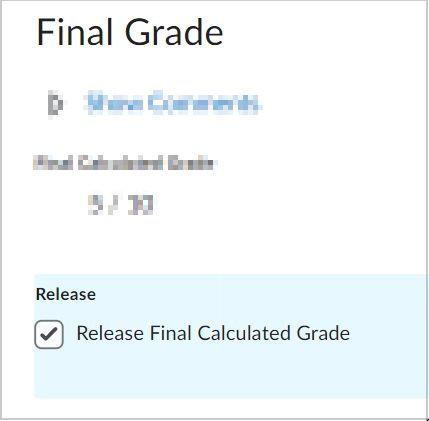
- Click Save and Close.
The final grade is now posted for that learner. Repeat the steps to release final grades to additional learners.

|
Tip: Release all final grades at once
To post final grades to all learners at once:
- In Grades, select the Enter Grades tab.
- From the Final Calculated Grade column, click the Actions menu (▼).
- Choose Release All.
- Click Save and Close.
This ensures that all final grades are posted and visible to learners at the same time.
|
Video: Release Final Grades
Clear a grade
You can remove a grade from one or more learners using the Clear Grades option.
On the navbar, click Grades.
In the Enter Grades tab, click the down arrow next to the grade item you want to clear, and select Enter Grades from the context menu.
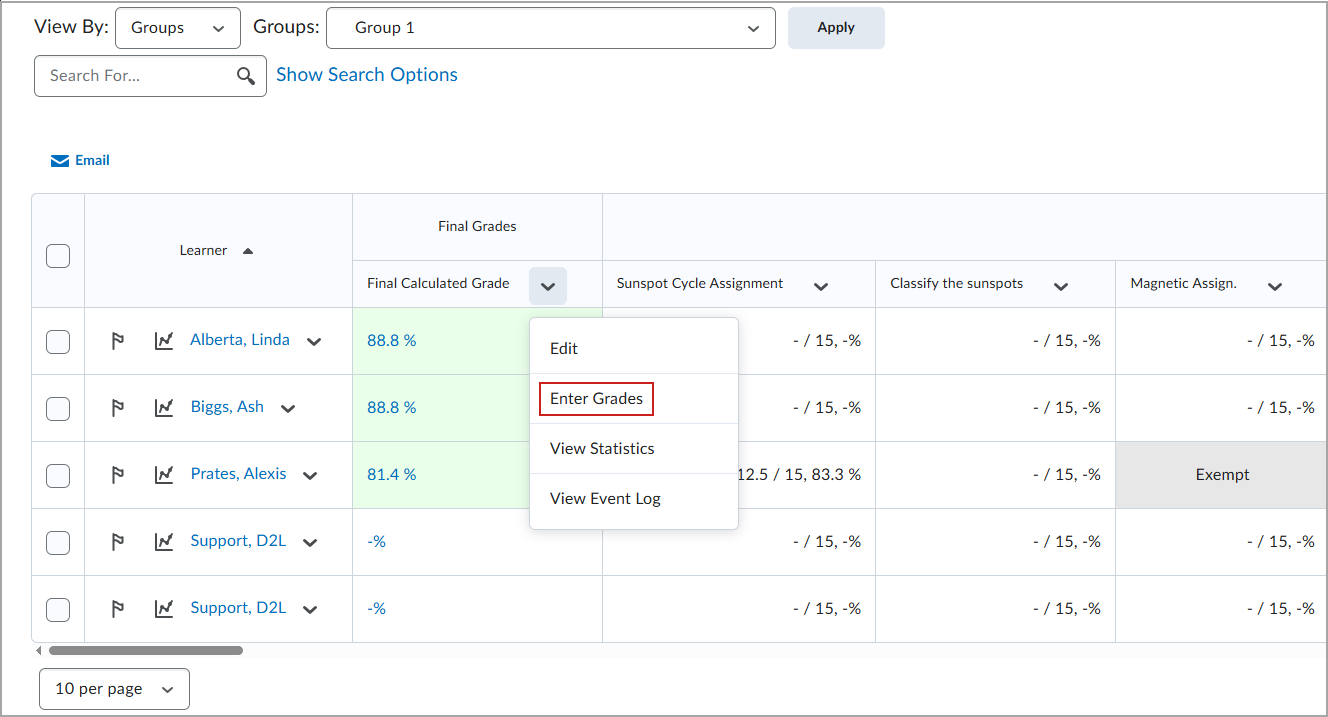
Select the checkbox beside the learner(s) whose grades you want to clear.
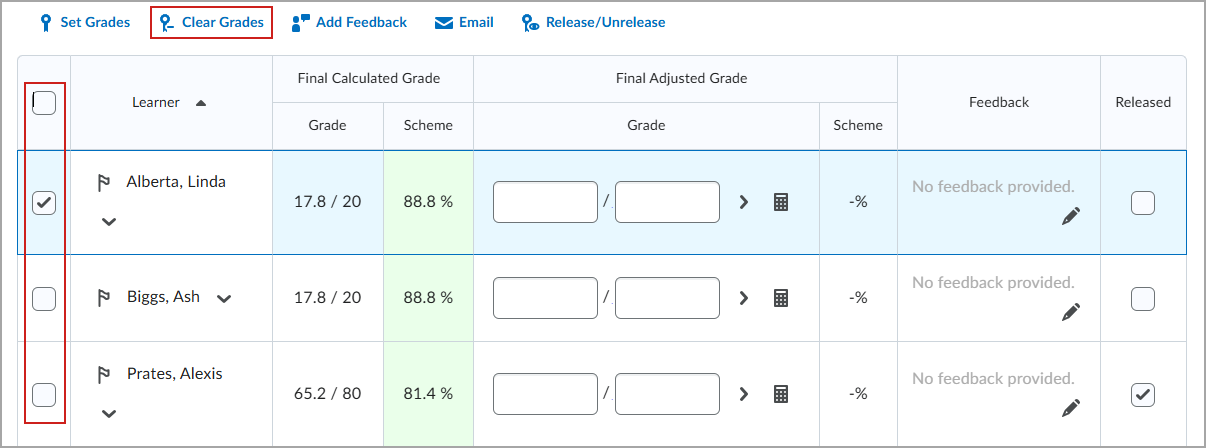
Click Clear Grades.
On the confirmation dialog, click Yes.

|
Important: This action cannot be undone. Once a grade is cleared, it must be re-entered manually if needed.
|
Unrelease final grades
You can easily undo the release of final grades to learners in your course using the Unrelease All option.
- On the navbar, click Grades.
- On the Enter Grades page, from the Final Calculated Grade or Final Adjusted Grade context menu, click Enter Grades.
- From the Final Grades drop-down menu, click Unrelease All. Click Yes.
- Click Save.
Troubleshooting grades
Grades for quizzes, assignments, discussions, and other content can be made visible and published to learners in the Grades tool. Grade visibility for activities is controlled by the details you set in the Grades tool.
Learners can't see their grade for their quiz
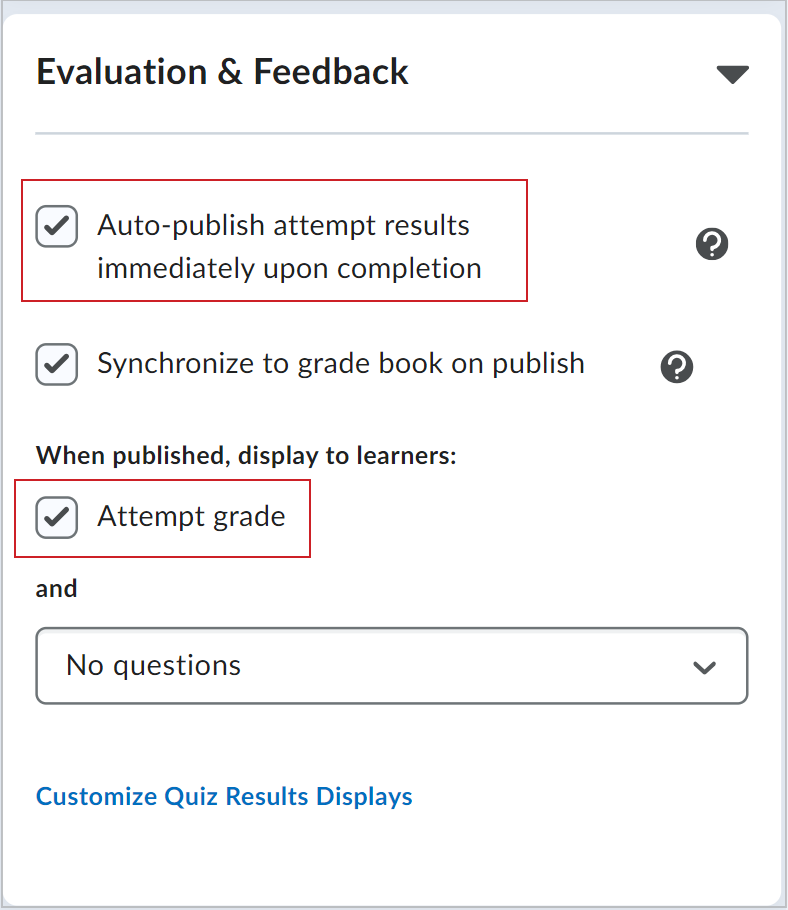
The visibility for a quiz grade is controlled in the Evaluation & Feedback menu when you create or edit a quiz. You can click the check box for Attempt grade to let learners view their grade for their quiz. You can also select the check box for Auto-publish attempt results immediately upon completion so that learners can see their grade as soon as they finish a quiz.
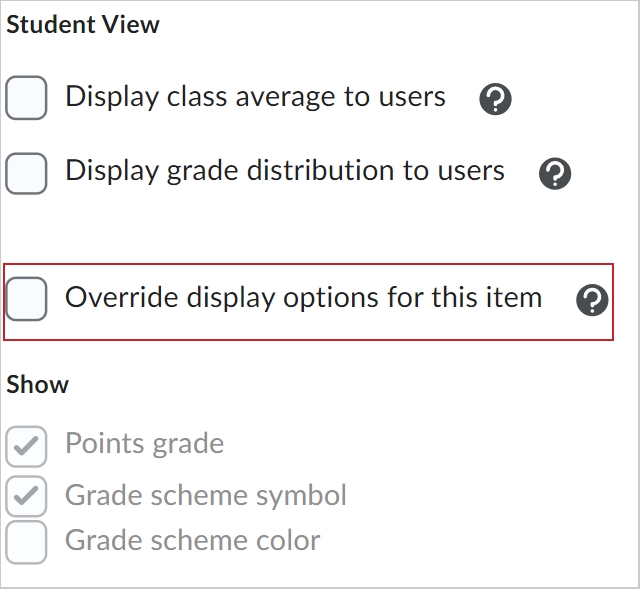
Additionally, navigate to the Grades tool and select the quiz you want to configure. In the Properties tab, in the Display Options > Student View section, click Override display options for this item to alter how the quiz grade is displayed to learners.
Learners can't see their grade for their assignment
Assignments and assignment feedback are manually published by the instructor. In the Assignments tool, when you select an assignment to grade, all the submissions for your learners appear. If you click on a user to view and grade their assignment, you can either click Publish to publish the assignment grade and feedback or click Save Draft to continue working on the submission later. Learners may not be able to view their assignment grade because the graded assignment submission is still saved as a draft. The published grade appears in the Grades tool for both you and the learner.