Custom widgets allow you to expand the functionality of available content in your homepages to suit your specific organizational and course needs. You can add custom HTML code to create a wide range of widgets. You can create custom widgets for your courses, or use custom widgets shared to your course offerings from the organization, department, or semester level.

|
Note: Your administrator may have chosen to implement an additional safeguard on custom widgets called ‘sandboxing’. When a custom widget is sandboxed, a secure iFrame is created around the widget and prevents scripts from executing outside the widget. You can view if a widget is sandboxed or not on the list of custom widgets. Un-sandboxed widgets are not unsecured per se, but should only be created by trusted roles. |
In the widgets list, un-sandboxed widgets have a warning icon:

To create a custom widget
- On your course homepage, click Course Admin > Widgets.
- Click Create Widget.

- From the Properties tab, enter a name and description for the widget.

- To add your own HTML content to the widget using the HTML Source Editor, click the Content tab >
 HTML Source Editor icon. Add your HTML custom code.

- To apply different styling options to the widget, click Customize Widget Style.

- In Widget Settings, do any of the following:
- To hide the titlebar, clear the Display Titlebar check box.
- To enable sandboxing of widget content, click to select Widget is Sandboxed and/or Render in iFrame.
| Note: If your role does not have permission to toggle this setting, but you feel your widget needs to be unsandboxed to behave as expected, please contact an administrator with the Widget Security permission. |
- To remove the default border style, clear the Display widget container style check box.
- Select Prohibit minimizing widget to prevent users from closing the widget on the homepage.

- To set a custom title, in the Widget Name section, select the Custom radio button. Enter your text in the field.
- Click Save. To attach release conditions to the widget, click the Release Conditions tab and do one of the following:
- Click Attach Existing then select from existing release conditions available to the org unit. Click Save. From the dropdown list, select All conditions must be met or Any condition must be met.
- Click Create and Attach to create a release condition and attach it. Click Create. From the drop-down list, select All conditions must be met or Any condition must be met.
- Click Save and Close.

Add External CSS and JavaScript to a widget
Custom widgets in Brightspace allow you to personalize your course homepage with unique content and functionality. While the default widget editor supports HTML and inline styling, you can enhance your widgets by linking external CSS and JavaScript files.
Using external resources enables more advanced styling and interactivity while keeping your widget content easier to maintain.
Why add external resources?
Linking external CSS and JavaScript files allows you to:
- Add dynamic behavior using JavaScript, such as animations or interactive elements.
- Apply custom styling with external CSS beyond Brightspace’s default theme.
- Centralize design updates by managing styles and scripts in a single location.
Before you begin
When linking external CSS and JavaScript files to a custom widget, you must decide:
- Where to store your widget files:
- At the course level, for widgets used in a single course.
- At the organization level (Public Files), for widgets shared across multiple courses.
- How to reference those files in the widget’s HTML using the correct relative path.
The following sections provide step-by-step instructions for both options.
Store widgets at the course level
Course-level storage is best for widgets that are used in a single course offering.
Step 1: Upload your files
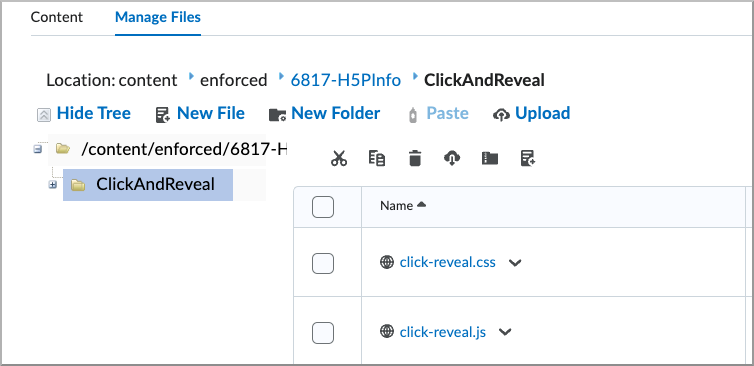
- Navigate to Course Administration > Manage Files.
- Create a new folder to store your widget files (for example, ClickAndReveal).
- Upload your CSS and JavaScript files.

|
Tip: Create your files in a code editor before uploading (for example, click-reveal.css and click-reveal.js). |
Step 2: Open the widget HTML editor
- Navigate to Course Administration > Widgets.
- Create a new custom widget or edit an existing widget.
- Select the Content tab.
- Switch to the HTML Source Editor.
Step 3: Link external CSS and JavaScript files
- Navigate to Course Administration > Course Offering Information.
- Copy the Course Offering Path displayed on the page.
- In the widget’s HTML <head> section, link your files using the Course Offering Path followed by your folder structure.
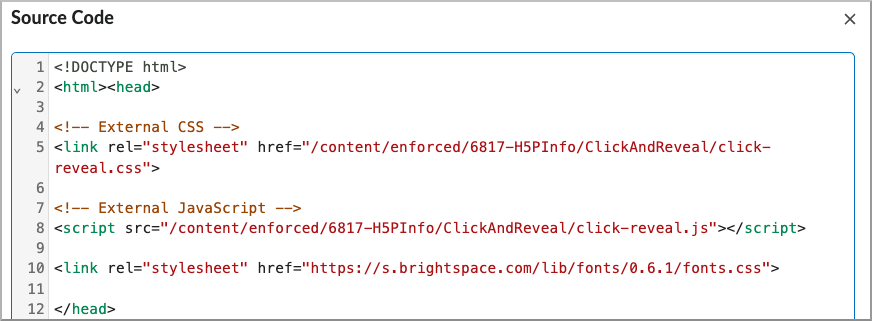
Figure: Example of linking external CSS and JavaScript files in the widget’s HTML <head> section using the Course Offering Path.
Step 4: Build your widget
Use the HTML editor to add your widget content. The linked CSS and JavaScript files control the widget’s styling and behavior.
Store widgets in Public Files (organization level)
Storing widgets in Public Files allows you to reuse them across multiple courses. This option typically requires administrator permissions.
Step 1: Upload your files
- Click the Admin cog icon on the Brightspace minibar.
- Select Public Files.
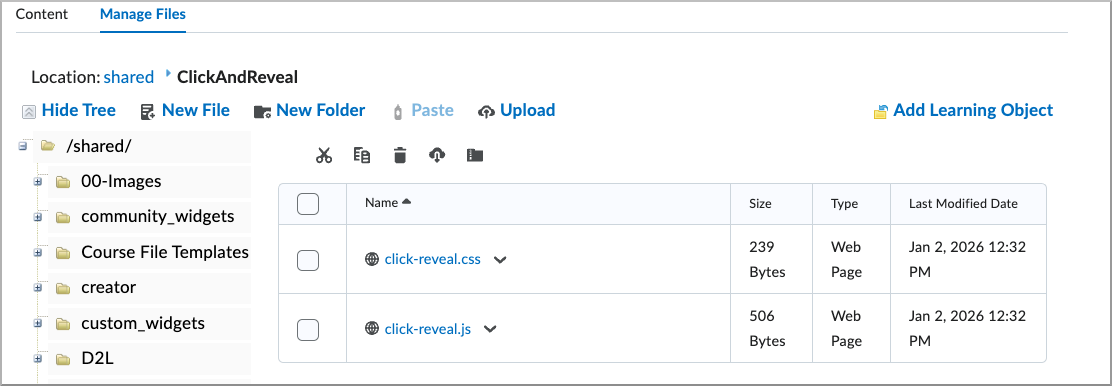
- Create a new folder to store your widget files (for example, ClickAndReveal).
- Upload your CSS and JavaScript files.
|
Tip: Create your files in a code editor before uploading (for example, click-reveal.css and click-reveal.js). |
Step 2: Open the widget HTML editor
- Navigate to Homepage Management.
- Select the Widgets tab.
- Create a new custom widget or edit an existing widget.
- On the Properties tab, locate Make widget available to and click Add Org Units.
- Select the organizational units where you want the widget to be available.
- Select the Content tab and switch to the HTML Source Editor.
Step 3: Link external CSS and JavaScript files
In the widget’s HTML <head> section, link your files stored in Public Files using a relative path that starts with /shared, followed by your folder structure.
|
Tip: The /shared path is case-sensitive. |
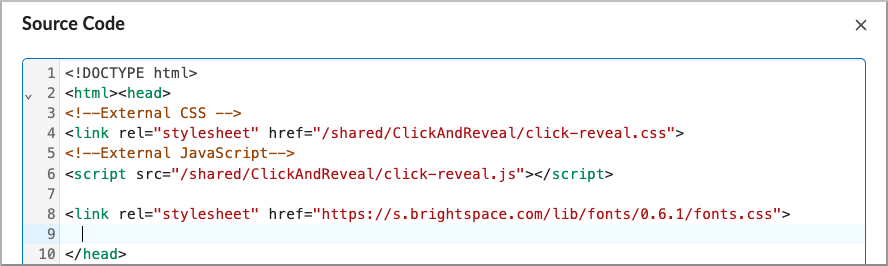
Figure: Example of linking external CSS and JavaScript files stored in Public Files using a /shared path.
Step 4: Build and deploy your widget
Use the HTML editor to add your widget content. Once complete, add the widget to the appropriate homepage so it appears for learners or instructors.