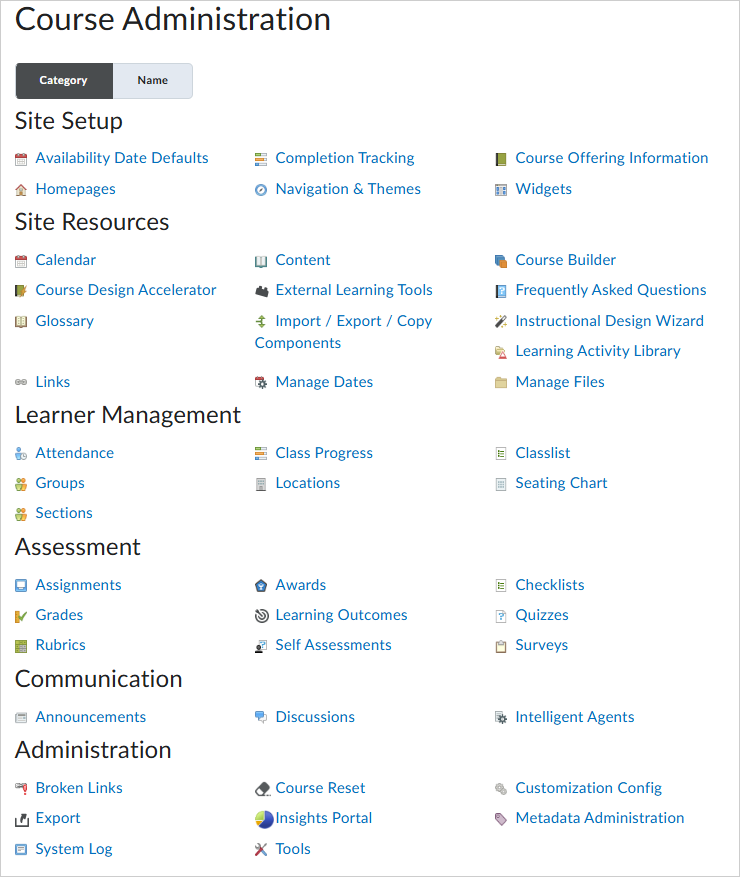
Course Administration is a central area for accessing tools related to setting up and managing your course. From here you can access many tools to help you run your course smoothly, including:
- Enable and disable course tools
- Rename course tools
- Manage course offering information
- Import course components
- Import learning outcomes

|
Note: Course Administration is now the central location to manage learning outcomes. Learning Outcomes continue to appear in New Content Experience (Lessons), and any learning outcome you import in one location is reflected in the other. |
Visual tour of the Course Administration page
To access the Course Administration page for your course, click Course Admin from your course navbar.

|
Important: The tools available and visible to you on the Course Administration page will vary depending on what tools your organization administrator has made available to you at the org level. If you want to set the visibility of tools in your specific course offering, you require the Course Management Console > See Tool Management and the Course Management Console > Set Tool Status role permissions to set tools statuses for a course. Refer to Course Management Console permissions for more details and content your administrator for assistance.
|
You can select the Category tab to organize all available Brightspace tools by category:
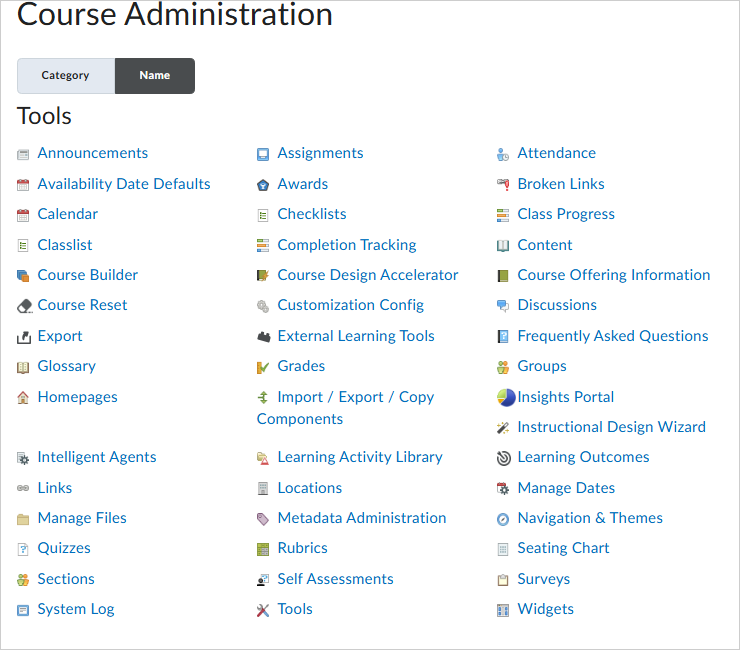
You can also sort available tools alphabetically by selecting the clicking the Name tab:
Set Course level tool availability
You can set the status (availability) of tools for an individual course. This overwrites the Org Unit Defaults applied at the organization level. It also determines which tools appear to you on the Course Administration page.
Before enabling a tool, be aware of the following:
- Some activated tools can only be accessed from the navbar or home page widgets.
Before disabling a tool, be aware of the following:
- Release conditions based on the tool are not enforced as long as the tool remains disabled.
- Competency activities associated with the tool are hidden but are still associated with any learning objectives to which they are attached. Users cannot complete these learning objectives while the tool is disabled. You should detach or delete any activities associated with a tool before disabling the tool.
- Grade items associated with the tool remain, but you must manually update them in the grade book.
- Quicklinks to the tool’s items persist but a “No Resource Found” message displays when they are followed. You should remove any related quicklinks when you deactivate a tool.
- Deactivating a tool does not delete any items or user data inside the tool; it simply hides the tool from your course offering.
|
Important: Users must have the Course Management Console > See Tool Management and the Course Management Console > Set Tool Status role permissions to set tools statuses for a course. Refer to Course Management Console permissions for more details.
|
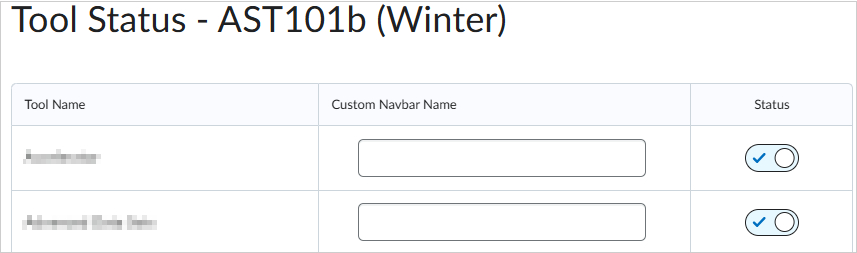
To set tools status for a course
- From a course homepage, click Course Admin > Tools.
- From the Tool Status page, under Status, click to toggle the tool On or Off.
Rename a tool
You can change the name of a course tool as it appears on your course navbar.
|
Important: Changing the custom navbar name for a tool does not replace all uses of the original term throughout the system. It only changes the display name for the tool on the navbar. To replace all references to a specific term, a site administrator can update your organization’s language pack using the Manage Languages tool.
|
To rename your tool on your course navbar
- From your course navbar, click Course Admin.
- Click Tools.
- In the Custom Navbar Name field for the tool that you want to rename, enter the new tool name.
- Press Enter or click outside the field.
Your changes save automatically.