Administrators can use the Create App workflow to create and manage their own integrations. You can configure Learning Tools Interoperability (LTI) registrations, deployment settings, and app details, then deploy the app within your Brightspace organization. If you are a D2L partner, you can also submit your app for review and publish it to Find Apps for other organizations to install.
To learn more about becoming a partner, visit D2L Partner Program.
Create a Brightspace App
To create an app in Brightspace, you will need to complete the following tasks:
- Create the app shell
- Add features and functionality
If you are an administrator creating a local app, complete the following task:
- Configure a deployment
Publish a Brightspace App
If you are an app publisher or D2L partner, continue with the following tasks:
- Configure a default deployment
- Submit your app for review
- Make changes and version your app
Create the app shell
- Navigate to Admin Tools > Manage Extensibility.
- In the Apps tab, click Create App.
- Enter a Name, Short Description, and Description, and then click Create App.
You can complete the remaining fields later.
Add features and functionality
- In the Features and Functionality section, click Add LTI Registration.
- To choose your registration method, do one of the following:
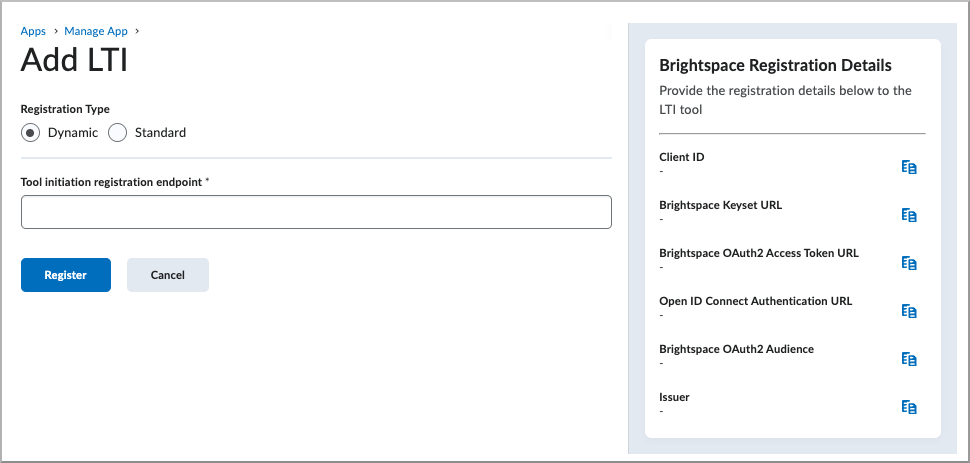
- Dynamic: Enter the registration URL provided by the tool provider to automate the setup.
- Standard: Manually enter the tool details, including domain, redirect URLs, and keyset URL if extensions are needed.
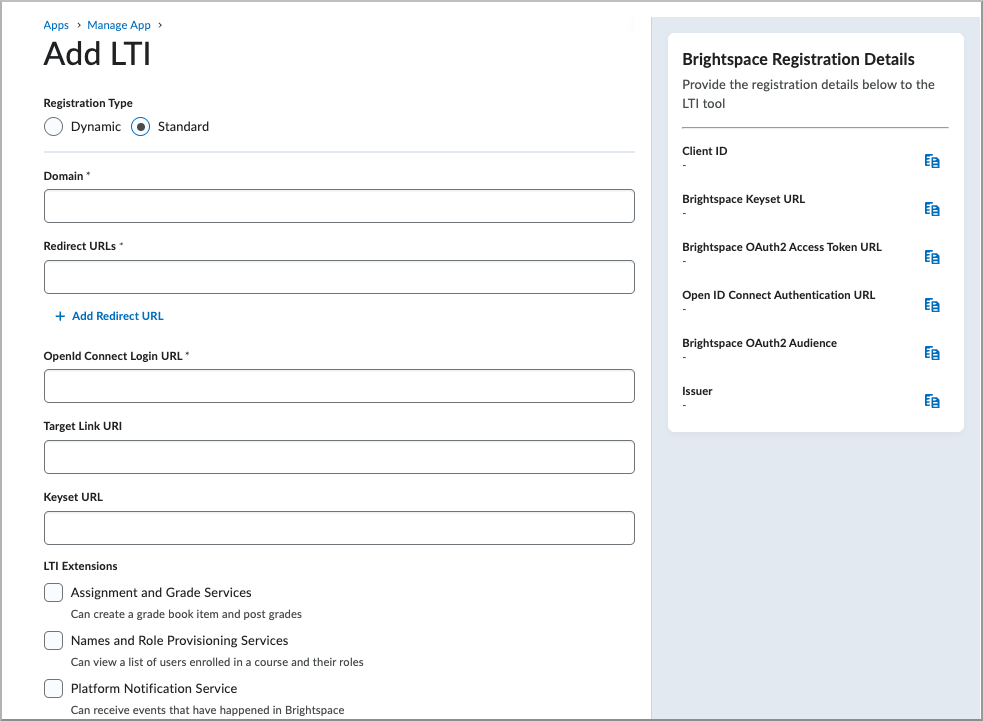
To select the required LTI services, choose the services your tool requires:
- Assignment and Grade Services: Can create a grade book item and post grades.
- Names and Role Provisioning Services: Can view a list of users enrolled in a course and their roles.
- Platform Notification Service: Can receive events that have happened in Brightspace.
- Copy Content Notice: Can view when courses have been copied.
- Asset Processor: Can view submitted assignments, process them, and report on them.
To send the institution role mapping from IMS Configuration in the launch, select Institution Role.
To configure parameters, do one or more of the following:
- To select dynamically substituted parameters from Brightspace at launch, select Substitution. Brightspace supports the following parameters:
$Activity.id.history$Activity.title$Activity.available.startDateTime$Activity.available.endDateTime$Activity.submission.endDateTime$Context.id.history$CourseOffering.sourcedId$CourseOffering.title$CourseSection.label$CourseSection.sourcedId$CourseSection.title$CourseSection.timeFrame.begin$CourseSection.timeFrame.end$CourseTemplate.sourcedId$CourseTemplate.title$Person.address.timezone$Person.email.primary$Person.name.family$Person.name.full$Person.name.given$Person.sourcedId$ResourceLink.available.startDateTime$ResourceLink.available.endDateTime$ResourceLink.description$ResourceLink.id.history$ResourceLink.submission.endDateTime$ResourceLink.title$User.id$User.username
- To define static name/value pairs required by the tool, select Custom, and then enter the custom parameters.
To register the LTI component, select Register.
 | Note: For more information on LTI 1.3 launch and authentication, refer to About LTI 1.3 launch and authentication. When you create the LTI registration, it appears as an LTI component. Deployment configurations are not applicable to LTI in Brightspace Apps.
The LTI registration domain must be unique for all LTI registrations in your Brightspace instance. An app cannot use an LTI registration domain that is used by an enabled LTI registration outside Brightspace Apps. To create the app LTI registration, disable the existing LTI registration in Manage Extensibility > LTI Advantage. |
The Brightspace Registration Details appear in the right side panel.
Click Save and Close.
Configure a deployment
Administrators can configure a deployment for their app. App publishers and D2L partners must configure a default deployment. Refer to Configure a default deployment.
- In the Deployments section, click Add Deployments.
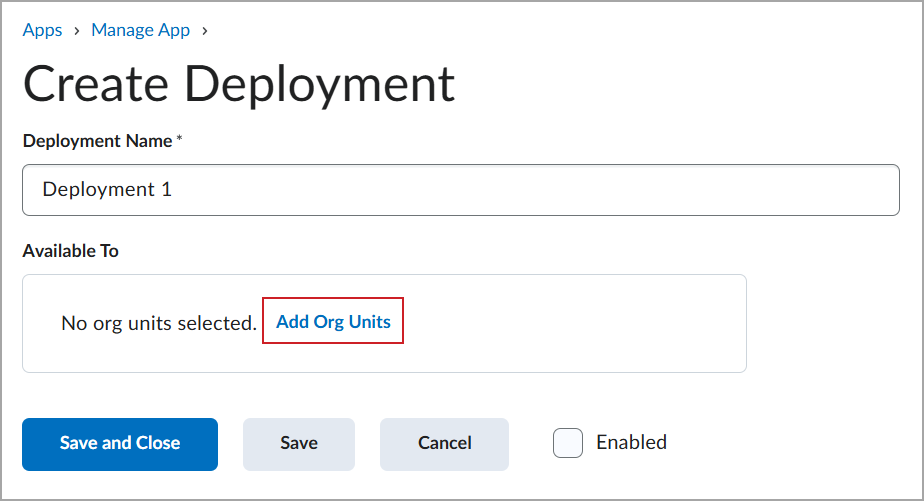
- In the Deployment Name field, enter a name for the deployment.
- In the Available To section, click Add Org Units, then select the org units, and click Insert.
- Complete the following sections that appear based on your app configuration:
- LTI Extensions: Select the LTI services to include with the deployment.
- Information to Share: Select the user and context information to share with the tool provider for apps with LTI.
- Additional Settings: Select additional settings, as needed.
- Parameters: Add any name/value pairs required to identify accounts or set preferences.
- If you want to make the deployment available to users, select Enabled.
- Click Save and Close.
Configure a default deployment
|
Note: Only D2L partners are required to create a default deployment. Administrators can only create a deployment. The first deployment you create becomes the default deployment. After the default deployment is initialized, you can create additional deployments and select a different default deployment. A default deployment is required to publish your app. |
- In the Deployments section, click Add Deployments.
- Complete the following fields in the Create Deployment dialog:
- Deployment Name: Enter a descriptive name for the deployment.
- LTI Extensions: Select the LTI services to include with the deployment.
- Information to Share: Select the user and context information to share with the tool provider for apps with LTI.
- Additional Settings: Select additional settings, as needed.
- Parameters: Add any name/value pairs required to identify accounts or set preferences.
- To define where the deployment is available, select Add Org Units, and then select specific courses, departments, or the entire institution.
- To make the deployment available to users, toggle the switch from Disabled to Enabled.
- To save the deployment configuration, click Save and Close.
| Note: The deployment name appears in the External Learning Tools list and on the Asset Processor card if the tool supports Asset Processor. The deployment name also appears in the External Tool Activity menu when instructors add LTI quicklinks. Custom and substitution parameters cascade from the registration to the deployment and links as inherited parameters. |
Submit your app for review
Only D2L partners and app publishers can submit their apps for review. Administrators cannot submit apps for review.
- Review your selections and click Publish.

- Complete the required fields:
- Short Description: Enter a sentence to briefly describe your app.
- Description: Enter a detailed description for your app.
- Upload and preview images for your app listing:
- App Icon: Upload a square image between 300 px and 1000 px.
- Listing Header: Upload a header image that is exactly 750 px by 270 px.
- Screenshots (optional): Upload up to two screenshots. Images must be exactly 776 px by 526 px.
- Categories: Select one or more category tags to help users locate your app in Find Apps.
- Resources (optional): Click Add Resource and provide up to 10 links to external resources, such as documentation or certifications.
- Click Submit.
The status of your app appears next to Publish.

The D2L Partner Support Team reviews your submission before publishing it to Find Apps.
|
Note: The D2L Partner Support Team may contact you with questions about your app. Add partnersupport@d2l.com to your safe senders list to ensure you receive these messages. |
When your app is approved, you will receive an email notification from the D2L Partner Support Team, and the app status will change from Unpublished to Published.
Make changes and version your app
You can update your app and create new versions as needed. After a new version is approved, the app listing in Find Apps is updated. The new version does not automatically update existing installations of your app.

|
Important: Users with an existing installation cannot update the installed app from Find Apps. To use changes from the new version, they must manually configure the changes in their existing installation. Alternatively, they can delete the existing app and install it again; however, this is not recommended in most cases because links and content from the previous installation are not retained in the new installation. |
- To make changes to your app after making a submission, navigate to Apps, locate your app in the list and click Manage.
- Make changes in each section as needed to update your app.
- Click Publish. Your app will be versioned automatically.
- Confirm the details and click Submit.
- If your app has been approved and published to Find Apps, you will have the option to describe your change in the Version Description field and click Submit for Review. This field appears in your listing.
The D2L Partner Support Team reviews the updated submission before publishing the changes to Find Apps.
|
Note: The D2L Partner Support Team may contact you with questions about your app. Add partnersupport@d2l.com to your safe senders list to ensure you receive these messages. |