About this integration
The Microsoft 365 Learning Tools Interoperability (LTI) app connects Microsoft 365 tools with Brightspace. This integration allows instructors and learners to access files, assignments, and collaboration tools within their courses.
This integration allows your organization to:
- Enable access to Microsoft 365 tools inside Brightspace
- Allow instructors and learners to create and share documents and assignments
- Sync classlists and permissions
- Send grades to the grade book
Before you begin
Make sure you meet the following requirements:
- You have a Brightspace administrator account.
- A Microsoft 365 Global Administrator is available to complete setup.
- User email addresses in Brightspace match Microsoft Entra ID email addresses.
- Browser settings allow cookies and pop-ups.
Register the Microsoft 365 LTI app
To configure Microsoft 365 LTI, you must have administrator permissions and complete a one-time setup. The following sections outline the process and should be completed sequentially.
Register the app in Microsoft
- Sign in to the Microsoft Registration Portal with your Microsoft 365 user account.
- Click Add new registration.
- Select Microsoft 365 LTI, then click Next.
- Enter a name for the registration.
- Select D2L/Brightspace as the LMS platform then click Next.
- Copy the keys and values provided. You will need them for the next steps.
- Keep your browser window open while you register the app in Brightspace.
Register the app in Brightspace
- Log in to Brightspace as an Administrator or Super Administrator.
- Navigate to Admin Tools > Manage Extensibility
- Open the LTI Advantage tab and click Register Tool.
- Select Standard registration.
- Enter the following values provided by Microsoft:
- Name: Microsoft 365 LTI
- Domain: Copy the Target Link URL value from the Microsoft registration.
- Redirect URLs: Copy the Redirect URL value from the Microsoft registration.
- OpenID Connect Login URL: Copy the OpenID connection URL value from the Microsoft registration.
- Target Link URL: Copy the Target Link URL value from the Microsoft registration.
- Keyset URL: Copy the JWKS URL from the Microsoft registration.
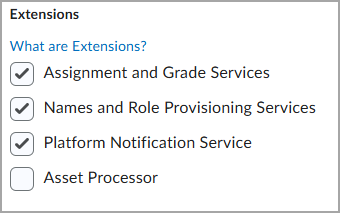
- In the Extensions section, select the following options:
- Assignment and Grade Services
- Names and Role Provisioning Services
- Platform Notification Service
- In the Roles section, select Send Institution Role.
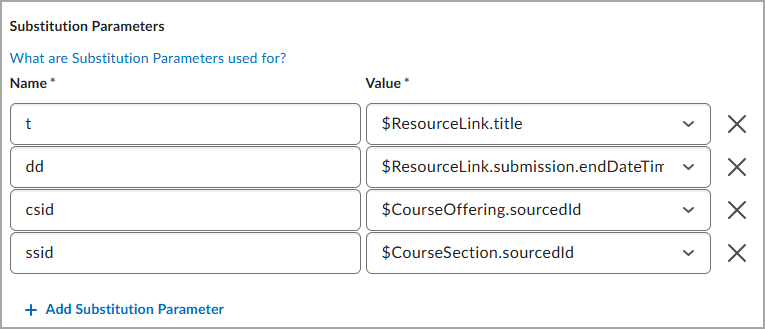
- In the Substitution Parameters section, enter the following value pairs:
- Name: t
Value: $ResourceLink.title - Name: dd
Value: $ResourceLink.submission.endDateTime - Name: csid
Value: $CourseOffering.sourcedId - Name: ssid
Value: $CourseSection.sourcedId
- Click Register.
- The dialog opens. Copy the Brightspace registration names and values. These are needed to complete registration in the Microsoft Registration Portal.
Create a Deployment
- Navigate to Admin Tools > External Learning Tools.
- Click New Deployment.
- Select Microsoft 365 LTI as the Tool, and enter "Microsoft 365 LTI" as the Name.
- Enable all Security Settings.
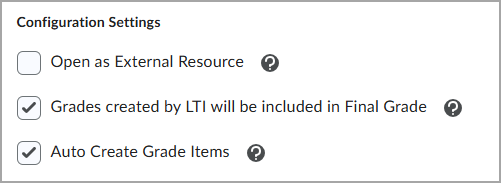
- In the Configuration Settings section, select the Grades created by LTI will be included in the Final Grade check box, the Auto create grade items check box, and clear the Open as External Resource check box.
- Click Add Org Units, then select the org units where you want to deploy the tool.
- To deploy to all org units, search for the organization name and select All Descendants.
- Click Create Deployment, then copy and save the Deployment ID along with the Name from step 3. You will use it in the Microsoft Registration Portal.
Link Microsoft and Brightspace
- Return to the Microsoft Registration Portal.
- In the LMS provided registration keys tab, click Next.
- Enter the following Microsoft registration fields using the corresponding values from Brightspace:
- Issuer ID URL: Issuer
- Client ID: Client ID
- Keyset URL: Brightspace Keyset URL
- Platform authentication URL: OpenID Connect Authentication Endpoint
- Deployment ID: Deployment ID
- Access Token URL: Brightspace OAuth2 Access Token URL
- Click Next, then review the Review and save page.
- Click Save and exit.
Add links to the tool
Create links so instructors can access Microsoft 365 tools in their courses.
- Navigate to Admin Tools > External Learning Tools
- Select Microsoft 365 LTI then scroll down and select View Links.
Use the following sections to create different types of links:
Create basic Launch Links for course navbars
- Click New Link.
- Enter Microsoft Education as the Name.
- Enter https://lti.edu.cloud.microsoft/tool for URL.
- Select Basic Launch for Type.
- Click Save and Close.
Create a Deep Linking Quicklink for documents
- Click New Link.
- Enter Microsoft 365 Document as the Name.
- Enter https://lti.edu.cloud.microsoft/tool for the URL.
- Select Deep Linking Quicklink for Type.
- Create a Custom Parameter:
- Enter launchType for Name.
- Enter linkSelection for Value.
- Click Save and Close.
Create a Deep Linking Quicklink for content activities
- Click New Link.
- Enter Microsoft 365 Document as the Name.
- Enter https://lti.edu.cloud.microsoft/tool for the URL.
- Select Deep Linking Quicklink for Type.
- Create a Custom Parameter:
- Enter launchType for Name.
- Enter courseAssignments for Value.
- Click Save and Close.
Create a Deep Linking Insert Stuff link for documents
- Click New Link.
- Enter Microsoft 365 Document as the Name.
- Enter https://lti.edu.cloud.microsoft/tool for the URL.
- Select Deep Linking Quicklink for Type.
- Create a Custom Parameter:
- Enter launchType for Name.
- Enter linkSelection for Value.
- Click Save and Close.
Create a Deep Linking Quicklink for document collaborations
- Click New Link.
- Enter Microsoft 365 Document as the Name.
- Enter https://lti.edu.cloud.microsoft/tool for the URL.
- Select Deep Linking Quicklink for Type.
- Create a Custom Parameter:
- Enter launchtype for Name.
- Enter collaborations for Value.
- Click Save and Close.
Create a Widget link to add to course homepage layouts
- Click New Link.
- Enter Microsoft Education as the Name.
- Enter https://lti.edu.cloud.microsoft/tool for URL.
- Select Widget for Type.
- Click Save and Close.
Add links to Navigation and Themes
- Navigate to Admin Tools > Navigation and Themes.
- Select the navbar you want to modify, then click Add Links.
- Click Create Custom Link.
- Enter Microsoft Education as the Name.
- For the URL, select Insert Quicklink, and then Microsoft Education.
- Select Same window for Behavior.
- Click Create.
- Select the Microsoft Education check box and click Add.
- Drag the Microsoft Education link to the desired location in the navbar.
- Select Save and Close.
Activate the Microsoft 365 LTI app
After registering, deploying, and adding links, the Microsoft 365 LTI app will now be available to users and the older OneDrive app can be turned off if you are ready to migrate.
Turn off the One Drive app
- Navigate to Admin Tools > Config Variable Browser.
- Locate the variable titled d2l.3rdParty.OneDrive.EnableOneDrivePicker and set the value to off.
Add the Microsoft 365 LTI app to Brightspace activity bar
You must add an org unit Config Variable to the link ID of the LTI app.

|
Note: Repeat these steps for every org ID (or parent org ID) where you want the Microsoft LTI app to appear in the activity bar. |
Collect the link ID
- Navigate to Admin Tools > Manage Extensibility to view the LTI Advantage Deployments list.
- Select the Microsoft 365 LTI LTI Advantage app you created.
- Click View Deployments at the bottom of the page.
- Select the Microsoft 365 LTI app deployment you created.
- Click View Links at the bottom of the page.
- Select the Microsoft 365 Document link with the Deep Linking Quicklink type.
- In your browser’s address bar, copy the number after the final / in the URL.
Update the Config Variables
- Navigate to Admin Tools.
- Click Config Variable Browser.
- From the All Variables menu, click 3rdParty > Microsoft > OneDriveLTI.
- In the right pane, click 3rdparty.microsoft.onedriveLTI.linkId.
- Click Add Value on the LinkID configuration screen.
- Select an Org Unit, then paste the Link ID value you copied earlier.
- Repeat this process for each org unit where you want to use the Quicklinks Activity Bar.
- Optional: To apply this setting to descendant org units, edit Cascading Org Unit Types, then select the org unit types and order.
First-time configuration by a Brightspace Administrator
To complete the configuration for your deployment, a user with the Brightspace System Administrator role must launch the app for the first time.
- Access any course with the Microsoft Education link added.
- Continue with the Microsoft 365 LTI first-time configuration steps to complete the configuration for your organization.
Ongoing use by non-admin users
On first access, users must sign in using their Microsoft 365 (Microsoft Entra) account. No configuration is required.
Browser settings
Ensure the following settings are enabled for Microsoft apps:
- Enable cookies
- Allow pop-ups
If you encounter a cookie error:
- In your browser’s address bar, enable third-party cookies and pop-ups
- If the issue persists, check your browser settings to ensure cookies and pop-ups are enabled for this app