The Brightspace Course Connector for Microsoft Teams® is available for purchase and is set up as a Learning Tools Interoperability (LTI®) integration. It allows administrators and instructors to seamlessly create Teams based on a course in Brightspace. This integration automatically synchronizes the class list with Microsoft Teams daily. Administrators can also manually trigger a class list synchronization on-demand for any course from the ShuffleExchange platform.
Once a course is connected, a link on the course homepage provides access to your Teams environment from within Brightspace. This integration provides enhanced communication and collaboration between instructors and learners.
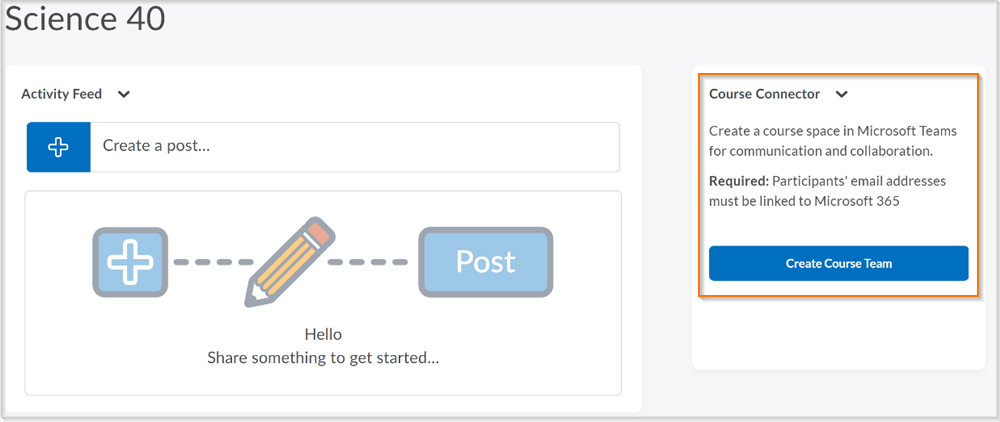
Figure: The Course Connector for Microsoft Teams widget on a homepage.
This guide outlines the process for integrating your Microsoft Teams platform with your Brightspace and upgrading to the latest version of Brightspace Course Connector.

|
Note: For guidance on various types of integration, refer to the Limitations section. |
Integrate Microsoft Teams platform with Brightspace
The following sections describe how to integrate Microsoft Teams platform with Brightspace.
To integrate Microsoft Teams platform with Brightspace
- Register a new LTI Advantage tool for Course Connector in Brightspace. This workflow also includes configuring an LTI launch of Course Connector as a basic launch widget and making it available to the appropriate Org Units.
- Register a new Valence API application for Course Connector in Brightspace.
- Obtain student and instructor roles.
- Register the ShuffleExchange LTI tool.
Register a new LTI Advantage tool for Course Connector in Brightspace
This section describes the steps to create a widget on the course homepage.

|
Note: You require administrator privileges to create a widget. |
To create a widget on the course homepage
- Log in to Brightspace.
- From the Admin Tools menu, click Manage Extensibility.
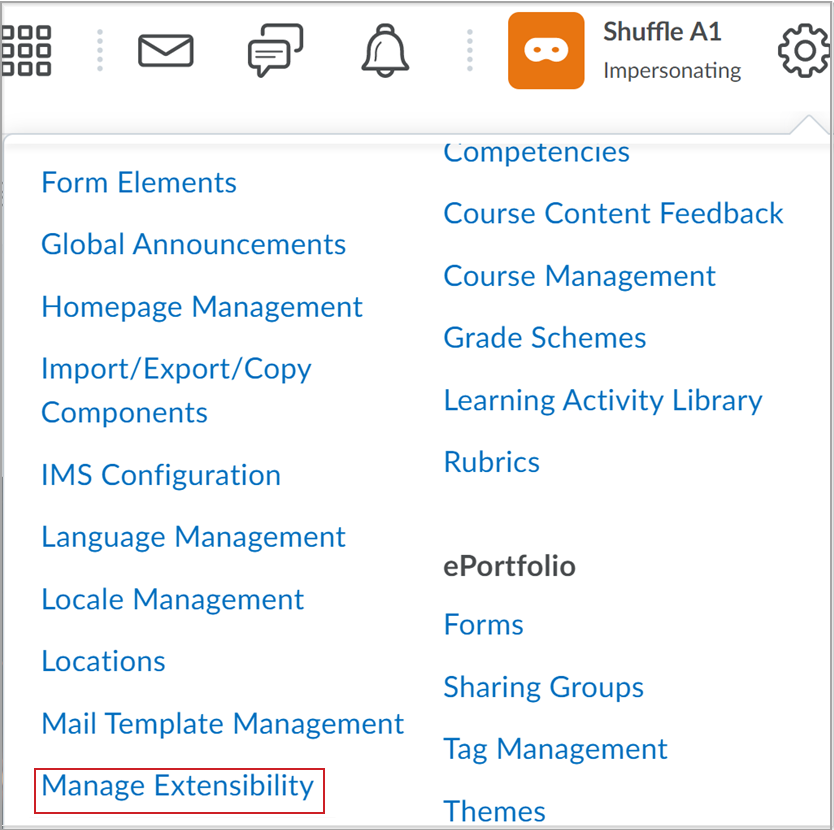
Figure: From the Admin Tools menu, select Manage Extensibility.
- On the LTI Advantage tab, click Register Tool.
- On the Register a Tool page, enter the following details:
- How would you like to register your tool?: Select Standard registration.
- Name: Enter your preferred name for the tool. For example, Microsoft Teams.
- Domain:
- Redirect URLs:
- OpenID Connect Login URL:
- Keyset URL:
Keep all remaining default values and click Register. Your registration details appear.
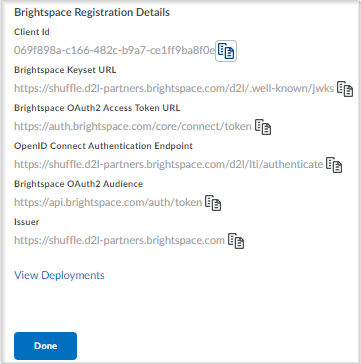
Figure: Review the LTI Advantage tool registration details.
Note your Client Id and Issuer URL.
Now you can configure the LTI launch of Course Connector.
To configure the LTI launch of Course Connector
- Click View Deployments.
- On the LTI Advantage tab, click New Deployment.
- To make the tool available to all Org Units, on the Deploy Tool page, enter the following details:
- Tool: Select the tool name you specified in step 4 above.
- Name: Your preferred name for the deployment. For example, Microsoft Teams.
- Security Settings: Select Org Unit Information and select User ID.
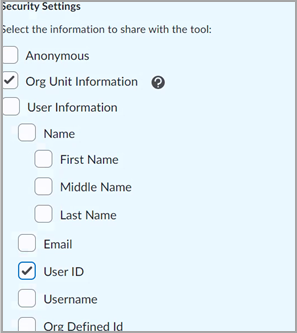
Figure: Select the Org Unit Information and User ID options.
- Make tool available to: Click Add Org Units and select all the course offerings where the tool should be made available and click Add.
Keep all remaining default values and click Create Deployment. Your deployment registration details appear.
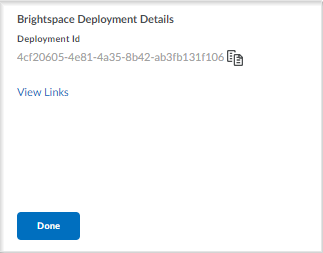
Figure: Review the Brightspace Deployment Details.
Note the Deployment Id.
To configure the widget
- Click Manage External Learning Tool Links.
- Click New Link and provide the following details:
- Name: Your preferred name for the tool. For example, Microsoft Teams.
- URL:
- Type: Basic Launch Widget, Height: 300.
Keep all remaining default values and click Save and Close.
Register a new Valence API application for Course Connector in Brightspace
The Brightspace Course Connector for Microsoft Teams uses a Valence API to access course, section, and enrollment information. This section details steps to register a Valence application and create credentials to access Brightspace APIs.

|
Note: Registering a Valence application and creating credentials requires Brightspace administrator privileges. |
To register a new Valence API application for Course Connector
- Log in to Brightspace.
- From the Admin Tools menu, click Manage Extensibility.
- On the ID Key Authorization tab, click Register an App.
- On the Register an Application page, provide the following details:
- Keep all remaining default values and click Register Application. Your registration details appear.
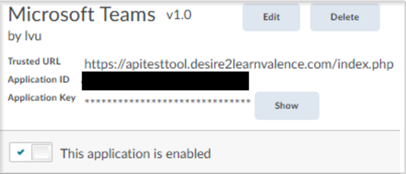
Figure: Record the Valence API registration details, which you need later in the registration process.
- Note the Application ID and Application Key.
- In incognito mode, navigate to the API Test Tool page and specify the following details:
- Host: Your Brightspace host URL without https or a trailing slash. For example, d2l.com.
- Port: 443
- App ID: Application ID from Step 6 above.
- App Key: Application Key from Step 6 above.
- Click Authenticate. An access confirmation message appears.

Figure: Review the access confirmation message.
- To populate the User ID and User Key, click Continue.
- Note the User ID and User Key.
You are now ready to obtain student and instructor roles.
Obtain Learner and Instructor Roles
To ensure the correct users are created as Team owners and members in Microsoft Teams, ShuffleExchange, the partner platform, requires the associated role IDs mapped to course instructors and learners.
To obtain learner and instructor role IDs:
- Log in to Brightspace.
- From the Admin Tools menu, click Roles and Permissions.
-
Click on a learner or instructor role. Refer to the browser URL field to note the role ID.
- Repeat Step 3 for each role and note all the role IDs for students and instructors separately.
Register the ShuffleExchange LTI Tool
The ShuffleExchange (SE) LTI Tool requires the details captured in the earlier steps to enable the Teams integration with your Brightspace instance.
To register the SuffleExchange LTI Tool
- In incognito mode, navigate to one of the following:
-
https://Teams-asia.shuffleexchange.com (for Singapore)
Log in with the credentials supplied to you by your D2L partner after purchasing this add-on.

Figure: Image of the ShuffleLabs Administration Panel
Integration Settings
Enter the following integration settings:
- Integration Type: Select the integration type you want to use to connect to your Office 365 environment:
- Standard Team (Application Permissions) doesn’t require a service account but requires administrator consent for the application to run on behalf of the tenant.
- Standard Team (Delegated Permissions) requires a service account. The service account is the default owner of every Team created.
- Class Team is created as a Class Team rather than as a Standard Team. The Team creation follows the guidelines proposed by Microsoft, which makes the Team compatible with other Microsoft LTI tools. The Class Teams are created through Application Permissions.
- Refresh Token: Click Connect and log in as a global administrator to install Brightspace Teams Connector. Your tenant token displays.
- Brightspace URL: Your D2L Tenant URL/Brightspace domain name, without the trailing slash
- Client Id: Client Id noted in the Register a new LTI Advantage tool for Course Connector in Brightspace section (step 6)
- Deployment Id: Deployment Id noted in the Register a new LTI Advantage tool for Course Connector in Brightspace section (step 11)
- Issuer URL: Issuer URL noted in the Register a new LTI Advantage tool for Course Connector in Brightspace (step 6)
- Instructor Role ID(s): a comma separated list of instructor role Ids noted in the Obtain student and instructor roles section (step 4)
- Student Role ID(s): a comma separated list of student role Ids noted in the Obtain student and instructor roles section (step 4)
- App Id: Application Id noted in the Register a new Valence API application for Course Connector in Brightspace section (step 6)
- App Key: Application Key noted in the Register a new Valence API application for Course Connector in Brightspace section (step 6)
- User Id: User Id noted in the Register a new Valence API application for Course Connector in Brightspace section (step 10)
- User Key: User Key noted in the Register a new Valence API application for Course Connector in Brightspace section (step 10)
- Brightspace Tab Name: The name of the Tab in the Team’s General Channel where you access your Brightspace course.
- Group Mail Prefix (obsolete): This setting is replaced by the Group Mail Format.
- Group Mail Format: The email address format to be used while creating the group. Include {0} in the format string to insert the course ID. For example, where the course ID is 6744, course-{0}-group creates course-6744-group@yourdomain.com.
- Team Name Format: The format to be used for naming the Team. Include {0} in the format string to insert the course name. For example, where the course name is Getting Started, Brightspace {0} Team creates Brightspace Getting Started Team.
- Name Blocked Words: The words that you want to remove from the Brightspace course name before using it in the Course Name Format. This feature is typically used when Office 365 has Team/Group name restrictions.
- Hide ‘Learners can create new private channels’ Option: This option is normally available in the course widget. Selecting this item will hide that option and the Team will follow policies set by the Microsoft Teams Policies
- Wait until Course Start Date (In days): Number of days to wait before the start date of a course before the Team is created in Microsoft. A value of zero (default) indicates that the Team will be created immediately. If the Course and Team are already synchronized and the start date is then removed or set to a future date, the Team will not be removed.
- Team Course Cleaning Option: Choose what to do when a course end date passes. The options are Nothing, Delete or Archive. See the Team Course Cleaning Waiting Period option for further settings.
- Team Course Cleaning Waiting Period (In days): Number of days to wait after the end date of the course, before the Team is cleaned (deleted or archived). 0 indicates that no action will occur. This feature does not apply when a course is manually deleted in Brightspace. If a course is deleted in Brightspace, the related Team is simply unlinked. There is no maximum value. If the end date passes and the Team is archived/deleted (per this option) and subsequently the end date is removed or set to a past date, the Team will not be re-added or re-synchronized.
- Hide Synchronized Teams from the GAL: This option will apply to newly synchronized Teams and will hide their underlying email address from the Microsoft Exchange Global Address List (GAL) to reduce email address clutter. This feature doesn’t turn off or disable the address. It simply hides the email address from the listing. Selecting this option does not modify GAL entries for Teams that are already created, nor will clearing this option automatically create GAL entries for existing Teams. There are few cases where insertion into the GAL cannot be suppressed. Warnings will be provided in the administration panel for these cases.
- Hide Teams Calendar App: Both Brightspace and Teams offer calendars. These calendars are not synchronized, and students may confuse these two calendars. This option hides the Teams calendar from view. The calendar isn’t removed, it is hidden. An owner of the Team can show the calendar, but on the next synchronization event, the calendar will be hidden again.
- Hide Teams Assignments App: Both Brightspace and Teams offer assignments. These assignments are not synchronized, and students may confuse these two assignments. This option hides the Teams assignments from view. The assignment isn’t removed, it is hidden. An owner of the Team can show the assignment app, but on the next synchronization event, the assignment will be hidden again.
- Add Prefix to Archived Team names: As a best practice, archived Teams may be renamed by adding a prefix to the names. This is helpful to prevent conflicts if course or section names are reused in future academic sessions. This option is only relevant if the Team Course Cleaning option is set to Archive.
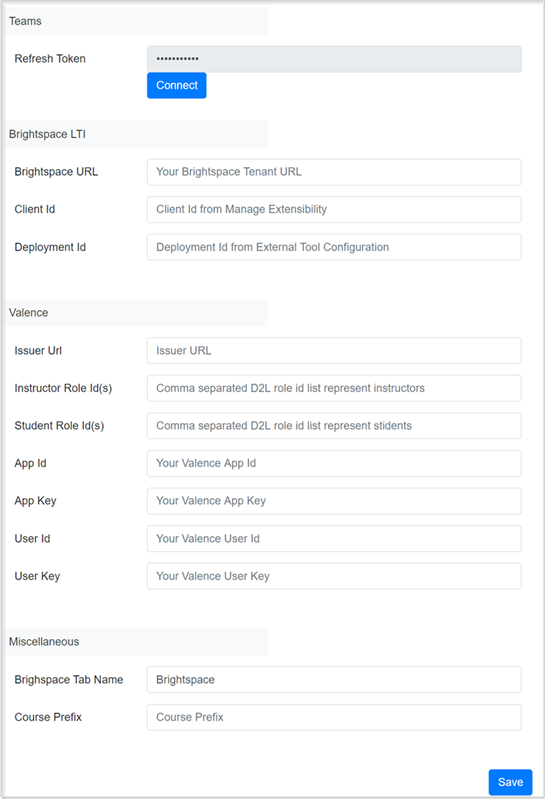
Figure: After all ShuffleExchange LTI tool registration details are entered, click Save.
About the Course Connector widget
The Course Connector widget allows an instructor to create a Team, to edit settings and allows learners and instructors to directly access their Team using links to their available Teams.
If enabled, instructors can view the message count for each Team from their widget to easily monitor the activity level of Teams in the course.
Instructors can add the Brightspace Course Connector widget for Microsoft Teams to their course homepage for easy access to Teams.
To add the Brightspace Course Connector widget for Microsoft Teams to the course homepage
- From your course homepage, click Course Admin > Homepages.
- Click to select the homepage you want to edit.
- In the Widgets area, click Add Widgets.
- Select Microsoft Teams and click Add.
- Click Save and Close.
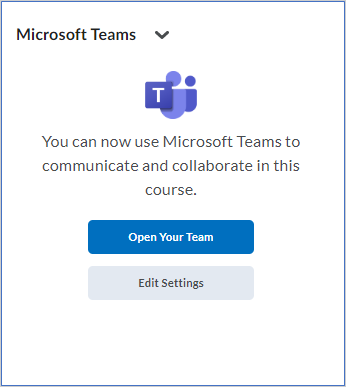
Figure: After the course is synchronized, click Open Your Team, or further edit the settings.
After a Team is synchronized, the main panel allows the operator to navigate to the Team or to adjust the settings. If there are multiple Teams, the panel shows all the Teams available to this user.
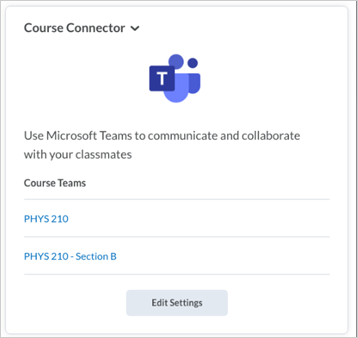
Figure: Select the Team with which you want to interact.
View the message count for Teams in the Course Connector widget
Instructors can view the message count for each connected Team in the Course Connector widget. Message counts indicate the number of new messages posted to the Team for the configured time span.
Administrators can set how far back message counts are retrieved, up to 72 hours (the default setting is 24 hours). This feature is useful for instructors as it provides a quick overview of Team activity, allowing you to monitor student engagement and participation in course discussions.
To retrieve the message count, the Course Connector widget must first receive permission from Microsoft Teams. This requires providing consent to allow the connector to access message data. When the message count feature is initially enabled, a consent message and corresponding link appears in the widget. You can revoke consent you previously provided for this feature at any time.
To provide consent to view message counts in the Course Connector widget:
- In the Course Connector widget, click here in the following message text: To view message counts, provide consent here.
To revoke consent to view message counts in the Course Connector widget:
- Access Microsoft's Edit or revoke application permissions in the My Apps portal page.
- Follow instructions as required.
Edit the message count visibility in the Course Connector widget
If the feature is enabled, instructors can manually control whether the message count is displayed or hidden within the Course Connector widget at any time.
To set the message count visibility in the Course Connector widget:
- Navigate to the Course Connector widget on your course homepage.
- Click the drop-down menu for the groups or sections you want to edit.
- Select Mute or Unmute as required.
Edit settings in the Course Connector Widget
You can edit the following settings in the Course Connector widget:
- Create a Team for each section: To assist with course organization in Brightspace, instructors can separate their students into sections. Selecting this feature creates a separate Team for each section and rosters those Teams with learners from the section. The rostering is synchronized periodically. Instructors are members of every Team. Learners who are members of multiple sections become members in multiple Teams. Course Connector always creates a primary Team linked to the course, and then creates one Team for each section. (The format of the Team name is managed by administrators.) After the Teams are created, the Course Widget displays a list of links to available Teams. The instructor or learner can select the link to navigate to that Team. If a course section has a related Team and the section is deleted, the ‘Course Cleaning Waiting Period’ rules dictate what the Microsoft Course Connector will do with the connected Team.
- Learners can create new private channels: Users with learner roles can create private channels. This option is only visible if the administrator allows this configuration through the administration panel in the ShuffleExchange tool.
- Create Team for groups: To assist with course organization in Brightspace, instructors can separate their students into groups which are organized by category. Instructors can select individual categories and Course Connector will create Teams for each group within that category. The rostering is synchronized periodically. Instructors are owners of every Team that is created. Learners who are members of multiple Brightspace groups become members in multiple Teams.
- Automatically add instructors to all channels: Selecting this option ensures that instructors have access to all channels. This option can be changed after the Team is created, and the change is implemented at the next sync activity. If a Team owner accidentally removes an instructor, the next sync activity re-adds any owners based on the value of the option. Changing this option to the non-default (not automatically add) will not remove instructors from any existing channels. Once the course is created, the Course Connector widget displays links to navigate to Microsoft Team(s). If sections are mapped to Teams, a link appears for the primary Team and for each Team for which the user is member of the associated section. If any settings are edited, synchronization changes update during the next regularly recurring synchronization event (usually within the next 24 hours.)
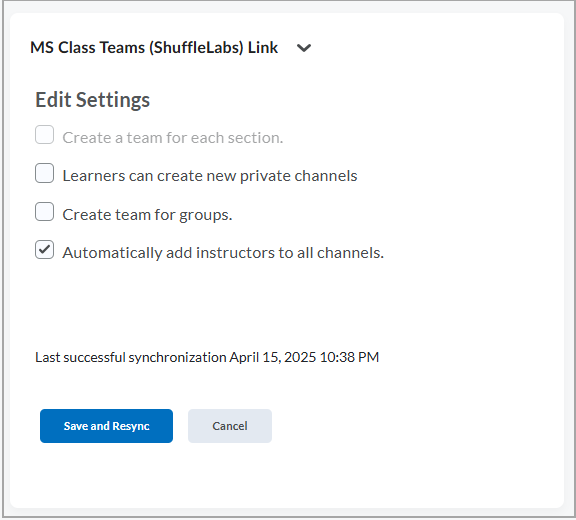
Figure: Choose the applicable options for your implementation from the Edit Settings panel. The settings may differ depending on Global options.
To edit settings in the Course Connector widget:
- Navigate to the Course Connector widget on your course homepage.
- Click Edit Settings.
- Select the check boxes for the setting options you want to enable or disable.
- Click Save and Resync.

|
Note: The Save and Resync action forces the Course Connector to perform a full course synchronization using the current settings. This action is not immediate. It is scheduled for execution and will take a few minutes to complete. This action is useful if the student roster changes or there are changes to the group or sections of a course. |
Error Reporting on First Synchronization
If any errors occur after the first synchronization, they are reported within the Course Widget.
Errors are listed only for the first synchronization, and they do not persist if the screen is refreshed. The administration panel in the ShuffleExchange tool displays all errors on the initial and subsequent synchronizations.
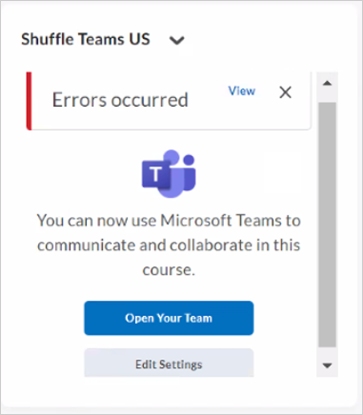
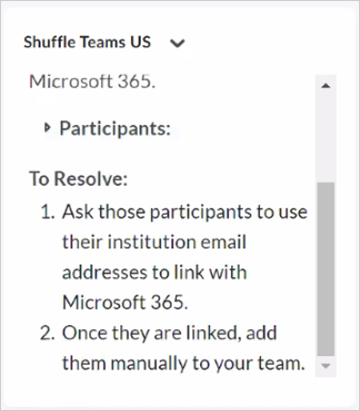
Figure: Error report after first synchronization. The error may reference a list of users. Click the participants drop-down to expand the list to view the users.
Office 365 IP Trust List
Microsoft 365 environments may reject requests made by the ShuffleExchange platform due to an unrecognized IP address.
To troubleshoot an unrecognized IP address, add the ShuffleExchange IP address range to your Microsoft 365 environment. For security reasons, contact D2L support or your account representative for further support.
Manage settings and connected courses in the ShuffleExchange Administration Panel
Operators will use the Administration Panel to manage settings, manage synchronized courses, and to perform validation.
Dashboard Tab
The Dashboard tab lists all the synchronized courses. You can search for specific courses in this list, and you can perform two actions on individual courses.

Figure: Review the Course Identifier, Course Name and details about synchronization for each course.
Course Status
The Course Status column can take on the following values:
| Status |
Description |
| Error |
The Team creation failed. |
| Pending |
Course creation is currently happening or scheduled to happen. |
| Completed |
The course is created and is synchronizing. |
Sync Enabled
The Sync Enabled column indicates if the ShuffleExchange connector is attempting to synchronize a selected course. This value is true until there are ten consecutive sync failures. After ten consecutive failures the synchronization attempts stop. A successful manual resynchronization returns this field to true and the Course Status field to Completed.
Failed Count
The Failed Count field shows the number of consecutive failed synchronizations attempts since the most recent successful synchronization event. Without any other manual intervention, the system performs one synchronization attempt per day.
Last Sync Status
The Last Sync Status column indicates the status of the most recent synchronization attempt. It displays one of the following values:
| Status |
Description |
| Pending |
The sync is currently happening. If it doesn’t change to COMPLETED, there may be a sync error. |
| Completed |
The most recent synchronization was successful. |
The Last Sync Details column may include additional details about a recent synchronization attempt.
Actions
Resynchronize Course: Manually synchronize a Course to the Team.
Delete Synchronization Connection: Delete the course connection in Course Connector.
Important: Delete Synchronization Connection does not modify the Team or the course. If you have deleted the connection, there are two ways to recreate the connection. (a) delete the corresponding Microsoft Team and return to the Course Widget to create a new Team, or (b) raise a support ticket with ShuffleLabs to re-connect the Course with the original Team.
Settings Tab
The settings in this tab are located in the Integration Settings section on this page.
Test Tools Tab
Administrators can validate their set up using the Test Tools tab on the ShuffleExchange Platform.

Figure: Validate your setup using the ShuffleExchange Test Tools.
Access Test: Run this tool to confirm that the Valence API settings are correct. A dialog box informs the user that the settings are correct and the tool can connect to, or the settings are incorrect.
Class Tests: Run this tool to confirm that the Course Connector is connected to the corresponding Teams class. The Check Instructors option checks that instructors are present in this class, and the instructor account is valid in Office 365.

Figure: A verification message indicates if the course is accessible. Click OK to dismiss the message.
Email Tests: Run this tool to confirm that this user is configured in the Microsoft Office 365 Environment. You can enter the email or the UPN of the user. A dialog box provides the results of the test.
Limitations
There are several limitations imposed by Microsoft Teams:
- There are limitations on the number of Teams that may can be created.
- If you select delegated permissions, you can create a maximum of 1,000 Teams and a maximum of 250 Team members.
- If you select Class Teams application permissions, the system creates the Teams, rather than a delegated user account. There are no limits on the number of Teams or numbers of Team members.
- If a Team is archived, members continue to be part of that Team. To remove the membership, either unenroll the user, or delete the Team.
- Currently. you can create a maximum of 30 private channels per Team and each private channel may enroll a maximum of 250 members.
Validate the Brightspace Course Connector Settings
Administrators can validate their setup using the Test Tools tab on the ShuffleExchange Platform.

Figure: Run the ShuffleExchange test tools to verify your setup.
The following tests are available:
-
Use the Access Test to confirm that the Valence API settings are correct. A dialog box displays that indicates whether or not the settings are correct and the tool can connect to Microsoft Office 365.
-
Use Class Tests to confirm that the Course Connector is connected to the corresponding Teams class. The Check Instructors option verifies that an instructor is present in the class, and the instructor account is valid in Office 365.

Figure: Use the Verification information to confirm that the valence credentials are valid.
Upgrade Brightspace Course Connector
- Log into the ShuffleExchange platform.
- From the environment selector in the upper right corner of the screen, select the environment to upgrade.
- On the left navigation pane, click Settings and then click Connect.
- A Microsoft 365 global administrator must grant consent to install the new Brightspace Teams Course Connector application.
- Once the application is installed, click Save.
- Repeat the above upgrade steps for each environment in your ShuffleExchange account.
- Once all upgrades are complete, a Microsoft 365 administrator can safely uninstall the following:
- ShuffleTeamsApp (the previous version of the Course Connector application).
- The previously created Microsoft 365 service user.

|
Note: The user should have permissions to give tenant wide consent to the Brightspace Course Connector application. The Microsoft documentation (Grant tenant-wide admin consent to an application - Azure AD | Microsoft Docs) indicates: Granting tenant-wide admin consent requires you to sign in as a user that is authorized to consent on behalf of the organization. This includes Global Administrator and Privileged Role Administrator, and, for some applications, Application Administrator and Cloud Application Administrator. A user can also be authorized to grant tenant-wide consent if they are assigned a custom directory role that includes the permission to grant permissions to applications. |
When authorizing as an administrator you are providing permissions to the Graph API for:
- Create Teams
- Add and remove members from all Teams
- Read and change all Teams settings
- Read tabs in Microsoft Teams.
- Create tabs in Microsoft Teams.
- Create groups
- Read directory data
- Sign in and read user profile
Troubleshooting recommendations
The Brightspace-Microsoft Teams Course Connector (MTCC) integration allows users to connect their Brightspace instance with Microsoft Teams, enabling seamless collaboration and communication between the two platforms. However, there may be instances where the integration fails to connect successfully. This documentation section provides troubleshooting steps to help you resolve any issues you encounter during the setup process.
If you encounter any of the following images while trying to connect the MTCC widget, please refer to the troubleshooting steps below.
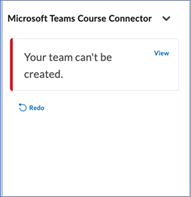
Figure: The error message when a Team cannot be created.
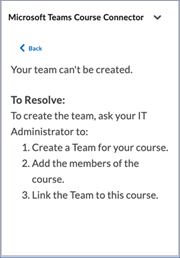
Figure: An error message with steps to resolve the issue.

Figure: Error message for a failed connection.
Troubleshooting steps
- Ensure Proper Setup: Before troubleshooting any issues with the integration, it is essential to ensure that you have followed the setup steps accurately. To confirm this, go through the following checklist:
- Double-check Credentials and Permissions: Confirm that you have entered the correct credentials and have the necessary permissions to connect Brightspace with Microsoft Teams.
- Make sure you have the appropriate access rights granted by your organization. If you are unsure about your permissions, consult with your organization's IT administrator or Microsoft administrator for verification.
- Review App Setup: The configuration settings for the MTCC play a crucial role in the successful integration with Microsoft Teams. It is essential to review and verify the following settings:
- API Key: Ensure that you have entered the correct API key during the setup process. A minor typo or incorrectly entered character in the API key can hinder the Course Connector from configuring correctly. Refer to the API key provided by your Brightspace administrator and confirm its accuracy.
- Organization URL: Verify that the organization URL entered for the MTCC is accurate. Any discrepancies or incorrect URLs will prevent the integration from establishing a connection. Make sure to enter the full URL of your organization's Brightspace instance.
- Configuration Settings: Review all other required information and configuration settings for the MTCC. Ensure that you have entered them correctly according to the guidelines provided during the setup process. Check for any typos or errors in these settings that may impede the integration.
- Restart the Setup Process: If you have verified the above steps and are still experiencing issues with the MTCC integration, restarting the setup process might help resolve the problem. Follow these steps to restart the setup process:
- Disconnect the Integration: Within the Microsoft Teams interface, navigate to the Apps section and locate the Brightspace Course Connector. Disconnect the integration from Microsoft Teams by removing it from the list of installed apps.
- Restart the Setup: Access the Brightspace administrator interface and initiate the setup process for the MTCC again. Follow the provided instructions carefully, ensuring that you enter the correct information and complete all steps accurately.
- Test the Integration: Once you have finished the setup process, it is important to test the integration to ensure it is configured properly. To do this, navigate to the Test Tools tab on the ShuffleExchange admin site. Look for the blue Test Valence button and click on it to verify that the connection has been successfully established. If you encounter a message stating 'Trouble! Valence credentials are not valid, please reconfigure,' the tool is indicating that there is an error within the configuration setup phase. In such cases, you should review the configuration settings to ensure the credentials are entered correctly. If the issue persists even after double-checking the configuration, it is recommended to seek further assistance from technical support. They will be able to provide expert guidance and help troubleshoot the problem effectively.
Additional Resources
Refer to the following resources for more information:
Release Notes
Subscribe to Brightspace Release Notes Updates to ensure you receive notifications for new updates. You can also view What's new in Microsoft Teams .
Looking for Help?
Contact your Account Manager for questions about:
- Purchasing Brightspace Course Connector for Microsoft Teams
- Account Set Up
- Billing
Contact D2L Support if you need technical support related to the integration to Brightspace.
Contact Microsoft Teams help and learning if Brightspace Course Connector for Microsoft Teams is not functioning as expected.