From Manage Extensibility > Apps, you can view installed and manually created apps, manage their configurations, deployments, external learning links, and review activity logs.
View Brightspace App activity logs
Use activity logs to track the status and history of management tasks for your apps, such as when an app is enabled, disabled, or when a new deployment is created.
To view app activity logs
- To open Brightspace Apps, from Admin Tools, select Manage Extensibility > Apps.
- To open the app, select Manage for the app you want to review.
- To open logs, select the Activity Logs tab.
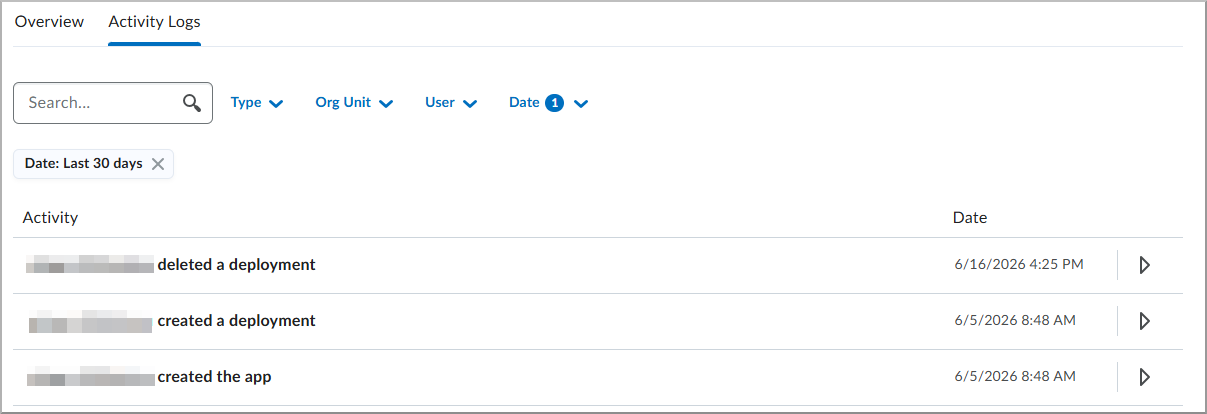
- To filter logs, do one or more of the following:
- Select a Type.
- Select an Org Unit.
- Select a User.
- Select a Date range. By default, the log includes the last 30 days.
- To review details for an activity, in the Activity list, select the right-facing arrow to expand the log.
Create and manage external learning links
While most LTI links are created automatically through the simplified installation flow, you can manually create organization-level links for specific tool deployments. This provides direct access to external learning tools across multiple courses or specific org units from a single management view based on the deployment sharing rules.
You can customize or create new links for use in the org units available to the deployment. Users with the required permissions can create individual links at the org level where the tool is deployed. In cases where a tool requires multiple LTI links per course or across many courses, the tool can provide a deep linking workflow to help users create links quickly.
All previously supported link types are available in Brightspace App with LTI.
To manage external learning links
- To open Brightspace App, from Admin Tools, select Manage Extensibility > Apps.
- To view available links, select Manage for the app.

- To open deployment links, in the Deployments section, select Manage Links.
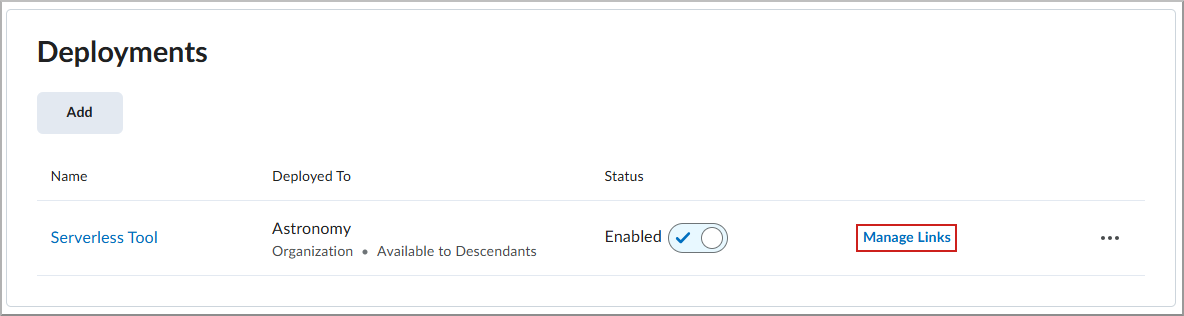
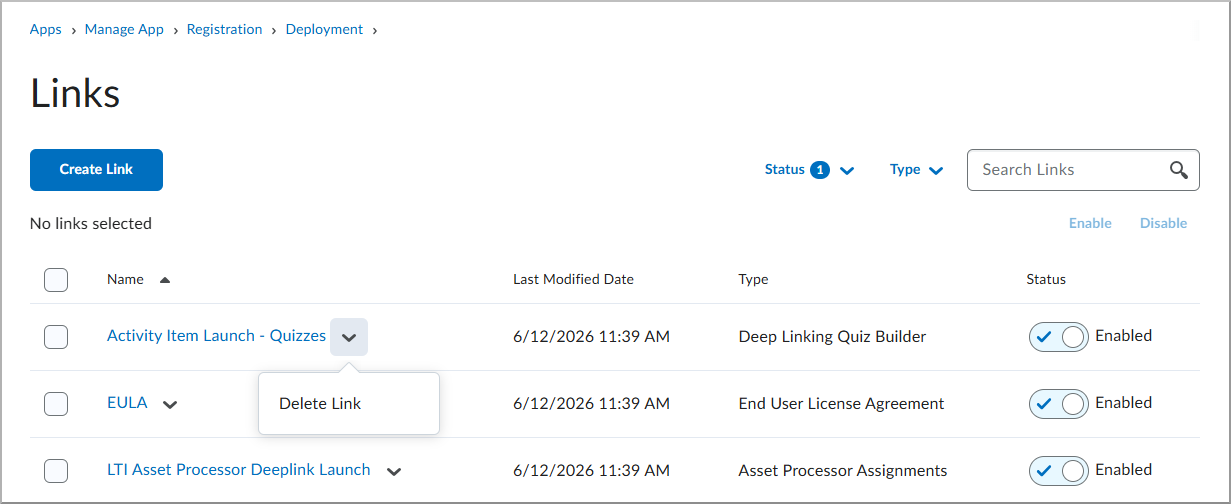
- From the Links page, do one or more of the following:
- To create a link, select New Link.
- To edit a link, select the link name.
- To delete a link, select the action menu next to a link, and then select Delete Link.
- To search links, use the search field at the top of the page.
- To control link availability without deleting the link, toggle the Enabled status.
To create new external learning links
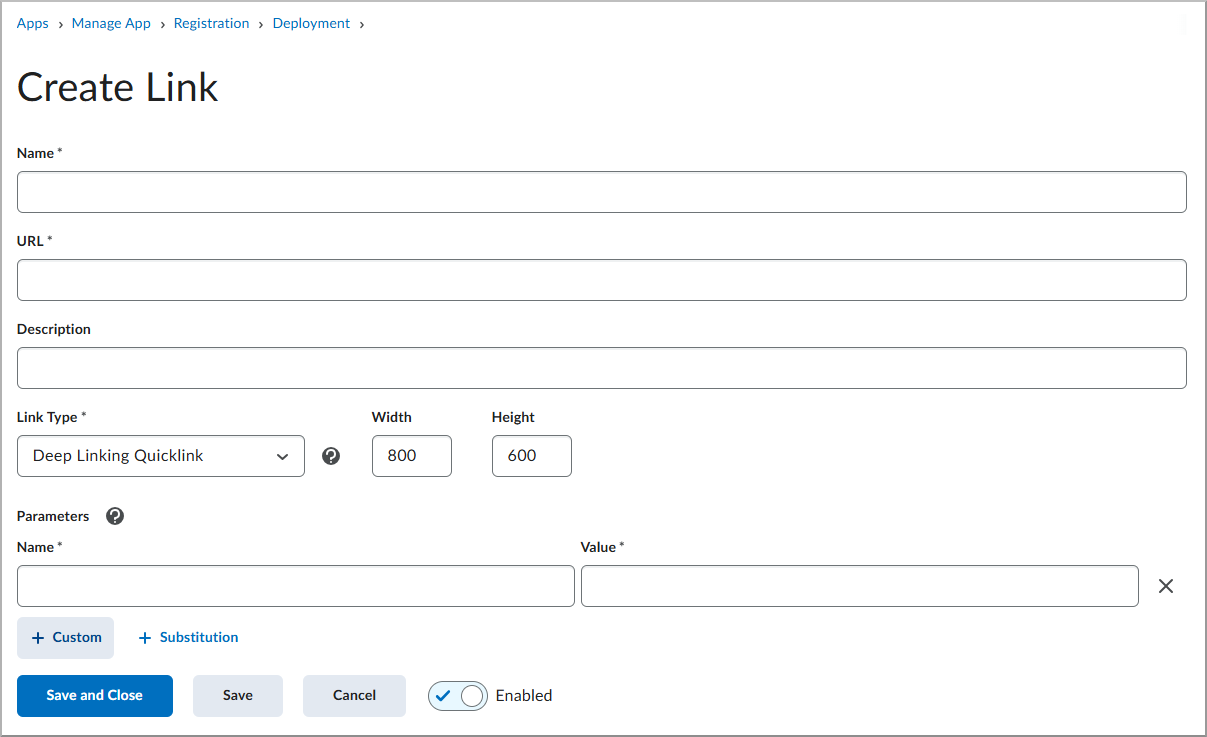
- To create a link, select Create Link.
- To configure the link, specify the following fields on the Create Link page:
- Name: Enter the name that appears in other areas of the Brightspace interface.
- URL: Enter the launch point URL where users navigate when they select the link.
- Description: Enter an optional description to help users understand the tool.
- Type: Select how the link can be used. The following types are available:
- Asset Processor Assignments: Supports deep linking to a processor tool through Assignments.
- Basic Launch: Supports a basic launch to a tool. For deep linking, change this to one of the supported deep linking selector types.
- Deep Linking Insert Stuff: Supports deep linking to a tool as a content selector in the Insert Stuff Brightspace Editor area.
- Deep Linking Quicklink: Supports deep linking to a tool through a quicklink in Content > Existing Activities.
- Deep Linking Quiz Builder: Supports deep linking to a tool in Quizzes, allowing users to select items with a link in a quiz.
- End User License Agreement: Supports a basic launch to an external processor tool in Assignments. There should only be one link of this type per deployment.
- Widget: Supports a basic launch from a widget to a tool. The tool provider dictates the plugin used.
- Width and Height: Specify the size of the iframe that Brightspace opens when users select content and browse the tool interface.
- Parameters: Do one or more of the following:
- To select dynamically substituted parameters from Brightspace at launch, select Substitution. Brightspace supports the following parameters:
$Activity.id.history$Activity.title$Activity.available.startDateTime$Activity.available.endDateTime$Activity.submission.endDateTime$Context.id.history$CourseOffering.sourcedId$CourseOffering.title$CourseSection.label$CourseSection.sourcedId$CourseSection.title$CourseSection.timeFrame.begin$CourseSection.timeFrame.end$CourseTemplate.sourcedId$CourseTemplate.title$Person.address.timezone$Person.email.primary$Person.name.family$Person.name.full$Person.name.given$Person.sourcedId$ResourceLink.available.startDateTime$ResourceLink.available.endDateTime$ResourceLink.description$ResourceLink.id.history$ResourceLink.submission.endDateTime$ResourceLink.title$User.id$User.username
- To define static name/value pairs required by the tool, select Custom, and then enter the custom parameters.
- To make the link active, set the toggle to Enabled.
- To save the link, select Save and Close.
Manage deployments
You can manage, rename, update, and delete app deployments. Deleting the app deployment disables the LTI deployment in External Learning Tools > LTI Advantage.
To enable or disable app deployments
- To open Brightspace App, from Admin Tools, select Manage Extensibility > Apps.
- To open the app, select Manage for the app you want to manage deployments for.
- Use the toggle in the Status column to Enable or Disable a deployment.
To change a deployment
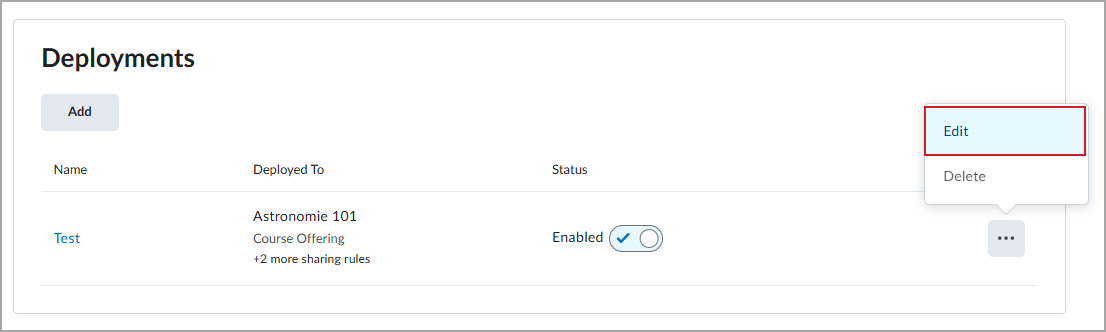
- To make changes to a deployment, Under Deployments, click more options and then Edit.
- Make changes to the fields as needed. The available fields depend on the app configuration. You can always update the following fields:
- Deployment Name: Type into the text box.
- Status: Select the checkbox to enable the deployment, or clear the checkbox to disable it.
- Available To: Click Add Org Units, select the org units, and then click Insert to specify where a deployment is available. To remove an org unit, click X.
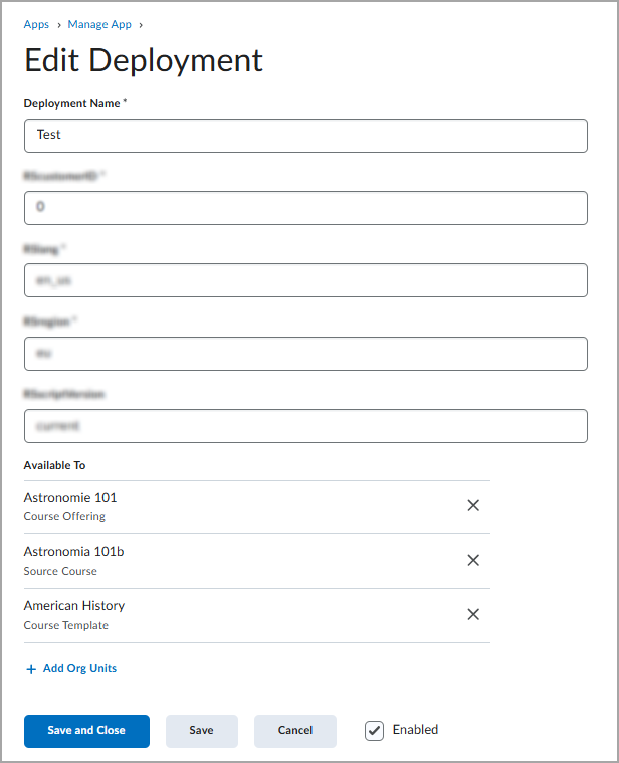
Click Save and Close
To create a new deployment
- To create a deployment, under Deployments, select Add.
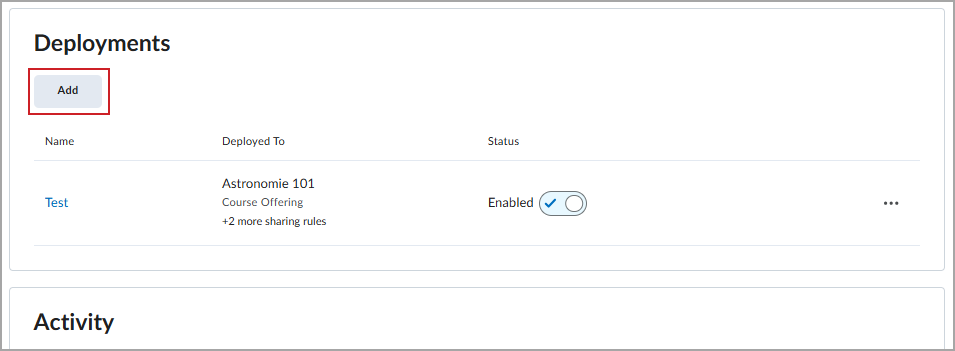
- To configure the deployment, complete the following fields in the Create Deployment dialog:
- Deployment Name: Enter a descriptive name for the deployment.
- Extensions: Select the LTI services required for this integration, such as Assignments and Grades.
- Information to Share: Select the user and context information to share with the tool provider for apps with LTI.
- Configuration Settings: Toggle options for opening in a new window or grade item creation, as needed.
- Custom and Substitution Parameters: Add any name/value pairs required by the tool provider to identify your account or set preferences.
- To define where the deployment is available, select Add Org Units, and then select specific courses, departments, or the entire institution.
- To make the deployment available to users, toggle the switch from Disabled to Enabled.
- To save the deployment, select Save or Save and Close.

|
Note: The deployment name appears in the External Learning Tools list and on the Asset Processor card if the tool supports Asset Processor. The deployment name also appears in the External Tool Activity menu when instructors add LTI quicklinks.
Custom and substitution parameters cascade from the registration to the deployment and links as inherited parameters.
|
To delete a deployment
- To delete a deployment, under Deployments, click more options and then Delete.
- In the confirmation dialog, click Delete.
- The deployment is deleted and no longer appears in the list.
|
Note: For Brightspace partners, every app must have a default deployment. You can change which deployment is designated as the default, but an app must always have one. The default deployment cannot be deleted. In the Deployments list, the default deployment is identified by the Default tag. When you open the deployment, an information message indicates that it is the default deployment. |