Due dates and end dates
A due date is the submission deadline of an assignment in your course. This date is specific to assignments only.
End dates are attached to assignments. The end date is the final date an assignment is available for you to submit to, regardless of the due date. Once the end date of the assignment is past, you are no longer able to submit, no matter what the assignment's due date is.
You can check these dates and date settings on the Assignment List page. The hover tooltip includes the information about start and end dates with settings to explain how the assignment appears before and after these dates.
Submit an assignment
The Assignments tool enables you to submit assignments in Brightspace, eliminating the need to email your work to instructors.

|
Note: Your instructor controls what file types and extensions are permitted for an assignment submission. Before submitting your assignment, confirm on the assignment submission page in the section Allowed File Extensions what file types can be submitted. |
Review the permitted file extensions on your assignment submission page.
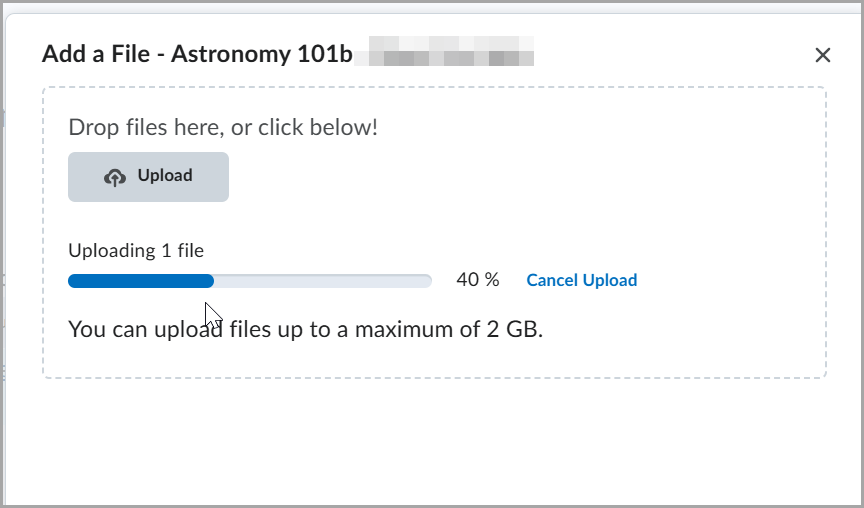
A progress bar indicates that your file is uploading.
The Assignment submission page includes a Show Assignment Information drop-down section that, depending on your course settings, reveals details about the assignment such as:
- Rubrics which are used to evaluate your work
- Learning outcomes that your assignment will be assessed against
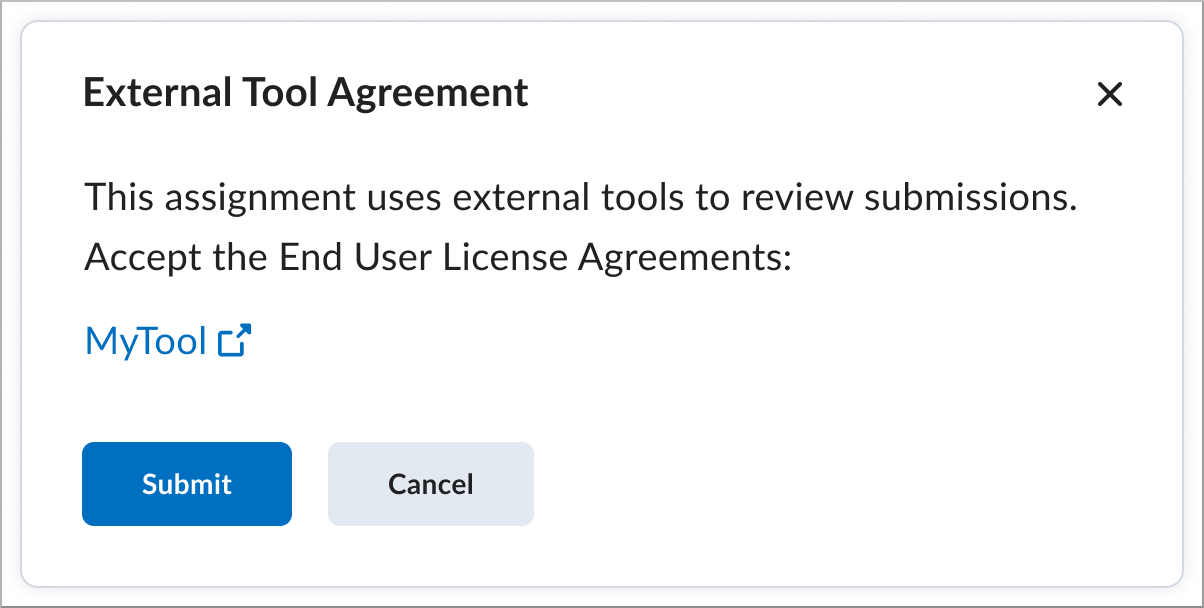
- Integrated external tools that can review your submission and generate reports assessing originality, grammar, AI use, and more. If available, End User License Agreements (EULA) for these tools appear as a link here. In these cases, you can click the link and accept the EULA before submitting your assignment.
- When you submit an assignment without accepting a EULA, a confirmation modal appears.
 | Note: If you submit an assignment without accepting the EULA and the processor requires acceptance, an error message may appear, indicating that the EULA has not been accepted. |
- You can submit assignments without accepting a EULA, but reports from these tools may not be available to you until you accept. You only need to accept the EULA once per tool and will not be required to accept it again for every assignment submission.
To submit an assignment
- From the navbar, click Assignments.
- On the Assignments page, click on the assignment you want to submit to.
- Follow the assignment instructions, and do one of the following:
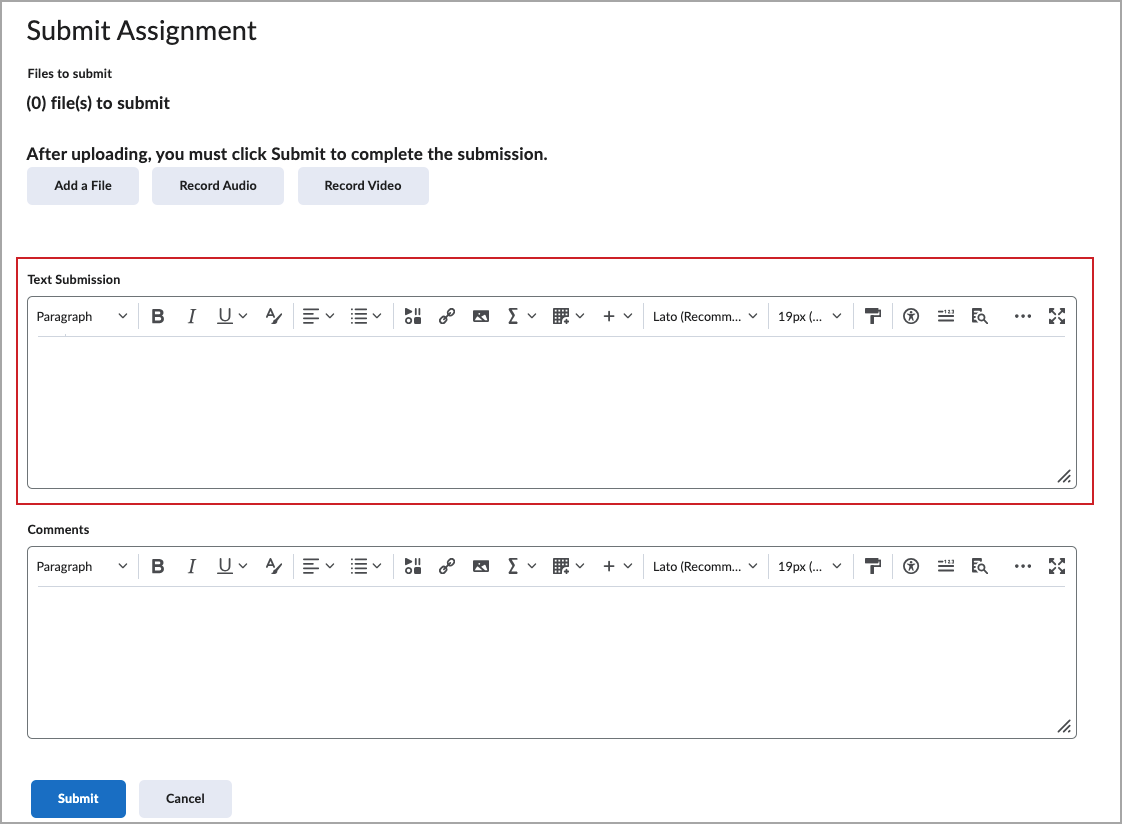
- Type your assignment directly in the Text Submission field. When you finish your written response, click Submit.
 | Note: Text submissions have a character limit of 1,048,576 characters. |
- To browse for the file you want to submit, click Add a File. Select the files from your local computer or storage device, a personal locker, a group locker, or Brightspace ePortfolio, and then click Add. Enter any comments you want to submit with the file. Click Submit.
- Some assignments let you choose between file and text submissions. You can upload your assignment file, type your assignment directly in the Text Submission field, or submit a file and add extra information in the Text Submission field.
- You can select Record Audio to add feedback. When you finish a recording, click Add. Enter any comments you want to submit with the file. Click Submit.
 | Important: - If you try to upload a file with an unsupported extension, Brightspace tells you what to fix. When fewer than seven types are restricted, you’ll see the exact allowed extensions; with seven or more, you’ll see a simplified message.
- You can review allowed file extensions on the submission page, and Activity Display highlights any files that aren’t allowed (including files with no extension or when multiple unsupported files are uploaded).
|
If your instructor enabled e-rater ® Grammar feedback, to view grammar feedback on your assignment, on the Submission History page, click the View e-rater® grammar feedback link in the Inline Feedback column.- If your assignment allows multiple submissions, you can incorporate any grammar feedback and resubmit your assignment.

|
Notes:
- If the assignment is Turnitin enabled, the file you submitted is pre-validated at the time of submission to ensure it is within the Turnitin file type and size requirements.
- If you are submitting on behalf of a group, the submission appears for all members of the group. Any feedback is also visible to all group members.
- If Online Grading or Similarity Report has been enabled, you can view your Submission ID within your Submission History page.
- Depending on your course settings, you may be able to view any rubrics that are used to evaluate your work directly on the submission page.
- If you need to find or cannot access your assignment dropbox, contact your instructor.
- If you have questions on how to complete your assignment, contact your instructor.
|
Submit an assignment using the New Content Experience
You can submit assignments directly in Content without navigating to other course tools.
To submit an assignment using the New Content Experience
- Navigate to Content.
- Click on your module and then click on your assignment.
- In the My Work section, add a file from your device or personal drive.
- In the Comments section, add any additional information for your instructor.
- Click Submit.
Your assignment submission appears in the My Work section of your assignment module. You can revisit this section at any time to view your assignment.
View an assignment
From the Assignments tool, click on the assignment you want to submit to.
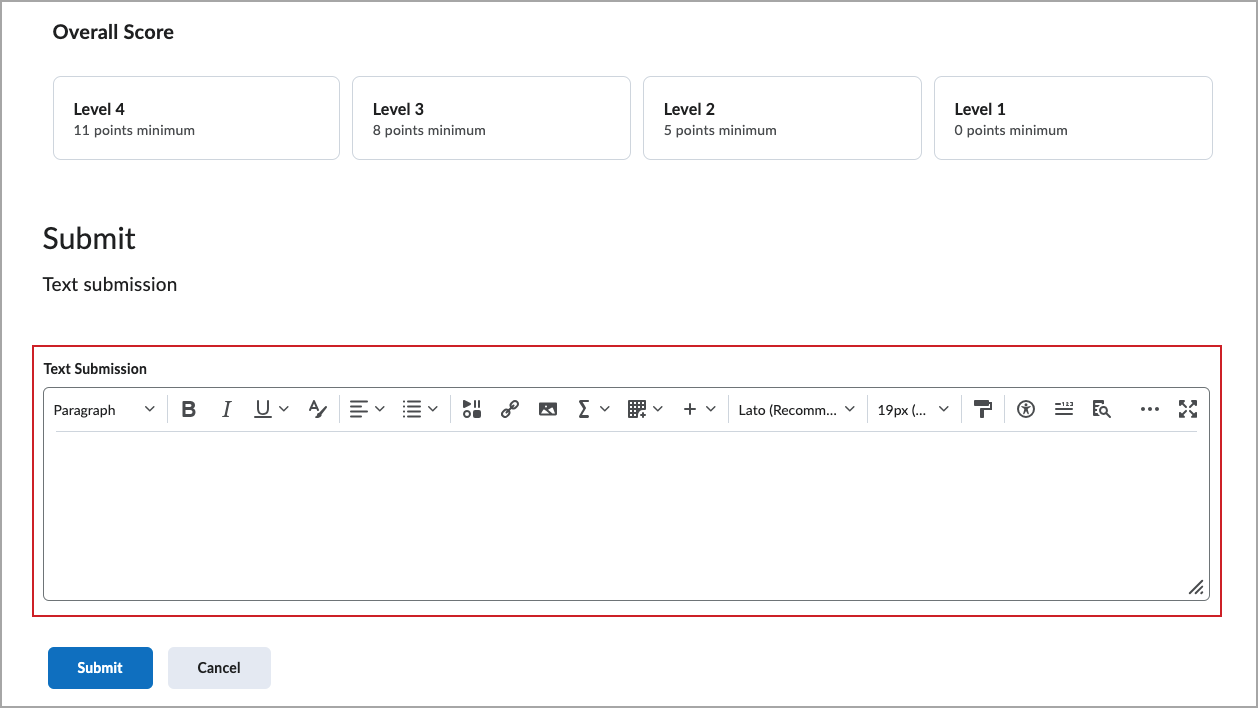
Make a Text submission
- Type your assignment directly in the Text Submission field.
- When you finish your written response, click Submit.
Make a File submission
- To browse for the file you want to submit, click Add a File. You can attach files from your local computer or storage device, a personal locker, a group locker, or Brightspace Portfolio.
- Enter any comments you want to submit with the file.
- Click Submit.
Add an audio or video submission
- Click Record Audio or Record Video.

|
Note: Allow your browser to access your microphone and webcam. |
- To upload an audio or video file from your device, click Upload File > Choose File.
- Click Add.
- Enter a Title, Description, and Audio Language for your recording or file. Click the Automatically generate captions from audio checkbox to enable closed captioning for your file.
- Click Add.
- Enter any comments you want to submit with the recording or file.
- Click Submit.

|
Notes:
- To edit or delete an assignment after submitting it, contact your instructor.
- If your enabled e-rater ® Grammar feedback, to view grammar feedback on your assignment, click the View e-rater® grammar feedback link in the Inline Feedback column on the Submission History page. If your assignment allows multiple submissions, you can incorporate any grammar feedback and resubmit your assignment.
- If the assignment is Turnitin enabled, the file you submitted is pre-validated at the time of submission to ensure it is within the Turnitin file type and size requirements.
- If Online Grading or Similarity Report is enabled, you can view your Submission ID in your Submission History page.
- Depending on your course settings, you may be able to view any rubrics that are used to evaluate your work directly on the submission page.
|
Video: Resubmit assignments
Edit or delete an assignment submission
When a file is successfully submitted to an assignment folder, you can’t delete it. However, if you have the permissions to make another submission, re-submit the file and make sure to also contact your instructor to let them know about your re-submission.
To re-submit an assignment submission
- Navigate to the Assignments tool in your course.
- Click on the assignment folder where you would like to edit or delete a submitted file.
- Click Add a File to add another file to the assignment folder.
- Enter any comments you want to submit with this new file.
- Click Submit.
- Contact your instructor directly to inform them of your resubmission.
If you do not have the ability to make another submission, contact your instructor and let them know that you would like to re-submit a file to the affected assignment.
Troubleshooting Assignments
You might occasionally experience a problem when attempting to upload your assignment file. This section provides you with the errors you might encounter when uploading your assignment and troubleshooting solutions.
Assignment unable to be submitted or resubmitted
There are multiple reasons for why you may not be able to submit an assignment. You may not be able to submit an assignment for the following reasons:
- The end date has passed and your instructor has disabled late submissions.
- Access is restricted for your assignment. This could be because your instructor has only made the assignment available for a specific start and end date or you must complete other course activities, like a quiz or view content, before being able to submit your assignment.
- Your instructor has turned off the assignment's visibility and made it hidden for learners.
- You are not uploading the correct file type or including specific details for your assignment. For more information about assignment and uploading errors, refer to the latter parts of this topic.
- Your instructor only allows one submission for the assignment, so you cannot resubmit your assignment.
- You require special access to submit the assignment.
If you cannot submit or resubmit your assignment, contact your instructor and ask them to perform the necessary steps to allow assignment submission.
File upload errors
If you try to submit a file assignment using a file type that isn’t allowed, Brightspace displays an error message to help you correct the issue.
Why your file might be rejected
An assignment can restrict which file types are allowed. If you upload a file with an unsupported file extension, your submission cannot be completed.
Depending on how the assignment is configured, you may see one of the following messages:
- If only a few file types are restricted, the message lists the file extensions you are allowed to submit.
- If many file types are restricted, the message indicates that only allowed file extensions can be submitted.
Check the Allowed File Extensions
For File submission and File or text submission, you can review the list of Allowed File Extensions before submitting your work. Use this list to confirm that your file type is supported.
Feedback in Activity Display
After uploading files, Activity Display highlights any files that are not allowed:
- Files with unsupported file types are clearly identified.
- If a file has no file extension or its type cannot be detected, Activity Display indicates that the file type is not submitted and only allowed file types can be submitted.
- If multiple unsupported files are uploaded, Activity Display groups the not allowed file types to make it easier to review.
Remove unsupported files and upload a supported file type before submitting your assignment.
Assignment is not available or cannot find assignment
Assignments often have start and end dates that control when an assignment is available or visible. Instructors can also control whether an assignment is visible or not for learners when they create the assignment. If you are supposed to be able to access and view your assignment but you can't see it, contact your instructor and ask them to make the assignment available.
If you are having trouble locating your assignment, access the module related to your assignment in the Content tool. If you still can't find your assignment, navigate to the Assignments tool and search for your assignment name. If your assignment is not available in the Assignments tool and should be, contact your instructor.
Error: Field is required. Select at least one file to upload.
You will receive this error message when you click Add before your file gets completely uploaded.
To resolve this, wait until the green loading bar on your file name has finished loading and click Add.
Error: This file extension is not allowed
When you attempt to upload a file submission for an assignment of a file extension type that the instructor restricted, an error message appears.
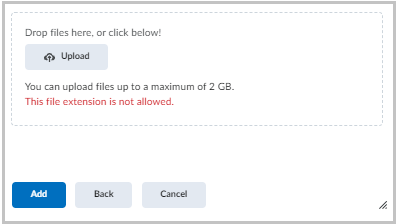
To resolve this, before uploading a file, review the allowable file types listed on the Submit Assignment dialog and upload only the allowable file type.
Error: Oops, your file could not be uploaded
The cause of this error message may be due to an invalid file name, network issues, or if the file that is being uploaded is beyond the file upload limit.
To troubleshoot and resolve this issue, check the following:
File name. Your file does not upload when:
- The file name contains illegal characters. The file name should not contain illegal characters. Rename your file and try uploading again. Some examples of illegal characters are: \ / : * ? " < > | ~ # % & + { } -
- The file name is too long. We recommend that you keep the file name under 120 characters.
File size. The File Upload function in Brightspace supports up to 2GB per file, depending on your organization’s settings.
To reduce the file size
- If your file contains images, you can reduce the resolution or size of the images.
- If your file contains many pages, try splitting this into two files. For example, in a presentation, you can create one file for slides 1-5 and one file for slides 6-10.
Internet connection
The file uploader in Brightspace uploads files in 10MB chunks. If one 10MB chunk takes longer than two minutes to upload, the upload process times out and your file will not continue to upload.
Your upload speed depends on your Internet connection.
- Always upload files using a wired Internet connection rather than wireless whenever possible.
- If you have access to a faster network, upload from this network (For example, Home, on campus).
To check your Internet connection speed
Go to an Internet speed test site and test your i=Internet speed.
Your upload speed determines how fast your file uploads. Along with the overall size of your file, a larger file takes longer to upload. Although there is no minimum Internet connection speed necessary to use Brightspace, the better your upload speed, the faster your files will upload.
Upload the correct file
When you save a file in Microsoft Office, like a file called assignment.docx, you may find two files saved on your computer: assignment.docx and ~$assignment.docx.
This is because Office creates both a temporary file and the document file, where the temporary file begins with ~$. Ensure you are uploading the actual document instead of the temporary file as the temporary file will not open and contains no data.
Error: Unavailable Quicklink
You may encounter this error when you click the assignment submission folder link from the Content tool or on an announcement post.
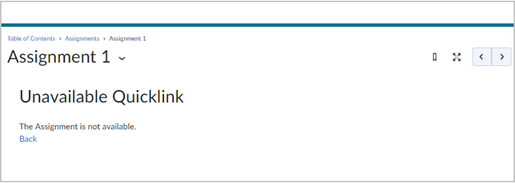
The cause of this error is if the assignment folder is not visible on the Assignments page because it may have been hidden, has a release condition, or does not exist. If the assignment is visible but grayed out, either the assignment has not opened yet or it’s already closed.
Contact your instructor for further help accessing the assignment submission folder if this is the case.
Browser issues
You may encounter an issue with uploading your assignment when the page is not loading properly, the assignment page is blank, or the page is unresponsive.
In this case, we recommend that you make sure you’re using a supported web browser. If the browser is supported, make sure it is updated.
Read more for how to update:
If updating your browser did not work, use a different supported browser, restart your computer, or clear browsing history, cache, and cookies.

|
Note: Clearing your browser history, cache, and cookies will permanently remove the your browsing history, cache, and cookies that you saved. |
Find and review feedback

|
Tip:
You can also view assignment feedback from User Progress and Grades.
|
To review feedback in Assignments:
- On the navbar, click Assignments.
- From the Assignments page, locate your assignment, and click Unread in the Evaluation Status column.
- From the View Feedback page, you can view your submission feedback, rubric assessment, and grade.
- If your instructor added annotated feedback to the assignment, click View Inline Feedback. The annotation view opens in a new tab, displaying annotated feedback using highlighting, free hand drawing, shapes, and associated commenting.
- To download the annotated assignment as a PDF, click Download.
- When you are finished viewing feedback, navigate back to the View Feedback page and click Done.
View reports from external learning tools
If your instructor has integrated external learning tools to evaluate the originality or grammar of assignment submissions in your course, you can view the reports from these tools after you submit the assignment. Reports from integrated external tools are only available for individual assignment submissions (not group assignments) and only for text and file submissions. If the tool requires an End User License Agreement to be accepted before processing submissions and you have not accepted it, your report might not be available.
To view reports from external learning tools:
- On the navbar, click Assignments.
- From the Assignments page, do one of the following:
- Click the link to your submission in the Completion Status column. This opens the Submission History page.
- Click Unread in the Evaluation Status column. This opens the View Feedback page.
- Click View in the External Tool Results column.
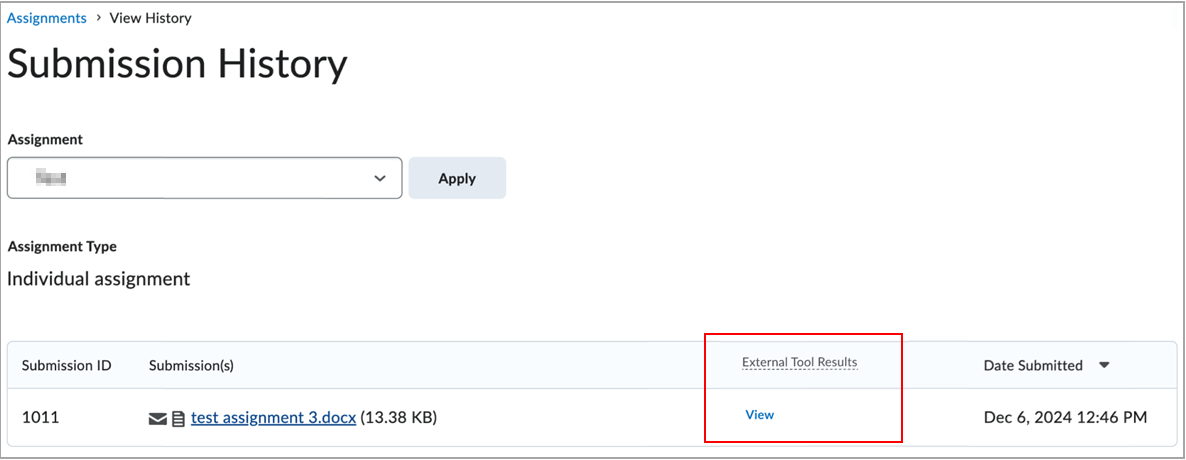
- Review the report that opens in the External Tool Results for [your name] pop-up window.
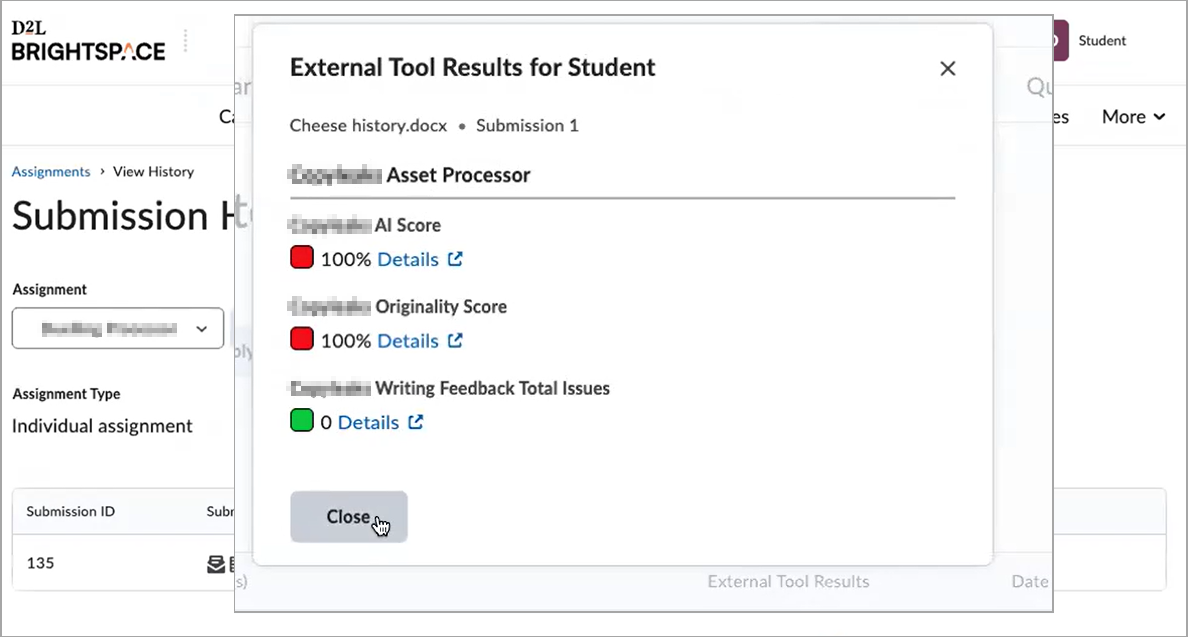
- Click Details to open and view a more detailed report in a new tab.
- When you are finished viewing the report, click Close in the External Tool Results for [your name] pop-up window.
Video: Submit and confirm an assignment submission
View Turnitin Similarity Reports
You can view Similarity Reports from the Submissions page. When a report is available, the status changes from In-Progress to a percentage rating, which indicates the level of matching content.
A lower percentage rating indicates that the content is likely original and has not been copied; a higher percentage rating indicates the content is likely not original and has been copied from another source.
The percentage ranges are associated with colors:
- Blue >= 0 and < 20%
- Green >= 20 and < 40%
- Yellow >= 40 and < 60%
- Orange >= 60 and < 80%
- Red >= 80 and <= 100%
Click the colored section beside the percentage rating to view the associated Similarity Report. The Similarity Report is comprised of two panes. The right pane lists all of the matching sources, including the percentage of text that matches and a link to the online content. The left pane displays the submission text using colored highlights to draw attention to the matching content.
Troubleshooting: I see an assignment submission showing an icon that says, "A Similarity report could not be generated for this file".
If there are no other details in the icon's message text, such as the file is not a supported type or does not include enough text, the generic error indicates an issue transferring the file to the Turnitin server. For assistance with troubleshooting, contact your instructor to contact D2L Support.