System Administrators are responsible for keeping Brightspace running smoothly during the busiest time of year.

From integration sync errors to permissions fixes, this guide gives you quick access to the most frequently used solutions.
Getting Support
- Brightspace Administrators: Please contact your institution’s help desk for support or utilize the support options available to you within your Brightspace environment.
- Approved Support Contacts: Submit cases via the ASC Support Portal (login required).
- New to D2L Brightspace? Join the Brightspace Community! You’ll find tutorials, tips, and support from peers and experts. Stay updated and get answers fast—register today!
We’re here to help you have the best possible start to your semester!
Most popular resources for Instructors getting started with Brightspace
Here are some of our best introductions to Brightspace for instructors.
Resource | Description | Link |
|---|
Introduction to Administrator Support Course | Content specifically designed for users are in the Approved Support Contact (ASC) role. | Introduction to Administrator Support |
Brightspace Certified Administrator Program | Are you an admin ready to take your Brightspace expertise to the next level? Whether you're just starting out or you're a seasoned system administrator, the Brightspace Certified Administrator Program is your gateway to getting the most out of Brightspace with confidence and earning official recognition for your skills. | Brightspace Certified Administrator Program (requires Community account) |
Getting Started with Brightspace (D2L Academy) | A list of all free downloadable resources across several D2L Academy Courses that can be accessed and downloaded for use in your own Brightspace environment. | Downloadable D2L Academy Resources |
IPSIS D2L Standard CSV Course | D2L Standard CSV is a simple, flexible method to get basic information from an outside information source into Brightspace. This course has been designed to cover topics ranging from initial development of your integration to ongoing maintenance. | IPSIS D2L Standard CSV Course |
Higher Education Instructor Knowledge Base | A centralized hub of topic-specific help articles—everything from course setup to grading, content creation, and learner engagement. | Higher Ed Instructor KB |
New Brightspace Administrator Learning Path | While aimed at administrators, this path offers valuable course configurations and environment setup tips that are beneficial for instructors too. | New Brightspace Administrator Learning Path |
Instructor Tutorials Playlist (YouTube) | A curated playlist of instructional videos covering navigation, tool usage, content creation, grading, and more—great for visual learners. | Instructor Tutorials Playlist |
SAML (Security Assertion Markup Language) Course | SAML (Security Assertion Markup Language Course) is an open standard used for authentication, which enables end users to securely access one or more web applications using a single set of login credentials. This course will cover everything you'll need to know to configure, troubleshoot, cut-over, and maintain SAML Single Sign-On (SSO) between your IdP and Brightspace. A step-by-step guide for using Brightspace export data to track instructor engagement—includes downloadable Excel templates for visualization. | Getting Started with Brightspace Data |
Getting Started with Analytics Builder | A course help you get started with D2L Analytics Builder. | Getting Started with Analytics Builder |
Most frequent start-of-term issues
This section lists the most common issues System Administrators request help with during the beginning of each Semester, with troubleshooting steps you can use to resolve or get support with each.
SIS and IPSIS
IPSIS - Troubleshooting Batch Errors
When the data doesn’t process correctly, you can use the Dashboard or Batches pages to review the error logs to help you figure out what needs to be corrected for the file to process properly. The Dashboard shows the most recent batch and the Batches page show a longer list of previous batches that have been processed.
Some of the types of errors you might see are:
- Parent org unit mapping not found
- User not found
- Org unit not found
- Org unit could not be deleted
The first three relate to IPSIS not knowing about that org unit or user: they either do not exist in Brightspace or were manually created, in which case IPSIS is unaware of them, even if they are visible in the Brightspace interface. The last error typically occurs when the org unit contains a child org unit.
IPSIS errors caused by incorrect user data, course or enrollment mappings, and batch formatting
IPSIS troubleshooting - D2L Standard CSV
Issue 1: Section creation was submitted via IPSIS, but the org unit doesn't exist in Brightspace
The section org unit was passed via Course Offering csv file instead of D2L standard csv for sections. Admins need to process the sections file via IPSIS for creating the section in Brightspace.
Issue 2: Enrollment sent via IPSIS fails silently because the user was created manually in Brightspace instead of through SIS.
IPSIS cannot enroll users it doesn't manage — the user must first appear in the IPSIS Users file for enrollment processing to succeed.
Confirm how the user was created.
Check whether the user was created manually in Brightspace (Admin Tools → Users) or through an IPSIS Users file. If created manually, IPSIS has no record of them.
Add the user to the IPSIS Users file.
Include the user in the Users CSV with the correct OrgDefinedId, username, and required fields so IPSIS recognizes them as a managed user.
Ensure the OrgDefinedId matches.
The OrgDefinedId in the Users file must exactly match what's referenced in the Enrollment file — any mismatch will cause the enrollment to be skipped silently.
Process the Users file before the Enrollment file.
Submit the Users file first so the user is registered in IPSIS, then process the Enrollment file.
Issue 3: Org unit creation fails because the parent org unit cannot be found or mapped in Brightspace.
When an org unit fails with “Parent org unit mapping not found,” IPSIS cannot find or match the parent org unit in Brightspace. The parent may be missing, may have been created manually, or may not be mapped correctly in IPSIS.
Identify the failed org unit and its parent org unit in the IPSIS batch file. Confirm that the parent org unit already exists in Brightspace and that its identifier matches the value in the IPSIS file. If the parent is missing, add it to the appropriate D2L Standard CSV file—for example, the Departments or Semesters file—and submit the file through IPSIS. Wait for the parent org unit to be created and mapped successfully. Resubmit the file for the child org unit, such as a Course Template, Course Offering, or Section. Review the IPSIS processing results to confirm that the parent and child org units were created successfully.
It would be helpful to review IPSIS - D2L Standard CSV Error Troubleshooting Guide - Brightspace in case you are seeing any of the errors in your IPSIS batch.
IPSIS - User Last Name Not Updating
A user’s last name (or other user properties) may not update in Brightspace for multiple reasons. It's important to verify that the last name in the IPSIS batch is correct and ensure that the preferred first and last names are enabled in the IPSIS configuration.
Name contains invalid characters, is blank, or the user record is missing required fields
Verify the user record in your batch. The IPSIS Log Messages tab will provide a reason for IPSIS rejecting the user record.
The IPSIS configuration for your integration is set up to not update the Brightspace user when IPSIS receives changes from your SIS
Confirm which user properties IPSIS should overwrite on a Brightspace user from the Configuration screen of your integration setup.
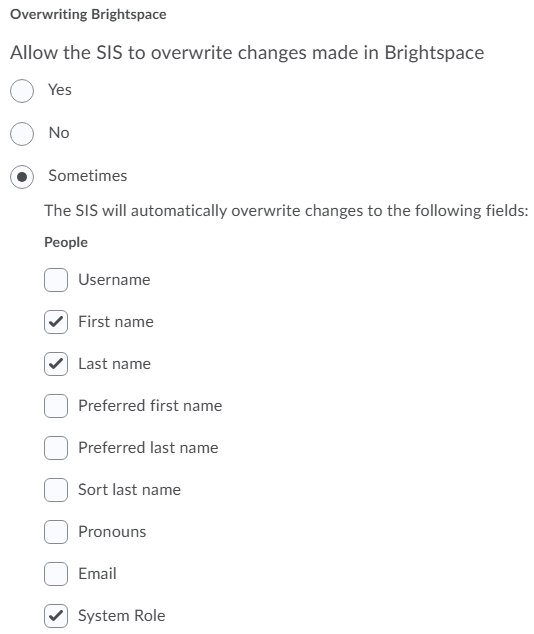
The batch is missing the user record entirely
Confirm the user record is present in your batch.
- For D2L Standard CSV batches, review the batch sent to IPSIS.
- For OneRoster integrations, you may need to contact D2L Support to obtain the batch files for you.
IPSIS - Changing User name and Org-Defined ID for IPSIS Sync
Within D2L Standard CSV integrations, the Org Defined ID of a user is their unique identifier - also called a sourced ID.
Each time IPSIS receives a user record with the same Org Defined ID, IPSIS knows which Brightspace user account to update because it maintains a relationship between the sourced ID and the Brightspace user ID.
Sending a different Org Defined ID for a user in a D2L Standard CSV file will result in a new Brightspace user, not an update to the intended user.
To change a user’s Org Defined ID, you must update it via the User Sourced ID tab in IPSIS Administration for your integration.
Note: A user’s Org Defined ID can be updated without issue within OneRoster and LIS integrations.
IPSIS - Request to Stop a Batch
Currently, there is no way to stop a batch.
If you initiate a critical IPSIS batch that is deleting substantial numbers of courses, users, or enrollments, contact D2L Support immediately.
Otherwise, do the following to address unwanted changes in an IPSIS batch:
- Let the batch complete.
- Correct the data files and submit a new batch.
To avoid unintended changes, always validate batch files before submission.
SIS - Unmerge Courses
SIS Course Merge only merges shells, not student progress, content topics, assignments, etc. Enrollment are maintained after the courses are merged. Unmerging re-activates the original section(s) and course offering(s) and re-enrolls users into the original course(s) and section(s).
Course management
Manage Courses Blank or Crashing
When you receive reports that courses are blank or crashing, check the configuration variable: d2l.Settings.HasCourseSelectionDropdowns.
This permission controls whether the Create Course and Copy Course Components pages display drop-down lists of available course offerings and templates. When disabled, users can select course offerings and templates through a search dialog.
Role and Permission Setup Problems
To set up permissions for a new role, follow these steps:
- From the Admin Tools menu, click Roles and Permissions.
- Click the role for which you want to edit permissions.
- From the Filter by Tool drop-down list, select a tool. Click Apply Filter.
- From the Choose Org Unit Types link, select or deselect the check boxes for the org units you want to view. Click Apply Filter.
- Make your changes.
- Do one of the following:
- To continue editing permissions for the role, click Save. Repeat the previous steps.
- To finish editing permissions for the role, click Save and Close.
Enroll a New User
To enroll a new user with the Users tool, follow these steps:
- From the Admin Tools menu, click Users.
- Click a user.
- Click the Enrollments tab.
- In the Search For field, type the course you want to enroll the user in or click Search to see all the possible courses.
- To change the user's role in the org unit, click the Select a new role icon beside the org unit you want to enroll the user in.
- Select the user's role from the drop-down list and click Apply.
Change the Role for an Existing User
To change the role of an existing user, follow these steps:
- From the Admin Tools menu, click Users.
- Click a user.
- Click the Enrollments tab.
- To change the user's role in the org unit, click the Select a new role icon beside the org unit you want to enroll the user in.
- Select the user's role from the drop-down list and click Apply.
Authentication Error - There was a problem processing your authentication
If upon logging in you see the error message There was a problem processing your authentication, you must reach out to D2L Support.
D2L Support can review logs and narrow down if the issue is with Username, Password, SSO provider, certificate, or Brightspace systems.
Online Help Resources
If this error appears after a user attempts to access PIE, they can use these steps to resolve it: Community FAQ's❓ - Brightspace
Authentication IPAS/Shibboleth, SAML - Certain roles are not able to log in through the D2L Local Login Page
Check the “Disable Allowing Local Login“ permission. If its not enabled, reach out to D2L Support.
Content
How to add content availability dates
Availability dates control when learners can access content, while due dates indicate when an activity should be completed. These dates can also appear in the Calendar and Upcoming Events to help learners stay on track.
Best Practices:
- Use Start Dates to control when learners can begin accessing content.
- Use Due Dates to communicate expected completion dates and help learners manage their workload.
- Use End Dates when access should stop after a specific date.
- Review the relationship between due and end dates, especially for assignments, as a due date can override an existing later end date.
- Use the Calendar and Upcoming Events to verify that dates are displayed as expected.
- When managing multiple topics or modules, use Bulk Edit in the Classic Content Experience to efficiently add or update dates.
Adding Release Conditions in the New Content Experience
Release Conditions allow you to control when learners can access content based on specific criteria, such as completing an activity or achieving a particular grade.
Important: Once a learner meets a release condition, the condition is cleared for that learner and cannot be reset. Please refer to Set release conditions for best practices for using Release Conditions.
SCORM User Stuck in Content
If you receive reports that a completion tracking in a SCORM module is not working, or that users become stuck in a module, verify that the Completion Threshold in the SCORM package is configured correctly.
For help with SCORM package settings, contact or review help resources from your SCORM provider.
SCORM Content Does Not Display Correctly in Brightspace
For information about resolving common display problems with SCORM content in Brightspace, see: Troubleshooting SCORM.
Data restoration
Restore Deleted Course Offerings
Problems restoring deleted course offerings occur when LE-Org Unit Management: Course Offerings are accidentally deleted and need to be restored.
Important: Restoring an org unit requires the Can Create and Edit Org Units permission.
- From the Admin Tools menu, click Org Unit Editor.
- Click Recycle Bin.
- Select the org units you want to restore.
- Click Restore Selected.
Assignments
Restore deleted folder
If an assignment folder is accidentally deleted, you can restore it from the Event Log and return it to the Assignments list.
- Navigate to Activities → Assignments in the course navbar.
- Click the More Actions button at the top of the page.
- Select Event Log.
- Locate the deleted assignment folder in the list.
- Tip: You can filter the list by clicking the Deleted link to see only removed items.
- Click the Restore button next to the folder name.
Learner submissions are missing or not visible in the Assignments tool.
Before submitting a support case, check the following information to help determine whether the learner's submission was recorded in Brightspace.
Step 1: Check the Assignment Submission Log
The Submission Log is the most reliable place to check whether Brightspace recorded a learner's submission.
- Path: Assignments > select the drop-down menu next to the assignment > Submission Log
The Submission Log shows:
- Each recorded submission attempt and its timestamp.
- Whether Brightspace recorded a submission for the learner.
If the Submission Log is empty for the learner, Brightspace did not record a submission. This may mean that the learner did not click Submit, or that the submission failed before it reached the server.
Step 2: Check whether the learner accessed Brightspace
Administrators can use User Tracking to confirm whether the learner accessed Brightspace around the time they say they submitted the assignment.
- Path: Users > search for the learner > Edit User Information > User Tracking
Review the learner's activity to determine whether they were logged in to Brightspace at the reported submission time.
Step 3: Ask the learner for their submission receipt
If the learner says the assignment was submitted successfully but no submission appears in Brightspace, ask them to provide their submission email receipt.
Submission receipts are available when the following configuration variable is enabled:
d2l.Tools.Dropbox.SubmissionReceiptEmail
If these checks do not resolve the issue, open a support case with D2L Support and include the information you gathered during your investigation.
Instructors/admins cannot access assignment instructions or learner submissions because required role permissions are missing or not configured
Instructors have been unable to access assignment instructions and user submissions: This behaviour mostly is related to a missing permission for the specific role.
To verify their permissions
- Go to Roles and permissions > Select role > Edit permissions > Filter by tool
- Verify the following are selected:
- See and Manage Assignment Submission Folders is selected: Provides access to the assignment’s Submissions page and allows the instructor to view submission information and the Submission Log.
- View Submitted Files: Allows the instructor to open and view files uploaded by learners. This permission requires See and Manage Assignment Submission Folders.
These permissions should normally be enabled for the instructor role at the Course Offering level, with the appropriate role enrollment in the course.
If the instructor also needs to grade or provide feedback, they may additionally require:
- View Feedback
- Give Feedback
Quizzes
How to create and preview arithmetic questions in the Question Library
- Navigate to the Question Library.
- Select New > Arithmetic Question.
- Enter the question and formula.
- Configure the precision, tolerance, units, and variables.
- Preview/test the question to verify the formula and generated values.
- Click Save.
Refer to the Creating Question Library questions documentation for detailed steps and the list of supported operations, functions, and constants, as well as the video demonstrating how to create an Arithmetic Question.
Best Practices:
- Always preview and test the question before saving to confirm the formula works as expected.
- Define variables with appropriate minimum, maximum, decimal places, and step values to generate meaningful variations for learners.
- Set Answer Precision to control the number of decimal places accepted, and use Enforce Precision when a specific number of decimal places is required.
- Use Tolerance when rounded, estimated, or near-accurate answers.
- If units are required, configure the unit type and evaluation option to ensure responses are graded correctly.
- Keep the Question Text with a maximum of 512 characters.
- Use Question Hints and Feedback to provide learners with helpful guidance or explanations.
Update Question Library with ongoing quizzes deployed
Delet a Question from Question Library
Questions imported into a quiz from the Question Library are copied, not linked. If you delete a question from the Question Library, it will still exist in any quiz where it was previously added. To remove it from a quiz, you must edit the quiz directly and delete the question there.
Edit a Question or Its Options
Changes made in the Question Library do not automatically update quizzes. To apply edits (e.g., updating answer options), you need to:
- Remove the question from the quiz
- Edit the question in the Question Library
- Re-add the updated question to the quiz
Important Notes:
When you import questions from the Question Library into a quiz, you create a duplicate version—one in the quiz and one in the library. Updates in the library do not automatically cascade to quizzes.
Past attempts remain unaffected; edits only impact future attempts.
Evaluate Quizzes in the Question tab
The Questions tab allows you to efficiently grade learner responses to individual quiz questions. You can grade responses individually or update all attempts for a specific question with the same score.
Best Practices:
- Use Hide learners' names when evaluating responses to support more objective grading.
- Use Save Draft if you need to pause grading and continue later.
- Review and provide feedback where appropriate.
- Use Publish Feedback when you are ready to release grades and feedback to learners. If needed, you can retract published feedback to temporarily hide scores and feedback from learners.
Restore a deleted quiz attempt
- From the navbar, navigate to Quizzes.
- On the Manage Quizzes page, from the context menu of the quiz with attempts you want to reset, click Attempt Logs.
- From the Overview tab, click Quiz Attempt Deleted. Click Restore for the quiz attempt you want to restore.
Grades
Review organization-level grade schemes
Organization-level grade schemes are usually created by administrators. You can review their settings and properties and, when permitted, change the default grade scheme.
Best Practices:
- Review the percentage ranges and assigned values to ensure they align with your grading requirements.
- Verify the labels/symbols (e.g., A, B, Pass/Fail) are clear and appropriate for learners.
- Use colors consistently to make grade patterns easier to identify in Grades.
- Before changing the default scheme, confirm it is the appropriate scheme for your organization’s grading needs.
Exemptions and final grades
Grade exemptions allow a learner to be excluded from a grade item without treating the item as a zero. Exempted items are excluded from final grade calculations, and if all grade items are exempted, no final grade is calculated.
Best Practices:
- Use exemptions when a learner should not be assessed on a specific grade item.
- Remember that exemptions are excluded from grade calculations and statistics, including minimum, maximum, and grade distribution.
- The calculation method matters when excluding items: Points uses Exclude from Final Grade Calculation, Weighted uses a weight of 0, and Formula requires removing the item from the formula.
- Be aware that exemptions can affect release conditions. Conditions such as Grade Value on grade item and No grade received do not trigger for an exempted grade item.
- If a learner is exempt from all items in a category, the category appears as Exempt in User Statistics.
Remove the grade association with LTI
You can remove the grade association from a graded LTI activity when you no longer want the LTI tool to send grades to the Brightspace Grade Book. The activity remains available to learners, and the associated grade item is not automatically deleted.
Best Practices:
- Confirm that you want to stop the LTI tool from sending grades before removing the association.
- Be aware that existing grades are not removed from the Grade Book. The existing grade column will remain in the Grade Book unless it is manually deleted.
- Use Reset to Ungraded only for the specific LTI activity that should no longer be associated with a grade item.
Best tips for success at semester start
- Always validate batch files before submitting.
- Bookmark the top 5 KB articles you use every term.
- Test course and org unit setup before instructors begin prep.